BMW 1 Series Coupe Forum / 1 Series Convertible Forum (1M / tii / 135i / 128i / Coupe / Cabrio / Hatchback) (BMW E82 E88 128i 130i 135i)


Post Reply
 
Thread Tools Search this Thread
      12-24-2009, 06:40 PM   #1
escobar929
Brigadier General
escobar929's Avatar
154
Rep
4,528
Posts

Drives: M2 CS
Join Date: Aug 2009
Location: Hollywood, FL

iTrader: (14)

Garage List
2020 M2 CS  [10.00]
2020 M240i  [0.00]
Arrow DIY - Adding an Amp and Subwoofer

A couple of months back, I created this thread:
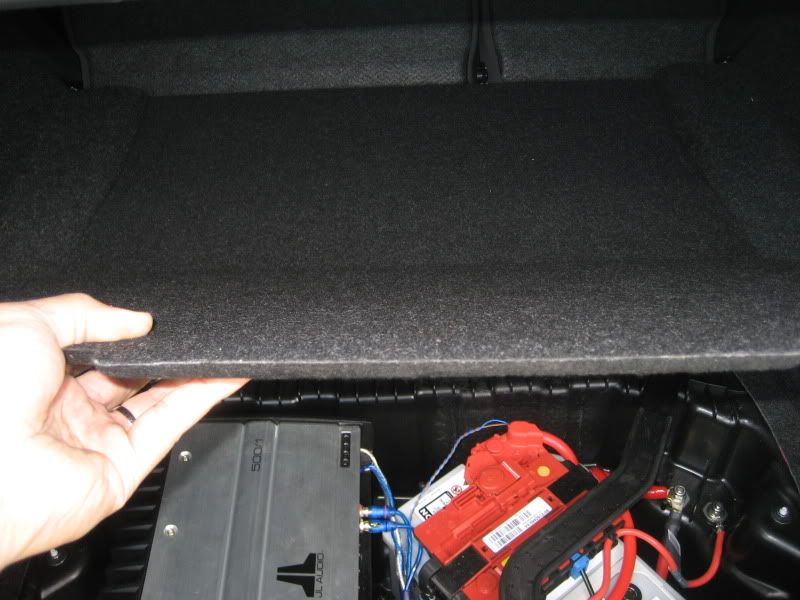
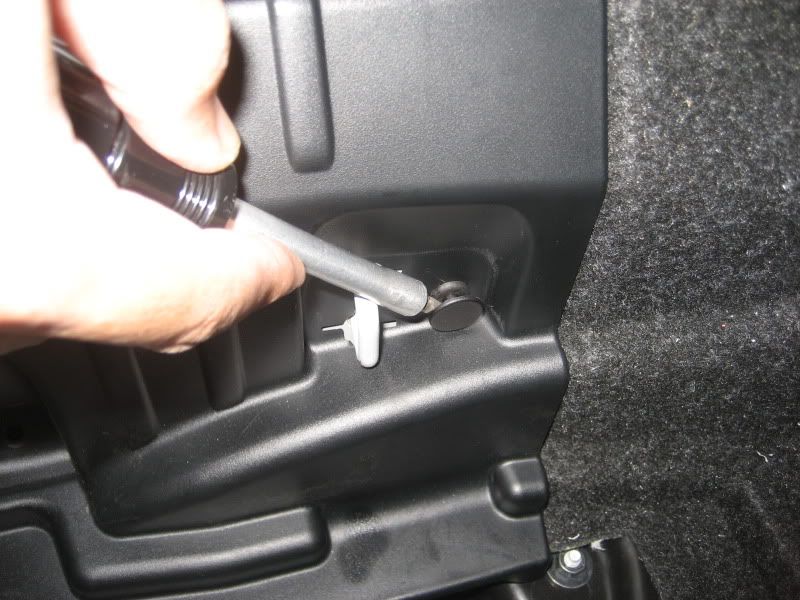
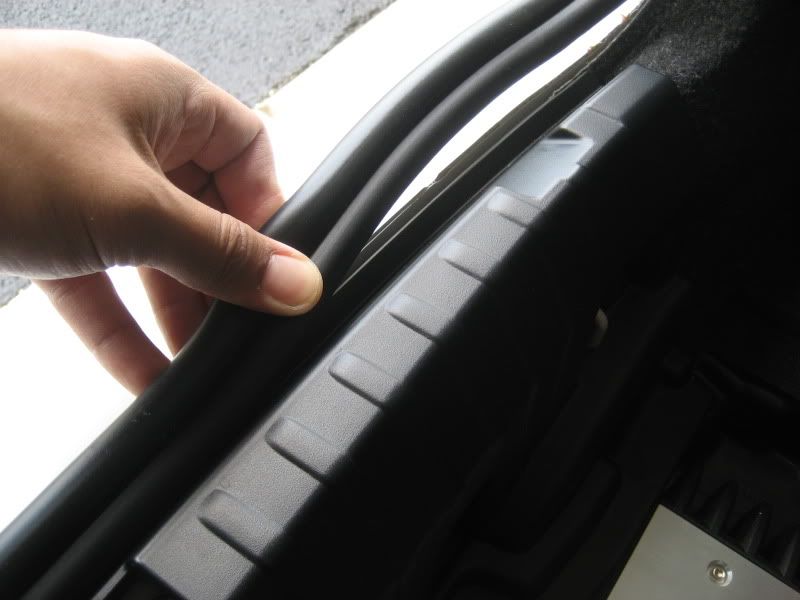
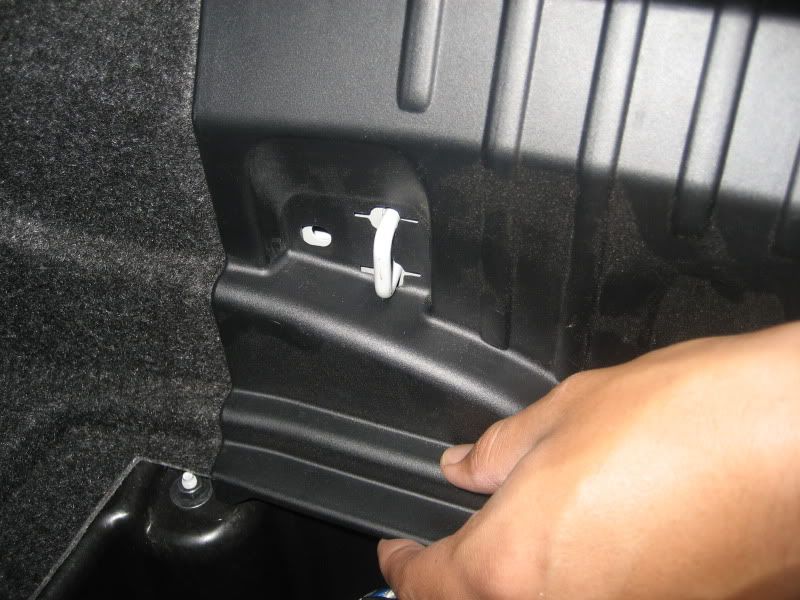
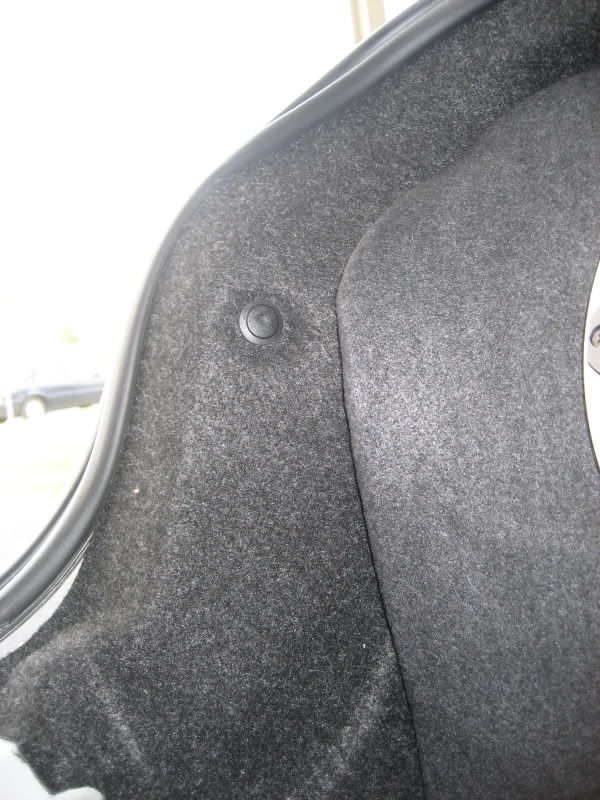
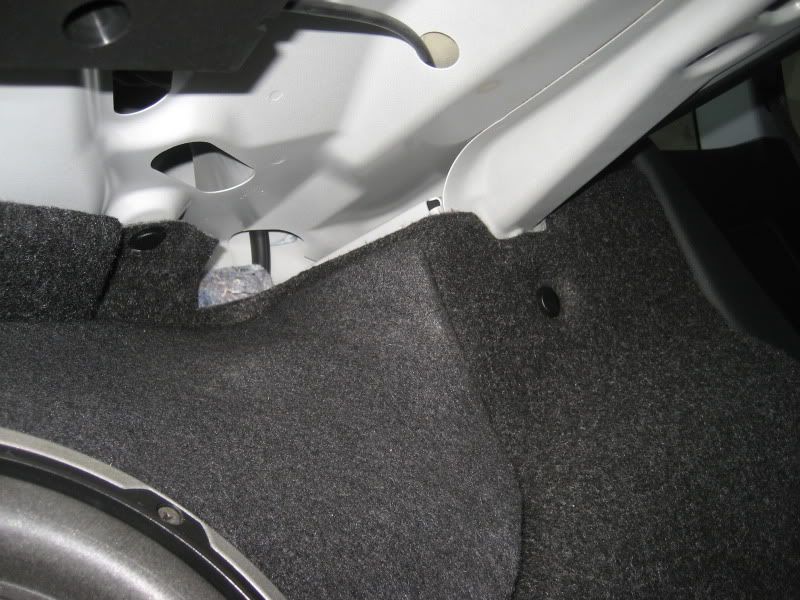
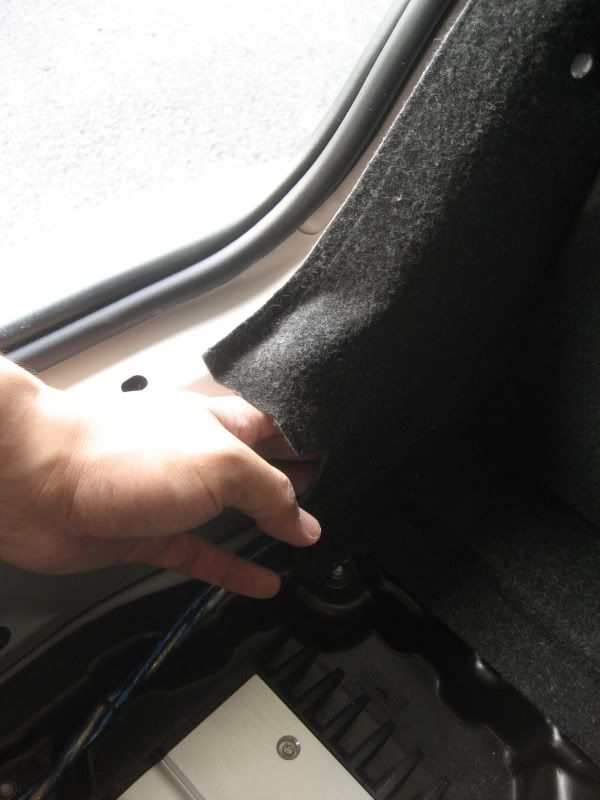
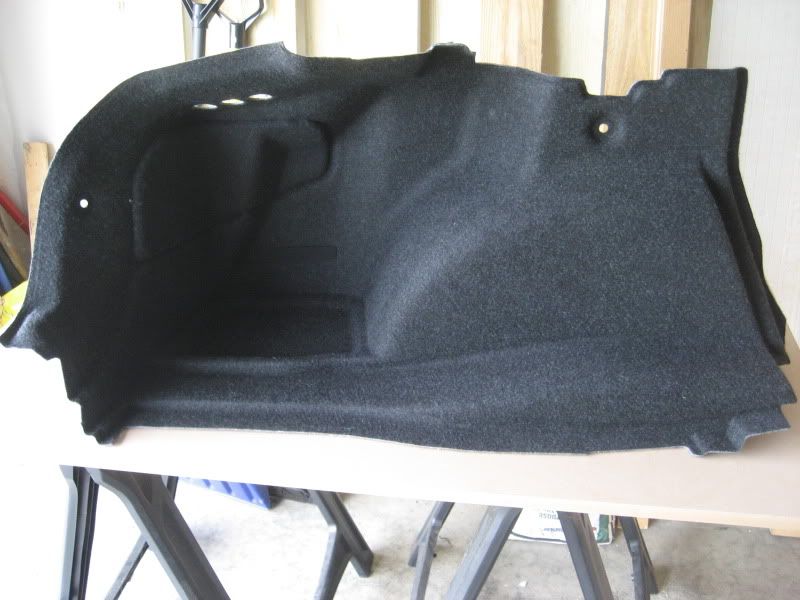
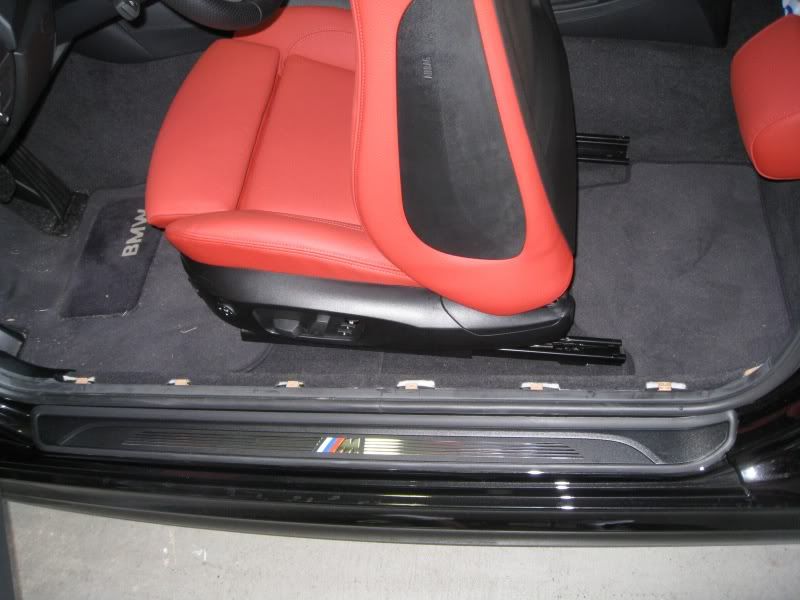
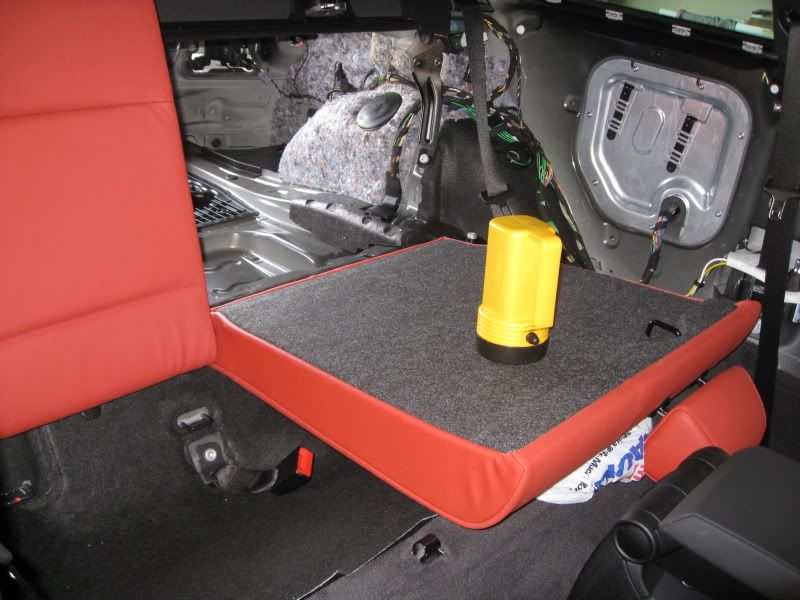
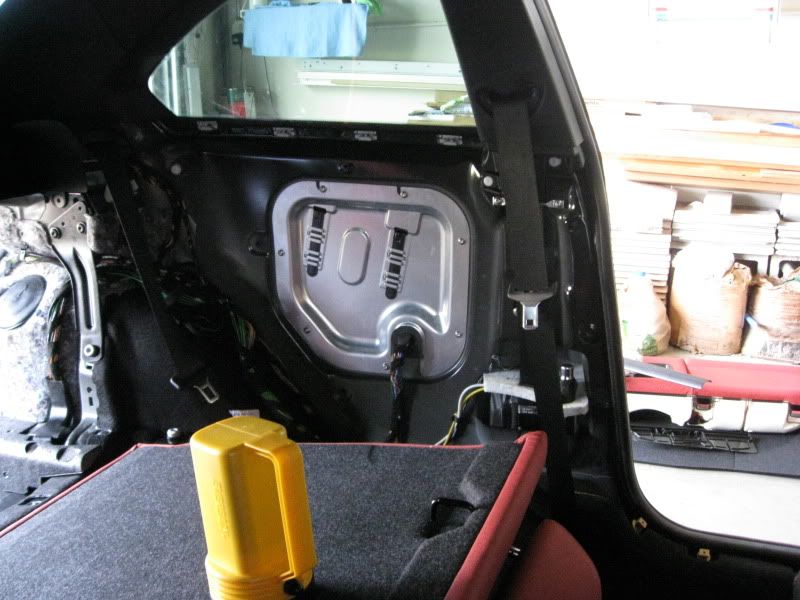
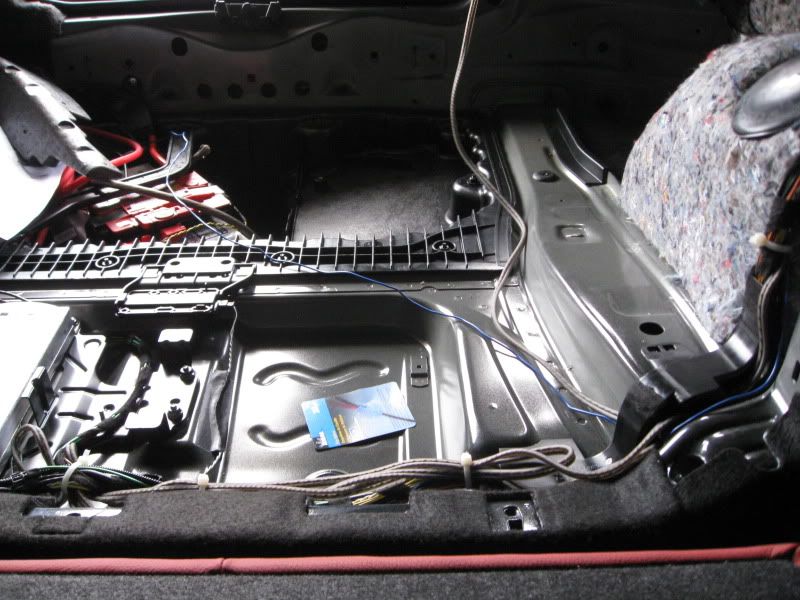
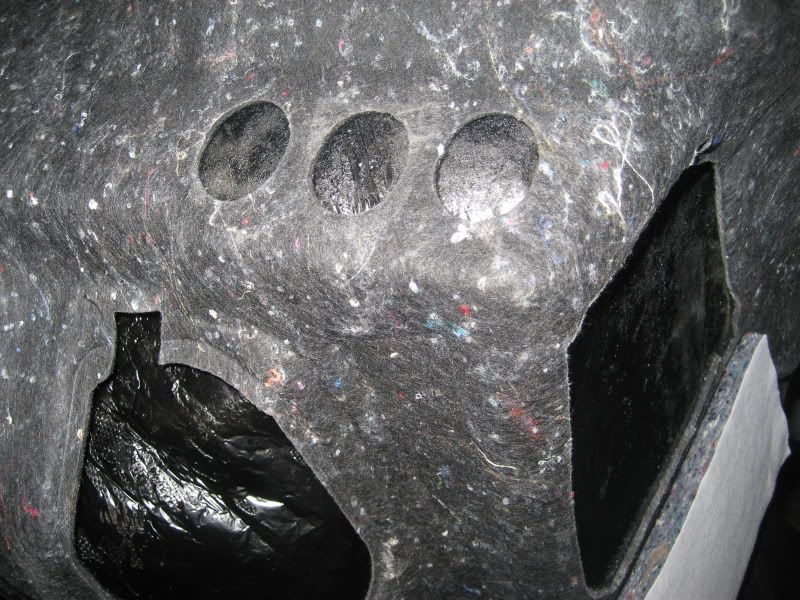
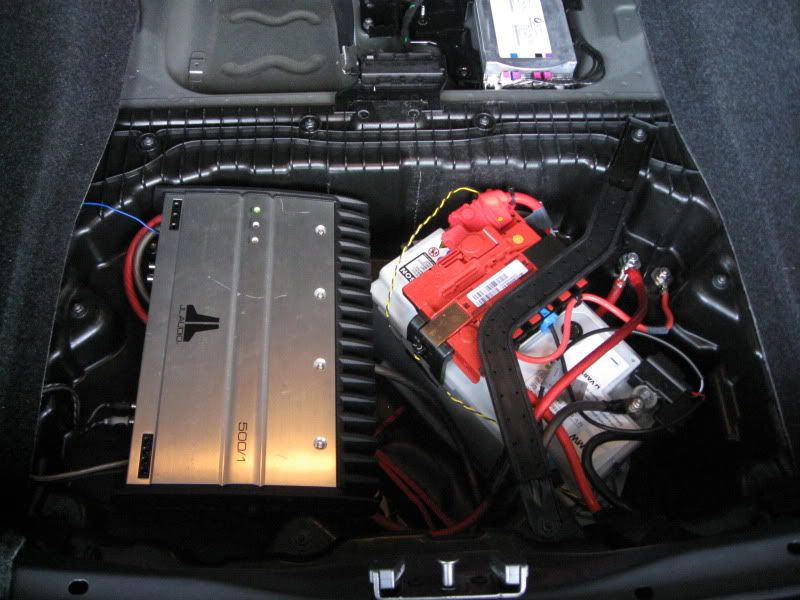
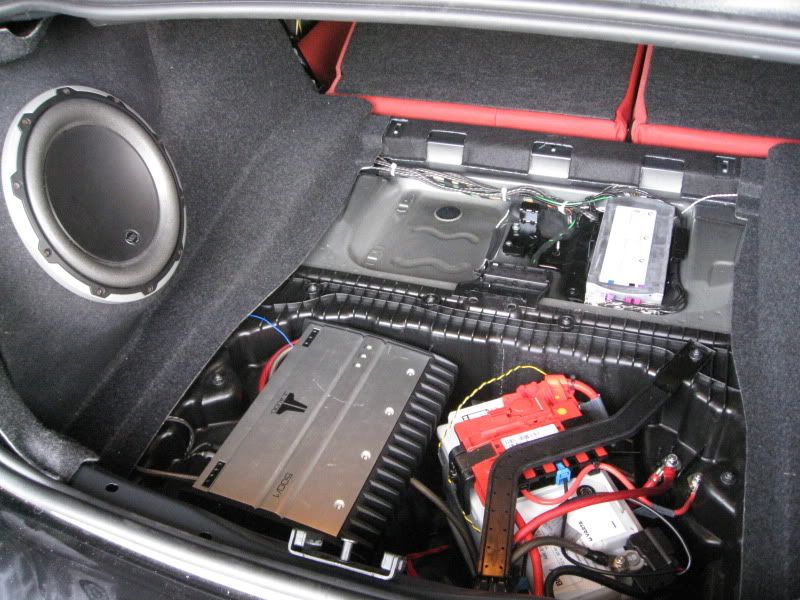
http://www.1addicts.com/forums/showthread.php?t=296110

Because of it, I came in contact w/ two different guys, whom w/ out I could have never done this; jtsherri & TPLSM3

After reading my thread, TPLSM3 decided to produce and sell more boxes like his and jtsherri was the first one who took him up on it and created a very detailed review, to which now after installing mine, I can say, I fully agree. Great quality product, for a very fair price. So thank you to the both of you.

My buddy Haris came over today and we decided to give it a shot since jtsherri, thru PMs helped me a lot on how to go about doing it and TPLSM3 provided precise details on how to mount his box

So lets get started:
  • The first step comes directly from Ben's (TPLSM3) instructions, so I'll post directly from there

    Quote:
    Originally Posted by TPLSM3
    1) Let's start off by removing your trunk floor cover by lifting up & pulling the entire cover out of the trunk.


    2) Remove the rear body panel trim finisher by removing the 2 phillips head screw & 2 push-in retainers (remove the center section & the retainer comes out).


    3) Pull up on the trunk seal, you do NOT have to remove the entire seal, just pull up enough so that it clears the rear body panel trim finisher & left side trunk carpet.


    4) Remove the rear body panel trim finisher by pulling it towards the front of the vehicle, be careful not to break the plastic tabs that the metal hooks come out of.


    5) Remove the 3 push-in retainers that hold the left trunk carpet trim in place.


    6) Fold down the left rear seats so that the trunk carpet may now come out.

    7) Pull the left trunk carpet trim out slowly, it may take some force, but there's nothing else holding the trim in place.


    8) Now that you have the left trunk carpet trim out, place it on a workbench so that you can fit the fiberglass sub enclosure into the trunk carpet trim.
  • This is where I'll stop Ben's instructions, so that we can remove the interior pieces and do the wiring, then we will pick up on Ben's instructions
  • The stock Logic7 amp is located on the driver's side rear panel.
  • In order to get to the amp, we must first remove the lower part of the rear seats, just pull straight up and it will come loose from its clips
  • Next, remove the cover by the front side sills, pull straight up. you can also use a pick tool to try to pry out the clips first but I found that you can just pull straight up


  • I put a bag w/ two big towels in btwn the seat and the lower part so that those clips wouldnt leave nasty indentations on the seat
  • You also must remove the small leather piece btwn where the seats fold down and the side, this also just pops out. There's is one 8mm bolt in the upper area but after putting everything together, im not sure it had to be removed
  • Now the rear side panel just pops out, incredible how easy this part turn out to be. This is how it will look


  • Now, remove the 7 T-20 bolts holding up that aluminum cover, the amp is attached to that cover so be careful.
  • Now unplug the amp so that its easier to work, the clip just slides out


  • Next is the fun part, the wiring. I used this post to figure out how to wire up the pac trunk loc to the Logic7 amp. I added a few comments that might remove any questions

    http://www.amazon.com/PAC-TRUNKLOC-A.../dp/B0007VNKZ4

    Quote:
    Originally Posted by ntpcrew13 View Post


    1, 2 are one channel and 3, 4 are the other channel. you should get a pac trunk-loc if you are gonna do this setup. if you use a pac trunk-loc:

    Wire 1- (red/blue) will go with the gray wire from pac.
    Wire 2- (brown/white) will go with the gray/black wire from pac.
    those are the right sub wires.

    Wire 3- (red/white) will go with the white wire from pac.
    Wire 4- (brown/yellow) will go with the white/black from pac.
    those are the left sub wires.

    Green wire from pac should go on wire 4 (brown/yellow). According to the instructions from PAC, this can go to any wire that has 6v

    Ground wire from pac goes to ground on car or ground it to the amp (I grounded to the amp ground). I grounded mine to a bolt near by

    Red wire from pac goes to +12 on amp. I wired this to a 12v supply from the stock amp, its the only Red wire not part of a twisted pair

    Blue wire from pac goes to remote on amp. This goes to the remote on the amp you are installing

    good luck.

    if you need more help you can follow my link.
  • Haris and I were so scared we might have screwed something up, so no pics were taken cause we were trying to hurry so we can see if it was right and it was. This is how it looked when all the wiring was done and we put the amp back in place


  • For routing the wires to the back, we followed where the stock wires run and just zip tided them together.


  • The two wires you see are the RCA from the trunk loc and the remote wire thats going to the amp
  • Now you can hook up the amp to Ground and 12v to the battery
  • Now we will pick back up on Ben's instructions since we are ready for the sub the be connected

    Quote:
    Originally Posted by TPLSM3

    9) You can choose now how to run your speaking wire out of the box. I chose to drill a hole towards the top of the fiberglass sub enclosure where there are 3 holes in the trunk carpet trim. From there, I ran the speaker wire out to the amplifier (I prefer to keep the holes in the trunk trim to a minium in case I decided to remove the equipment & go back to stock.)


    10) To use the supplied mounting hardware, fit the enclosure into the trunk carpet trim tightly & look for the 3 holes in the fiberglass enclosure on each end. Drill a hole now into your trunk carpet trim on each side & use the bolts/washers/nuts to secure the fiberglass enclosure onto the trunk carpet trim. Be sure to drill a hole similar in size of the mounting bolts.


    11) Refit trunk carpet trim & sub enclosure back into vehicle. Refit all other pieces in reverse order.


    12) Once trunk trim is all put back together, install subwoofer & drill pilot holes for subwoofer mounting screws.

    13) Mount subwoofer with screws. Now you should have a clean subwoofer enclosure like this! Enjoy your custom fiberglass subwoofer enclosure!
  • Now just put all the interior pieces back into place and enjoy!


Finally a big THANKS to Haris for doing most of the hard work (the wiring)
Appreciate 1
BAN_M2C4178.00
      12-24-2009, 06:47 PM   #2
escobar929
Brigadier General
escobar929's Avatar
154
Rep
4,528
Posts

Drives: M2 CS
Join Date: Aug 2009
Location: Hollywood, FL

iTrader: (14)

Garage List
2020 M2 CS  [10.00]
2020 M240i  [0.00]
Here's some of the posts that helped w/ figuring out whats what

http://www.e90post.com/forums/showth...82#post2599482

http://www.e90post.com/forums/showpo...66&postcount=1

http://www.e90post.com/forums/showpo...5&postcount=51

http://www.1addicts.com/forums/showt...97#post4217797
Appreciate 0
      12-24-2009, 07:24 PM   #3
TPLSM3
Captain
United_States
71
Rep
652
Posts

Drives: '16 Porsche GT4
Join Date: Dec 2007
Location: Tampa, FL

iTrader: (12)

Awesome write up Jose!! Glad everything worked out well. I think running the W6 & 500/1 amp is the best setup for our cars. The amp honestly looks like it belongs there. Definitely a clean setup for those of us that don't want a huge box in the trunk!
Appreciate 0
      12-24-2009, 07:25 PM   #4
jtsherri
Major
jtsherri's Avatar
United_States
144
Rep
1,262
Posts

Drives: TBD
Join Date: Aug 2008
Location: Metro Detroit, MI

iTrader: (14)

Garage List
2008 135i  [10.00]
EXCELLENT work & write-up, Jose! This deserves a sticky, for sure! Thanks for the shout-out and congrats on figuring out all of the details. Enjoy the new, quality sound!
Appreciate 0
      12-24-2009, 07:40 PM   #5
escobar929
Brigadier General
escobar929's Avatar
154
Rep
4,528
Posts

Drives: M2 CS
Join Date: Aug 2009
Location: Hollywood, FL

iTrader: (14)

Garage List
2020 M2 CS  [10.00]
2020 M240i  [0.00]
thanks guys!

i'm really glad i did this w/ the help of haris, not only did i save btwn $100-200 on the install but I know it was done right and w/ care

highly recommend for anyone to do the same
Appreciate 0
      12-24-2009, 11:19 PM   #6
MastaRip
New Member
1
Rep
8
Posts

Drives: G35
Join Date: Jan 2009
Location: South Florida

iTrader: (0)

Haha it all came out perfect at the end, looks great and sounds even better! This thread is like Gold on this forum, so many people are going to benefit from it.
Appreciate 0
      12-25-2009, 11:49 AM   #7
escobar929
Brigadier General
escobar929's Avatar
154
Rep
4,528
Posts

Drives: M2 CS
Join Date: Aug 2009
Location: Hollywood, FL

iTrader: (14)

Garage List
2020 M2 CS  [10.00]
2020 M240i  [0.00]
just went out and tuned the amp w/ the help of Jason (jtsherri) and my trusty aquemini cd. let me tell ya, it sound amazing, its so clear w/ a nice bit of bass

the gain was set way up initially from my previous car and it didnt sound very well in the 1er w/ after some tweaking, it came out great!
Appreciate 0
      12-25-2009, 11:51 AM   #8
MastaRip
New Member
1
Rep
8
Posts

Drives: G35
Join Date: Jan 2009
Location: South Florida

iTrader: (0)

Quote:
Originally Posted by escobar929 View Post
just went out and tuned the amp w/ the help of Jason (jtsherri) and my trusty aquemini cd. let me tell ya, it sound amazing, its so clear w/ a nice bit of bass

the gain was set way up initially from my previous car and it didnt sound very well in the 1er w/ after some tweaking, it came out great!

Dam nice
Appreciate 0
      12-25-2009, 11:53 AM   #9
escobar929
Brigadier General
escobar929's Avatar
154
Rep
4,528
Posts

Drives: M2 CS
Join Date: Aug 2009
Location: Hollywood, FL

iTrader: (14)

Garage List
2020 M2 CS  [10.00]
2020 M240i  [0.00]
this was very useful when tuning the amp
http://www.crutchfield.com/S-q3qjiwrWtei/tech/kb39.html

figuring out what it all means
http://mobile.jlaudio.com/pdfs/Switches_Knobs.pdf
http://mobile.jlaudio.com/products_a...php?page_id=30
Appreciate 0
      12-28-2009, 04:51 PM   #10
Lech911
New Member
0
Rep
9
Posts

Drives: 120I 2007
Join Date: Dec 2009
Location: Panama

iTrader: (0)

can i use any other low pass filter other that this PAC thing? i have an audiopipe low pass filter; should it be the same setting right?
Appreciate 0
      12-28-2009, 07:15 PM   #11
escobar929
Brigadier General
escobar929's Avatar
154
Rep
4,528
Posts

Drives: M2 CS
Join Date: Aug 2009
Location: Hollywood, FL

iTrader: (14)

Garage List
2020 M2 CS  [10.00]
2020 M240i  [0.00]
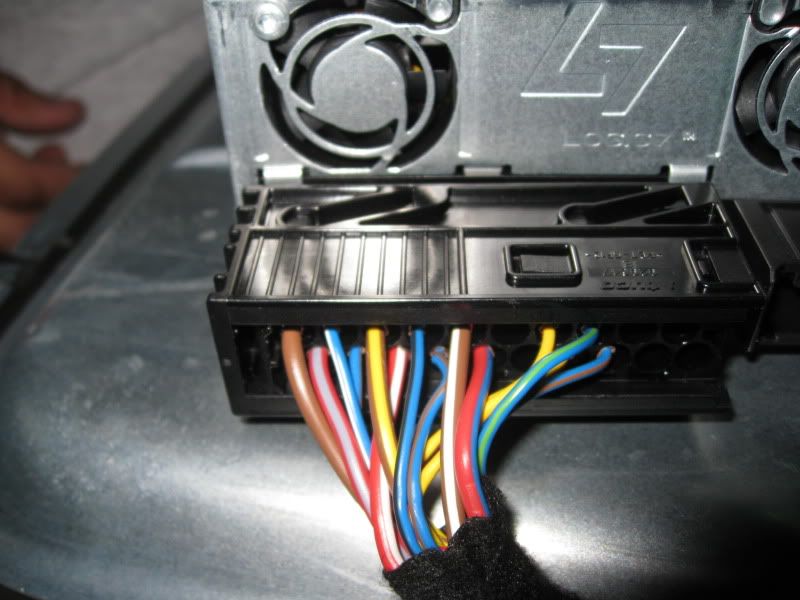
i dont know what inputs the low pass filter you are using has so i cant say.

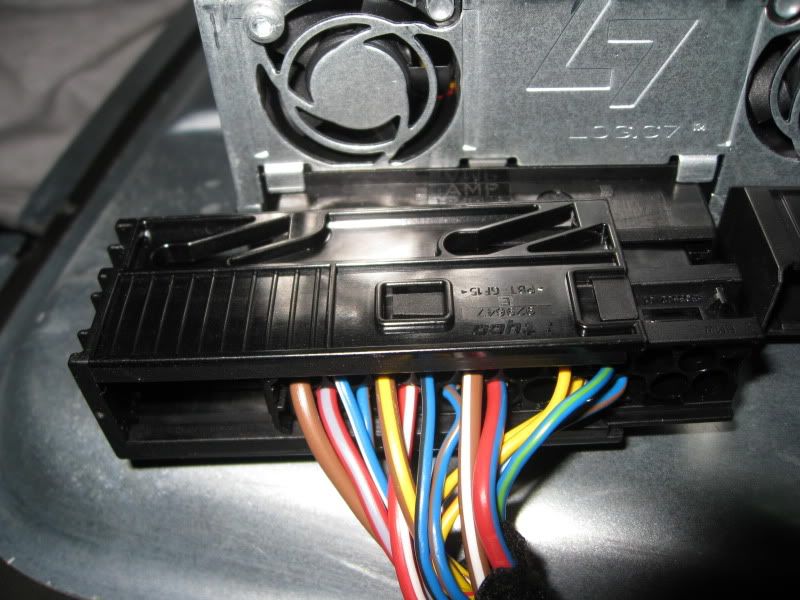
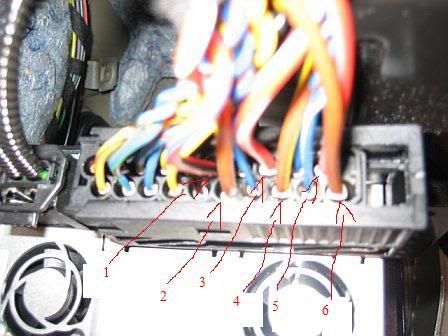
the pac unit comes w/ a spec sheet detailing what each wire is

if you have the same, look at this post for info on what each wire on the logic7 amp has
http://www.e90post.com/forums/showpo...66&postcount=1
Appreciate 0
      12-28-2009, 07:17 PM   #12
solid77
Private First Class
United_States
16
Rep
148
Posts

Drives: 2010 135i
Join Date: Oct 2009
Location: seattle, wa

iTrader: (3)

i have the exact same setup on a 2010 6 speaker system... JL 500/1 powering a jl 10w6v2 and TPLSM3 enclosure, i just used the JL stereo to rca cable

http://www.crutchfield.com/p_136CLR2...W.html?tp=2610

and hooked it from the rear speakers straight to the amp, no PAC or anything, the JL amp does a good job at filtering low/high inputs and frequencies... now i just need to get some tweets in the car :P
Appreciate 0
      12-28-2009, 07:25 PM   #13
escobar929
Brigadier General
escobar929's Avatar
154
Rep
4,528
Posts

Drives: M2 CS
Join Date: Aug 2009
Location: Hollywood, FL

iTrader: (14)

Garage List
2020 M2 CS  [10.00]
2020 M240i  [0.00]
Quote:
Originally Posted by solid77 View Post
i have the exact same setup on a 2010 6 speaker system... JL 500/1 powering a jl 10w6v2 and TPLSM3 enclosure, i just used the JL stereo to rca cable

http://www.crutchfield.com/p_136CLR2...W.html?tp=2610

and hooked it from the rear speakers straight to the amp, no PAC or anything, the JL amp does a good job at filtering low/high inputs and frequencies... now i just need to get some tweets in the car :P
yea, you can def do it that way. for me the pac unit wasn't too much more money so i figured it would be a cleaner install

i'm really impressed w/ this set up. i normally keep it on -3 or zero if i want a lil more boom. anything +4 or higher is crazy but still sounds fairly clean.
Appreciate 0
      12-28-2009, 07:29 PM   #14
solid77
Private First Class
United_States
16
Rep
148
Posts

Drives: 2010 135i
Join Date: Oct 2009
Location: seattle, wa

iTrader: (3)

i also tried the JL recommended settings for max boom lol... pretty impressive for what 1 10 can do, these settings are for 2 subs though, but it seems to work pretty well...
Attached Images
File Type: pdf SYS_5.pdf (152.5 KB, 891 views)
Appreciate 0
      12-29-2009, 07:45 AM   #15
Lech911
New Member
0
Rep
9
Posts

Drives: 120I 2007
Join Date: Dec 2009
Location: Panama

iTrader: (0)

no i can't find my logic7 amp; everything is o different here, i have a 120i coupe 2007, i think the logic7 is in the front panel, i followed the subwoofers cables and stopped right under the front panel
Appreciate 0
      12-29-2009, 08:50 AM   #16
escobar929
Brigadier General
escobar929's Avatar
154
Rep
4,528
Posts

Drives: M2 CS
Join Date: Aug 2009
Location: Hollywood, FL

iTrader: (14)

Garage List
2020 M2 CS  [10.00]
2020 M240i  [0.00]
hmm, weird

let us know where you find it for future reference
Appreciate 0
      12-29-2009, 09:43 AM   #17
Lech911
New Member
0
Rep
9
Posts

Drives: 120I 2007
Join Date: Dec 2009
Location: Panama

iTrader: (0)

ok, i didn't find it, but i tapped the subwoofer cables by chasing them under the seats, now i need a remote cablke, should i really tap my cigarrette lighter? i can't do it (remote cable) since i couldn't find my logic 7
Appreciate 0
      01-25-2010, 01:29 PM   #18
plasar
plasar
plasar's Avatar
United_States
24
Rep
385
Posts

Drives: M3 Vert
Join Date: Apr 2009
Location: Portland, OR

iTrader: (0)

Garage List
Thumbs up

Killer write up and pics Escobar, appreciate it!

(Even if I have no immediate plans to upgrade, it's cool to see the process and what the guts of our 1-er look like.)
Appreciate 0
      02-18-2010, 09:34 AM   #19
ItalianButter
Member
ItalianButter's Avatar
1
Rep
23
Posts

Drives: 6MT BMW 135i, Ducati 620 Sport
Join Date: Apr 2008
Location: NJ

iTrader: (0)

I didn't have the Logic amp behind the rear side panel...but tapped into the appropriate wires described in the schematic in the same area. Worked the first time and sounds great!!!


Thanks for a wonderful write-up! Much appreciated.
__________________
6MT 135i Black Sapphire
Production #: 399XXXX.
Status: In my hands! - 4/27/08
Configuration: 6MT, Black Boston Leather: Gray Poplar Wood: Premium Package: Sport Package: Heated Seats: Navigation: Satellite Radio: iPod and USB adaptor
Appreciate 0
      02-18-2010, 10:28 AM   #20
escobar929
Brigadier General
escobar929's Avatar
154
Rep
4,528
Posts

Drives: M2 CS
Join Date: Aug 2009
Location: Hollywood, FL

iTrader: (14)

Garage List
2020 M2 CS  [10.00]
2020 M240i  [0.00]
Quote:
Originally Posted by ItalianButter View Post
I didn't have the Logic amp behind the rear side panel...but tapped into the appropriate wires described in the schematic in the same area. Worked the first time and sounds great!!!


Thanks for a wonderful write-up! Much appreciated.
interesting, where was yours located?
Appreciate 0
      02-22-2010, 12:46 PM   #21
Tumo135
Private
2
Rep
61
Posts

Drives: 135i
Join Date: Feb 2010
Location: NY

iTrader: (1)

Garage List
2008 135i  [0.00]
So basically you are tapping wire #4 twice?
Appreciate 0
      02-22-2010, 01:21 PM   #22
escobar929
Brigadier General
escobar929's Avatar
154
Rep
4,528
Posts

Drives: M2 CS
Join Date: Aug 2009
Location: Hollywood, FL

iTrader: (14)

Garage List
2020 M2 CS  [10.00]
2020 M240i  [0.00]
exactly
Appreciate 0
Post Reply

Bookmarks


Posting Rules
You may not post new threads
You may not post replies
You may not post attachments
You may not edit your posts

BB code is On
Smilies are On
[IMG] code is On
HTML code is Off


All times are GMT -5. The time now is 02:00 AM.


1addicts
Powered by vBulletin® Version 3.8.11
Copyright ©2000 - 2024, vBulletin Solutions Inc.
1Addicts.com, BIMMERPOST.com, E90Post.com, F30Post.com, M3Post.com, ZPost.com, 5Post.com, 6Post.com, 7Post.com, XBimmers.com logo and trademark are properties of BIMMERPOST