

|
|
|
|
|
| 10-23-2017, 09:41 AM | #1 |
|
Brigadier General
 
3486
Rep 3,722
Posts |
Ok so this is only really a true DIY if you can weld - otherwise you'll need a quick jaunt to a local muffler shop for a job between $50-$100 depending on the shop and your preferences (I'll get into detail on this later).
Let's start with the "why"; After trying and experimenting with a few different exhaust setups I was starting to get frustrated with the options for the 1ers. I'm pretty particular about exhaust tone and realized that to get the note/sounds I wanted I essentially needed a straight pipe after the mids, which meant something like the Berk Race. All of those options produce a ton of drone, which is no good for me since I often do 3+hr road trips in this car. After faffing about for a few days I decided to try installing a cutout using the OEM exhaust setup, putting the dump just before the stock muffler. Now that it's all said and done, I am EXTREMELY pleased with the setup, it allows me to have a loud exhaust with a great tone and tons of fun burbles/pops/snaps and then with the push of a button I'm back to stock with the golf-tee mod for stealth/highway cruising! Now on to how it's done! What you'll need: -Electric cutout kit: 3" kit from eBay for $55 was my choice! -Ability to weld or a shop to do it for you: Expected cost between $50-$100 -Add-a-Circuit (optional) if you want to hardwire: $5 -Some shrink wrap and electrical tape: $5 Total Cost: $115-$165 if you have the welding done by a shop, less if you DIY that part Difficulty Level: 5/10 (moderate) - Requires some wrenching and drilling, but very easy once you know where you need to be, which is the point of this thread! Let's get started, here's the kit I chose, opened up and on inspection way better quality than I expected for $55 off eBay. We'll see how the motor holds up but the rest of the kit is excellent. Ignore the header wrap that is not part of this.  20170828_171941 by Matt Steele, on Flickr 20170828_171941 by Matt Steele, on FlickrHere, center screen, is the section of the stock exhaust I chose to use, it's right before the muffler and in a nice straight line. You do not even need to remove the exhaust from the car to do this, just make sure the parts are supported (notice the red trans-support jack) before you start. I had the shop cut out that straight piece and weld in the cutout, with the diverted section angled slightly down and mostly to the driver side of the car.  20170830_110834 by Matt Steele, on Flickr 20170830_110834 by Matt Steele, on Flickr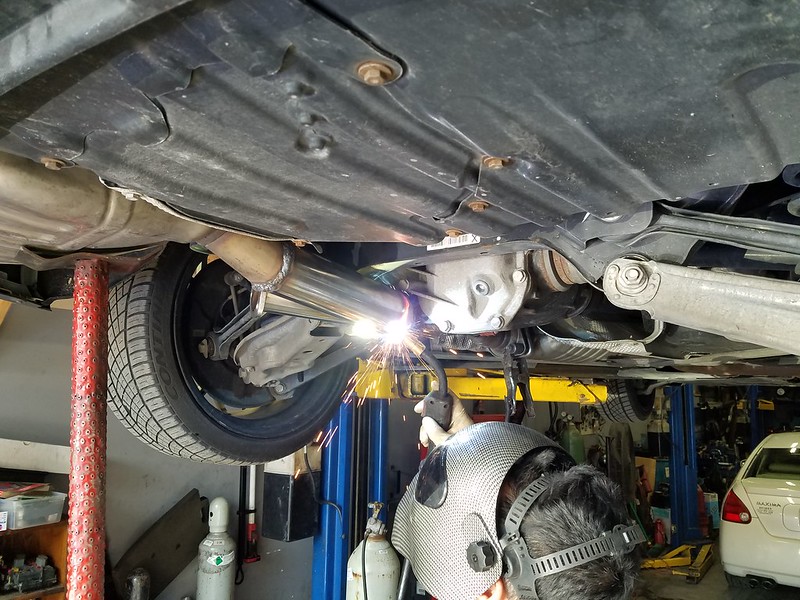 20170830_112530 by Matt Steele, on Flickr 20170830_112530 by Matt Steele, on Flickr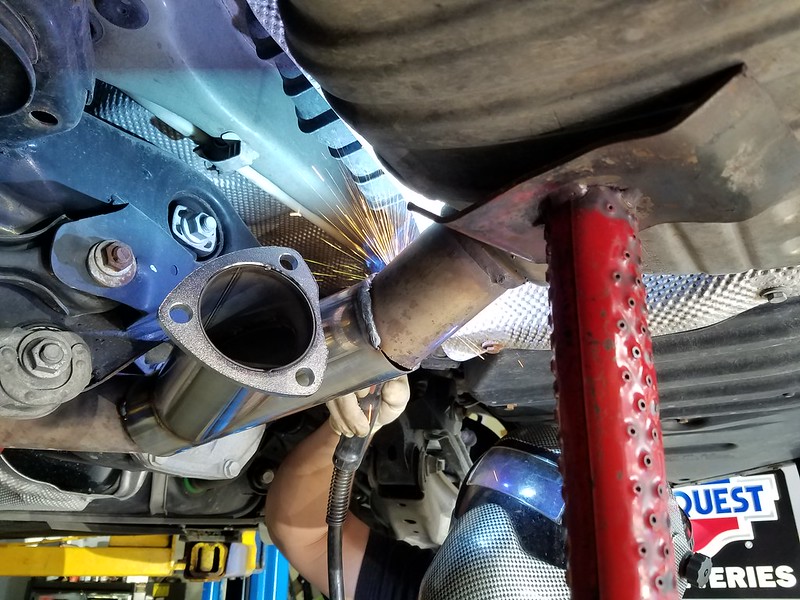 20170830_112055 by Matt Steele, on Flickr 20170830_112055 by Matt Steele, on FlickrNext step is attaching the gaskets, valve, and turn-down. SAFELY (this part is totally up to you) lift the car. This part is very straight forward but in case you are not aware here is the order you should install them, starting from the pipe: Gasket 1 - Valve - Gasket 2 - Ring Clamp - Turn Down Make sure you angle the motor so it is as far from the bottom of the car as possible, I was lucky with this kit and was able to install it perfectly vertical. I also angled the turn-down about 45* away from the center of the car, straight between toward the driver side and the ground.  20171020_192830 by Matt Steele, on Flickr 20171020_192830 by Matt Steele, on FlickrNow time for the wiring, you can do this one of two ways; 1-Hardwire to an accessory fuse using the add-a-circuit, http://www.1addicts.com/forums/showthread.php?t=211933. 2-Use the supplied cigarette lighter adapter. Either way you choose, you'll need to run the power cable from the cabin to the exhaust, don't worry, it's easier than it sounds. First off, remove the back seats by simply lifting them up and out, there's nothing holding them in so just pull up and they'll pop right out. Then you'll see these little plastic grommets toward the very lowest point on the drivers side. They're hard plastic and maybe 2.5" in diameter, you'll want to drill through this with a bit big enough to fit the power cable end that attaches to the cutout pigtail. Be very careful here as the fuel tank is just below toward the drivers side and forward. Drill a small hole first and check from underneath to see where you are, don't let the bit go more than an inch through the grommet. The spot you want to aim for is about .5" from the edge of the grommet, in the direction most near the passenger-rear corner of the car. The first picture is from the inside of the car, the second from underneath looking forward from the back. This area under the car is right above where the mid-pipe connects to the axle-back, and right where the heat shielding ends.  20171020_192619 by Matt Steele, on Flickr 20171020_192619 by Matt Steele, on Flickr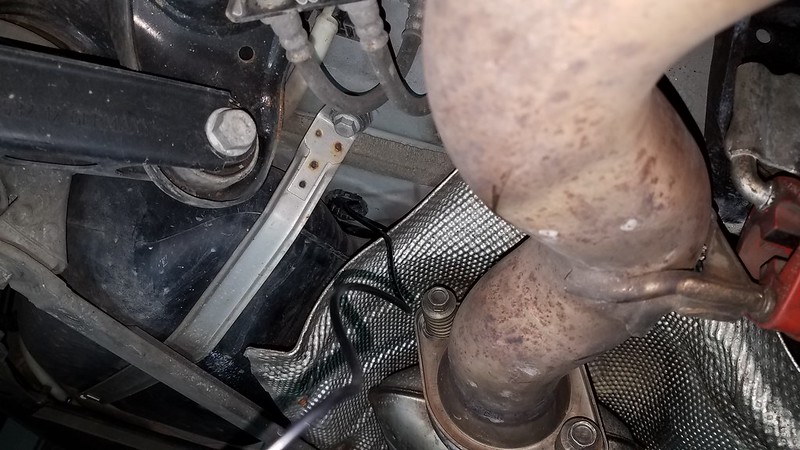 20171020_185431 by Matt Steele, on Flickr 20171020_185431 by Matt Steele, on FlickrOnce you've drilled the hole to start, either go up in bit size till you can fit the cable or use something else to widen it. Push the cable through from the inside and it will conveniently pop out under the car, go under the car and pull it through, route it to the cutout whatever way you want and are able to find. Just ensure it's clear of any moving suspension/drive/hot components. Secure cable with zip-ties and seal the hole in the cabin with tape or gasket maker if you're worried about moisture. When you've reached the cutout valve, secure everything up and before connecting the cable slip on your heat shrink wrap. I first connected the cable, then wrapped in electrical tape, and then heat shrinked the whole section for good measure. You really don't want water getting in there. 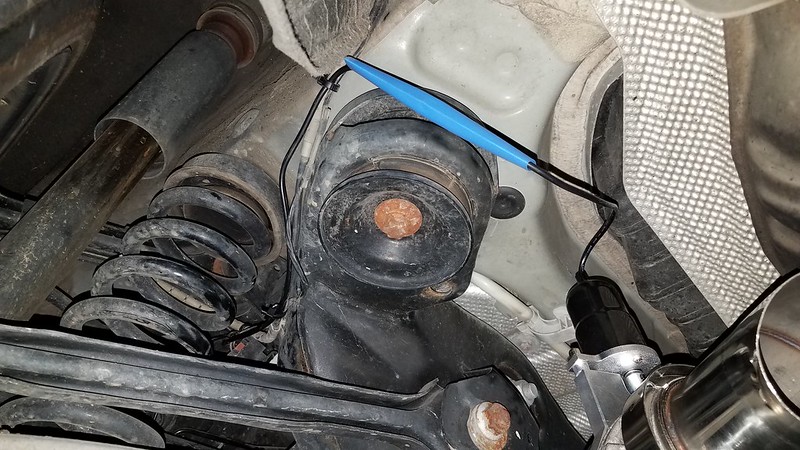 20171020_192839 by Matt Steele, on Flickr 20171020_192839 by Matt Steele, on FlickrYou're done! Keep the car lifted for a second and test everything out, reconnect the battery if you disconnected it to do the hardwiring. Admire your work and enjoy the tunes!  20171020_192856 by Matt Steele, on Flickr 20171020_192856 by Matt Steele, on FlickrHere are a couple quick videos of mine, I'll make another with some better footage of the audio at some point. Valve Operation: Quick Sound Comparison: Full Vid:
__________________
"Tobias" 2013 135i ///M-Sport 6MT Pure Stage 1 XDI 35 HPFP 404whp/440wtq Last edited by Matticus91; 01-24-2018 at 04:40 PM.. |
| 10-23-2017, 12:08 PM | #2 |
|
Enlisted Member
 
20
Rep 41
Posts |
Wow! Nice work, that is a very clean solution, and an excellent diy writeup and pics!
It's hard to tell, but does the cutout hang lower than the muffler? Scraping issues? |
|
Appreciate
1
Matticus913485.50 |
| 10-23-2017, 12:10 PM | #3 | |
|
Brigadier General
3486
Rep 3,722
Posts |
Quote:
__________________
"Tobias" 2013 135i ///M-Sport 6MT Pure Stage 1 XDI 35 HPFP 404whp/440wtq |
|
|
Appreciate
0
|
| 01-24-2018, 04:41 PM | #4 |
|
Brigadier General
3486
Rep 3,722
Posts |
New video up!
__________________
"Tobias" 2013 135i ///M-Sport 6MT Pure Stage 1 XDI 35 HPFP 404whp/440wtq |
|
Appreciate
1
BimmerAg425.00 |
| 12-05-2018, 09:44 PM | #5 |
|
Commuter
38
Rep 87
Posts
Drives: 2013 135i 6MT
Join Date: Sep 2015
Location: Michigan
|
SO! After having this setup for a little over a year (if you still do), would you recommend it? Any issues with the relatively cheap valve? Has road salt taken its toll on anything? Everything still work fine? This may be the perfect option for me as I too have a long commute and do tons of highway driving.
|
|
Appreciate
2
Preciado9.00 Matticus913485.50 |
| 12-05-2018, 10:58 PM | #6 |
|
New Member
9
Rep 11
Posts |
Great post, I myself plan on setting up a boost-actuated valve as opposed to the electric. Saves some money and to me it's more reliable from past experiences with certain electric valves giving out and unfortunately doing so while open.
|
|
Appreciate
2
99937.50 Matticus913485.50 |
| 12-06-2018, 08:57 AM | #7 | ||
|
Brigadier General
3486
Rep 3,722
Posts |
Quote:
I never updated the thread, but I did empty out my cat too. The combo of open dump with that is just nuts. With the valve closed though it's a totally different experience and very pleasant and quiet. Quote:
__________________
"Tobias" 2013 135i ///M-Sport 6MT Pure Stage 1 XDI 35 HPFP 404whp/440wtq |
||
|
Appreciate
1
99937.50 |
| 12-07-2018, 01:44 PM | #9 |
|
1Addict
3239
Rep 7,906
Posts |
Would you mind posting the name of the parts you got, the link in the OP is no longer pointing to an item. Thanks!
__________________
|
|
Appreciate
0
|
| 12-07-2018, 11:13 PM | #10 | ||
|
Brigadier General
3486
Rep 3,722
Posts |
Quote:
Quote:
Just search for 3" electric exhaust cutout and you'll see a bunch around the same price. They're likely all made in the same place.
__________________
"Tobias" 2013 135i ///M-Sport 6MT Pure Stage 1 XDI 35 HPFP 404whp/440wtq |
||
|
Appreciate
1
99937.50 |
| 04-03-2020, 11:04 AM | #11 |
|
Banned
238
Rep 277
Posts |
How's this holding up? Any issues? I think this is the one you have. Read elsewhere that after a year the motor will give out.
https://www.ebay.com/itm/JDMSPEED-3-...kAAOSwq-BdzqNv |
|
Appreciate
0
|
| 04-10-2020, 08:58 AM | #12 | |
|
Brigadier General
3486
Rep 3,722
Posts |
Quote:
__________________
"Tobias" 2013 135i ///M-Sport 6MT Pure Stage 1 XDI 35 HPFP 404whp/440wtq |
|
|
Appreciate
0
|
| 03-31-2022, 11:03 PM | #13 |
|
Private
 35
Rep 51
Posts
Drives: e82 135i / e36 M3
Join Date: Jun 2020
Location: Austin, TX
|
Just want to say thanks. I searched for exhaust mods about a year and half ago, found this thread bought this exact cutout and installed it. Been one of the coolest mods I've done to an exhaust best of both worlds and still works perfectly to this day. When I get tired of the loud I close it and it's back to stock or if it's too quiet I'll open it and boom race mode lol. If anyone is looking for a cheap change to their exhaust I'd highly recommend this.
|
|
Appreciate
0
|
Post Reply |
| Bookmarks |
| Tags |
| cutout, diy, electric, exhaust, install |
|
|


