


|
|
|
 |
| 12-13-2014, 04:38 AM | #1 |
|
Lieutenant
   
77
Rep 541
Posts
Drives: 2008 135i AT Monaco Blue
Join Date: Dec 2012
Location: Brisbane, Australia
|
P3 Gauge Owners - RHD install advice
Calling any Brisbane owners of a P3 gauge who might be kind enough to assist me with installing the boost line.
I just purchased a P3 v2.3 gauge for my N54 135i and had no problems installing it except the boost line which looks to be a little beyond my limited mechanic know-how. All the guides and videos I've seen are for LHD cars so I'm not sure on the steps to route the line in the case of a RHD. I understand I need to run the boost line from the harness in the driver's side footwell out through the plastic seal through the firewall and across the engine bay somewhere over to the passenger side to plug into the boost line feeding into the diverter valves. Would any Brisbane member who has installed this boost line be willing to assist? I imagine it would take 30 minutes tops for someone who knows what they're doing (i.e. not me). I'm happy to come to you (located Brisbane Mount Gravatt area). 
__________________
Last edited by OzJustin; 12-21-2014 at 06:42 AM.. |
| 12-13-2014, 05:10 AM | #2 |
|
Colonel
 
212
Rep 2,938
Posts |
Use a coat hanger to punch a hole in the grommet, then tape the hose onto it and push it through...
Ian PM'd me a few detailed photos of the route to secure the hose when I installed mine a while ago.. if I still have the PM I'll fwd it to you |
|
Appreciate
0
|
| 12-13-2014, 08:34 PM | #3 | |
|
Lieutenant
   
77
Rep 541
Posts
Drives: 2008 135i AT Monaco Blue
Join Date: Dec 2012
Location: Brisbane, Australia
|
Quote:

__________________
|
|
|
Appreciate
0
|
| 12-13-2014, 10:21 PM | #4 |
|
Colonel
 
212
Rep 2,938
Posts |
|
|
Appreciate
0
|
| 12-16-2014, 07:58 AM | #5 |
|
Lieutenant
   
77
Rep 541
Posts
Drives: 2008 135i AT Monaco Blue
Join Date: Dec 2012
Location: Brisbane, Australia
|
All good thanks Woosh. Will checkin with Ian to hear his recommendations.
After a bit of digging these are the only two RHD install photos I could find via google. You can see that it runs along the top cowl and then down through the weatherstrip like the LHD install procedure. 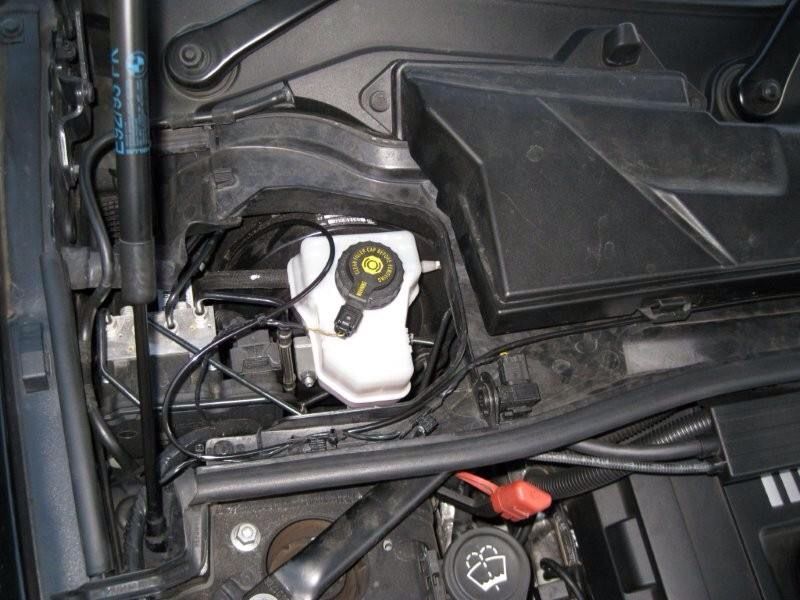 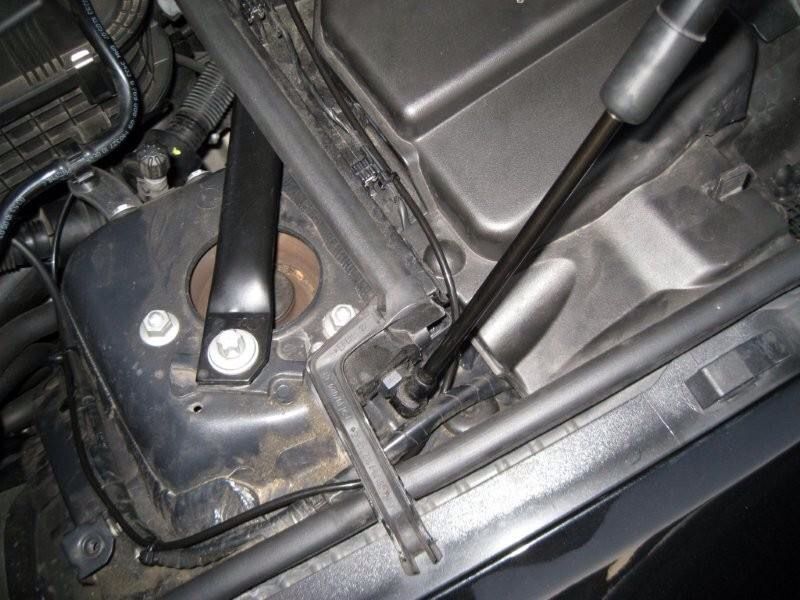 Based on my current thinking there seems to be two ways to do the install (see my below image). 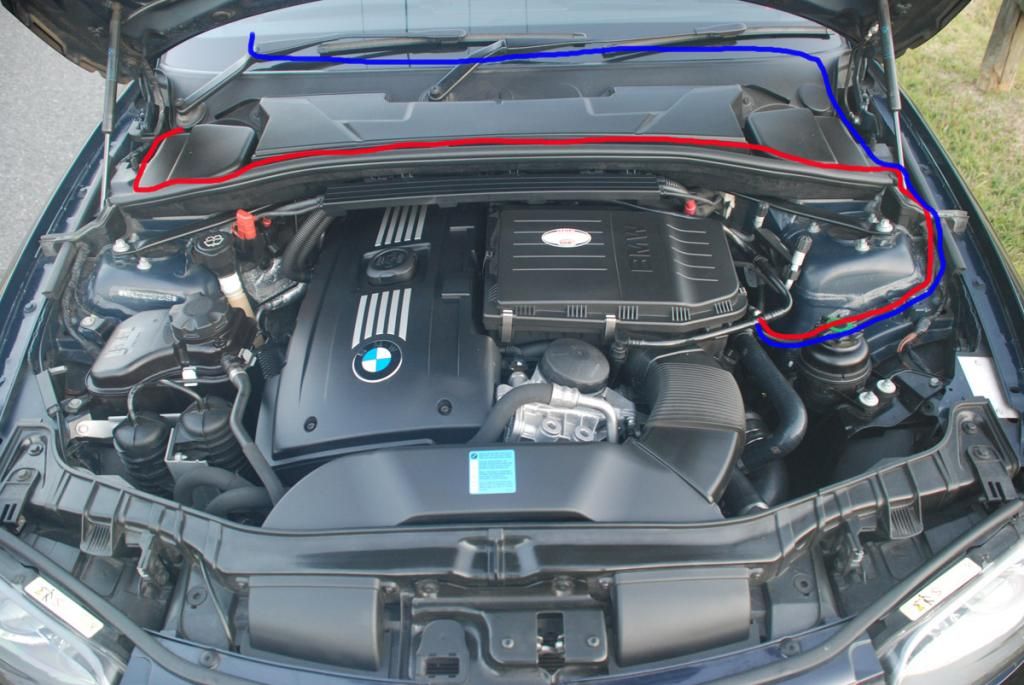 1) I could run up along the cowl (red install line) which should minimise heat on the boost line. I assume water drains down either side of the cowl so I shouldn't have any issues running it loose on top of the cowl like that? 2) The second options is to run it on the inside of the car (blue install line) below the dash from the driver to the passenger side and then out the alleged rubber grommet on the passenger side and down to the diverter valves. This would further minimise any heat issues and keep the boost line virtually hidden and protected apart from the very small section from the grommet, through the weatherstrip and down to the diverter valves. If I was to remove the lower dash cover on both sides does anyone know if there is line of sight between the driver's and passenger's footwell area to feed the boost line? I'm not interested in tearing apart the dash or centre console just to run the line and would probably go with the red line option otherwise.
__________________
|
|
Appreciate
0
|
| 12-16-2014, 09:26 PM | #6 |
|
Colonel
 650
Rep 2,601
Posts
Drives: G81 M3 Touring, GR Supra GTS
Join Date: Jan 2012
Location: Perth
|
Mine runs where the red line is but under the cowl. It is ziptied to some other wiring looms along the way. I'll grab some pics for you.
|
|
Appreciate
0
|
| 12-16-2014, 10:51 PM | #7 |
|
Colonel
 650
Rep 2,601
Posts
Drives: G81 M3 Touring, GR Supra GTS
Join Date: Jan 2012
Location: Perth
|
|
|
Appreciate
0
|
| 12-17-2014, 06:55 AM | #9 |
|
Lieutenant
   
77
Rep 541
Posts
Drives: 2008 135i AT Monaco Blue
Join Date: Dec 2012
Location: Brisbane, Australia
|
Thanks for the photos and recommendations guys.
I'll have a closer look at my engine bay over the next few days and have a crack at it. Under the dash and through the passenger firewall is still my pick if it can be done simply. So you both completely removed the cowl to install the line underneath it? No issues with heat/melting? My bonnet is very hot to the touch after only a brief drive so I shudder to think what the lines would be exposed to.
__________________
|
|
Appreciate
0
|
| 12-20-2014, 08:51 PM | #10 |
|
Lieutenant
   
77
Rep 541
Posts
Drives: 2008 135i AT Monaco Blue
Join Date: Dec 2012
Location: Brisbane, Australia
|
Quick update to note that I got this sorted.
It wasn't the easiest process in the world but it seems to be working ok now. I originally planned to run the boost line along the cowl above the engine bay and down to the diverter valve side of the car but it turned out the supplied line wasn't long enough for that. Instead I ran it directly across the top of the engine near some existing wires and zip tied it all up. I will monitor to make sure it's not contacting anything too hot with my current routing configuration. Any RHD owners looking to perform this install can see some guidance photos below (see blue line for rough location to follow). The hardest part was getting the line through the driver's footwell area into the engine bay. I made a small hole in the rubber piece (circled blue), taped the boost line to a coat-hanger and fed it through the rubber hole into the engine bay. Be aware that on the engine bay side the rubber hole actually leads out to a rubber extension piece the size of your little finger. Once you've removed the one plastic cover in the engine bay you should be able to see the coat-hanger and fish it out with your hand. It is a very small space and I have the deformed hand now to prove how hard it was to reach (even with pliers). Once you pull the line out you can run it to the left of the parts below where the cover would be and run it through the weatherstrip. From there I ran it along the strut brace and behind the battery positive charging terminal connection (red capped piece) and along the cowl with the existing wires. The last part is then hooking up the T-piece near the diverter valves and plugging in the boost line. Use zip ties along the length of the boost line routing at appropriate intervals to keep it tucked away neatly. I would also recommend you start your car to check for any leaks and then shut down the car and configure the P3 with your ignition on. Make sure you set the config options to 'N54' and calibrate the gauge for your environment. The gauge will then restart and you're good to go. Refer to the above linked P3 instructions for what buttons and settings to press. I've only been for a very small drive so far but the car seems to be reading vacuum fine and I've peaked at 14.2psi so far. That was in 6th gear in D/Economy mode on the Alpina flash. This thing is so damn fast it's hard to go full boost safely and within the speed limit! I'm running a custom Cobb tune and not entirely sure what peak boost is supposed to be (I was told 17psi by the previous owner) so will keep monitoring. Good to finally be able to see what boost my car is hitting.  Install location - RHD driver's footwell area: 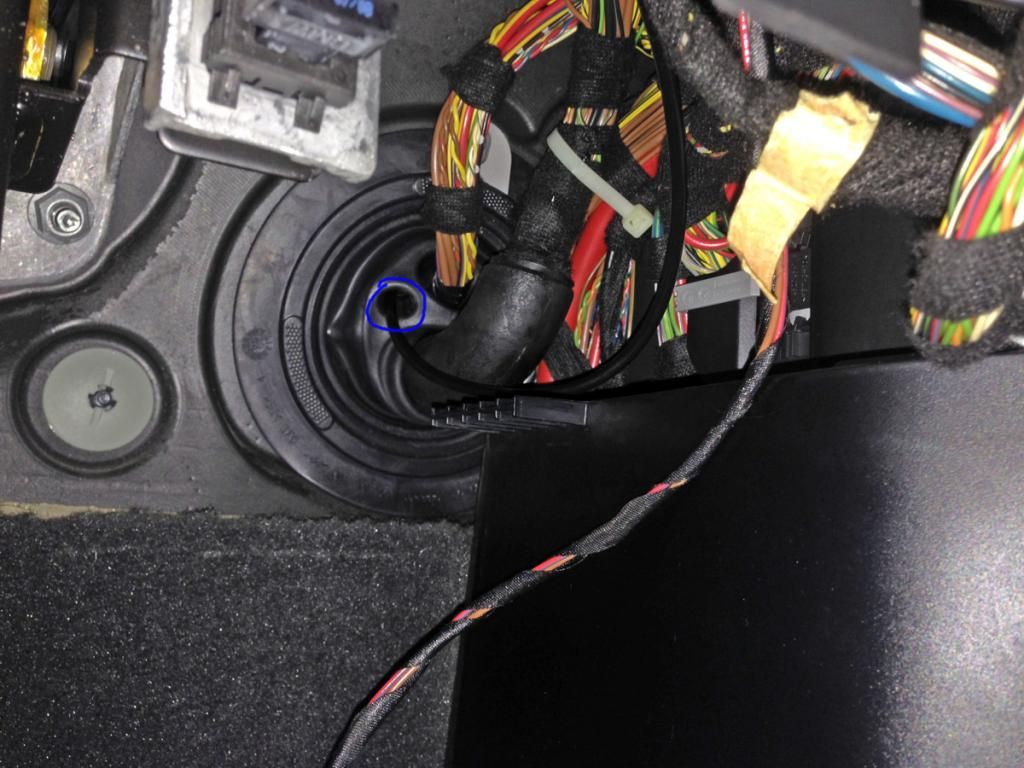 RHD driver's side engine bay routing: 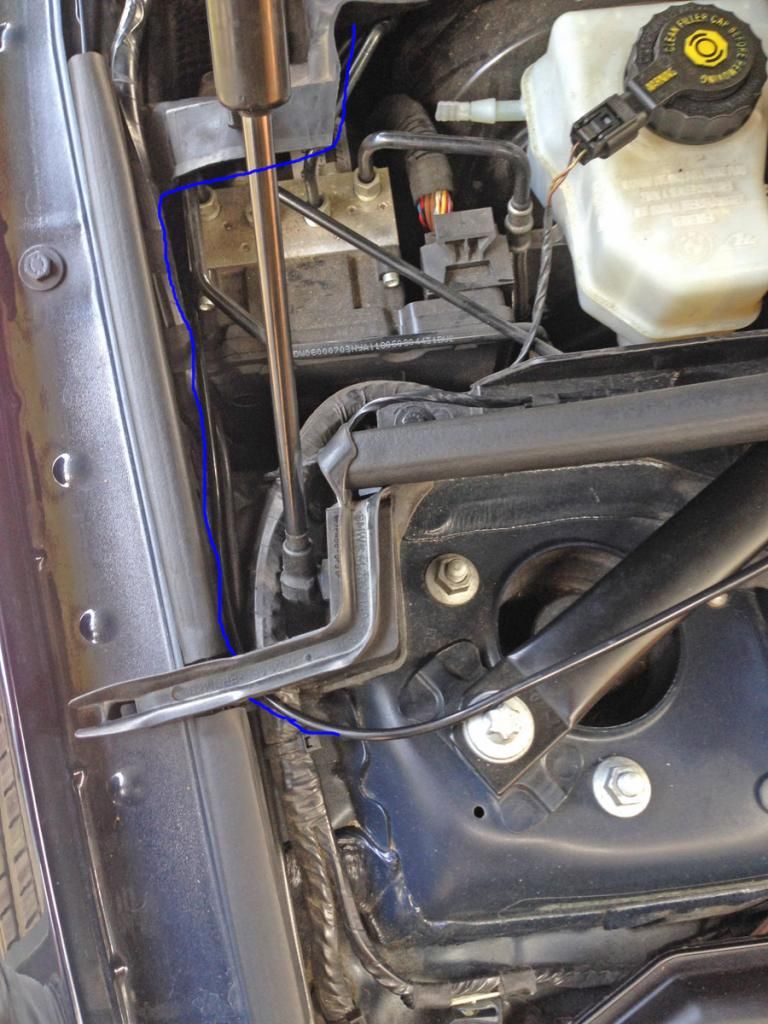 Finished product: 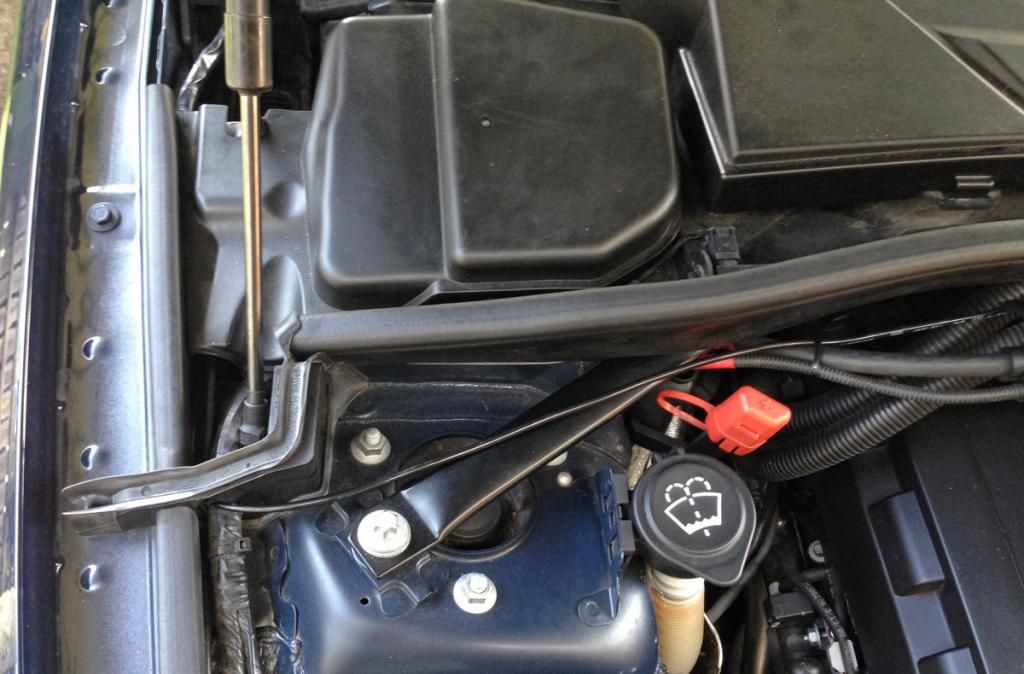 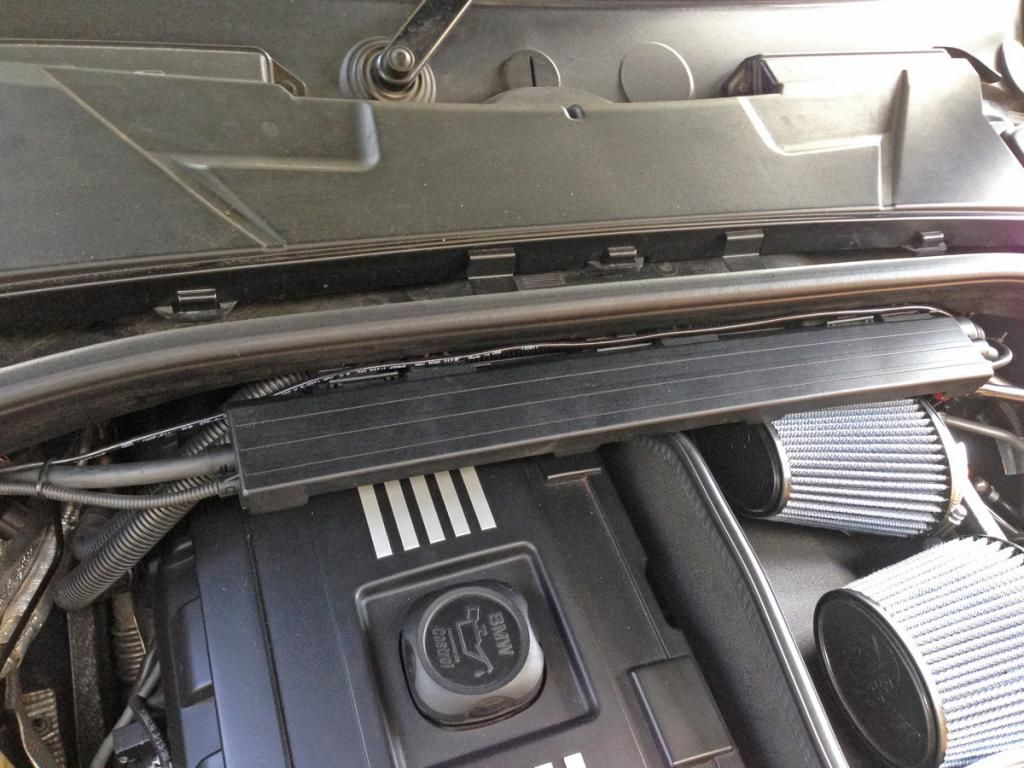 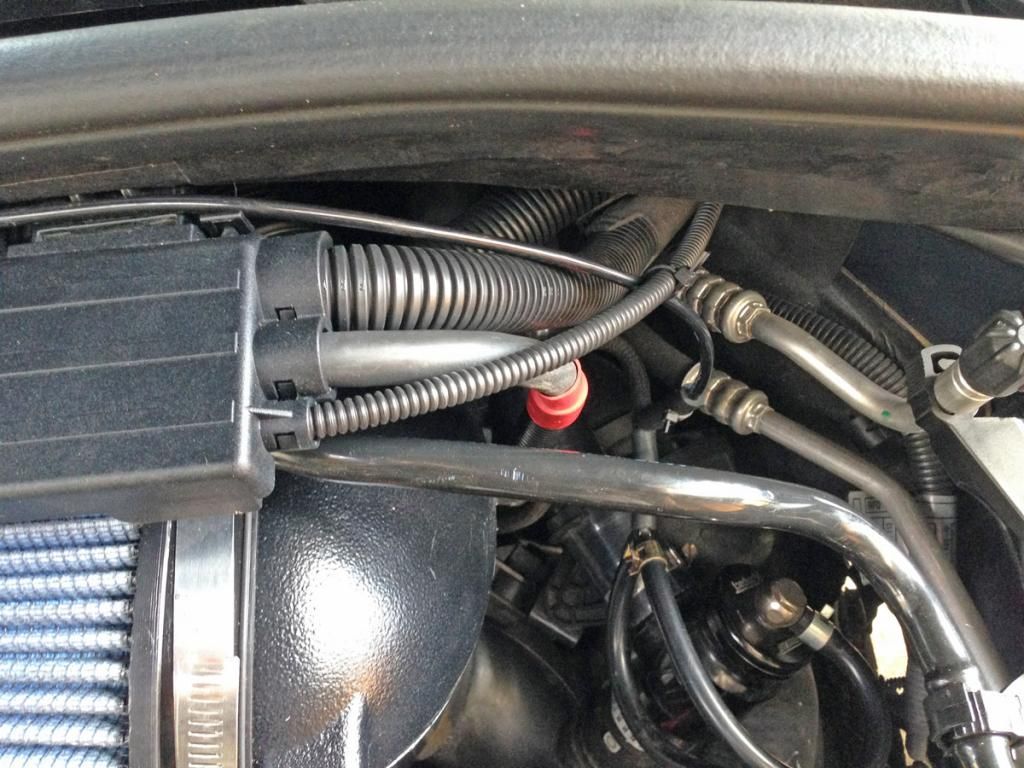 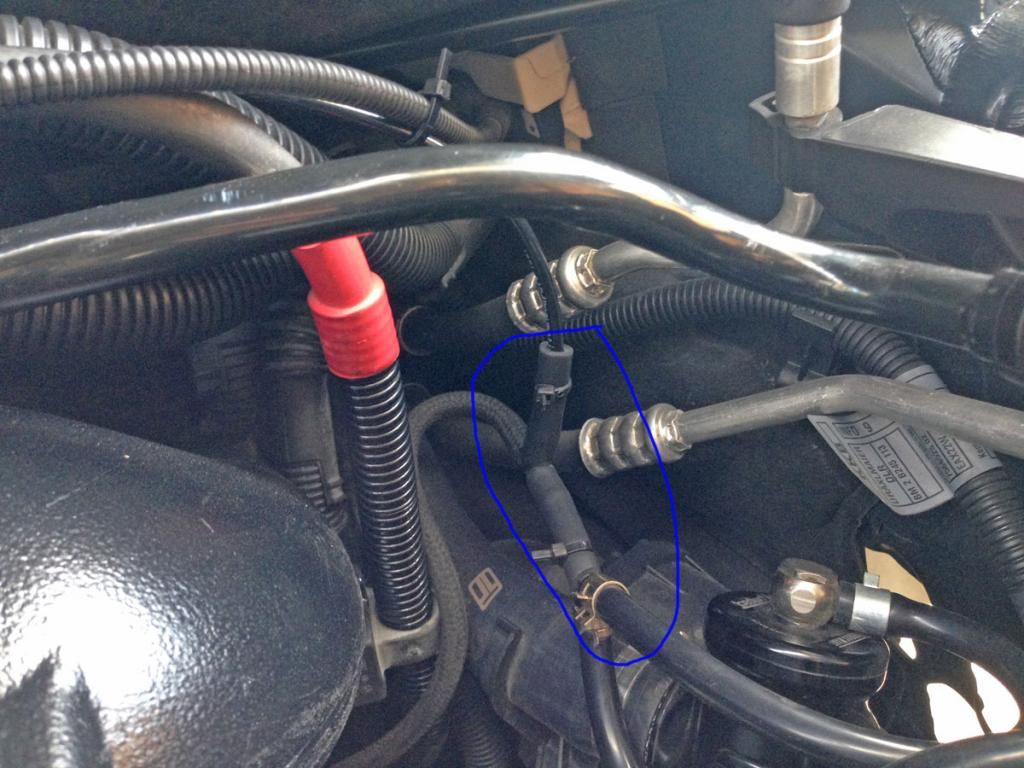
__________________
Last edited by OzJustin; 12-21-2014 at 06:40 AM.. |
|
Appreciate
0
|
Post Reply |
| Bookmarks |
|
|