

|
|
|
|
|
| 05-08-2010, 12:58 PM | #1 |
|
**************

29
Rep 190
Posts |
A Few Things to consider before buying the Dinan CAI
I recently purchased and installed the Dinan Carbon Fiber Cold Air Intake on my 135 coupe. Almost everything here seems to apply to the 335 as well, but I have not personally installed or seen the intake on a 335. The kit does come with parts and instructions for both.
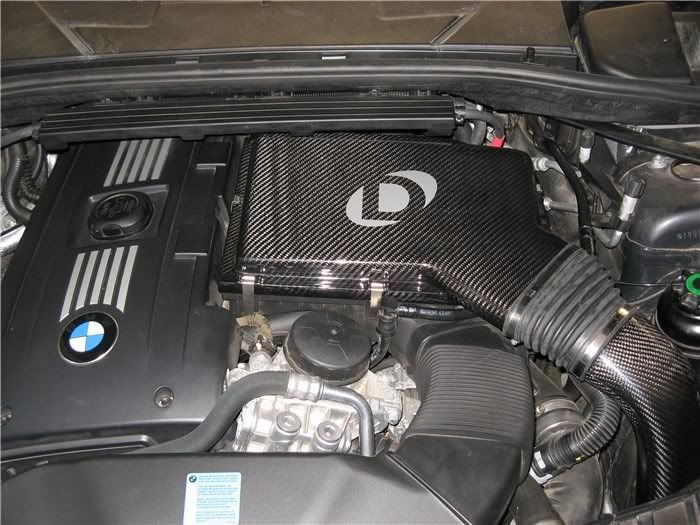
This thing is absolutely beautiful in the engine compartment, and although I can’t substantiate Dinan’s claims, I don’t se how it could fail to improve breathing. This set-up is additive to the stock intake (which also draws air from outside the engine compartment) and there is nothing that indicates it could cause a negative pressure, so it pretty much has to help to some degree as long as air is able to flow through it. Although my butt-dyno isn’t calibrated well enough to really detect an off-peak crankshaft 12 hp (vs. the 384 Dinan claims for my Stage 2 software and whatever the exhaust contributes), it “seems” at bit more eager. So no arguments with performance claims from me. I didn’t do a before dyno, so doing it now would be pointless. But there are some things I ran into that you should at least be aware of. There are several installation issues, some of which are cosmetic, and one pretty significant maintenance issue (imo). The cosmetic and maintenance issues apply whether you do it yourself or have it installed, and you probably should be aware of what installers are doing to your car as well. As far as the install, for the most part it is pretty straight-forward, with few kinks. First, be aware that although there is no cutting needed, you will have to drill eight 9/32” holes. Three of these are through the brake cooling duct and five through the flexible fender liner. From the instructions it appears the 3 series only uses 2 holes in the brake duct. (People with leased cars may want to stop here.) You will also be relocating the power steering reservoir with an included bracket, but that is pretty simple. Do note that there are a couple of lower mounting bolts for the stock unit that are hidden under hoses. These hoses are held to the stock PS bracket with a plastic clamp, so they will now be loose. I don’t see an apparent problem, but here was probably some reason to secure them. Dinan warns you, and sure enough you will have wrestle the Dinan airbox lid into place. It is a very tight fit, and one of those things you just have to maneuver around until it magically lines up. You will have to remove the front bumper skin, and this is an opportunity for a minor disaster. Or not so minor. Be careful when removing, handling and setting it aside. It is large, very flexible, and somewhat fragile. You really should take a look at a BMW manual before attempting this as the Dinan instructions seem to supplement rather than replace the information. There are some screws under the skin and a locator tab that aren’t mentioned. They also don’t mention that you need to free the seal strip along the top edge prior to removal, or that you need to use a wedge type trim tool to separate the skin between the headlight and wheel well on each side. There are simple but fragile locator tabs at that point, and if you break them off you will have a gap problem. They are molded into the skin, so replacement ain’t gonna be cheap. With the right tool, similar to the BMW manual illustration, it comes apart with no problems. You will lose a bumper skin mounting point on the “scoop shaped cover” that Dinan has you discard. There are 3 more mounting points in the vicinity, and it does not appear to be critical, but again, it is probably there for a reason. I found it necessary to remove the TPMS transmitter and install it upside down to provide some slack in the wires that need to be rerouted. This isn’t mentioned, but there is a photo where you can see that Dinan also did this, so I’m assuming (hoping?) that it doesn’t cause any problems. The transmitter looks like it should be pretty weather proof, but I’m planning to do something to cover it as it used to be protected by the “scoop shaped cover”, You will also have to “Bend the Horn Bracket”. Never have so few words covered so much. (This does not appear in the 3 series instructions.) This proved, for my inexperienced hands (as far as horn bracket bending goes), by far and away the most difficult part of the installation. Simple until you try to put everything together and have to re-bend it. Then again. And again. The Dinan illustration is pretty close to my final bend, but it took a fair amount of trial and error, as Dinan warns you, to get to the point where I could mount the horn and clear everything, including the Dinan heat shield as well as several OEM obstacles. This “inner” horn needs to have the outside of the opening lined up fairly close to parallel to the vertical brake duct surface to allow the heat shield to mount. And although it isn’t stated, you also need to bend the bracket for the “outer horn”. This is pretty easy, just bend it forward until you have adequate clearance of the Dinan filter. There is an illustration of the filter that shows how it will end up. I will admit that my bracket ended up mangled to the point that I am going to order another bracket and replace it next time I have the bumper skin off. When will that be, you ask? Sooner than you may think, but more on that later. You have to drill some holes, but these are all through relatively soft plastic. Locating the heat shield is a bit of a “jiggle it around” process, and the first time I tried it I took a few minutes to realize it was hanging on the inner horn. Thus began the trial and error mentioned earlier. When everything is right, it sort of snaps right into place and is secured with three bolts through the brake duct (two bolts for 3 series, and I would guess it might be easier to fit without the horn issue). The splash shield and filter bracket mount up easily enough to holes drilled through the flexible fender, but this is where the cosmetics come in. As with all cosmetic issues, one man’s ugly is another’s beautiful. If you follow Dinan’s instructions (or you installer does) you are going to have five bright, shiny 18mm washers, each topped with a shiny 12mm bolt head, showing clearly in your driver’s wheel well. You do have to bend down a little to see the fifth one. You may like this; I didn’t. Fortunately, I had some black 6x16mm allen head bolts left over from some motorcycle work. Rough up the washers a little, a coat of VHT, and 45 minutes later I was back in business with unobtrusive black hardware. 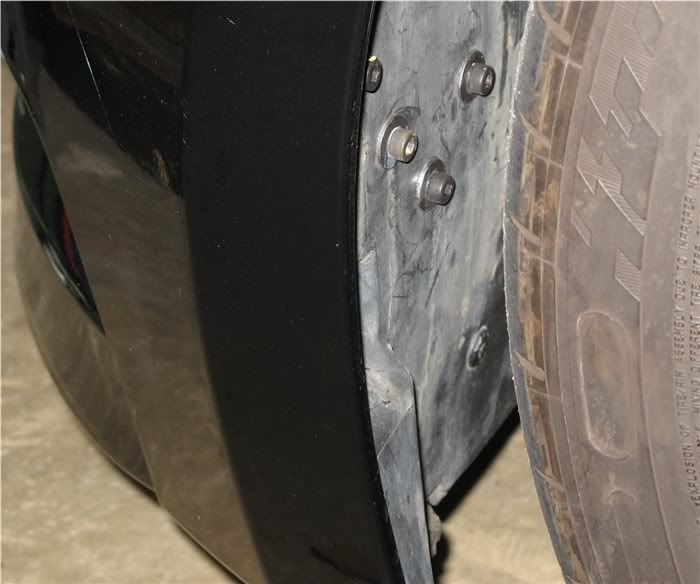 This photo shows my set-up, maybe someone can post a pic with the standard Dinan hardware. About the same, but with bright silver washers and hex head bolts. Also note that this photo is of a slightly lowered car running 245 tires on the front, and the tire is pointed dead ahead. In other words, if you are running a stock setup, this will be even more apparent. The shiny bolts could actually be an advantage if you are looking for an opportunity to show off your new intake. Having someone ask “what the heck are them bolts fer?” beats opening up your hood and acting like you’re looking for a dipstick. 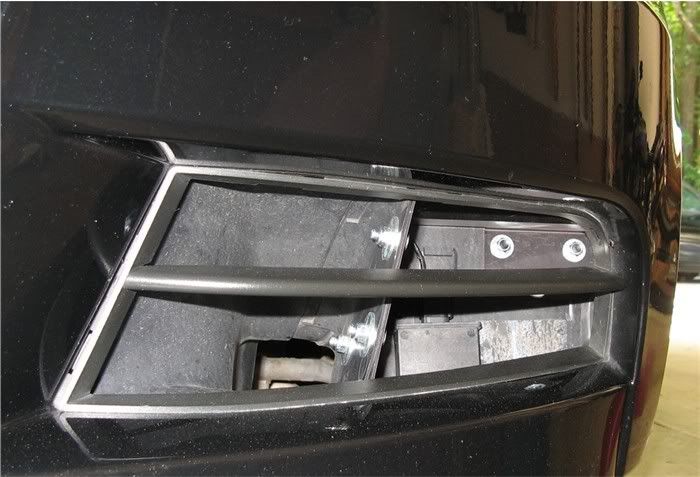 I honestly don’t spend a lot of time bending over and looking into the duct that feeds the intake, but if you do, this is what you see. Not very pretty with all the nuts, bolts, and washers. But then I didn’t have any black lock nuts. Doesn’t bother me, but if this sort of thing bothers you, be aware. You can also see the inverted TPMS sensor. As to the maintenance issue, one thing I was concerned about was servicing the lower filter (clean & oil, or replace, etc.). When I asked the salesman prior to buying, he told me that all you have to do is pull back the flexible inner fender to access the filter ahead of it. This made sense to me as it is the same process I used in changing a headlight on my daughter’s Honda Fit. As I was reinstalling the bumper skin it occurred to me that there was no way this was going to work. The filter is bolted to the inner fender, and clamped to the intake tube behind the heat shield. You can no longer move the inner fender more than an inch, maybe two if you are willing to really put some pressure on it.. The only way to get at the filter is to remove the bumper skin, the “filter shield” and the heat shield (to get to the clamp). If I had not seen this during the install I would not have realized I couldn’t access the filter until I finally tried to service it. Not good. Dinan now acknowledges that this procedure won’t work, so hopefully potential customers will no longer be hearing this.. As it was, I felt it was too late to back out of the install at that point. Not only had I been working on it for quite a while, but I had drilled fairly large holes (five in the inner fender where crap constantly flies off the tires), and bent up a bracket. I doubt I could have received a refund from Dinan after basically completing the install, let alone replacing the altered stock parts. Dinan recommends that you never clean and re-oil a filter. They state that this is because the delicate BMW Air Mass Sensors will “fry” when any excess oil hits them. (Without instructions not to re-oil filters, Dinan could be responsible for warranty coverage if somebody over-oiled, or improperly cleaned or dried a filter supplied by Dinan.) OK, but during a conversation with Steve Dinan he stated that that did not apply to “your car”, which he says does not have such an AMS. I’m assuming (and that’s all it is) that he meant this to apply to all N54s. As far as the necessity of servicing the filter, consider that on the 135 the opening that feeds this filter is protected by a single horizontal bar that will allow anything smaller than a golf ball to get through. On some 3s you have an egg crate grille that will keep out objects larger than a sugar cube. Although the splash shield Dinan supplies should prevent direct strikes by gravel and the like to the filter, anything that is light enough to remain airborne is going to be sucked into those pleats. If you live in an area with a lot of dust, sand, dirt or gravel roads, or, as in my area, a heavy pollen season (dense yellow pine pollen powder coats everything for a few weeks in the Spring), you re going to need to service the filter at somewhat greater frequency that the 50,000 miles K&N recommends. (Only the panel filter is a K&N, the additional lower filter is “proprietary”.) And when you service it (replace or clean), you will have to remove the bumper skin, unfasten the filter mounting bracket from the fender, then remove the splash shield and remove the heat shield to access the hose clamp that mounts the filter to the carbon fiber down tube. Then service the filter and reassemble. As far as I can tell from photos and the assembly instructions, this applies to 3 series as well. As an alternative, you could skip servicing altogether. After a few years, depending on conditions, the filter will gradually clog up and stop passing air. But since it is additive, the stock intake will continue to work and you will probably never notice the 5 - 14 hp Dinan claims for the intake as it slowly fades away. I can’t say for sure whether I would have purchased the intake had I known all this up front, but I would have given it a lot more consideration. I do have some experience with body and trim panels, so that is not necessarily a deal killer for me. But the visually obvious drilling and the difficulty of servicing the lower filter would have certainly been major factors. Ask me again after I’ve serviced the filter a couple of times. Last edited by davemohan; 05-08-2010 at 01:16 PM.. |
| 05-08-2010, 01:36 PM | #2 |
|
Colonel
 37
Rep 2,084
Posts |
IIRC Dinan recommends changing the lower filter every 30,000 miles. Suppose it's really 20,000 miles. For me, that's two years. Not a deal killer for me.
|
|
Appreciate
0
|
| 05-08-2010, 01:37 PM | #3 |
|
First Lieutenant
 33
Rep 361
Posts |
WOW what a great and thorough write-up, thank you for the information. Does anyone know if this mod interferes with the Cross strut bar ? I have the Cross SB on my car and would rather not have to leave it off just to get the CAI to fit.
|
|
Appreciate
0
|
| 05-08-2010, 06:02 PM | #4 |
|
Major General
 159
Rep 5,689
Posts |
Wonderful write up, I wish everyone reviewed products as in depth as you did, it sure is helpful in chosing which is best. Way to set an example!
Also post pics of the actual intake, i really want to see
__________________
 Legal Disclaimer: Anything I or anyone else says about my vehicle on this website(1addicts.com or any affiliated or nonaffiliated sites), pertaining to modifications, is only to gain acceptance from my/our peers, and does not actually represent anything actually existing on my car, and thus, cannot be held against me in any issues, i.e. warranty claims, that may arise. Legal Disclaimer: Anything I or anyone else says about my vehicle on this website(1addicts.com or any affiliated or nonaffiliated sites), pertaining to modifications, is only to gain acceptance from my/our peers, and does not actually represent anything actually existing on my car, and thus, cannot be held against me in any issues, i.e. warranty claims, that may arise. |
|
Appreciate
0
|
| 05-08-2010, 08:10 PM | #5 |
|
Private First Class
 

8
Rep 129
Posts |
Thanks for the write-up. Great job.
Now that you have installed it, what do you think of it in terms of sound and performance compared to stock?
__________________
 BMW 135I manual AW, red Coral, Procede processor, CDV, SprintBooster, H&R Front & Rear Sway Bars, Yokohama AO50's, SouthernBM camber plates, BMW Performance Rotors, Dinan Cold Air Intake, Dinan Exhaust, Dinan Oil Cooler, HPF Intercooler, Koni Front Sport Yellows, M3 rear subframe bushes BMW 135I manual AW, red Coral, Procede processor, CDV, SprintBooster, H&R Front & Rear Sway Bars, Yokohama AO50's, SouthernBM camber plates, BMW Performance Rotors, Dinan Cold Air Intake, Dinan Exhaust, Dinan Oil Cooler, HPF Intercooler, Koni Front Sport Yellows, M3 rear subframe bushes |
|
Appreciate
0
|
| 05-09-2010, 12:59 PM | #7 | |
|
**************
29
Rep 190
Posts |
Quote:
As far as sound, I really wasn't looking for a change and didn't notice anything. If it does sound any different, it is very subtle. The airbox is stock with a new lid, and the "auxiliary" intake is out in front of the fender, so you aren't going to hear much. I hate to sound like a Harley engine modder, but a large part of the reason for purchase was aesthetics. |
|
|
Appreciate
0
|
| 05-09-2010, 01:15 PM | #8 | |
|
**************
29
Rep 190
Posts |
Quote:
 A quick pic from above. I didn't think to get a picture of the filter location during the install, and it can't be seen after you put the bumper skin pack in place. If you look at the second photo in the original post, you'll see 2 washers & nuts on the right, with a third one partially visible behind the trim bar. These are the mounting bolts for the "filter shield". The secondary filter runs side-to-side and parallel to the ground directly above those bolts. |
|
|
Appreciate
0
|
| 05-09-2010, 01:25 PM | #9 |
|
Lieutenant

30
Rep 586
Posts |
Great write-up, great under hood bling and I hope you are happy with it. I think your performance expectations are accurate. Performance gains are very doubtful.
__________________
2009 135i Black on Black
Options|Leather| Sport Package| Premium Stereo| Steering Assist | V1 Engine MODS| JB4 install | AR DPs | Berk Axleback | ITG Filter | BHS OCC | Exterior Bling| Kerscher splitter | Interior Bling | Bimmian pedals | 3P Cars gauage | |
|
Appreciate
0
|
| 05-09-2010, 04:20 PM | #10 |
|
Captain
48
Rep 711
Posts
Drives: '04 E46 M3
Join Date: May 2008
Location: Beaufort, SC
|
Would the Dinan CAI fit if you have the BMW Performance Power Kit installed? I've been curious since that side of my engine bay seems like a snug fit for something like that since its installation.
__________________
 Last edited by Novator; 05-09-2010 at 04:25 PM.. Reason: Adding photos |
|
Appreciate
0
|
| 05-09-2010, 06:44 PM | #11 |
|
Lieutenant

10
Rep 446
Posts |
Weird, I had it installed for me and I can't see anything externally. Then again, they might not have had the same instructions when I got it(or the techs disregarded them). I have to double check, but I don't even remember any bolts in the fender lining.
|
|
Appreciate
0
|
| 05-11-2010, 03:29 PM | #12 |
|
Member
30
Rep 392
Posts |
Thanks so much for all of the detail Dave. I am bringing my car to my dealer to have this installed and figured I check the posts for any info just in case. I'll be sure to print this and talk to the techs before hand to discuss bolts showing and future servicing issues.
__________________
2009 135i
Dinan Stuff |
|
Appreciate
0
|
| 05-11-2010, 03:54 PM | #13 |
|
Banned
76
Rep 5,970
Posts |
Nice write-up, and great detail.
I'm not a huge fan of those bolts in the front. Not a big deal I guess, but it looks like they could have found a more OEM method of securing everything up there. |
|
Appreciate
0
|
| 05-11-2010, 04:50 PM | #14 |
|
Captain
41
Rep 825
Posts |
Excellent write up. Thanks for taking the time and going into detail. Now you need a CF engine cover to finish it off.
__________________
2019 X3 M40i - Black Sapphire Metallic - Mocha Lather - 21" 718M wheels - Every option except Sun Shade
|
|
Appreciate
0
|
| 05-13-2010, 01:43 AM | #15 |
|
Major
 
137
Rep 1,450
Posts |
I don't thik this intake will fit if the BMW Performance kit has been installed. For starters you have an additional radiator around the area of the brake duct you need to drill......I couldn't even get a hose up that side when I modded my "Stock" airbox.
__________________
M240i LCI (Mineral Grey):- M2 Door Mirrors, M2 Black Kidney Grills, Lower grille inserts, MP Exhaust, Dinan Carbon Fibre CAI, hot climate intake elbow
|
|
Appreciate
0
|
| 05-15-2010, 02:08 PM | #16 | |
|
**************
29
Rep 190
Posts |
Quote:
2 of the bolts in the fender lining mount the bracket that attaches to the end of the filter. If this has been left off, the filter is attached only to the cold air tube, which is attached only to a very flexible rubber fitting joining it to the air box lid. So in other words, the cold air tube and filter, an assembly about 2 feet long, is essentially loose and free to dangle around from the rubber boot. If the Dinan heat shield was installed, the rubber collar on the filter is going through a close fitting notch in a pretty thin piece of steel, which is going to cause wear problems if the filter isn't rigidly mounted. The other 3 bolts in the fender mount the "filter shield", which serves both as a splash shield and to protect the filter from debris coming in through a wide open duct. If something punches through the filter, it has a clear shot into the engine as air from the cold air tube does not go through the panel filter. A large volume of water directly hitting the filter isn't a good thing either. And if the heat shield was not mounted to the brake duct, it is a loose steel plate with a lot of edges. If it was left out entirely, your cold air intake is drawing much of its air from behind the radiator. So hopefully they used some less conspicuous fasteners? Last edited by davemohan; 05-15-2010 at 04:57 PM.. |
|
|
Appreciate
0
|
| 05-15-2010, 10:12 PM | #17 |
|
Commander
4
Rep 320
Posts |
i think they could have came up with a better design than that...
__________________
FS: CT9A parts and Enkei Wheels!!! PST
BLUEFAKES.COM ARE SCAMMERS, LIERS, AND CHEATERS! DO NOT BUY FROM THEM!!! |
|
Appreciate
0
|
| 05-17-2010, 03:48 PM | #18 |
|
Member
30
Rep 392
Posts |
So, I had my Dinan intake installed last week and picked it up Saturday. I made sure to say something to my service manager about the bolts and he said that his tech had installed one on a 335 and thought the fact that they shipped the kit with silver hardware was stupid. My tech actually replaced some of the bolts with matte black screws and for the bolts that he used he painted them black. I cannot notice any hardware sticking out anywhere on my car. I'll take some pictures of the intake and of the hardware for everyone to see, but I'm very happy with the way they did it for me at the dealer.
Thanks Dave for putting your pics up so that I knew to say something to my installer.
__________________
2009 135i
Dinan Stuff |
|
Appreciate
0
|
Post Reply |
| Bookmarks |
| Thread Tools | Search this Thread |
|
|


