

|
|
|
|
|
| 09-21-2009, 08:38 PM | #1 |
|
Colonel
 131
Rep 2,408
Posts |
Vk Motorwerks Downpipes DIY
DIY
Ok guys sorry for the long wait I have been a little bit busy as of late. I will start the first section off with the diy. This DIY is for a 135i but will work for a 335i as well. Tools Needed Car Jack and Jack Stands Ramp, Wood, or Sand bags 1/4" ratchet 5/8" ratchet 5/8 or 1/4 swivle Socket extenders 8mm wrench and socket 10mm wrench 12mm wrench and socket 13mm wrench and socket 16mm wrench 7/8 wrench or Crescent Wrench E10 Torx socket E12 Torx socket T25 Torx driver Large flathead screwdriver or small pry bar Pliers *Note I would go to home depot and pick up 4-3/8 by 1 1/2 SS bolts with 4 SS nuts and 8 SS washers, the bolt heads and nuts are a little to big that come with the kit.* Time Should only take 2-3 hours if you are skilled. But leave yourself 5 hours just incase you come up on some snags. The install is very easy and straight forward, if you have every installed headers on an E46 this will be cake to you. Now to jack up the car the easy way. First either take a pair of ramps if you have them if not take some blocks of wood or sand bags and make your own ramp. Next drive your car up on the ramps and pull the e-brake and shut off the car. From here you can be cautious and put something behind the rear wheels for extra safety. Now take your Jack and place it under the car by going under the front bumper below your grill. There will be a large plastic scrap shield under there with a little square section in the middle of it cut out. In this cut out there is a jack point place your jack on this jack point and lift the car to the desired hieght. Now place your jack stands under the jack points on the side of the car and lower the car down on the jack stands. Now to the Install First step is to take your wratchet with a 8mm socket on it and remove the screws (135i has 21 and the 335 has 16) that hold the large plastic scrap shield onto the bottom of the car. PS there are two screws hiddin on the sides in the back for you 135i folks, one on each side. 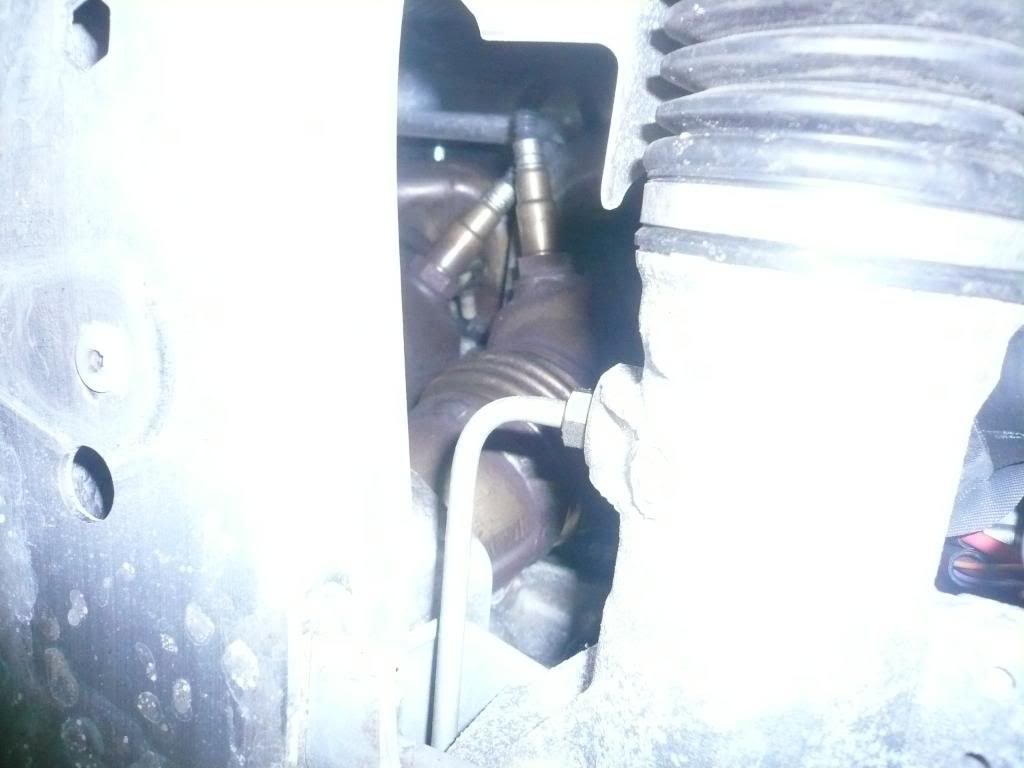 Now that the plastic shield is removed you are going to want to take a T25 torx bit with a wratchet or screwdriver and take out a single scre that is holding up a heatshiled. This heatshield is located on the passager side of the vehicle under the stearing rack. Once this screw is removed bend this heat shield out of the way. Once this is removed take a E12 Torx socket and a 5/8 wrench and undo the two bolts holding the steering wrake to the subframe. The 5/8 wrench goes ontop of the nut ontop of the stearing rack the nut on the drivers side will be the hardest one to get to.  Once you have both of these bolts removed you are going to want to pull the stearing rack towards the front of the car, I secured mine with a bungie cord. Also make sure that the lines on the stearing rack arn't being pushed against anything these are not that flexible and could brake if you are not careful. From here take a Crescent wrench or 7/8 wrench and remove the front dp's top O2 sensor. Remember righty tighty lefty loosy. These will probably be on there pretty tight so you are going to want to really push on them. Once the front dp O2 is out take the rear dp O2 sensor out the exact same way. Now dont worry about marking the O2 sensor's for location I have an easy way for you to identify where each one goes when you are ready to reinstall them. Now take either a 13mm wrench or 13mm socket and wratchet and loosen up the bolt that is on the band clamp to the forward most turbo. Once that bolt is completly loose and ready to come out move to the band clamp on the rear turbo and loosen that. Once this is accomplished take a long screw driver or small pry bar and put it inbetween the two juts from the band clamp and pry them apart. Do this to both of the band clamps from here you should be able to remove the band clamps from the turbo's or at least be able to swivle them around. If not just retigten the bolts and little bit and pry again. 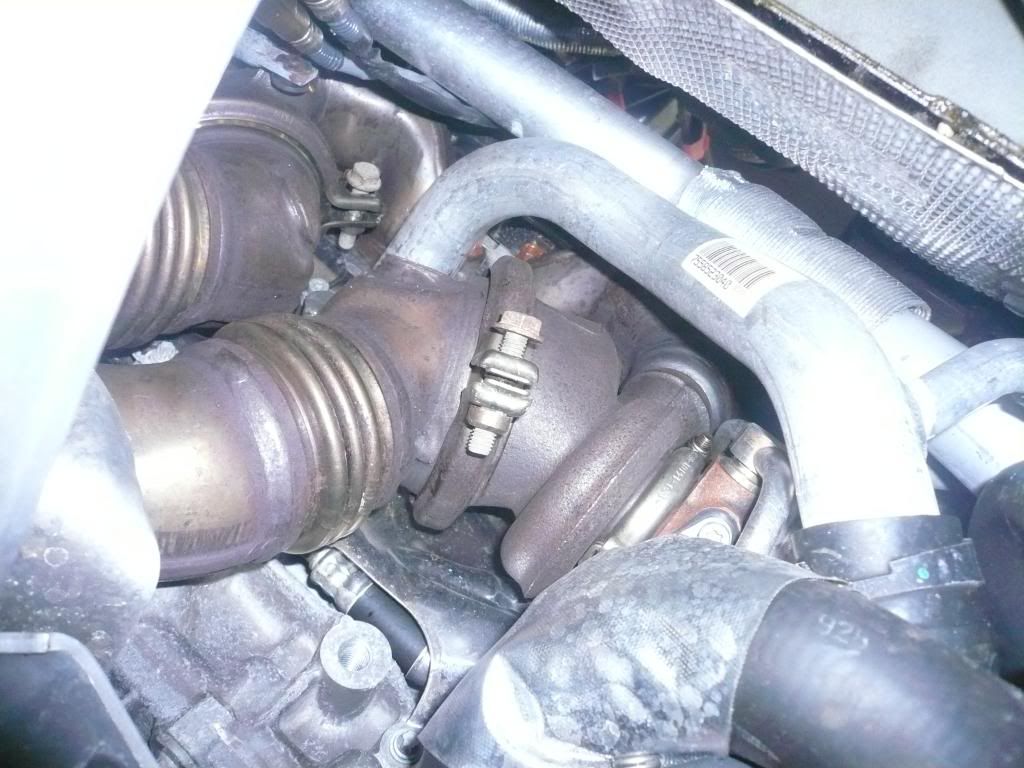 Now you are all done with the front side of the downpipes take a moment to let the blood recerculate through your body and then head down to where the exhaust bolts up with the down pipes. From here take a 12mm socket and wratchet and undo the four bolts that hold the exhaust to the downpipes. Now that those nuts are out move a little further back towards the back of the car and remove the muffler brace with an E10 torx socket and your wratchet. Now that this brace is removed there will be more play in the exhaust. From here go to the end of the downpipes (where they connect to the catback exhaust) and look above them and to the left of them and you will see two 12mm nuts that are holding the downpipes to a bracket. For the bolt to the left all that you will need is a wratchet with an extension and a 12mm socket. For the top nut you are going to need a swivle, which you will connect to the 12mm socket and then connect and extension to the swivle which will come back to your wratchet. Now your downpipes are ready to come out all you have to do is pry your screw driver between the bracket in the back (that you just got done taking the nuts off of) to lift it over top the bolt and the dp's will litteraly fall out. Start with the downpipe that connects to the front turbo it is also the longer downpipe. Once you pull it out set it on the ground and get ready to take out the rear O2 sensor. You can get more slack by undoing the O2 wiring. Now take your crescent wrench or 7/8 wratchet and remove the O2 sensor. Now repeat the last step to remove the smaller downpipe or the one located on the rear turbo. This is what you should see. 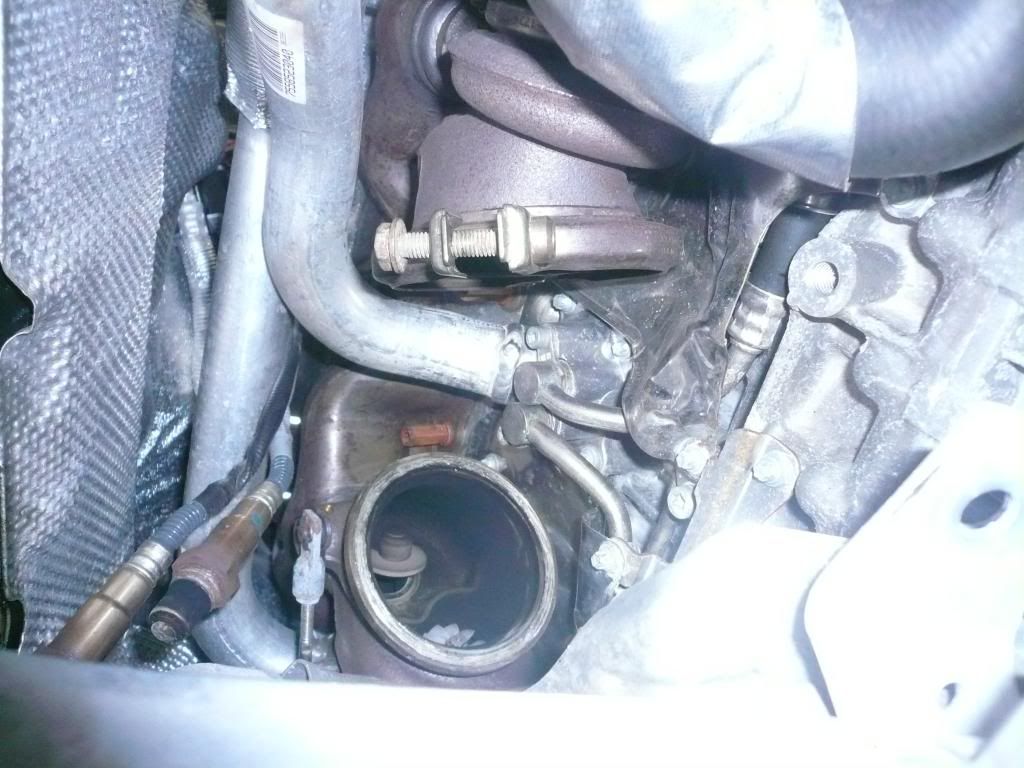 Here is a camparo pick to old vs new 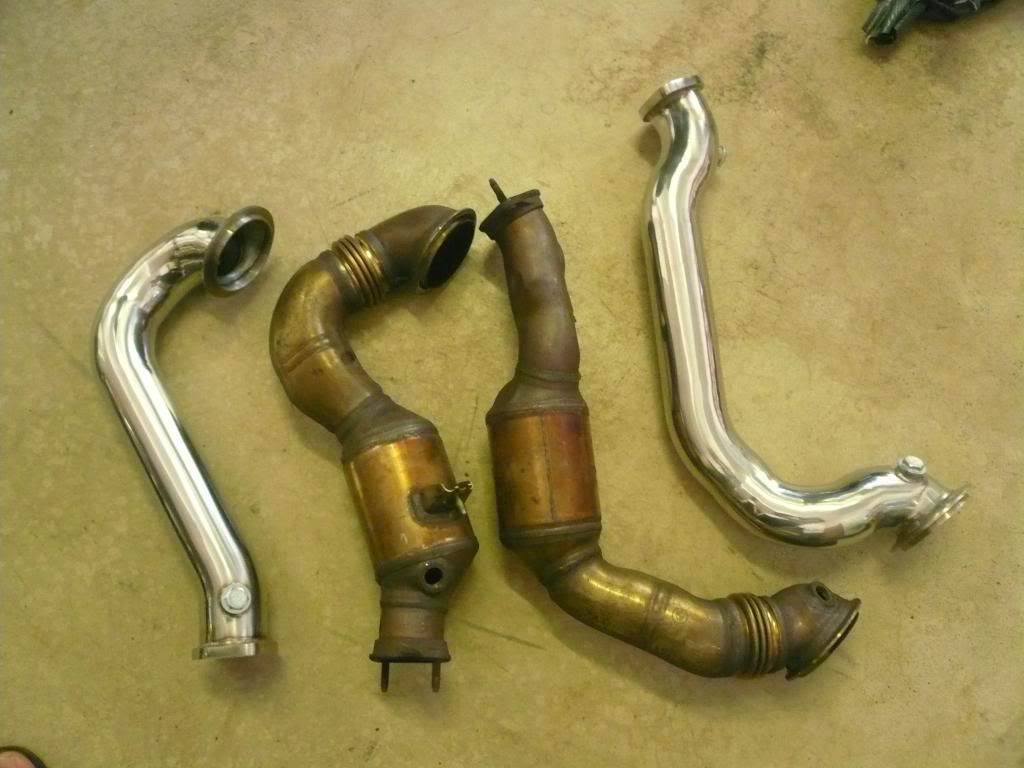 Now its time to install your new set of Down Pipes. Start by taking the shorter downpipe and reinstalling the rear O2 sensor. Now to know where each o2 sensor goes just look at the sensors them selves if you look up at the covered wiring you will see one O2 sensor has a gray sleave and the other O2 sensor has a black sleeve. This is the same for the front O2 sensors as well. The one with the grey sleeve goes to the dp that is connected to the rear turbo/smaller downpipe. The black sleeve is for the longer downpipe/one that mounts to the front turbo. So therefor you are going to connect the rear O2 sensor (gray sleeve) to the shorter downpipe. Make sure you tighten these with the crescent wrench or 7/8" wrench. Now ease the downpipe through the small gap between the subframe and the trans and connect it to the rear turbo. This might be kind of tricky at first but make sure the band clamp is already on the turbo and facing the right way (you can check my pictures to make sure it is on right) then pry apart the clamp with your fingers and place in the downpipe. Once this is accomplished make sure that the entire clamp is around the dp's and turbo, these is easily done by running your finger along the inside edge of the band clamp. Now you are going to want to make sure that the downpipe flanges are lined up with the exhaust flanges if the are not simply rotate the downpipes till they are in the correct position. Now take the bolt that goes to the band clamp and hand tighten it, do not tighten it with the wratchet or wrench yet. Once the smaller pipe is completed do the exact same thing to the larger downpipe that connects to the front turbo. Now that both downpipes are connected to the turbo's but not tightened you are going to want to move to connecting the exhaust to the downpipes. Now take one bolt in your hand with the washer already on it and take your other hand and push the exhaust towards the downpipes. Make sure that you put the new gaskets in. The easiest way to tighten them will be to put the head of the bolt facing the front of the car. Put in all four bolts and hand tighten the nuts and other washer onto them, easiest to do them one at a time. Now you might need to adjust the downpipes again by twisting them for optimal fitment this is why we didn't tighten the band clamps. Once you have all four bolts hand tightened move back up the band clamps and tighten them all the way with either your 13mm socket/wratchet or your 13mm wrench. Now that the downpipes are tightend on the turbo's you can put the front O2 Sensor (gray sleeve) on the downpipe that is mounted to the rear turbo, make sure you tighten this one all the way. Now put in the front O2 sensor (black sleeve) on the downpipe that is connected to the front turbo and tighten it. 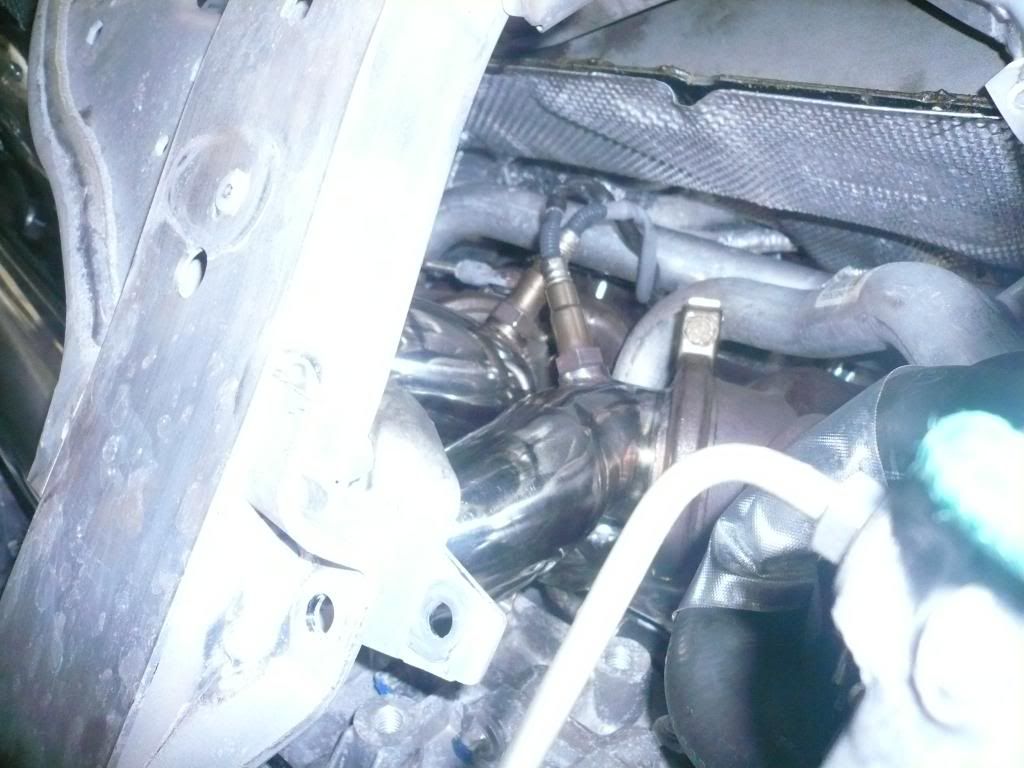 You can now go back to the exhaust and tighten the four bolts that connect it to the downpipes. You are going to want to use a 13mm wrench and 13mm socket, extension, and wratchet. Put the wrench in the back and the wratchet in the front. Congratulations you have installed your new set of downpipes. Make sure you have someone start up the car and rev it a couple of times while you are underneath the car, you are going to want to check to see if you can hear any exhaust leeks. If you can hear any then you are good to go if not then you are going to want to recheck the exhaust connection and the band clamps. Be careful though because the down pipes will be hot. Now just reinstall the small heatshiled that you bent out of way and reinstall the stearing rack. Put back on the plastic shield and put all of the screws in it. Now put the ramps, sand bags, or wood back under the tires. Remove the jackstands and lower back onto your make shift ramp and drive off of them. Bonus DIY (BMS O2 sims) (JB3 PNP) Get to your ecu box and remove the smaller of the two clips it will be the one closest to the driver's side. From here take out the small black clip with red wires attached to it also remove this same one from the male end. Now go to the female end this is the end you are going to use for reference to the slot numbers I give you. Go to slot 19 on the female end and depin this and the same wire's male end. Put the white sleeved wires in this location male to male and female to female. Now go to slot 20 on the female end and depin this and the same wire's male end. Put the red sleeved wires in this location male to male and female to female. Last but not least go to slot 23 on the female end and depin this and the same wire's male end. Put the black sleeved wires in this location male to male and female to female. Repluge everything back in and you are good to go. Last edited by ridin135; 09-21-2009 at 09:22 PM.. |
| 09-26-2009, 03:08 PM | #2 |
|
Good life

130
Rep 1,937
Posts |
Very nice! I think you're the first one that has written a downpipe diy for the 135i specifically. I am still debating on whether I want to install them now or wait until next spring. This should be a STICKY THREAD.
__________________
Current: 08 E90 M3 Alpine White
 Former: 11 135i Msport Space Gray -Former: 07 335i Titanium Silver E92- Former: 08 135i Alpine White E82- Past: 06 Subaru STI WRB- Past: 04 Audi S4 Imola yellow- Past:97 Honda prelude Ice blue Former: 11 135i Msport Space Gray -Former: 07 335i Titanium Silver E92- Former: 08 135i Alpine White E82- Past: 06 Subaru STI WRB- Past: 04 Audi S4 Imola yellow- Past:97 Honda prelude Ice blue |
|
Appreciate
0
|
| 10-03-2009, 05:47 PM | #4 |
|
drk one

38
Rep 797
Posts
Drives: 2008 135i
Join Date: Dec 2007
Location: Tampa/Orlando
|
Little too involved for me... DPs will be my first mod I'll pay to have installed
__________________
Jet Black | Coral | HighGlossBlack | Steptronic | Premium | Sport | Comfort | ActiveSteering | Navi | HiFi | HD | iPod | SAT
BMS JB3 v2.0 | BMS DCI | Berk Tech Sport Exhaust | UR * DPs | CoolingMist Meth Kit w/ CMGS | H&R OE Sport Springs | Breyton GTS-R | Dunlop Direzza Sport Z1 Star Specs | GP Thunder 8000K Low Beams/Angel Eyes/Cornering Lights | LED Interior Light Kit | Window Tint | Smoked Tail Lights | Smoked License Plate Cover |
|
Appreciate
0
|
| 10-03-2009, 09:51 PM | #5 | |
|
Colonel
131
Rep 2,408
Posts |
Quote:
|
|
|
Appreciate
0
|
| 11-28-2009, 06:40 PM | #6 | |
|
First Lieutenant
 
14
Rep 395
Posts |
Quote:
I have a question, I quickly bolted the steering rack back into place so I could roll the car a little bit with the DP's off. I noticed when the wheels are straight the steering wheel is no longer centered, its about 15-20 degrees off... When I finish the install on Monday I am assuming with the steering rack off I just need to straighten the wheels and center the steering wheel, make sure they stay in place, and then mount the rack back into place? Any other tips, if I feel its off a bit is there an easy way to do small adjustments? I have to say the install is very easy, the only difficult part is that 3 of the nuts are hard to reach. But as long as you have the right tools then you wont have any issues. Both of the 5/8 nuts on top of the steering rack were kind of a pain, the only real problem bolt was the 12mm nut that required a swivel that attaches the rear dp to the bracket.
__________________
LeMans 135i ///M-sport 6MT
|
|
|
Appreciate
0
|
| 11-28-2009, 07:34 PM | #7 |
|
They like my Swag...
433
Rep 3,762
Posts
Drives: 15 GSM 435i GC
Join Date: Aug 2008
Location: South Dakota
|
Great write-up.
__________________
 2015 435i Gran Coupe - Current 2008 AW 135i - Sold |
|
Appreciate
0
|
| 11-30-2009, 09:53 PM | #9 |
|
First Lieutenant
14
Rep 395
Posts |
for everyone wondering about the steering rack: I just bolted the steering rack back into place while keeping the wheels straight. With the car still jacked up and the steering rack mounted I could then move the steering wheel back to the center position without moving the wheels. After that I drooped the car back on the ground and everything was back to normal. It feels perfectly centered to me, it probably is a hair off but I cant tell so it really doesn't matter.
__________________
LeMans 135i ///M-sport 6MT
|
|
Appreciate
0
|
| 01-23-2011, 09:06 PM | #11 |
|
They like my Swag...
433
Rep 3,762
Posts
Drives: 15 GSM 435i GC
Join Date: Aug 2008
Location: South Dakota
|
Thanks to the OP for the DIY. I used it today for my Racelands. Worked like a charm.
There is one thing I would like to add. If you do not line the V-Band clamps back up properly (specifically the bolt), it may interfere with and block the wastegate actuator arm. Ask me how I know  If you install the DP's and drastically lose power, throw 30FF codes etc. Check to see if this is the reason. If the actuator arm can't move, it cant close and let the system build boost. 
__________________
2015 435i Gran Coupe - Current 2008 AW 135i - Sold |
|
Appreciate
0
|
| 01-23-2011, 11:33 PM | #12 |
|
Major General
 159
Rep 5,689
Posts |
This is the single most helpful DIY I have come across

__________________
 Legal Disclaimer: Anything I or anyone else says about my vehicle on this website(1addicts.com or any affiliated or nonaffiliated sites), pertaining to modifications, is only to gain acceptance from my/our peers, and does not actually represent anything actually existing on my car, and thus, cannot be held against me in any issues, i.e. warranty claims, that may arise. Legal Disclaimer: Anything I or anyone else says about my vehicle on this website(1addicts.com or any affiliated or nonaffiliated sites), pertaining to modifications, is only to gain acceptance from my/our peers, and does not actually represent anything actually existing on my car, and thus, cannot be held against me in any issues, i.e. warranty claims, that may arise. |
|
Appreciate
0
|
| 04-22-2011, 11:32 PM | #13 | |
|
Major

36
Rep 1,054
Posts |
Quote:
__________________
JB4 beta 15 ohms FSB,AEM inline filter/ CM 10, ETS fmic, ER custom made charge pipe,TSW Donnington 18's,Simitumo HTRZ3, Injen DCI, AR DPs, Forge DVs, AA SLD, Koni FSD, ZSP springs.
|
|
|
Appreciate
0
|
| 04-24-2011, 12:06 PM | #14 |
|
They like my Swag...
433
Rep 3,762
Posts
Drives: 15 GSM 435i GC
Join Date: Aug 2008
Location: South Dakota
|
Its possible to rotate the clamp so that the bolt isnt in the actuator path at all. If it is in the way, you will see a lower than normal boost pressure
__________________
2015 435i Gran Coupe - Current 2008 AW 135i - Sold |
|
Appreciate
0
|
| 05-13-2011, 11:16 AM | #15 |
|
Colonel
131
Rep 2,408
Posts |
Thanks for the responses guys hopefully it made it as easy as possible. Hondagonerogue that would of defiantly sucked to find out after everything was back together.
|
|
Appreciate
0
|
| 05-29-2011, 03:27 AM | #16 |
|
Banned
6
Rep 117
Posts |
Great write up! Its still helping people with installing their dp's 2 years later. FWIW I was able to install without unbolting the steering rack...didn't have the Torx socket so I just went for it. Real tight but it works.
|
|
Appreciate
0
|
| 11-23-2013, 11:24 PM | #17 |
|
The Crowing
111
Rep 2,005
Posts |
I know this is a resurrection but this is the first search I came across that had helpful insight to the position of the sensors. So here is my question. I am hunting down a misfire problem and both bank/ all 4 sensors bad codes. I replaced 2 the other day and noticed something after reading this DIY. Is everyone sure that both the gray sensors go on the same dp? And both the black sensors go on the same dp's. I've had ses light since dp install and I noticed I have the downstream sensors colors swapped. So black and gray on the same dp. Got really bad misfire codes and at points un drivable with misfires in limp mode. Also shuddering at low throttle but increase throttle got rid of that. As long as I didn't go wot for very long it would be ok. Please someone help me with this. After changing 2 sensors and battery unplugged for about 20 mins, it ran great for about 20 mins, not shuttering and no limp mode. Then went back to ses and misfiring. I'm hoping I have the rear sensors installed backwards. Gray with gray and black with black? Thanks in advance.
__________________
 2009 135i : BMS JB4 G5 ISO,CXRacing FMIC Kit,Injen Cold Air Intake,Evolution Raceworks Charge Pipe,Walboro Inline Fuel Pump, E85 BMS Backend Flash w/ 60% E85,BMS Meth injection (trunkmount),BMS dual meth nozzles,Spec stage 2+ clutch w/ steel SWFW,BMS Catless Downpipes,Berk Tech Race Axleback |
|
Appreciate
0
|
Post Reply |
| Bookmarks |
|
|


