

|
|
|
|
|
| 03-30-2014, 07:14 PM | #23 |
|
Brigadier General
 459
Rep 4,531
Posts |
Well here is my problem.
I was able to successfully clear the sealant out of the fender via steel wire brush thing and a dremel. However when I went to go roll, I came into a pretty serious issue. Because of the new suspension, it doesn't droop much compared to OEM...so now the tool can physically get underneath the fender to start pushing the fender up. I tried all configurations, and while some do get me underneath the fender...they "bottom out" and dont have any more range of adjustability so I do not have any pressure to push against. Pics: 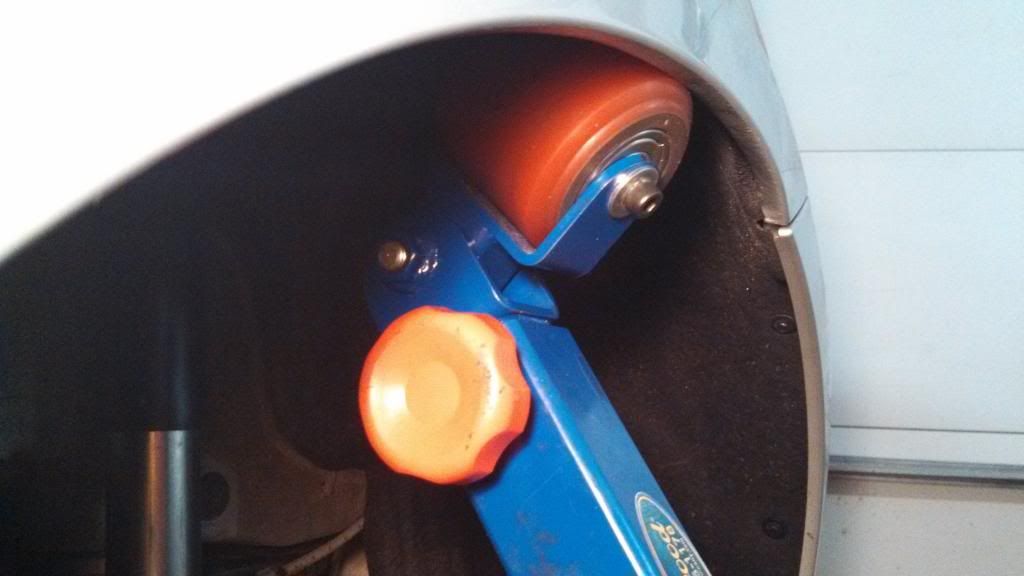  Odd angle, but really the only spot where I was able to start getting a decent roll. However I couldn't get the right angle and starting pulling the fender too much, and called it quits for now. I may just have a shop do it. 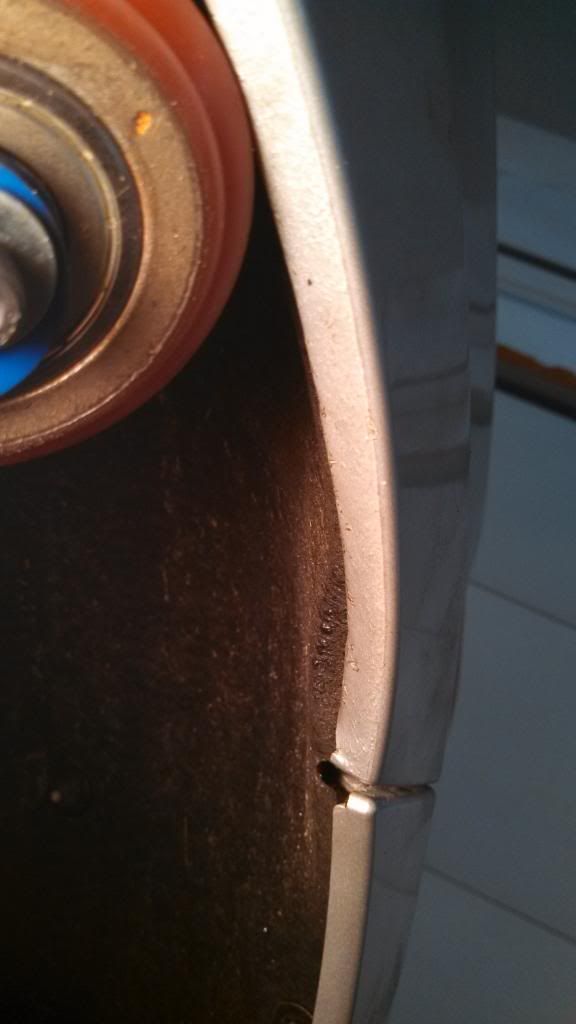 |
|
Appreciate
0
|
| 03-31-2014, 11:28 AM | #24 |
|
Lieutenant
 170
Rep 445
Posts
Drives: 2018 X3 M40i
Join Date: Oct 2013
Location: Milky Way, Earth, North America, Arizona more specifically.
|
Looks like the limited space with the non OEM suspension is an issue for sure... but judging by the pics, where is the jack placed? Form here it looks like under the suspension arm, which of course would not "help" any.
If you support the car by the jacking points, you SHOULD be able to pull the hub assembly far down enough the gain an extra couple of inches. You may have to disconnect the rear sway to help.
__________________
"Since light travels faster than sound, some people appear bright until you hear them speak". |
|
Appreciate
0
|
| 03-31-2014, 12:28 PM | #25 | |
|
Brigadier General
459
Rep 4,531
Posts |
Quote:
At this point I'm just going to have a shop do it (Koala Motorsports). I got my fronts rolled, so borrowing the tool was indeed worth it. It is just these rears are a PITA |
|
|
Appreciate
0
|
| 03-31-2014, 12:36 PM | #26 | |
|
Lieutenant
170
Rep 445
Posts
Drives: 2018 X3 M40i
Join Date: Oct 2013
Location: Milky Way, Earth, North America, Arizona more specifically.
|
Quote:
|
|
|
Appreciate
0
|
| 11-02-2014, 08:05 PM | #27 |
|
Lieutenant General
2282
Rep 12,565
Posts
Drives: Z4 M, X5, GX460
Join Date: Apr 2008
Location: CT
iTrader: (99)
Garage List F15 X5 xDrive35i [8.75]
E86 Z4 M [10.00] F10 550i (Retired) [9.17] F25 X3 xDrive35i (R ... [9.43] E82 135is (Retired) [9.50] E85 Z4 M (Retired) [9.41] E90 328i xDrive (Re ... [9.25] E86 Z4 3.0si (Retired) [9.22] |
Thread bump -- what exactly is the purpose of this sealant between liner and fender? Is there any negative effect from removing it?
__________________
Follow
|
|
Appreciate
0
|
| 11-03-2014, 07:47 AM | #28 | |
|
Brigadier General
459
Rep 4,531
Posts |
Quote:
However, when I removed mine, prior to rolling I took undercarriage liner spray and sprayed some back where I removed it, then proceeded to roll. |
|
|
Appreciate
0
|
| 11-03-2014, 12:38 PM | #29 |
|
Major
 
81
Rep 1,051
Posts |
I imagine it also plays a part in rust prevention so water/salt doesn't sit inside the lip.
__________________
2009 BMW 135i 6MT Sport, AFE intake, Cobb AP, Apex 18x8.5+9.5, 255/275 PSS
|
|
Appreciate
0
|
| 11-03-2014, 04:57 PM | #30 |
|
California-bound

385
Rep 1,480
Posts |
It's for rust prevention and panel bonding. I believe that the quarters on these cars are bonded to the structure and not just welded.
__________________
Streets of Willow: 1:27.7 CW 11/15/15; 1:29.5 CCW 8/15/15 |||| Autoclub Speedway ROVAL (CCW): 1.52.6 - 12/2/17
Willow Springs - Big Willow (CW): 1:35.8 - 3/31/18 |||| Buttonwillow #13 (CW): 1:59.3 1/27/18 https://www.facebook.com/JakeStumphRacing |||| http://www.youtube.com/user/RaceMeMZ3 |
|
Appreciate
0
|
| 03-21-2015, 06:06 PM | #31 |
|
Enlisted Member
 1
Rep 31
Posts |
Resurrecting this old thread. Has anyone else had any easier methods of removing this sealant? I'm in the same scenario here. I spent about 4 minutes on the sealant and it wasn't giving away very easily at all. I imagine it would take many hours to remove it all with a Dremel, and I'm worried about damaging the fender in the process.
|
|
Appreciate
0
|
| 03-23-2015, 10:27 AM | #32 | |
|
Second Lieutenant

115
Rep 256
Posts |
Quote:
__________________
2014 X5 50i
 |
|
|
Appreciate
0
|
| 03-23-2015, 11:03 AM | #33 |
|
Brigadier General
827
Rep 3,856
Posts |
This looks like an absolute PITA, hope it works out for you though
EDIT: LMAO god damn thread revive got me again! Last edited by chris82; 03-26-2015 at 09:03 AM.. |
|
Appreciate
0
|
| 03-23-2015, 05:23 PM | #34 | |
|
Lieutenant
170
Rep 445
Posts
Drives: 2018 X3 M40i
Join Date: Oct 2013
Location: Milky Way, Earth, North America, Arizona more specifically.
|
Quote:
 From there you can grab it with some vice grips, and you should be able to tear it out, even if in 3" lengths. From there you can grab it with some vice grips, and you should be able to tear it out, even if in 3" lengths.Also helps if you're not doing this in sub-80F weather... that stuff is BARELY pliable.
__________________
"Since light travels faster than sound, some people appear bright until you hear them speak". |
|
|
Appreciate
0
|
| 03-23-2015, 08:04 PM | #35 | |
|
Enlisted Member
1
Rep 31
Posts |
Quote:
 Got 3 questions: 1. How much roll are you guys achieving? Any estimates on clearance? 2. How easy would it be to damage your fender while doing this? I can be quite clumsy at detail work like this, and getting a dremel at that angle seems pretty awkward. 3. What are you guys using to seal it all back up when you're done rolling? Last edited by digitallyblue; 03-23-2015 at 08:10 PM.. |
|
|
Appreciate
0
|
| 03-24-2015, 03:25 PM | #36 | |
|
Lieutenant
170
Rep 445
Posts
Drives: 2018 X3 M40i
Join Date: Oct 2013
Location: Milky Way, Earth, North America, Arizona more specifically.
|
Quote:
2. The grinding/cutting Dremel disks I used were small (maybe 1.5" diameter)... I could tell even by sound alone if it touched anything other than rubber/goop in the channel. 3. I am in Arizona, so moisture is far from a concern... but I would suggest probably squeezing in some RTV or silicone sealant into the channel once complete.
__________________
"Since light travels faster than sound, some people appear bright until you hear them speak". |
|
|
Appreciate
0
|
| 04-10-2015, 03:41 PM | #37 |
|
California-bound
385
Rep 1,480
Posts |
Bumping this up, will be rolling the rears soon. Before I dig into this, how do you remove the liner? I haven't been under the rear of the car in a while, is it all clips?
__________________
Streets of Willow: 1:27.7 CW 11/15/15; 1:29.5 CCW 8/15/15 |||| Autoclub Speedway ROVAL (CCW): 1.52.6 - 12/2/17
Willow Springs - Big Willow (CW): 1:35.8 - 3/31/18 |||| Buttonwillow #13 (CW): 1:59.3 1/27/18 https://www.facebook.com/JakeStumphRacing |||| http://www.youtube.com/user/RaceMeMZ3 |
|
Appreciate
0
|
| 04-10-2015, 06:40 PM | #38 |
|
Colonel
 121
Rep 2,037
Posts
Drives: 2008 135 blk, blk, step
Join Date: Jan 2009
Location: Atlanta, GA
iTrader: (0)
Garage List 1994 Porsche 968 Cab [0.00]
2017 AMG GTS [0.00] 1994 Porsche 968 Coupe [0.00] 1977 Mercedes 450SE ... [0.00] 2008 135 [8.00] |
I'm not sure where it originates/attaches on the central side. The outside area is what needs adjusted/removed. It slices easily and cleanly. Most just cut it at the lip and then up much higher to remove the section. A sharp knife, etc will do it easily.
__________________
Injen, RR OCC, MadDad Whisper, donut spare, 19x8.5et43fr 19x9.5et45r Volk LE37's, rear fenders rolled/pulled, PSS4S 225/35fr 255/30r, KW V1's, AR coated catless dps, Cross strutbar, CF grills and license plate holder, iCarbon diffuser, ETS black anodized FMIC, M3 control arms, Quaife, ER chargepipe, ForgeDV's, Topspeed Custom Tune, V3sims, Braille, Andrey_GTA rear hub mod, Ebay Mstyle front bumper and performance style side skirts.
|
|
Appreciate
0
|
| 04-10-2015, 11:36 PM | #40 | |
|
California-bound
385
Rep 1,480
Posts |
Quote:
__________________
Streets of Willow: 1:27.7 CW 11/15/15; 1:29.5 CCW 8/15/15 |||| Autoclub Speedway ROVAL (CCW): 1.52.6 - 12/2/17
Willow Springs - Big Willow (CW): 1:35.8 - 3/31/18 |||| Buttonwillow #13 (CW): 1:59.3 1/27/18 https://www.facebook.com/JakeStumphRacing |||| http://www.youtube.com/user/RaceMeMZ3 |
|
|
Appreciate
0
|
| 04-13-2015, 11:13 AM | #41 |
|
Second Lieutenant
115
Rep 256
Posts |
I pulled my fender liner out to do the roll then put it back in. Make sure you leave a little bit of gap when doing the fender so the liner can slot back in.
I didnt cut my fender liners at all. You can "remold" them using your heat gun. Just heat up the fender liner and press hard with a cold wet rag. This changes the shape enough so you wont rub on the liner.
__________________
2014 X5 50i
|
|
Appreciate
0
|
| 04-15-2015, 02:17 PM | #42 | |
|
Second Lieutenant
18
Rep 205
Posts |
Quote:
When you say you netted 5mm from rolling, are you talking about the rear fenders only? I'm curious how much clearance there is to be gained in the front fender from rolling alone. There is obviously much less of a lip to work with there.
__________________
[SIZE="1"]JB4 ISO, PURE Turbo Stage 1 v2, Megan DP, 5" stepped VRSF FMIC, AFE CAI, Fuel-it Stage 1 inline LPFP, ER Charge Pipe, KWV3 w/swift spring conversion, M3 Front Control Arms, e90 M3 FSB, Whiteline RSF Inserts, Dinan Camber Plates
|
|
|
Appreciate
0
|
| 04-20-2015, 05:45 PM | #43 | |
|
Lieutenant
170
Rep 445
Posts
Drives: 2018 X3 M40i
Join Date: Oct 2013
Location: Milky Way, Earth, North America, Arizona more specifically.
|
Quote:
__________________
"Since light travels faster than sound, some people appear bright until you hear them speak". |
|
|
Appreciate
0
|
| 06-01-2015, 12:53 PM | #44 |
|
California-bound
385
Rep 1,480
Posts |
Bumping this up. Got started on the rears of the car last night (fronts were as easy as any of my other cars I've done). I ground pretty much ALL of the sealant out of the wheel arch as could be done. It took about 4 hours to get all of it out. The backside of the fender lip is smooth metal, i.e. minimal residual rubber/sealant.
I have started to roll the rears, but they aren't giving very much. Does anyone have any pictures of what their fender lips actually look like after being rolled? I want to see how far to push them before giving up. Using this handy pic found in this thread: 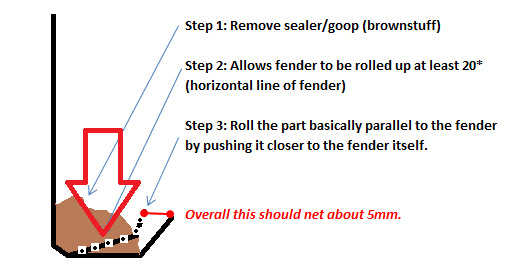 Does the portion of the fender lip that the big red arrow is pointing towards roll flat? The "Step 3" section seems to be coming along, but the bulk of the fender lip doesn't really want to go. Is this as far as the fender will go?  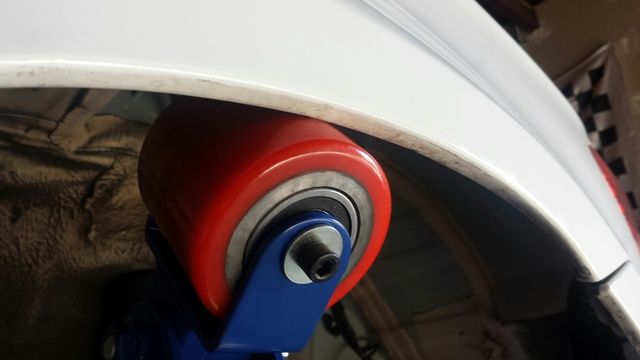
__________________
Streets of Willow: 1:27.7 CW 11/15/15; 1:29.5 CCW 8/15/15 |||| Autoclub Speedway ROVAL (CCW): 1.52.6 - 12/2/17
Willow Springs - Big Willow (CW): 1:35.8 - 3/31/18 |||| Buttonwillow #13 (CW): 1:59.3 1/27/18 https://www.facebook.com/JakeStumphRacing |||| http://www.youtube.com/user/RaceMeMZ3 |
|
Appreciate
0
|
Post Reply |
| Bookmarks |
|
|


