


|
|
|
 |
| 07-19-2016, 11:10 PM | #1 |
|
Lieutenant
   108
Rep 487
Posts |
1M rep bumper install with 1M ducts.
Updated 7/29:
1m rep bumper back from paint removed old bumper installed passenger side duct installed driver side duct Installed 1m rep bumper. Fitment review: Overall, fitment is 7/10. -There's about a 2' gap between the bottom of fender liner and bottom of bumper, on each side. -I had to drill new holes on the underside of bumper so it would bolt securely to the under tray. -There's a nearly identical gap on both sides, between bumper and duct. All fitment pictures at end of post. I am almost certain I forgot something, so if I did or if anyone has questions, please feel free to ask away. I used the very helpful 1m conversion thread created by user TUN3D as a ROUGH TEMPLATE. Purchased 1M rep bumper from a vender local to me in SoCal (**********s). Bumper does not come with holes for headlight washers, so they have been coded out. It does come with Foglight vents/clips and mounting points. I will be retrofitting the 1m ducts, relocating my horns to accommodate the driver side 1M duct.The passenger side duct is "plug and play" thanks to mounting points via the oil cooler. If you have an IS model, both passenger and driver side ducts will be "plug and play". My first step was to cut out the Foglight clips. Using a Dremel and some 1000 grit wet/dry sand paper. This was not at all hard to do, just tedious and time consuming. Unpainted 1M rep bumper   Removing passenger side duct. -There are 4, 8mm bolts that hold the stock passenger side duct in place. -You will only re-use 3 of these bolts when installing the 1m passenger duct. -The 2 left bolt heads are facing towards fender liner. -The middle bolt can be removed once the plastic oil cooler vent located in the fender liner is removed.(4 8mm bolts) 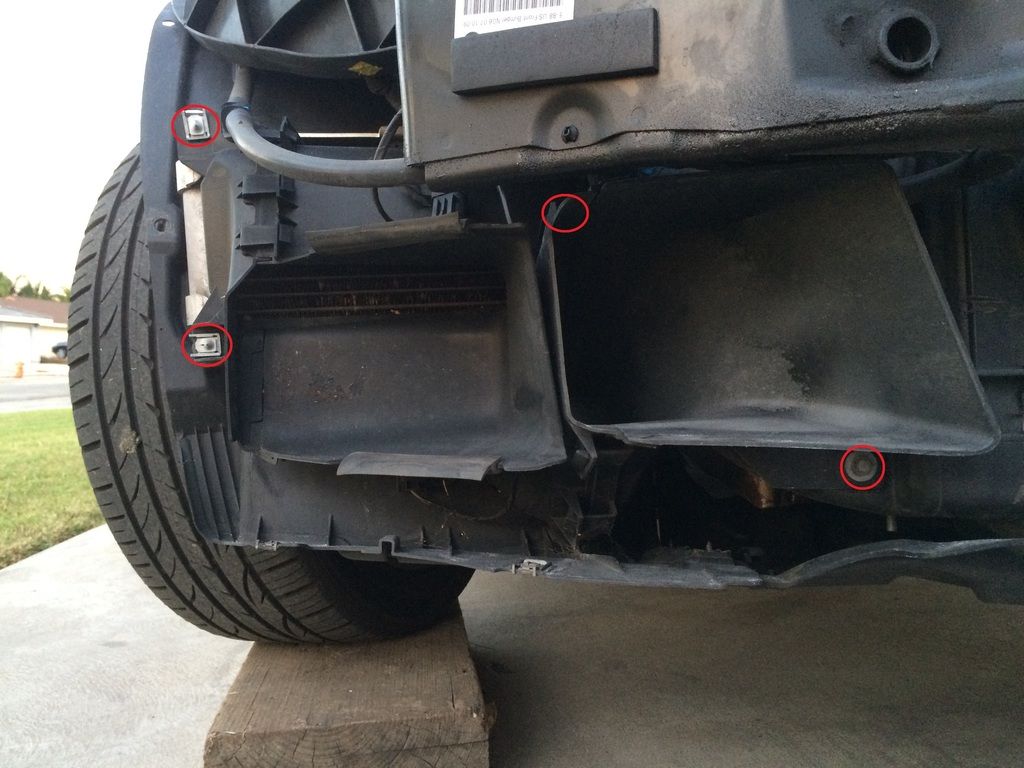 Plastic vent removed from fender liner, last bolt is now accessible. 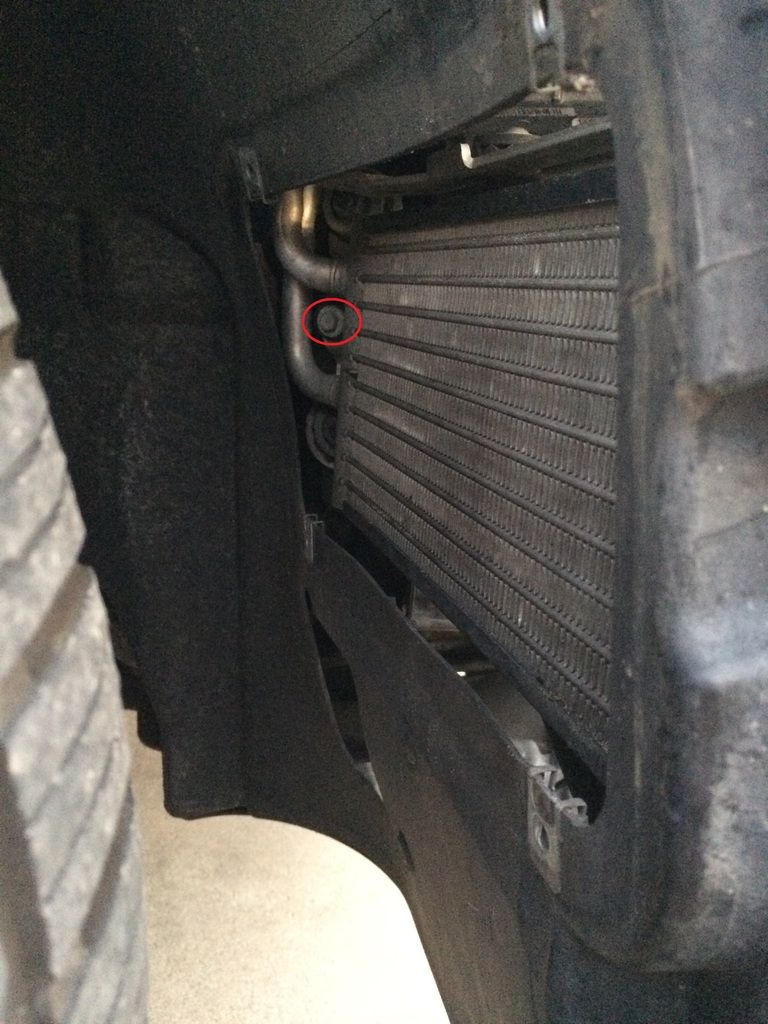 Stock ducts removed. 3 mounting points for 1M duct circled. 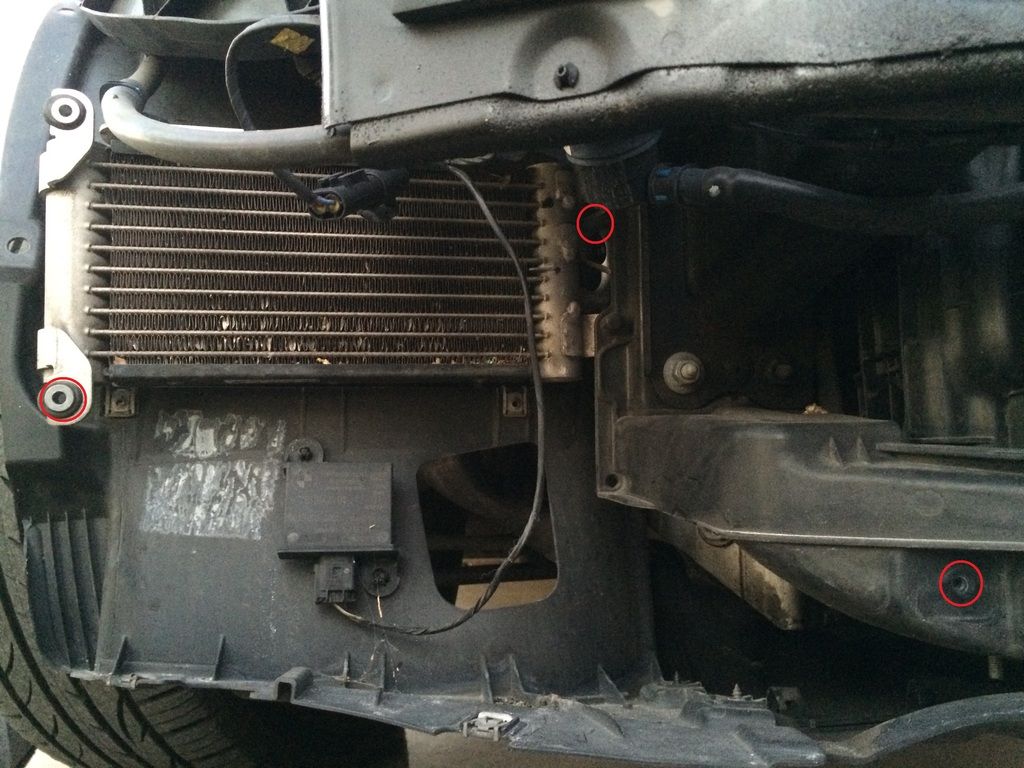 Removing drivers side duct. I forgot to take pictures before removing drivers side duct, its pretty self explanatory tough. Remove the 8mm bolts and bobs your uncle! I reused only 1 of 8mm bolts. Picture of 1m duct held in place, showing only reusable mounting point. 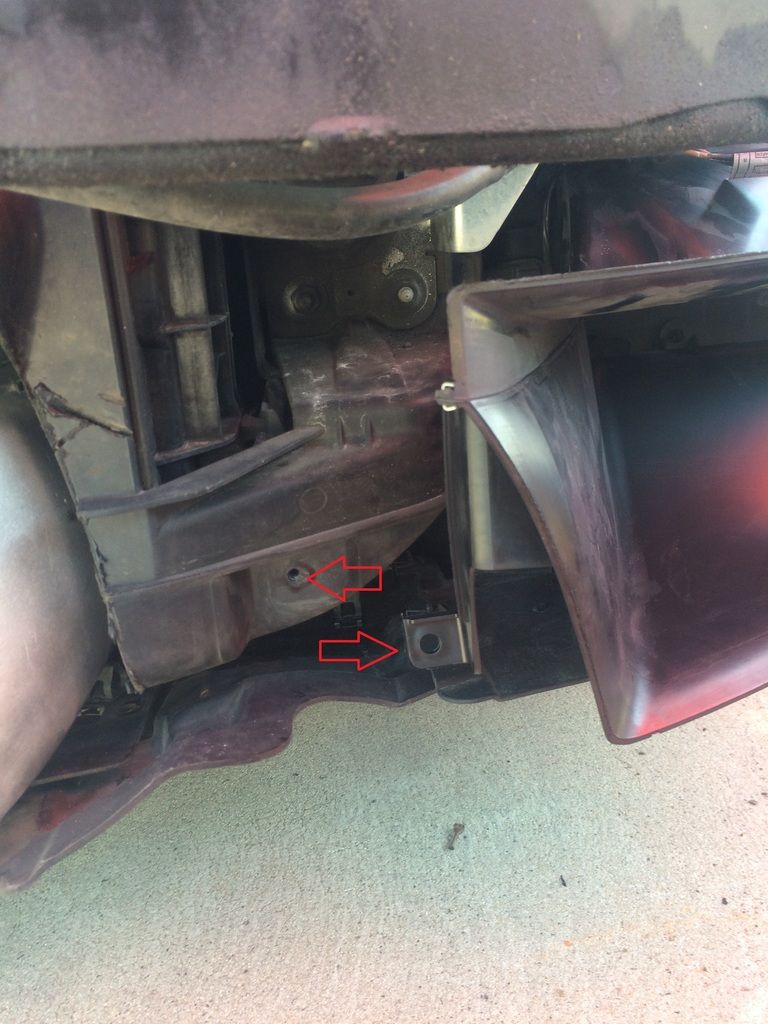 Installing 1M drivers side duct. For the 1M drivers side duct to align properly (without cutting the duct), you have to: -Remove horn bracket(this requires removing headlight) -relocate the horns to each side of bumper carrier -For the horns to have enough space to fit on ends of bumper carrier, you will FIRST have to remove headlight washers and the brackets they are attached to. Picture below shows how 1M duct cannot sit properly due to horns/bracket. 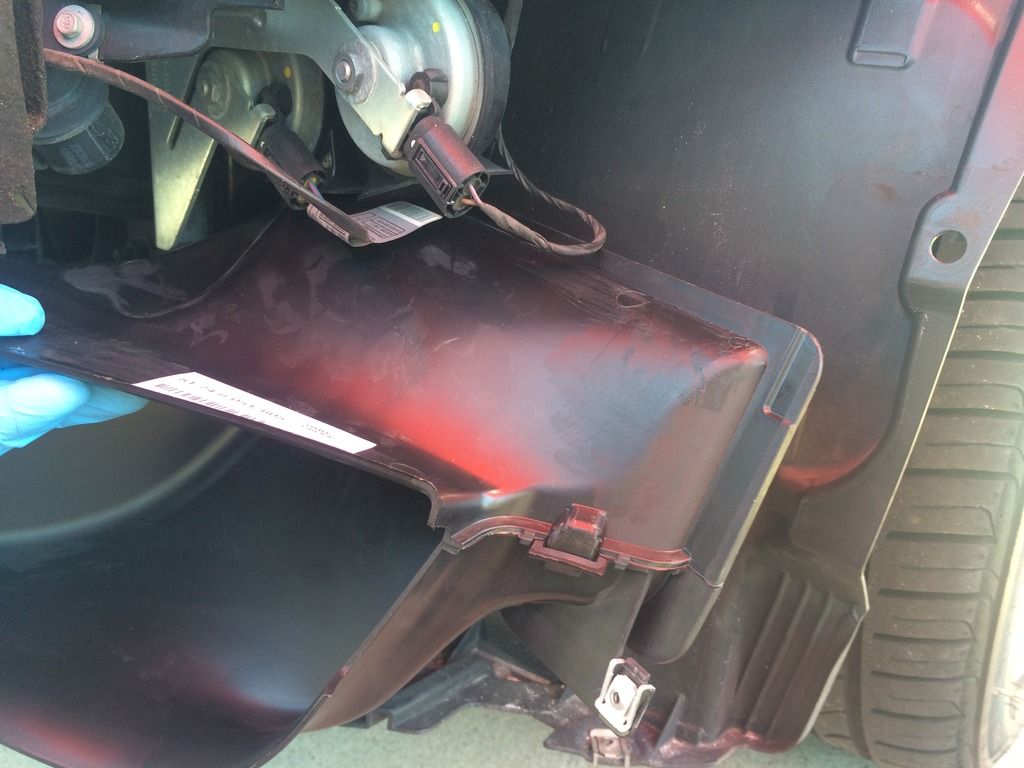 Removing headlight washers and washer brackets. -The washers are held in by 2 8mm bolts.(circled in red below) -The washer bracket(outlined in yellow) is held in place by two plastic rivets(circled in yellow bellow). I drilled the rivets out. 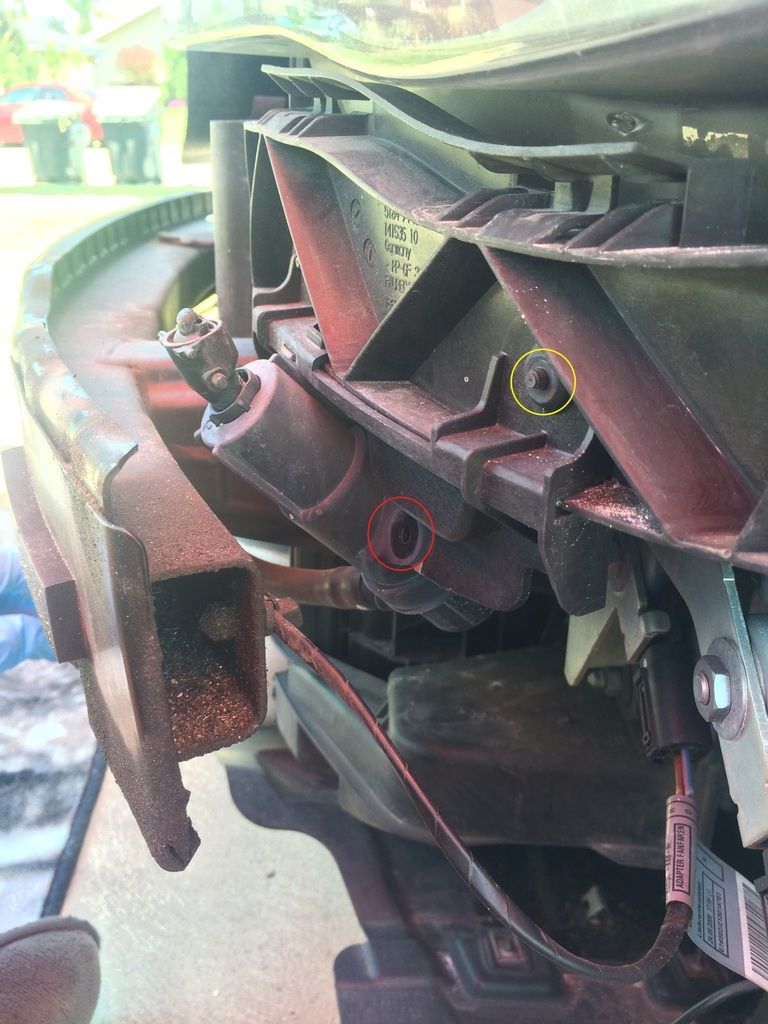 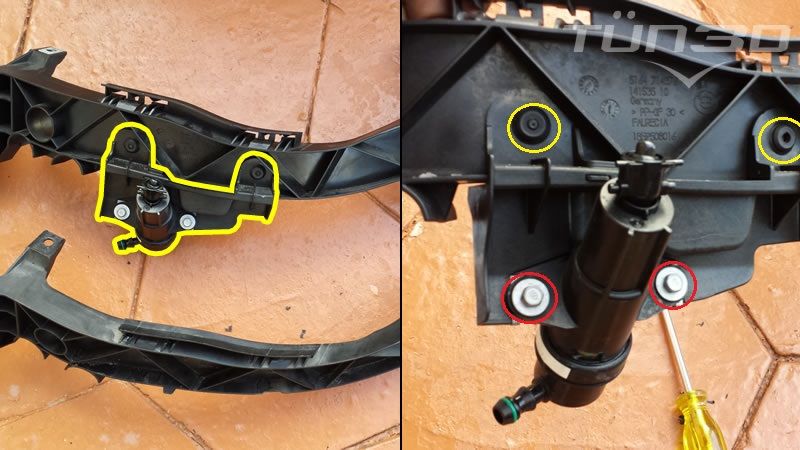 Picture below is of horn bracket. (headlight has already been removed at this point and horns removed from bracket) Removing horn bracket The bracket is held in place by 2 bolts(circled in red) and 2 metal rivets(circled in yellow). -Remove the two bolts -To remove rivets, drill them out. 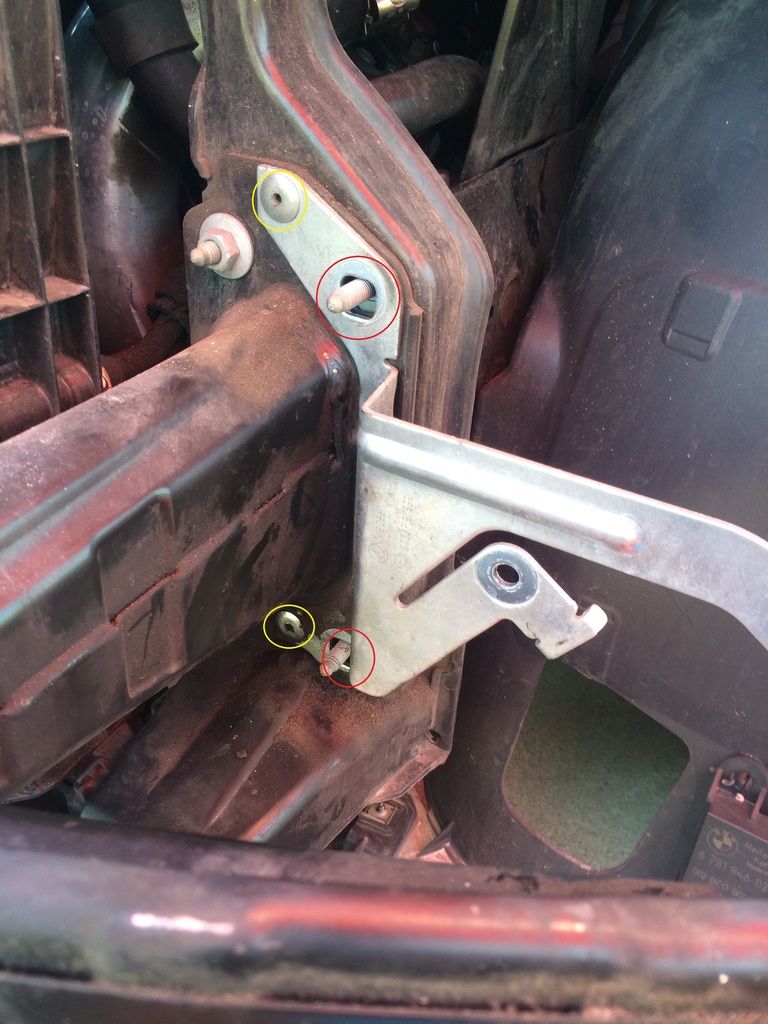 Relocating horns to ends of bumper carrier. -There are two holes at each of the bumper carrier that you can use to mount each horn. -Each hole needs to be slightly widened to accommodate the bolt that is attached to each horn. -Once holes are wide enough, simple reinstall and bobs your uncle! -Side note: Each horn has its own wire harness, the wires are held in by tie wrap push pins on backside of bumper carrier.Simple remove the push pins to have enough slack to relocate each horn. Driver side horn relocated, utilizing existing hole in bumper carrier(red arrow). 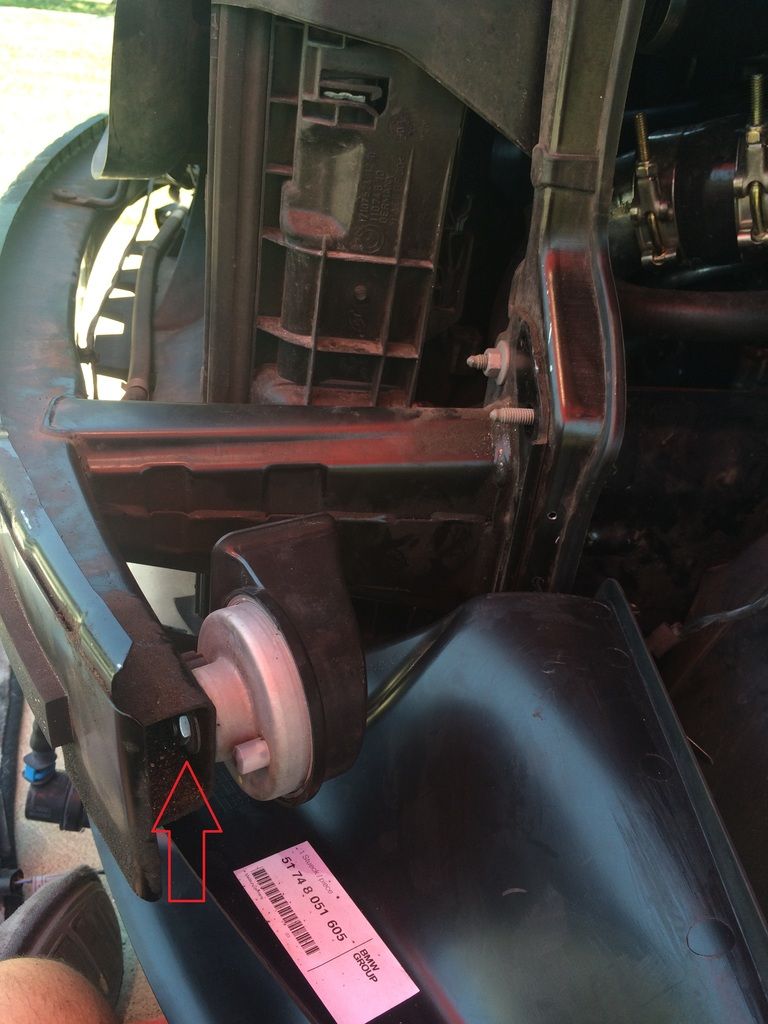 Passenger side horn relocated, utilizing existing hole in bumper carrier(red arrow). 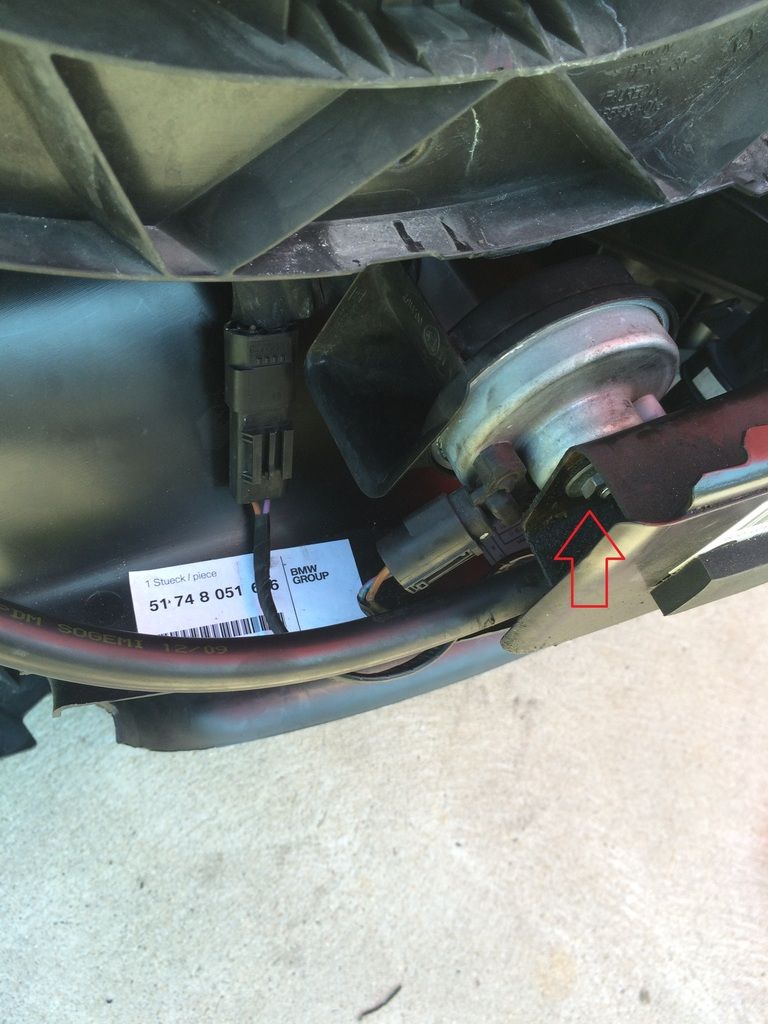 Mounting the duct. To mount the upper portion of duct i used a 3' bolt and 3 nuts. (I did not get exact measurements of bolt and nuts, just mixed and matched from the can of junk nuts/bolts i have in garage, my apologies.) -I secured bolt to frame with first nut via hole I drilled.(the first hole i drilled was to high, so had to try again  ) )-I then used the two remaining nuts to properly space/secure duct to bolt. Picture below shows how duct fits correctly without horn bracket. 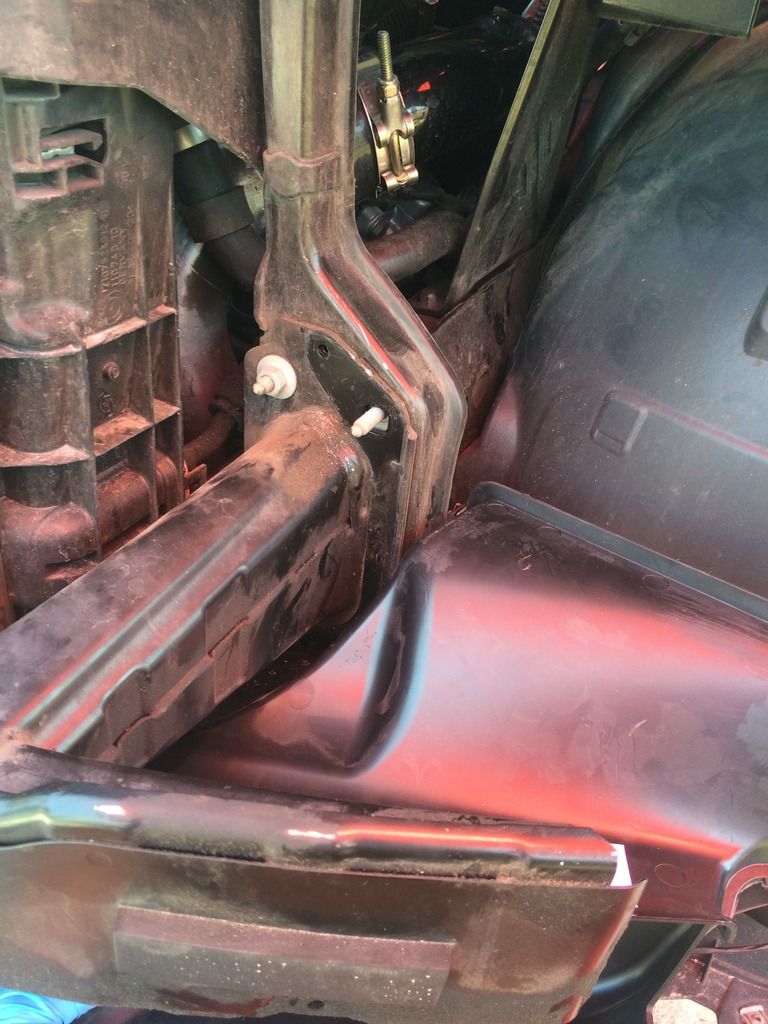 Picture below shows how I mounted the upper part of the duct to the frame.(zip tie was for mock-up purposes) 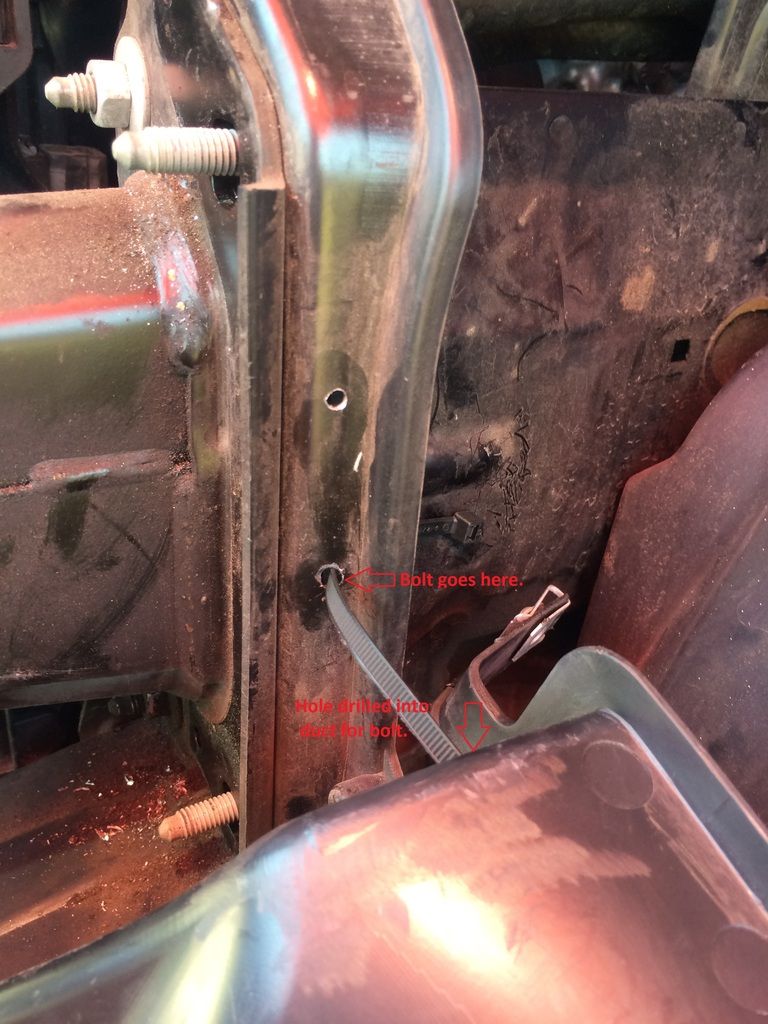 Clearance of OEM bumper 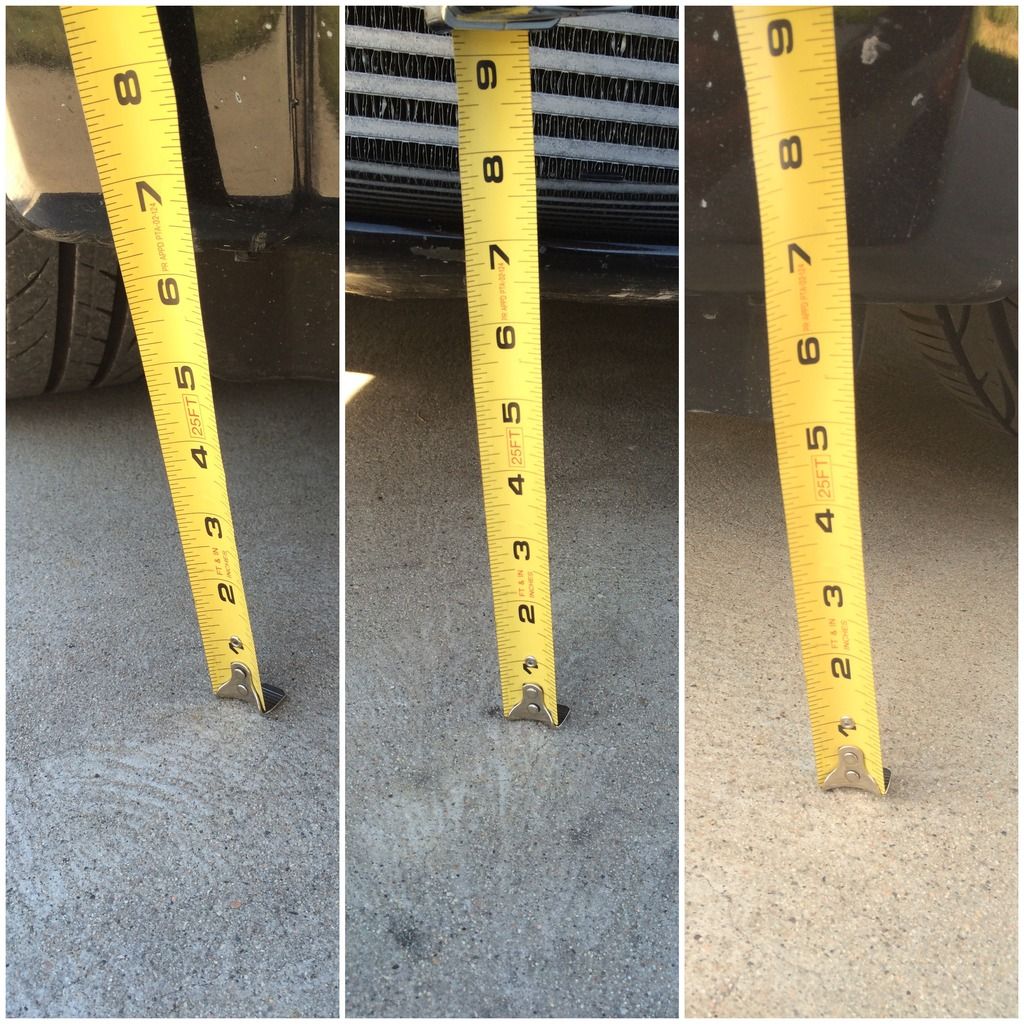 Clearance of 1M rep bumper. 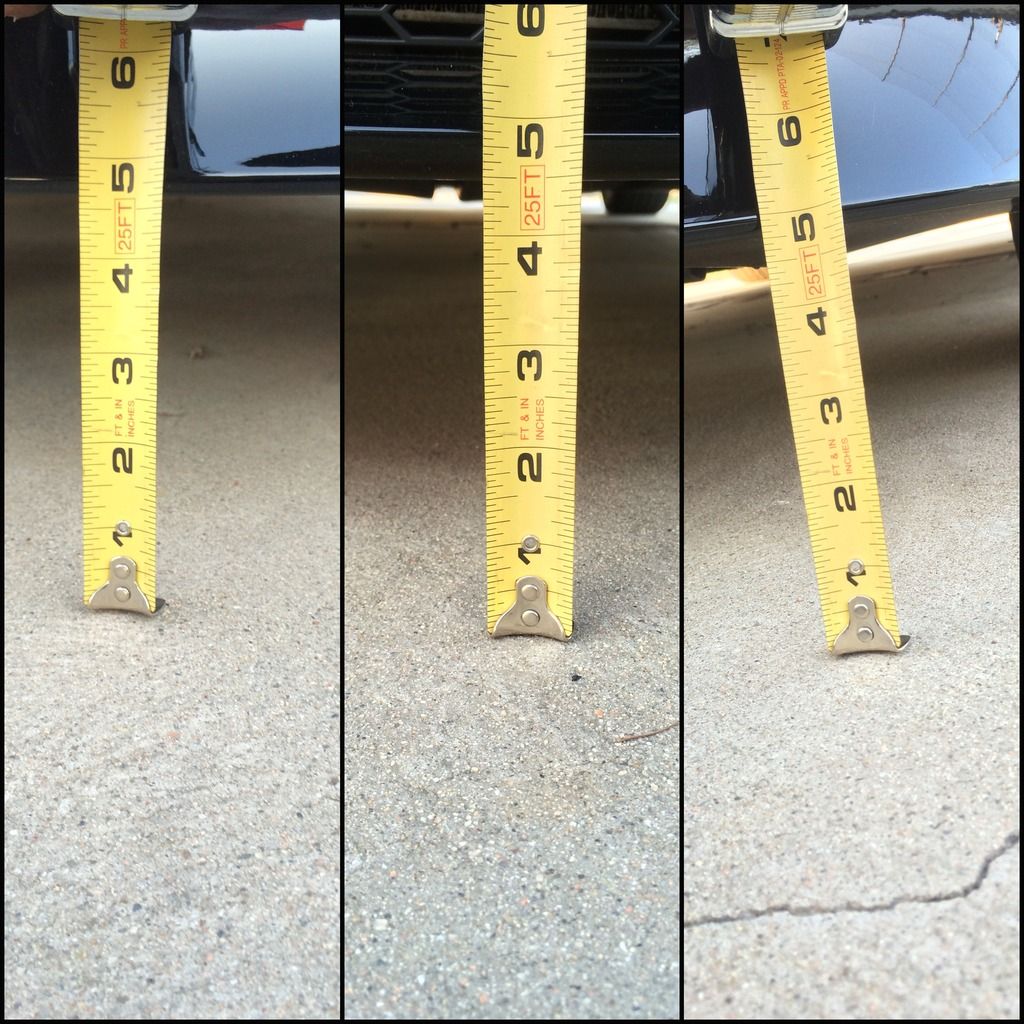 Passenger side fender liner gap 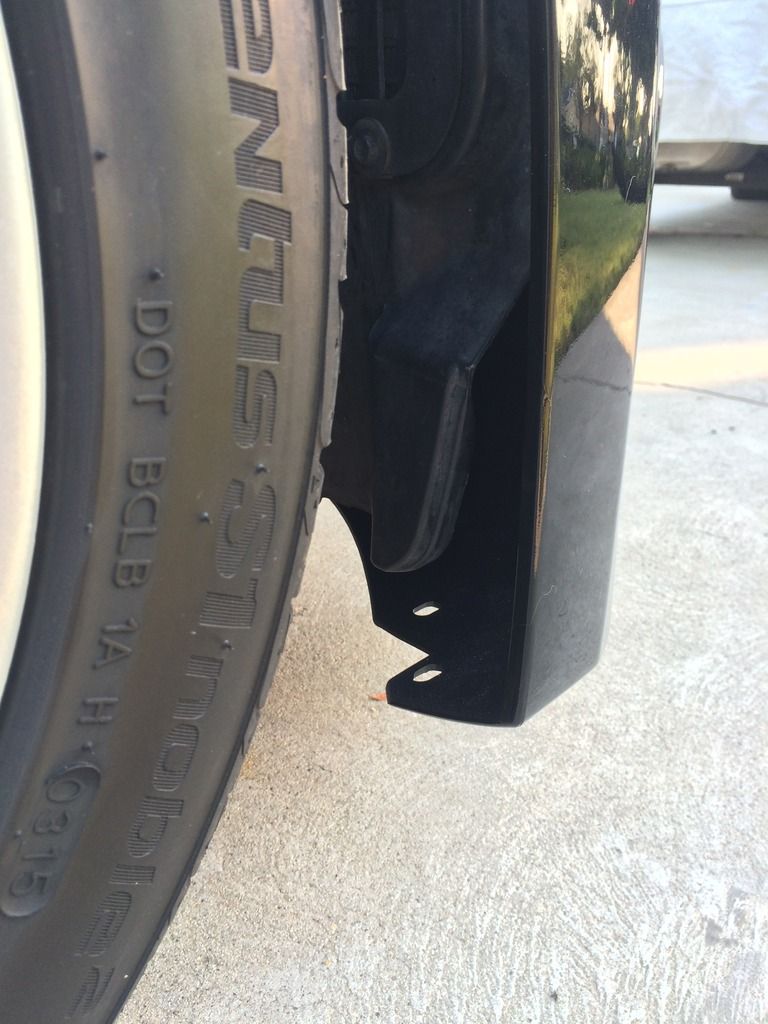 Driver side fender liner gap 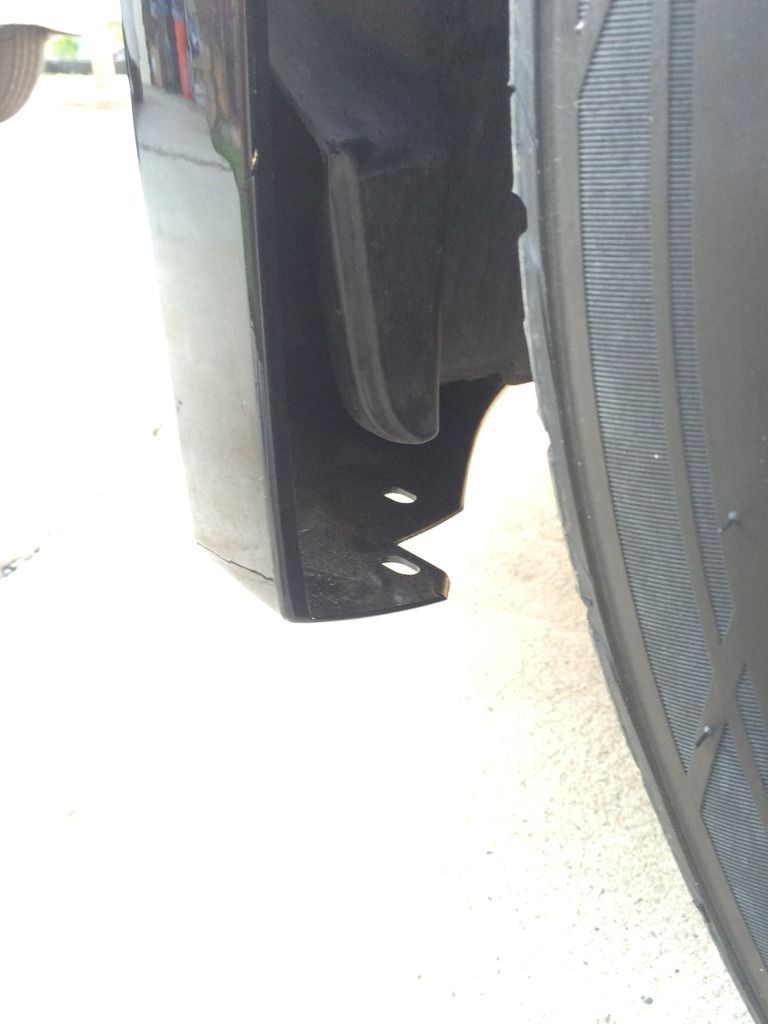 Passanger side bumper/duct gap 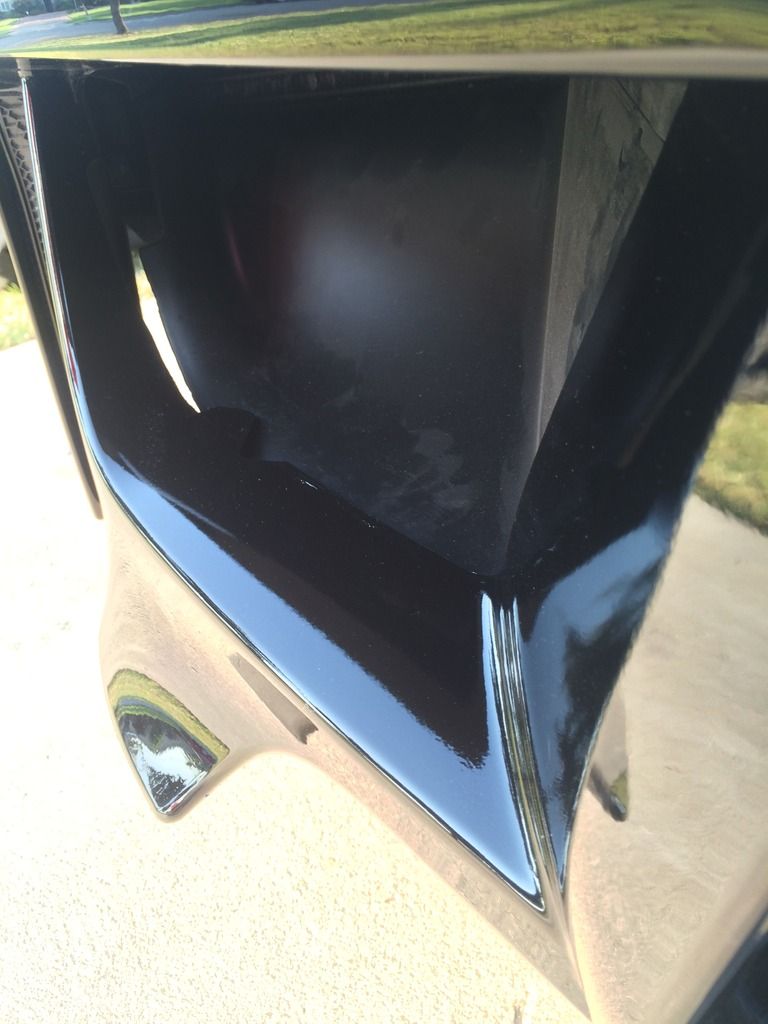 Driver side bumper/duct gap 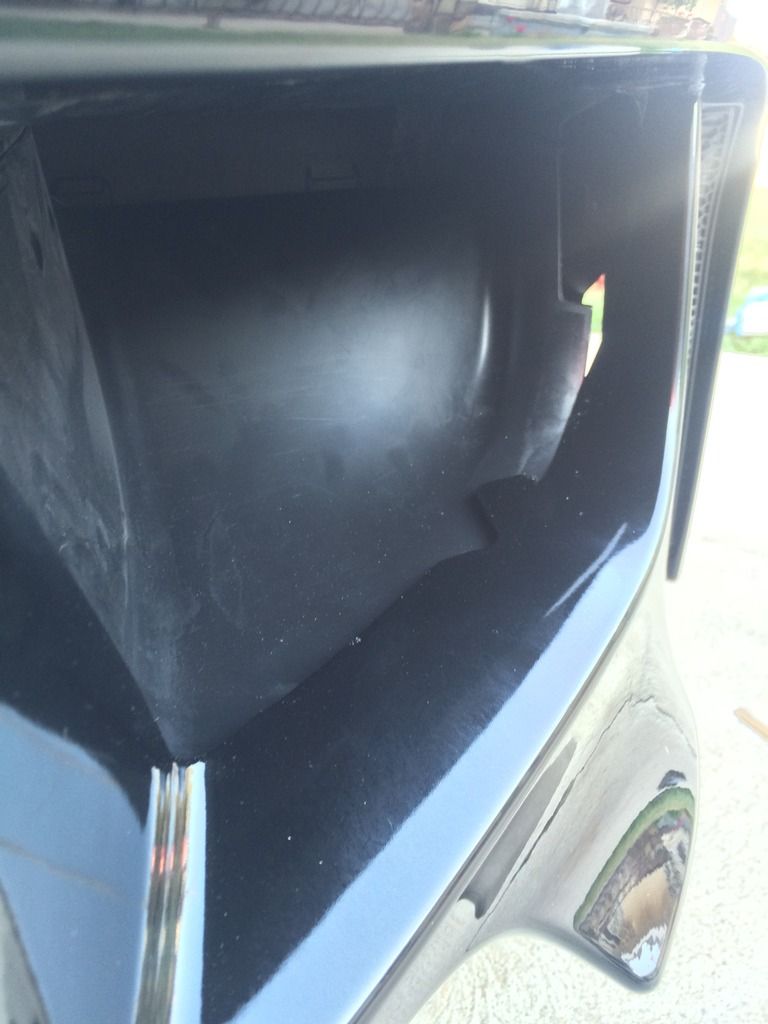 Last edited by 714_2er; 08-01-2016 at 03:06 AM.. |
| 07-27-2016, 09:47 AM | #4 |
|
BMW Master Tech

587
Rep 850
Posts
Drives: E30, E36, E82, E90, F10, F80
Join Date: Jan 2011
Location: SoCal
iTrader: (0)
Garage List 2015 Aston Martin V ... [0.00]
2010 Lamborghini LP ... [0.00] 1985 Alpina C2 2.7 [0.00] 2017 BMW M3 [0.00] 2008 BMW 128i [10.00] 2013 BMW 135is [0.00] 1992 BMW 325i [0.00] |
For the 135is guys, we have an additional radiator on the drivers side that the 1M duct bolts right up to. No modification needed.
__________________
135is #502 of 586
BMW LED Performance Wheel | OEM FULL Carbon Fiber | E9X M3 Gauge Cluster | E9X Exterior Mirrors | E9X M3 Full Suspension | E9X M3 Diff | PT-CAN2 Enabled | Bilstiens | Michelin PSS's | NBT Navigation Retrofit with Touch Pad |
|
Appreciate
0
|
| 07-28-2016, 03:04 AM | #5 | |
|
Lieutenant
   108
Rep 487
Posts |
I have no idea.
 We shall wait and see.lol Quote:
 |
|
|
Appreciate
0
|
| 11-02-2017, 11:16 AM | #6 | |
|
First Lieutenant
  
46
Rep 370
Posts |
Quote:
can u update the pic? |
|
|
Appreciate
0
|
| 12-18-2017, 10:07 AM | #7 |
|
King of Goodness

152
Rep 185
Posts
Drives: 2012 128i Coupe
Join Date: May 2017
Location: Dixie
|
Man, I wish the pictures showed up...my body shop is telling me mine will not fit...
Edit: The OP had it right...this is at best 7 of 10 fit. Wheel wells and the bottom tray are the biggest issue...wonder why they couldn't come up with something better than this? My install is on a 128i and I am using the foglights, so I don't have near the issues the 714_1er had to cope with. Hoping to see the pictures...I can host them on Imgur and post them if I can get the original files... Last edited by varoadking; 12-18-2017 at 05:24 PM.. |
|
Appreciate
0
|
| 12-21-2017, 03:16 PM | #8 |
|
King of Goodness

152
Rep 185
Posts
Drives: 2012 128i Coupe
Join Date: May 2017
Location: Dixie
|
Don't want to hijack the thread, but no real need to start another unless someone thinks I should.
My paint and body guy did a great job dealing with the 1M bumper on my 128i, and did the side skirts and a cheapo spoiler from TMS for me as well. I am well pleased with the overall look...     |
|
Appreciate
0
|
| 12-28-2017, 11:24 PM | #9 |
|
Loves me some MHD!

1855
Rep 1,718
Posts |
For those asking about the pics, they're still there, just hijacked by photobucket. If you're using firefox or chrome there is an extension you can use that brings the images back again!
https://addons.mozilla.org/en-US/fir...t-fix/?src=api https://chrome.google.com/webstore/d...alioapbifiaedg Worked for me, let me use this guide to install my 1M rep bumper
__________________
1and1
135i - E82.N54 2009 BSM - MHD / xHP / DCI, PR CP & 7.5" Race IC / N55 mid & Borla . . WL RSFI, Koni, Eibach & Dinan CP's, M3 CA's / EBC Red's & Firehawk 500's X1 - E84.N20 2013 MGM - JB4 - The Wife's, now with new turbo & ewg |
|
Appreciate
1
low1352210.50 |
Post Reply |
| Bookmarks |
| Thread Tools | Search this Thread |
|
|