BMW 1 Series Coupe Forum / 1 Series Convertible Forum (1M / tii / 135i / 128i / Coupe / Cabrio / Hatchback) (BMW E82 E88 128i 130i 135i)


Post Reply
 
Thread Tools Search this Thread
      06-09-2014, 01:13 PM   #1
Rated-M3
Enlisted Member
22
Rep
34
Posts

Drives: '98 M3, '10 128i
Join Date: Oct 2010
Location: Maryland

iTrader: (0)

DIY: 128i Power steering fluid filter change/fluid flush (Non-active steering models)

This guide is for cars without Active Steering that use CHF11s fluid only. Your original reservoir cap should have the sticker pictured below. The guide may be similar or applicable to active steering or other chassis’. Use the guide at your own risk.


Disclaimer: I am not responsible for any damage done to your vehicle or, any bodily harm or injuries as a result of following this guide. This is simply an informative procedure. Work on your vehicle at your own risk and always consider safety first.

I changed my power steering fluid based on my experience with my E36. The thing with BMW power steering fluid reservoirs is that they have a filter built in to them and are easily to replaced. I chose to do this service at 50k miles. I will see what the Blackstone Labs analysis says to better estimate a maintenance interval.

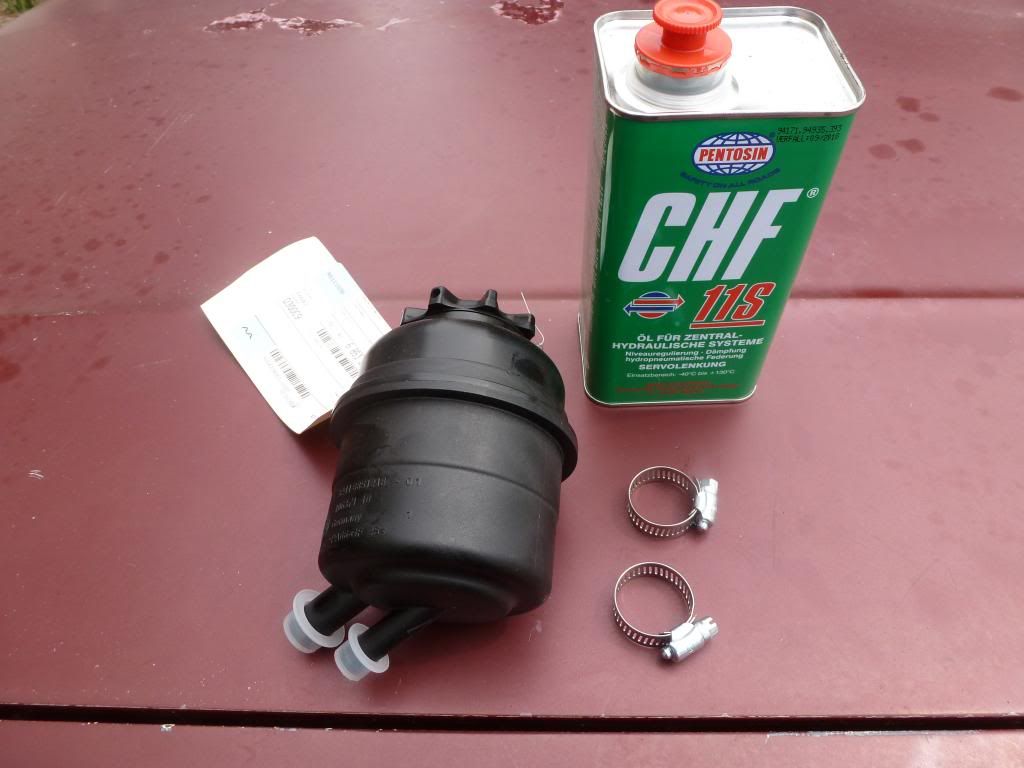
Parts list:
1qt Pentosin CHF11s (Maybe 2qts if you plan to drain and refill thoroughly)
32-41-6-851-218 Reservoir (Comes with new cap and seal)
07-11-9-906-463 Crush washers x2 per line (I didn't replace these)
Hose clamps (Sorry. I don’t have any size listed as these came from an assortment that I have. I used one of the smallest and one of the second to smallest.)


Tools
8mm socket
10mm socket or wrench
22mm wrench

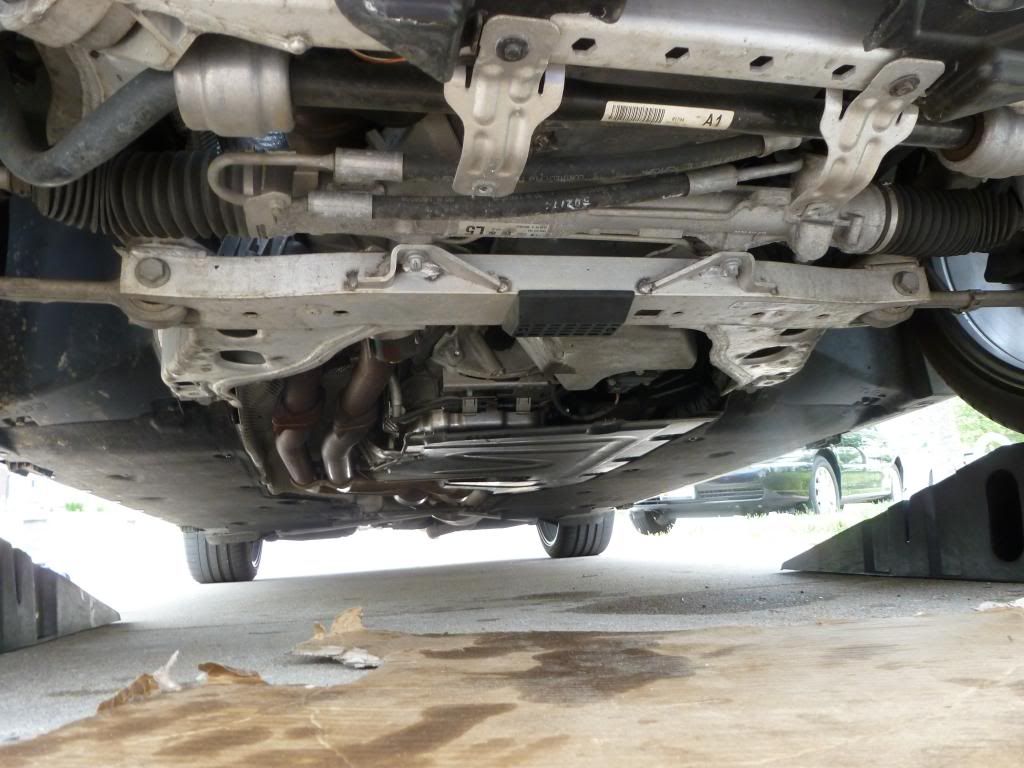
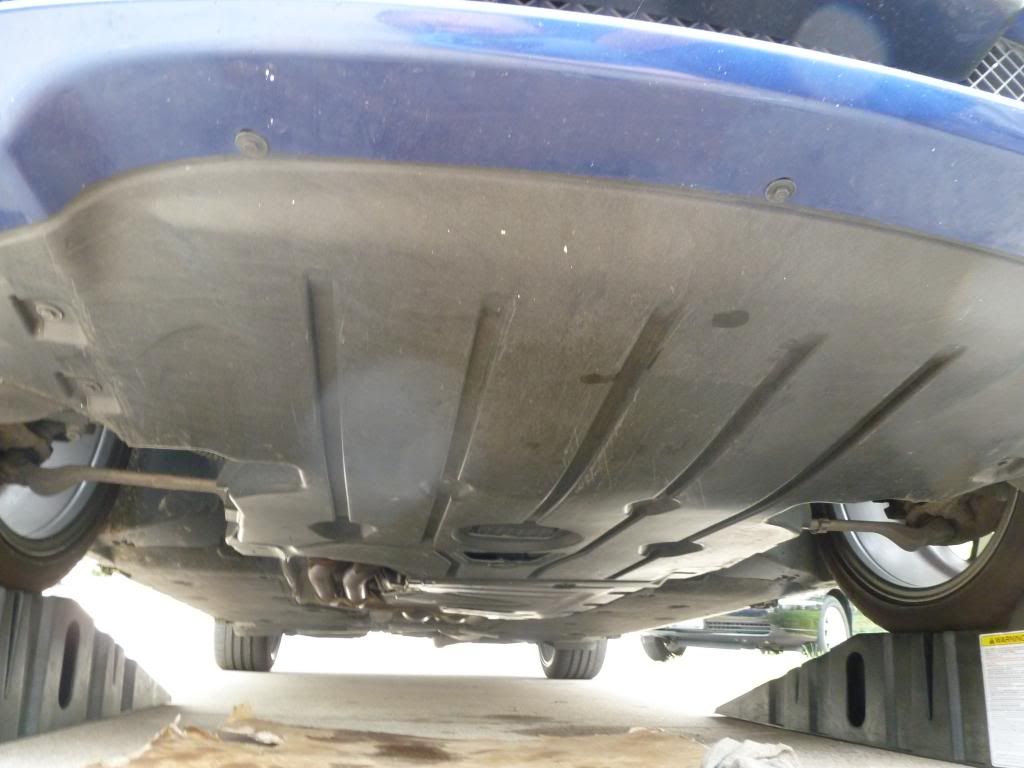
1. With the front of the car in the air, remove the front under panel covering the bottom of the engine. I believe I counted 17 bolts total. (8mm socket)


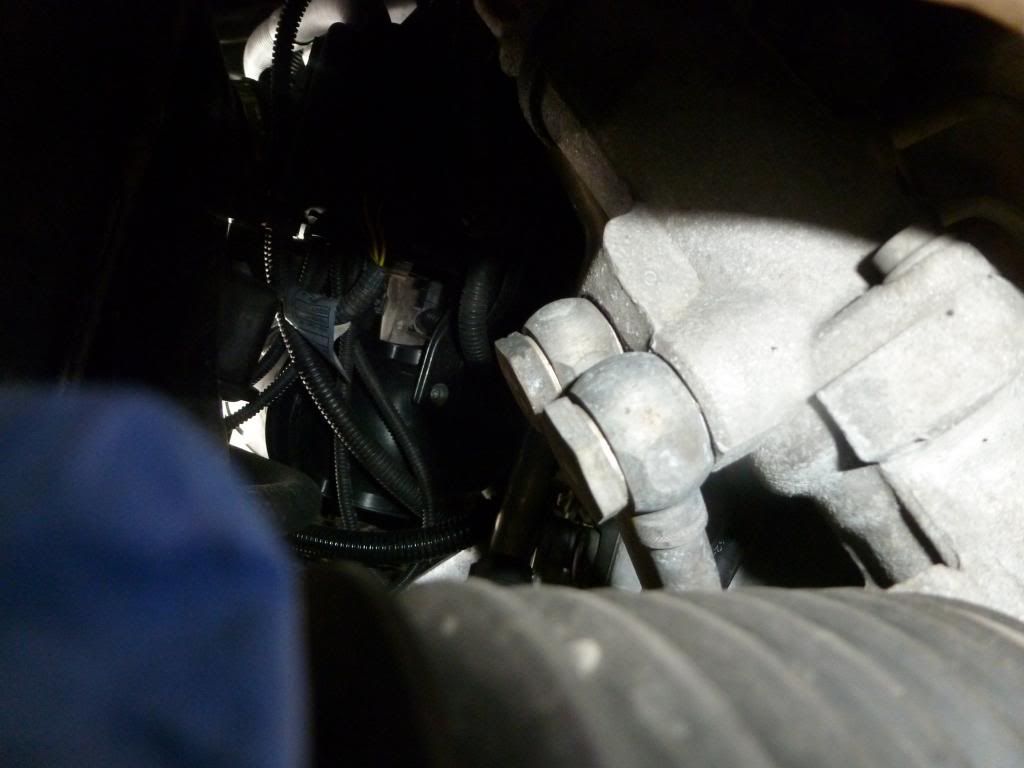
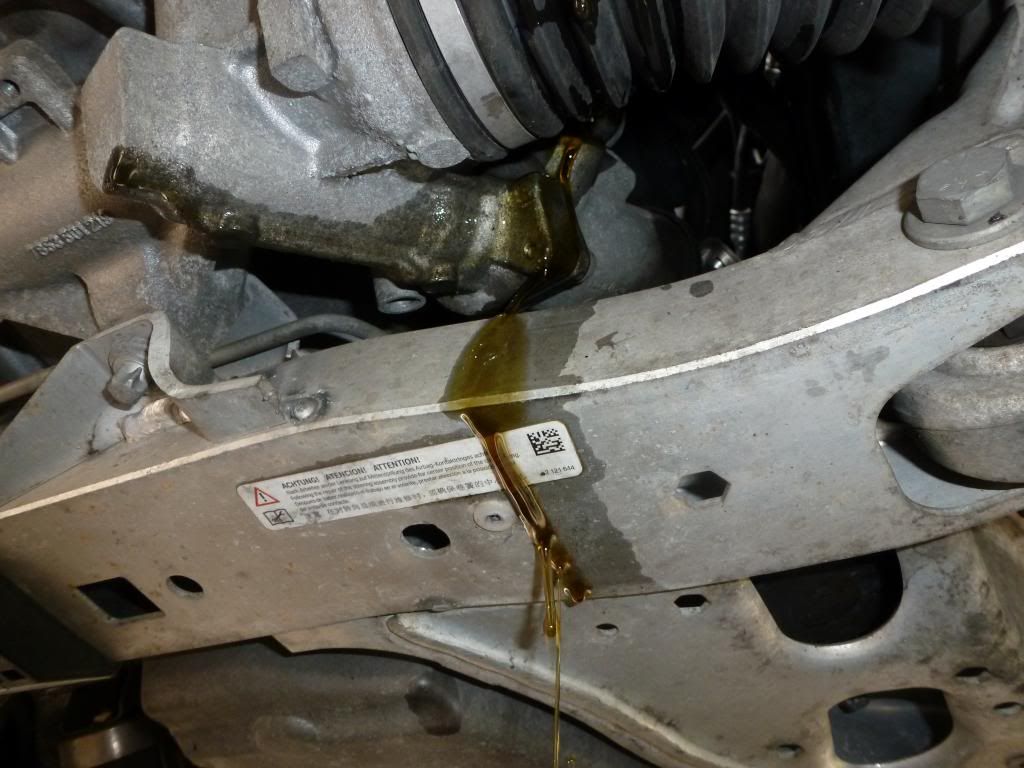
2. Locate the return and feed lines above the driver’s side steering rack boot.


3. Crack the bottom line to drain the fluid from the reservoir (22mm wrench). I didn’t think ahead that I may need new crush washers. You could probably drain more fluid by cracking the other line too. I opted not to in order to minimize the number of parts I touch in case a leak springs up.


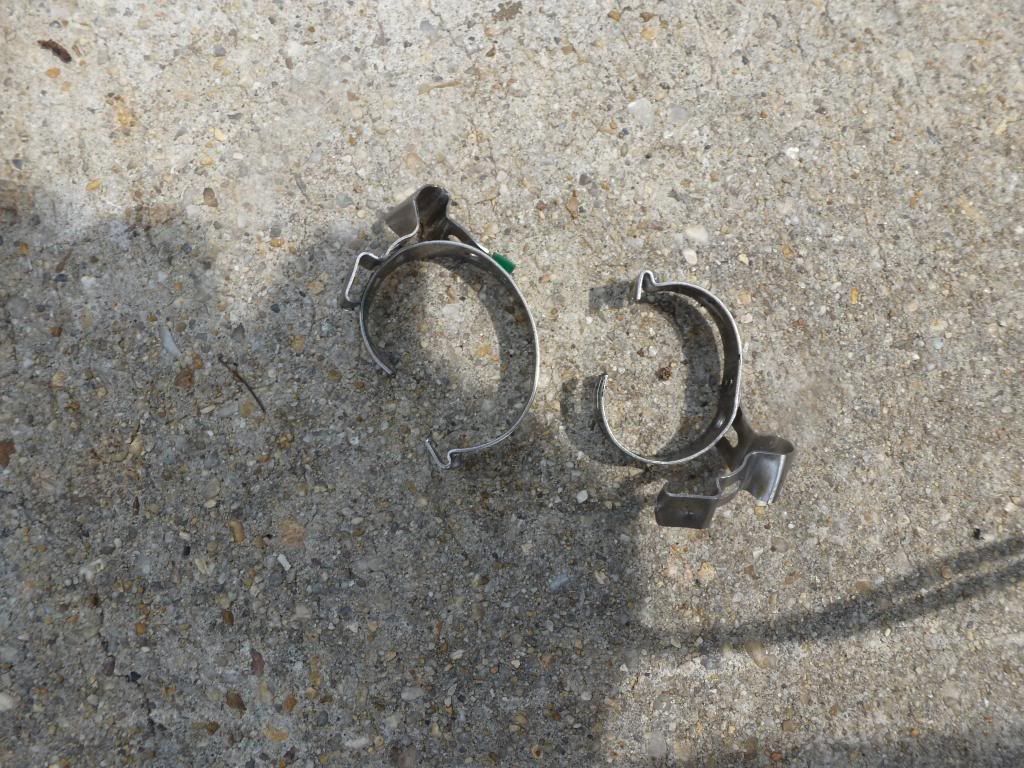
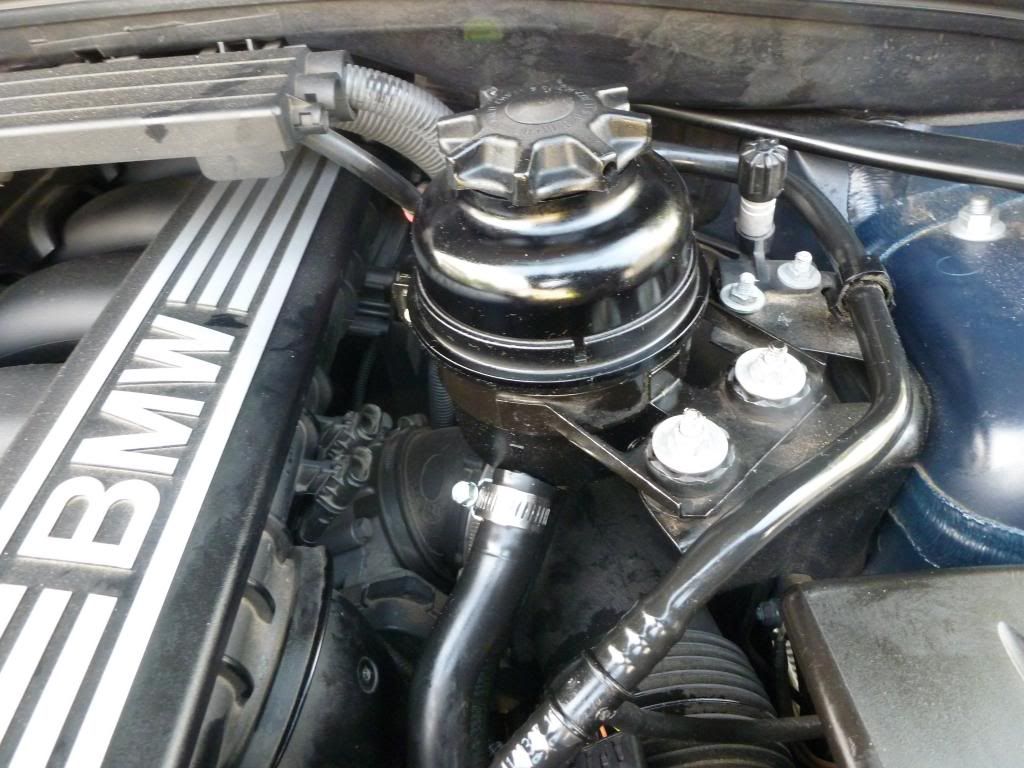
4. Go under the hood and remove the 2 bolts for the clamp holding the reservoir to the chassis (10mm socket). You will need to do so to achieve better angle to remove the OE hose clamps. To remove the clamps, stick a small flat head in the crimps and twist. Then, move up to a larger flat head and twist again. Study the clamp to understand how it will come apart. Remove the hoses and remember which goes where. The larger hose sits closer to the front of the car.


5. Loosen the clamp to remove the old reservoir and install the new (10mm socket). Reconnect the hoses using new clamps. I have had good experience with screw style clamps. Your opinion may vary. Tighten the clamp and reinstall it to the chassis. I don't have torque specs on these and hand tightened them to what I felt they should be.


6. Tighten the cracked line back up (I don't have the torque spec for this). Replace the crush washers now if you chose to. Refill the reservoir to the top most line of the dipstick on the reservoir cap. Verify nothing is leaking.
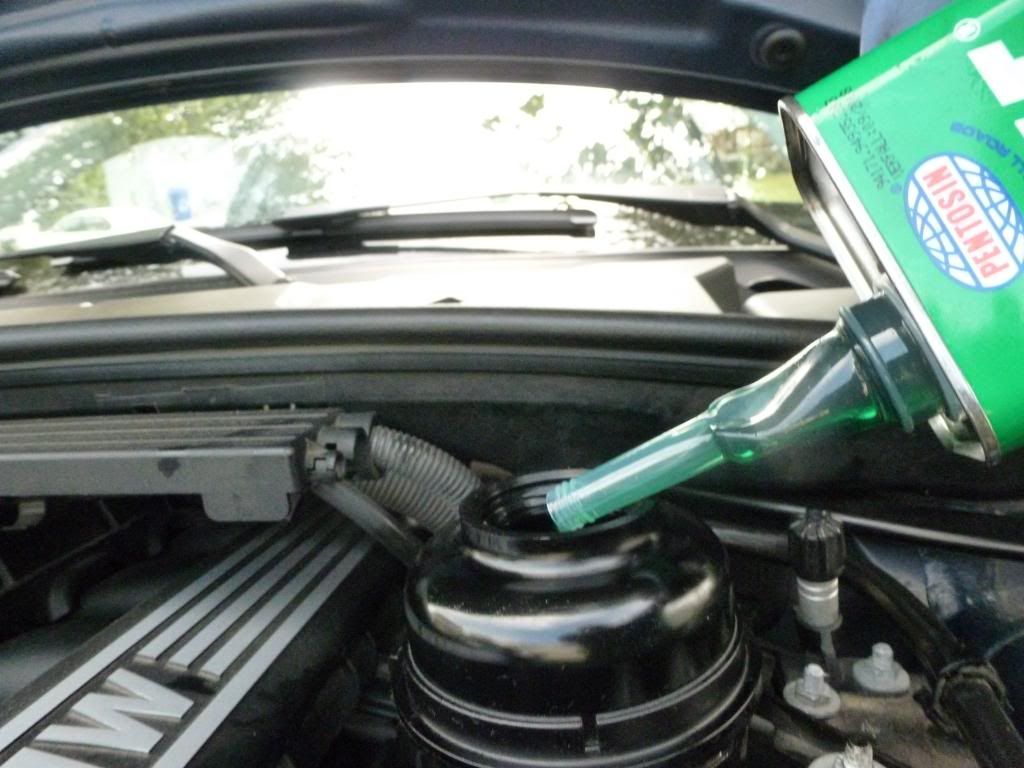


7. Start the car. With the reservoir cap loose, slowly turn from full lock to full lock to bleed the system. Refill the reservoir. Repeat until you no longer need to top off the system. If you want to be real thorough, repeat draining, refilling, and bleeding the system.

8. Test drive the car. Check the fluid level and verify there are no leaks. Reinstall the under panel (Hand tighten the bolts).

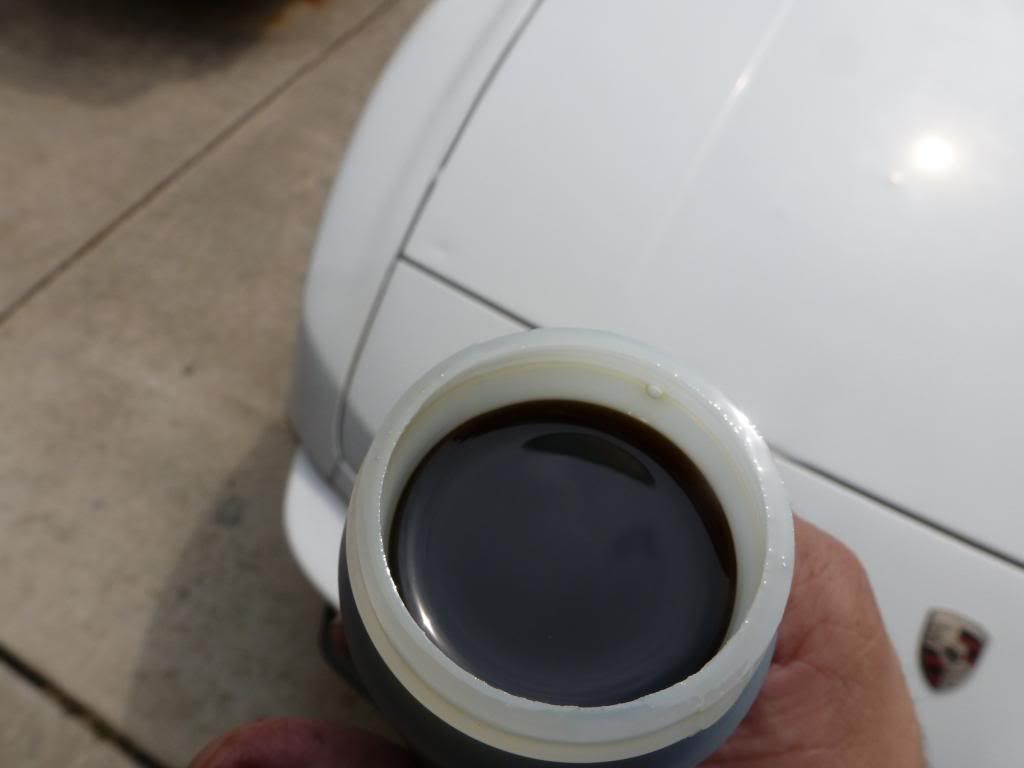
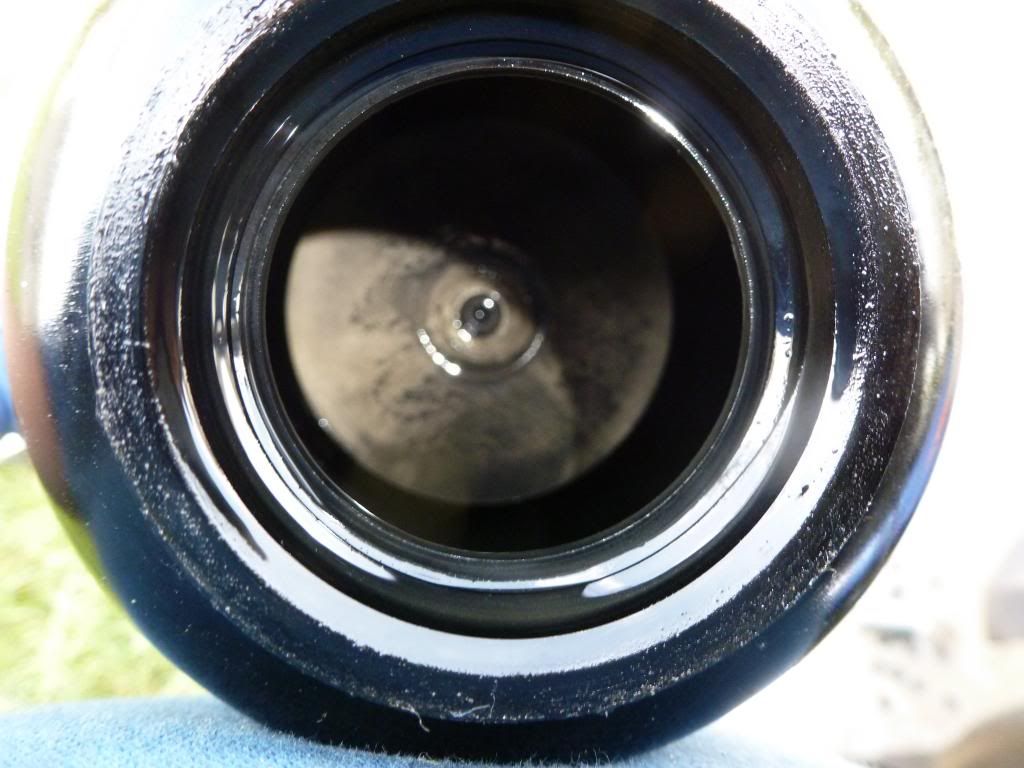
This is the residue left on the bottom of the reservoir and how dark the fluid was compared to the green fluid pictured above.


Appreciate 1
c0bra185.00
      06-17-2014, 07:16 AM   #2
wolfe
Captain
wolfe's Avatar
134
Rep
613
Posts

Drives: e82 / e70 / r56 / r60
Join Date: Apr 2010
Location: USA

iTrader: (1)

Thanks for the write up!

I think you're right to use screw clamps on the hoses when you re-install. After a few years the OE clamps compress the hoses making them slightly thinner where the clamps sit, and if you use OE clamps they often won't have enough clamping force due to the now-thinner wall of the hose, and you'll get a slight leak.
Appreciate 0
      06-17-2014, 07:22 AM   #3
MightyMouseTech
Major General
MightyMouseTech's Avatar
4338
Rep
6,196
Posts

Drives: 13 135i 6MT LeMans Blue MSport
Join Date: Feb 2013
Location: Ottawa, Canada

iTrader: (0)

Actually, I would not use gear clamps. Using gear clamps on anything that gets hot WILL cause them to leak. This is due to the gear clamps not having any flex to them. As the pipe/hose gets hot it expands, but the gear clamp does not give, pinching the hose, then the hose cools and shrinks. After a while, it will leak. Using the OEM clamps or at least a corbin clamp will maintain the proper tension during thermal expansion and contraction.

You will never find a gear clamp on anything that gets hot.

I prefer corbin clamps because they are reusable and maintain their tension better:

Appreciate 3
Rmtt8208.00
lab_rat394.50
      06-17-2014, 09:54 AM   #4
pj.rodriguez
Lieutenant Colonel
pj.rodriguez's Avatar
Canada
84
Rep
1,623
Posts

Drives: Alpine White 128i Cabrio
Join Date: Jun 2013
Location: Toronto, Ontario, Canada

iTrader: (9)

Garage List
Quote:
Originally Posted by MightyMouseTech View Post
Actually, I would not use gear clamps. Using gear clamps on anything that gets hot WILL cause them to leak. This is due to the gear clamps not having any flex to them. As the pipe/hose gets hot it expands, but the gear clamp does not give, pinching the hose, then the hose cools and shrinks. After a while, it will leak. Using the OEM clamps or at least a corbin clamp will maintain the proper tension during thermal expansion and contraction.

You will never find a gear clamp on anything that gets hot.

I prefer corbin clamps because they are reusable and maintain their tension better:

Interesting.

Never knew that and I was about to tackle this job also sometime in the near future. Thanks for the insight. Mighty Mouse always has something good to input!
__________________
2008 128i E88 / Alpine White / Boston Leather Sport / 6AT / M3 Paddle Shifters / Bilstein B8 / H&R Springs / Dinan Fixed Camber Plates / BMW 335i Front Brakes / PIAA Xtreme White 4150K Angel Eyes / Rear Fogs Enabled / Cyba Air Scoops / Euro Airbox / BMW Performance Exhaust / Stubby BMW Antenna
Appreciate 0
      06-17-2014, 11:22 AM   #5
NorthernDancer
Colonel
848
Rep
2,276
Posts

Drives: 08 Sedona 128 & 06 330xiT 6MT
Join Date: Apr 2011
Location: Ottawa On Canada

iTrader: (3)

MMT: thanks for that info. You are perfectly correct.
Appreciate 0
      06-17-2014, 12:11 PM   #6
TheSt|G
Resident Tamed Racing Driver
TheSt|G's Avatar
United_States
298
Rep
4,697
Posts

Drives: 911, 130is, E39 M5, E36 M3
Join Date: Mar 2008
Location: Outside Philly

iTrader: (2)

Quote:
Originally Posted by MightyMouseTech View Post
Actually, I would not use gear clamps. Using gear clamps on anything that gets hot WILL cause them to leak. This is due to the gear clamps not having any flex to them. As the pipe/hose gets hot it expands, but the gear clamp does not give, pinching the hose, then the hose cools and shrinks. After a while, it will leak. Using the OEM clamps or at least a corbin clamp will maintain the proper tension during thermal expansion and contraction.

You will never find a gear clamp on anything that gets hot.

I prefer corbin clamps because they are reusable and maintain their tension better:

+1

Just rebuilt the tie rod ends from rack to spindle on my ZHP. BMW rather nicely provides grooved pinch clamps in the boot kit.
__________________
2005 E46 M3 Interlagos/Cinnamon with Sunroof Delete
Appreciate 0
      06-18-2014, 07:24 PM   #7
Rated-M3
Enlisted Member
22
Rep
34
Posts

Drives: '98 M3, '10 128i
Join Date: Oct 2010
Location: Maryland

iTrader: (0)

Interesting. I will look into these next time around.
Appreciate 0
      07-10-2014, 02:34 AM   #8
andrey_gta
Brigadier General
andrey_gta's Avatar
Canada
298
Rep
4,040
Posts

Drives: 130i coupé ;)
Join Date: Nov 2011
Location: Bimmerpost

iTrader: (1)

Garage List
2008 BMW 128i  [10.00]
I would add a drain hose to the cap hole( bmw ppart repurposed). I have a parts list. Will edit this post
__________________
128i Sport 6MT converted to Euro 130i spec, 3.73 diff, tuned by evolve ~220 whp 207 wtq(ft-lb) SAE
In-progress: //M front arm, M3 rack, e36M lip Wishlist: Coils, n55 mnts, headers, LSD, e60 finn diff


"The 1-series is the last car that BMW engineered before the Germans, as a car-making culture, fell out of love with driving." - R&T 2013 135is
Appreciate 0
      07-10-2014, 02:50 AM   #9
andrey_gta
Brigadier General
andrey_gta's Avatar
Canada
298
Rep
4,040
Posts

Drives: 130i coupé ;)
Join Date: Nov 2011
Location: Bimmerpost

iTrader: (1)

Garage List
2008 BMW 128i  [10.00]
Drain hose

I used a hose is a BMW air hose - e46 part of crank vent hose refresh. Part # 11657803732

The barb is from Home Depot - 3/16 to 3/18.
1/8th to 1/8th may work better though

The cap is soft so the barb can go in at least 50%

I routed it towards the wheel well


Enjoy
Attached Images
  
__________________
128i Sport 6MT converted to Euro 130i spec, 3.73 diff, tuned by evolve ~220 whp 207 wtq(ft-lb) SAE
In-progress: //M front arm, M3 rack, e36M lip Wishlist: Coils, n55 mnts, headers, LSD, e60 finn diff


"The 1-series is the last car that BMW engineered before the Germans, as a car-making culture, fell out of love with driving." - R&T 2013 135is

Last edited by andrey_gta; 07-10-2014 at 02:55 AM..
Appreciate 0
      05-06-2020, 10:22 AM   #10
Bimmer-Bob
!
Bimmer-Bob's Avatar
United_States
693
Rep
3,266
Posts

Drives: 2010 128i
Join Date: Feb 2010
Location: Anacortes, WA

iTrader: (4)

Garage List
Getting ready to do this job in the next week or two. The correct spring clamps for the hoses are p/n 32-41-6-751-127 and 32-41-6-751-127 (one each). FCP Euro has a kit containing the reservoir, the two spring clamps, and a quart of Pentosin CHF 11S. The reservoir in their kit is branded ZF, not OE BMW, but is 1/3-to-1/2 the cost, depending where you shop. ZF is very likely the OE supplier anyway, since they made the steering rack, and everything I've read says the two parts are identical (down to "BMW" markings on the reservoir). I'm personally very comfortable going with the ZF part.

If you're really picky, like me, you can also buy the green ring-shaped label for the reservoir cap (the one that says "CHF 11S ONLY"), but it'll set you back about $20; p/n 71-21-2-122-171.
__________________
____________________________
Appreciate 1
lab_rat394.50
      06-07-2020, 10:07 PM   #11
Bimmer-Bob
!
Bimmer-Bob's Avatar
United_States
693
Rep
3,266
Posts

Drives: 2010 128i
Join Date: Feb 2010
Location: Anacortes, WA

iTrader: (4)

Garage List
Finally got around to doing this today. Kind of a PITA the first time; I think next time will be really easy.

I chose not to crack any of the lines down at the steering rack and used a fluid extractor to empty the reservoir. I then removed the hoses and used the fluid extractor to get as much as I could out of each one, but I still made a mess because the lower half of the reservoir was still full. I discovered later that the filter is held in place with a Torx fastener - I don't think there would be any way to remove it, but you could at least get it out of the way in order to extract more fluid.

The Oetiker clamps holding the hoses onto the reservoir are kind of a pain in the ass. I didn't have the proper tool (I thought I could use just any set of hose clamp pliers) and so I basically had to destroy the factory clamps to remove them. I had Genuine BMW replacements, but I couldn't figure out a way to crimp them (again, didn't have the right tool) so I ended up running to the store and picking up some screw-on hose clamps. I measured the hoses at roughly 1" and 3/4", so was able to use the same size clamp for both (rated for 1/2"-1 1/4"). Eventually, I'd like to get the correct clamps and tool, but I'm not sure I can place the new clips without removing the hoses - if anyone knows, please fill me in. I felt like kind of an idiot being bested by these stupid clamps, lol.

The old fluid looked pretty dirty, but as I did not completely drain the system, the new fluid was instantly tainted by the old. Still, I think even a partial fluid change is better than none, and in any case the filter is brand new.
__________________
____________________________
Appreciate 1
c0bra185.00
      06-08-2020, 05:12 PM   #12
Thunderguts
Captain
Thunderguts's Avatar
776
Rep
992
Posts

Drives: 2009 128i Sport MT
Join Date: Jul 2018
Location: DFW

iTrader: (0)

Quote:
Originally Posted by Bimmer-Bob View Post
Finally got around to doing this today. Kind of a PITA the first time; I think next time will be really easy.

I chose not to crack any of the lines down at the steering rack and used a fluid extractor to empty the reservoir. I then removed the hoses and used the fluid extractor to get as much as I could out of each one, but I still made a mess because the lower half of the reservoir was still full. I discovered later that the filter is held in place with a Torx fastener - I don't think there would be any way to remove it, but you could at least get it out of the way in order to extract more fluid.

The Oetiker clamps holding the hoses onto the reservoir are kind of a pain in the ass. I didn't have the proper tool (I thought I could use just any set of hose clamp pliers) and so I basically had to destroy the factory clamps to remove them. I had Genuine BMW replacements, but I couldn't figure out a way to crimp them (again, didn't have the right tool) so I ended up running to the store and picking up some screw-on hose clamps. I measured the hoses at roughly 1" and 3/4", so was able to use the same size clamp for both (rated for 1/2"-1 1/4"). Eventually, I'd like to get the correct clamps and tool, but I'm not sure I can place the new clips without removing the hoses - if anyone knows, please fill me in. I felt like kind of an idiot being bested by these stupid clamps, lol.

The old fluid looked pretty dirty, but as I did not completely drain the system, the new fluid was instantly tainted by the old. Still, I think even a partial fluid change is better than none, and in any case the filter is brand new.
I replaced mine earlier this year with the FCP kit. I did open the system at the bottom and I actually used an entire bottle of Pentosin just flushing out the system. Even after that, it still looked brown as soon as I put the new fluid in and bled the system. It make me wonder just how much dirty fluid was hiding down there.

The clamps are a PITA. I bought a pair of side-clamp Knipex pliers for them, but even those still didn't make it easy.
__________________
Official BMWP Whore - BMWP suspension kit w/ M3 arms, BMWP big brake kit, BMWP intake w/Mishimoto tube, BMWP exhaust, BMWP carbon strut brace, BMWP short shifter, and BMWP carbon spoiler. OZ Leggera HLT w/ 245 square setup.

Appreciate 0
      06-21-2020, 10:58 PM   #13
c0bra
Commander ;)
c0bra's Avatar
United_States
185
Rep
115
Posts

Drives: E88 N54
Join Date: Aug 2018
Location: Westchester, NY

iTrader: (0)

Quote:
Originally Posted by Bimmer-Bob View Post
Finally got around to doing this today. Kind of a PITA the first time; I think next time will be really easy.

I chose not to crack any of the lines down at the steering rack and used a fluid extractor to empty the reservoir. I then removed the hoses and used the fluid extractor to get as much as I could out of each one, but I still made a mess because the lower half of the reservoir was still full. I discovered later that the filter is held in place with a Torx fastener - I don't think there would be any way to remove it, but you could at least get it out of the way in order to extract more fluid.

The Oetiker clamps holding the hoses onto the reservoir are kind of a pain in the ass. I didn't have the proper tool (I thought I could use just any set of hose clamp pliers) and so I basically had to destroy the factory clamps to remove them. I had Genuine BMW replacements, but I couldn't figure out a way to crimp them (again, didn't have the right tool) so I ended up running to the store and picking up some screw-on hose clamps. I measured the hoses at roughly 1" and 3/4", so was able to use the same size clamp for both (rated for 1/2"-1 1/4"). Eventually, I'd like to get the correct clamps and tool, but I'm not sure I can place the new clips without removing the hoses - if anyone knows, please fill me in. I felt like kind of an idiot being bested by these stupid clamps, lol.

The old fluid looked pretty dirty, but as I did not completely drain the system, the new fluid was instantly tainted by the old. Still, I think even a partial fluid change is better than none, and in any case the filter is brand new.
I got an extra 4 ounces of fluid out by removing the torx screw and pushing the filter aside! Your post is where I got the idea, thank you! I posted a new power steering fluid DIY too.

I also thought they were Oetiker clamps, but it turns out they are Clic-R clamps! You can spread or pry them open to get around the hoses. They are technically reusable clamps when handled with care. See the right tool below.


Quote:
Originally Posted by Thunderguts View Post
I replaced mine earlier this year with the FCP kit. I did open the system at the bottom and I actually used an entire bottle of Pentosin just flushing out the system. Even after that, it still looked brown as soon as I put the new fluid in and bled the system. It make me wonder just how much dirty fluid was hiding down there.

The clamps are a PITA. I bought a pair of side-clamp Knipex pliers for them, but even those still didn't make it easy.
This is the tool you're looking for... Clic-R clamp pliers! Makes working with these clamps super easy! Position one way to remove clamps and flip the opposite way to install clamps. I picked mine up from FCP.

Remove


Install
Appreciate 2
spidertri397.50
lab_rat394.50
      06-22-2020, 05:56 AM   #14
Bimmer-Bob
!
Bimmer-Bob's Avatar
United_States
693
Rep
3,266
Posts

Drives: 2010 128i
Join Date: Feb 2010
Location: Anacortes, WA

iTrader: (4)

Garage List
Quote:
Originally Posted by c0bra View Post
Quote:
Originally Posted by Bimmer-Bob View Post
Finally got around to doing this today. Kind of a PITA the first time; I think next time will be really easy.

I chose not to crack any of the lines down at the steering rack and used a fluid extractor to empty the reservoir. I then removed the hoses and used the fluid extractor to get as much as I could out of each one, but I still made a mess because the lower half of the reservoir was still full. I discovered later that the filter is held in place with a Torx fastener - I don't think there would be any way to remove it, but you could at least get it out of the way in order to extract more fluid.

The Oetiker clamps holding the hoses onto the reservoir are kind of a pain in the ass. I didn't have the proper tool (I thought I could use just any set of hose clamp pliers) and so I basically had to destroy the factory clamps to remove them. I had Genuine BMW replacements, but I couldn't figure out a way to crimp them (again, didn't have the right tool) so I ended up running to the store and picking up some screw-on hose clamps. I measured the hoses at roughly 1" and 3/4", so was able to use the same size clamp for both (rated for 1/2"-1 1/4"). Eventually, I'd like to get the correct clamps and tool, but I'm not sure I can place the new clips without removing the hoses - if anyone knows, please fill me in. I felt like kind of an idiot being bested by these stupid clamps, lol.

The old fluid looked pretty dirty, but as I did not completely drain the system, the new fluid was instantly tainted by the old. Still, I think even a partial fluid change is better than none, and in any case the filter is brand new.
I got an extra 4 ounces of fluid out by removing the torx screw and pushing the filter aside! Your post is where I got the idea, thank you! I posted a new power steering fluid DIY too.

I also thought they were Oetiker clamps, but it turns out they are Clic-R clamps! You can spread or pry them open to get around the hoses. They are technically reusable clamps when handled with care. See the right tool below.


Quote:
Originally Posted by Thunderguts View Post
I replaced mine earlier this year with the FCP kit. I did open the system at the bottom and I actually used an entire bottle of Pentosin just flushing out the system. Even after that, it still looked brown as soon as I put the new fluid in and bled the system. It make me wonder just how much dirty fluid was hiding down there.

The clamps are a PITA. I bought a pair of side-clamp Knipex pliers for them, but even those still didn't make it easy.
This is the tool you're looking for... Clic-R clamp pliers! Makes working with these clamps super easy! Position one way to remove clamps and flip the opposite way to install clamps. I picked mine up from FCP.

Remove


Install
Thanks for the info! I actually ordered a set of these pliers from ECS a few hours before I saw your post, but I still wasn't sure if they were the right ones, or how I was supposed to use them exactly, so your post proved very timely! I think I'm going to go back and install the proper clamps once the tool arrives.

I'd also like to do a more complete flush next time. Your method with the hose - did you use any kind of suction, or was it simply the turning of the wheel that pushed the fluid through?
__________________
____________________________
Appreciate 0
      06-22-2020, 08:30 AM   #15
c0bra
Commander ;)
c0bra's Avatar
United_States
185
Rep
115
Posts

Drives: E88 N54
Join Date: Aug 2018
Location: Westchester, NY

iTrader: (0)

Quote:
Originally Posted by Bimmer-Bob View Post
Thanks for the info! I actually ordered a set of these pliers from ECS a few hours before I saw your post, but I still wasn't sure if they were the right ones, or how I was supposed to use them exactly, so your post proved very timely! I think I'm going to go back and install the proper clamps once the tool arrives.

I'd also like to do a more complete flush next time. Your method with the hose - did you use any kind of suction, or was it simply the turning of the wheel that pushed the fluid through?
I couldn't find the tool on FCP at first because "this part does not fit" my car according to their search. Of course it's a universal tool and does a great job.

Just turning the wheel will manually pump new fluid in and push old fluid out. You can go at your own pace and pause at any time to check the reservoir level, perfect for a one man job. Flush can also be done with the engine idling, but the fluid pumps way too fast for my liking.
Appreciate 0
Post Reply

Bookmarks

Thread Tools Search this Thread
Search this Thread:

Advanced Search

Posting Rules
You may not post new threads
You may not post replies
You may not post attachments
You may not edit your posts

BB code is On
Smilies are On
[IMG] code is On
HTML code is Off


All times are GMT -5. The time now is 09:00 PM.


1addicts
Powered by vBulletin® Version 3.8.11
Copyright ©2000 - 2024, vBulletin Solutions Inc.
1Addicts.com, BIMMERPOST.com, E90Post.com, F30Post.com, M3Post.com, ZPost.com, 5Post.com, 6Post.com, 7Post.com, XBimmers.com logo and trademark are properties of BIMMERPOST