Just thought I'd do a write up on my recent suspension refresh DIY.
Lets start off with a bit of backstory:
Bought the car with bone stock suspension and was unhappy with the handling. Felt it had no front end grip and the rear was very loose and wobbly, especially since I bought the car with downpipes, fmic and tune already installed. Felt like there was a good chassis underneath, but hidden underneath terrible runflat tyres, soft subframe bushings.
Started off with Nolathane subframe bushings, installed in April 2015. Locked down the rear end, much more stable. Induced harshness over fast bumps on runflats.
Was not happy with the front end grip so did M3 control arms June 2015, small improvement, I would not say it was massive. The control arms I removed were in good condition. I noticed some extra front end grip under long corners. I dont think it did a lot for steering feedback or turn in. After pulling the alignment pins in the stock strut towers I only managed -1degree of negative camber. Not the best bang per buck mod in my opinion, but I don't regret the purchase at all.
Run flat tyres that came with the car were finally finished so I went with Yokohama AD08Rs in November 2015. Ride quality was much improved, was really needed due to installing the Nolathane bushes. But after a while I found the ride was still not comfortable enough for me. Sharp bumps were still very harsh and would avoid driving over street reflectors on the road to avoid clunking over them. I suspected that the old shocks had worn out and weren't reacting fast enough to the bumps.
Did my research and ended up with Bilstein B12 Prokit. It was $1k aud delivered which made it much cheaper than most spring strut combinations available. I got it new off ebay shipped from Germany.
There were a few other alternatives, could have bought BC coilovers for $1300-$1400 locally but didn't want clunking over bumps. Have since ridden in a BC equipped E92 and was very impressed with the product, even the damping adjustment is very convenient and does not require removal of the rear shocks to adjust, you get a remote adjuster that you can route through the rear boot carpet.
There was also Koni yellows but I thought they were too expensive to get them landed in Aus. The rear shocks require removal from the car to adjust. I watched the convoluted process of adjusting the rear and decided it was not for me
The Bilstein B12s seemed like a nice upgrade from stock without going too crazy with lowering. My car is first and foremost a street vehicle, with some use on track. I was still not happy with the front end grip and noticed that the outside edge of the tyres were getting trashed from track use so I went with fixed Dinan camber plates to get more front camber. These plates cost around $250aud delivered so this setup is very very close to the cost of a set of basic coilovers. Will have to weigh up which is best because the BC coilovers includes a new strut bearing and adjustable camber plate.
I figured if I was going to all this expensive I would refresh all the old suspension bits off the car.
Installed yesterday:
Bilstien B12 pro kit - Bilstien B8 shock + Eibach prokit springs (30-35mm drop)
New front Lemforder strut mounts
New front strut gaskets
New front strut rubber perches upper and lower
Dinan front camber plates
Dinan rear upper shock mount upgrade - gain additional 10mm of shock travel and more solid mounts
Meyle lower rear shock mount
Was all done in an afternoon. I regret not buying the few additional parts for the front struts. This would have allowed me to assemble the entire strut without having to reuse anything from my old strut. Would have been a massive time saver not having to disassemble the old struts just to salvage a few cheap parts.
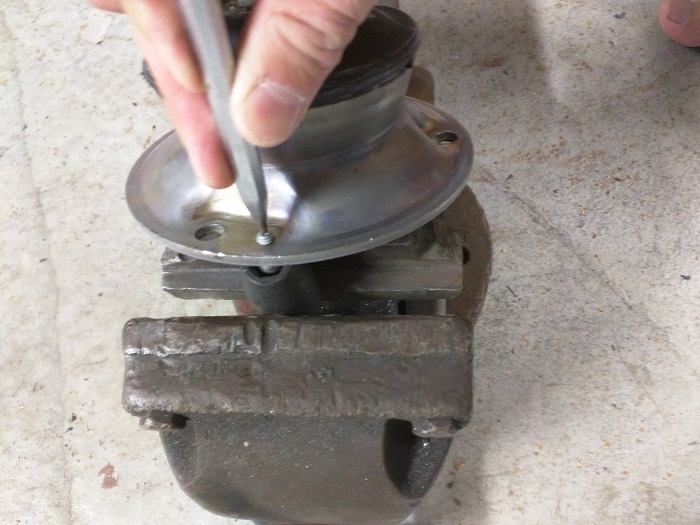
Because I bought new strut mounts, it saved a lot of time not having to fiddle with the old ones while the car was apart. All the studs and alignment pin need to be knocked out so the camber plate can be installed. I used a G clamp and socket to press out the studs and a punch to knock out the alignment pin:
Pressing out studs

Knocked out alignment pin
Strut mounts prepared:

To attach the camber plate to the strut mounts theres a allen head countersunk bolt that attached the two together. Couldn't find an easy way of holding the strut while torquing the bolt. Using a vice would certainly scratch up the parts. I just drilled two holes in one of my side benches and placed the strut mount in the holes:

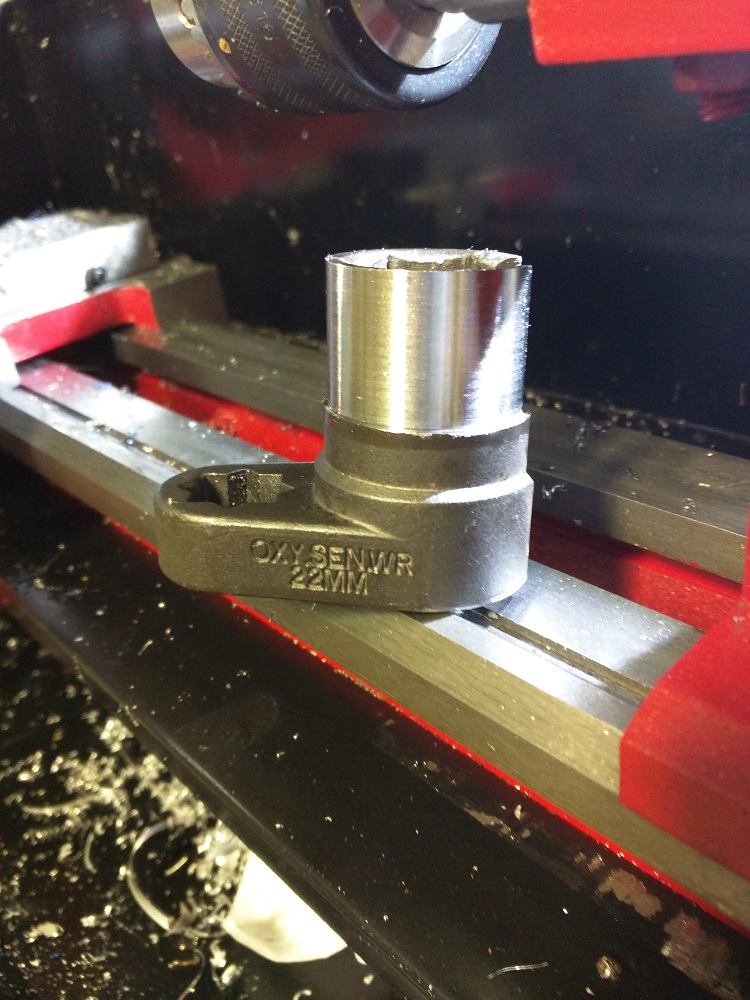
I made sure I had all the tools to do the job correctly. I wanted to use a torque wrench on absolutely everything. The stock strut but is 21mm while the B12 struts are 22mm. I have a 22mm o2 sensor socket that can be used with a torque wrench. Because the top is open, you can fit a hex socket to stop the strut from rotating as you tighten the nut. Unfortunately my socket was too big to fit into the strut mounts. As I only found this out the day before I was just about to install, I just put the socket in my lathe, and machined it down until it fit!
I did all this prior to the day of the install so I would have less thing to think about. I can't imagine how frustrating it would be if I had to figure all of this out on the day!
Install wasn't difficult. Just hit a snag when I had reassembled the right side, torqued everything down and noticed the spring wasn't sitting in the rubber perch perfectly. Had to remove from the car and use the spring compressors until I could rotate the spring to sit correctly.
Looks a bit empty in there!

Fully assembled strut:

Installed in the car:

Reassembled everything and torqued the front control arms while the front was sitting on ramps, to make sure the bushings are not stressed. I am very happy I went with new strut mounts. The old ones had noticeable play in the bearings when I took them off!
The rear strut and springs were very straight forward. I just marked out the eccentric bolts for camber and toe adjustments with a Sharpie so I could keep the rear alignment straight. Didn't get any pictures, hands were way too dirty. Install for the rear is fairly simple, removing the rear boot carpet is a big pain. Installed the Dinan rear upper shock mounts and Meyle lower mount. I did not think to replace the rubber dust cover of the shock, one of the old ones look a little warped. Not a big deal and still works but just annoying. Might need to rectify that later...
Then the really time consuming part: I loosed all the bolts in every arm of the rear suspension, and torqued down everything while the hub was jacked up by my floor jack. This allows me to tighten everything while the car is at ride height. The car has been lowered and I do not want the rubber bushings being under twist when the car is resting normally and cause premature wear of the rubber bushings. Not sure if any shop will do the same level of detail. Took another hour and half or so.
Finished up just as it was getting dark around 6pm. Car actually drove fine and tracked straight after the install, was surprised. I thought the added camber would toe in the wheels excessively, causing the car to drive like shit when i did my M3 control arm install before alignment. Heres the alignment sheet:
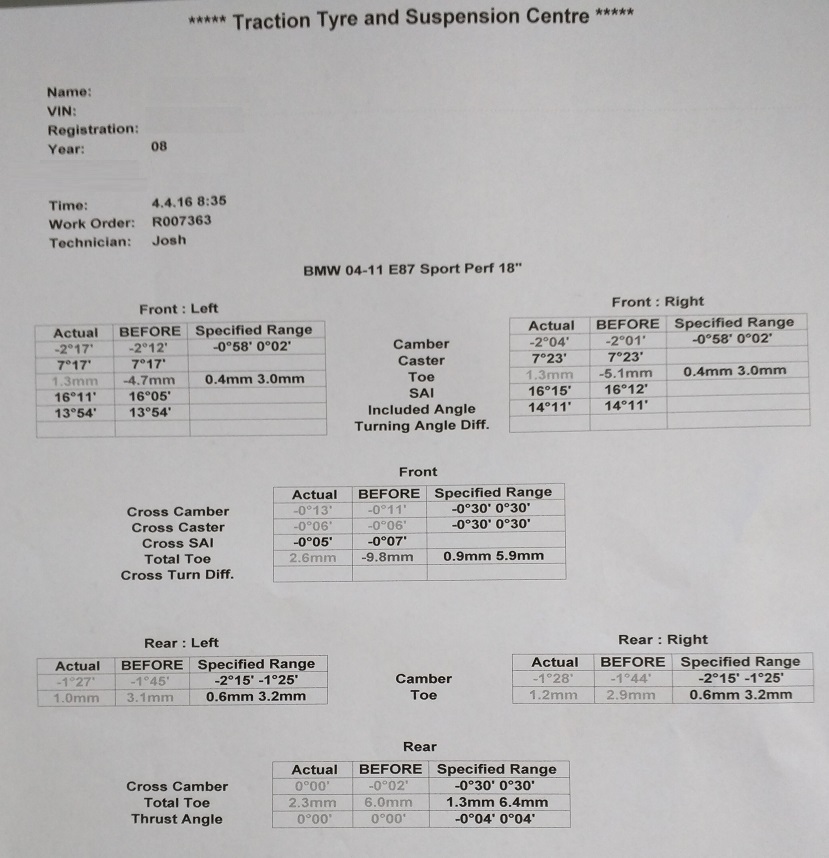
-2 degrees should be plenty for my needs. Just took the car out to Mt dandenong. Turn in is very responsive and body roll is significantly reduced. Wasn't pushing the car hard so its difficult to gauge the balance and overall front end grip but seems more neutral now. Ride quality is improved, but not as much as I had hoped. Absorbs the fast bumps a little better but I think the stiff sidewalls of the Yokohama AD08R might be the cause of the rough ride. I may play with the pressures to see if it makes a difference.
Happy with the setup at the moment, I think maybe the next step will be wider wheels to accommodate some decently wide rubber (stock 261 wheels at the moment), pretty good how this thing handles with just 225 front and 255 rears though...