**Update 12/1/17**
It's been almost another year, so time for an update. This time nothing cosmetic, but some pretty important service stuff happened all at once. I'll be adding the updates as comments from now on to make everything a bit more readable.
**Update 20/1/16**
Finally got my hands on some LCI Headlights, added some air intake scoops, a new battery and completed some coding.
**Update 31/10/15**
Added in some more photos, and a new love!
**Update 26/9/15**
It's been over a year since my last update and so much more has been done!
Photos and Write up are all below for pretty much everything!
Latest photos are right down the bottom, with more coming soon with the new wheels fitted!
Mod list so far:
[x] LED Smoked Side Markers
[x] Shark Fin Aerial
[x] Extra 12v Sockets
[x] Nav Tray Retrofit
[x] LED Angel Eye Bulb Change
[x] Carbon Grilles
[x] LCI "Highline" Smoked Tail Lights
[x] Twin Rear Washer Jets
[x] Octane Window Tint
[x] BMWP (135i) F+R Brakes Retrofit (Painted Phoenix Yellow)
[x] 135i Exhaust + Resonator Delete + Custom Y Pipe
[x] K&N Filter
[x] 3M Roof/Mirrors Wrap in Gloss Black
[x] Carbon Spoiler
[x] Carbon Rear Diffuser
[x] Quaife LSD
[x] BMS Powerbox
[x] Complete Interior LED replacement
[x] Carbon Front Splitters
[x] M3 Front Control Arms
[x] M3 Rear Guide Rods + Wishbones
[x] M3 Subframe Bushings
[x] M3 Transmission Mounts
[x] ECS Billet Oil Filter Cap
[x] ECS Braided Stainless Lines
[x] F30 Front Protection Plates (Dust Shields)
[x] Blackvue FHD F+R Cameras
[x] Euro Plates
[x] Pirelli P Zeros
[x] Painted Engine Cover (Phoenix Yellow)
[x] Yokohama Advan RS-D Wheels
[x] Motorsport Hardware Stud Conversion
[x] Motorsport Hardware Titanium Nuts
[x] ZHP Gear Knob
[x] BMWP Handbrake Lever
[x] Professional Detail by Dan at Dan's Garage
[x] Air Intake Scoops
[x] Varta E38 Battery
[x] LCI BiXenon Headlights (AHL)
Warning: The rest of this post is very long! I've done my best to link threads and products i've used. If you want any info, just PM me!
**Update 13/9/14**
Alright! So i've had the car for a little over a month now and have done a couple of aesthetic/useful mods to give it a more personal feel so thought instead of creating a new thread, i'll just update this one with any progress!
**Original Post**
Hey everyone,
Picked up my new (to me), Sparkling Graphite 130i on Thursday evening and after a thorough weekend 'get to know session' driving all in the country, i've now got some time to throw some photos up!
Thanks to
quasio for keeping the car in such perfect condition and for dealing patiently with a first time buyer!


Being an '06 car, the side marker housings have started to yellow, so I decided it would be the perfect opportunity to swap to LED's and get some nice smoked housings.
Sourced from eBay, cost about $15 posted from Taiwan, straight swap following the
installation guide on Bimmian.

Much prefer the shark fin aerial as opposed to the stubby or the original extra long aerial. Sourced from BMW Kings Way.
Got some colour matched paint (A22 for Sparkling Graphite)
For anyone looking, I followed this install from
babybmw.


I use a Garmin Sat Nav in the car usually for trips to unfamiliar places, and as you fellow 130i owners know, there's only 3 12v sockets in the car.
I got this idea from the
dash cam install thread where they were routing cables out of sight. That only left the problem of where to plug the routed cables in, so decided to install a dual 12v socket underneath in the footwell (sourced from
Jaycar)as I need the space in the glove compartment for other things. Any cabling will route to here, and also gives the passenger ample ports to use.


I wanted to do away with having my Sat Nav in the car. We don't have that much windscreen real estate to start with, so keeping it clear and clean is definitely a plus! I've been taking the Sat Nav out and placing it away when I leave the car, but this also means taking the mount off the window as well to deter theft.
Anyway, this is the
thread that inspired me.
Now this took me quite awhile to work up the courage to do. It's no small thing cutting away at your dash. There was a lot of checking, then double checking, then taking it off and replacing it, but i'm glad I did it, and when my iPad isn't there, I now have somewhere for my sunglasses!
Google maps handles all my navigation needs, and the iPad holds my music, or I can link it to Pandora or Spotify for more music. When I want to remove it from the car, it appears as if the car just has an empty compartment.
On another plus, I ordered some replacement BMW badges for my remote keys (couple of bucks from eBay) and just so happened to have one extra that fit perfectly right in where the BMW Nav mount would go!


- LED Angel Eyes and High Beam Bulbs
The yellow halogen rings give the car a bit of a dated look so decided to go ahead and swap with some white LED's. Bought a kit from MyLitCo eBay UK, they arrived just over a week later and they look the part.
I also wanted to change the high beam bulbs to a nice white light to match the rest, and ordered a pair of Phillips Blue Vision Ultra bulbs. Bit disappointed, as they aren't as white as I expected, but it's not something i'm worried about. At least now I know I won't need to change them for awhile!
Update: These aren't bright enough to really be seen during the day. Looking into alternatives, but there isn't much out there unless changing to aftermarket headlights.
Update 2: Finished my LCI BiXenon Headlight retrofit. No longer have to use those low powered H7 LEDs. Picked myself up some 80W HID H8 CREE LEDs. See LCI Headlight mod for pictures.


I've been officially sucked in to carbon.
Sourced from eBay, they were sold by a seller in Taiwan, arrived in just over a week and a half. The installation in the end was really simple. This time I disregarded any threads on the topic as they weren't helping. What I did was unscrew the bonnet seal, gently ease the bumper away and unclip the top two clasps holding the grille in. Now there are 2 more clasps down the bottom and I tried every tool I had to try and get under the clasp and flick it out. No success.
I was at the brink of pulling the bumper off just to get to them when I had enough and just decided to firmly yank outwards and up on the grille and pop, it came right out! From there it was a quick clean of the housing and new grilles popped in perfect.


I've decided i'm going to stick to the darker colour scheme as IMO it really compliments the body colour of my car. Plus the original emblems are starting to show some pretty visual damage, so changed over the boot and bonnet emblems to black and white.
Both sizes are 82mm, but be aware the listing that I bought from stated that it fit fine on the boot latch, however the backing of the OEM boot emblem is slightly different and for the aftermarket ones to fit, you will need to file down the mounting points on your boot latch.
Sourced from eBay, they didn't cost much at all and I think they are a nice compliment to the overall look! I've seen people use the carbon fiber emblems or just get vinyl tape and cover the blue patches, but apparently they don't hold out very long in Australian weather.
Update: These eBay badges can't handle the sun. Lasted a couple of months until it started to yellow. Changed back to OEM badges


- LCI Blackline Tail Lights Install
I decided instead of wrapping tint around my tail lights, i'd just buy the LCI Blacklines that were OEM smoked and not only would I get that darker look, but also an update to the overall car.
Ordered from Stu at
BMR Autowerkes, he was very informative the whole time, providing me with updates on how long it would take for the lights to come in. The only thing is, he forgot my 1addicts sticker, but such a small thing, haven't even emailed him about it yet. Fantastic price and service nonetheless!
Update: Ended up getting sent 2x stickers! Haha
Anyhow, the install was long due to me not preparing properly. I followed these threads
here and this
German thread here.
I ended up being delayed twice. Once for not buying the correct connectors (requires spade connectors and a wire tap into the license plate lights). I got both items from Jaycar), and another time because I thought the bolts to secure the lights in would be the same for both sets of headlights. The LCI's have a slightly smaller Diameter and require new nuts. I ended up just using some self tapping nylon nuts for now.
I tapped into just the single license plate light wire to power both LED tail light strips. As you can see in the last photo (sorry for bad quality), I used a twist cap to secure all the wires together.
I have to say they look brilliant. The best mod i've done to date. It just updates the entire cars look. Now if only I knew enough German or someone who could code the lights properly.
Update: Finally coded in my tail lights correctly! Now only the LED bar is lit. See Coding mod for a picture.


- Twin Jet Rear Window Washer
The original single jet rear window washer was blocked and needed replacing so decided to do the twin washer mod. I don't have any pics unfortunately, but everything you need to know is right
here in this thread.
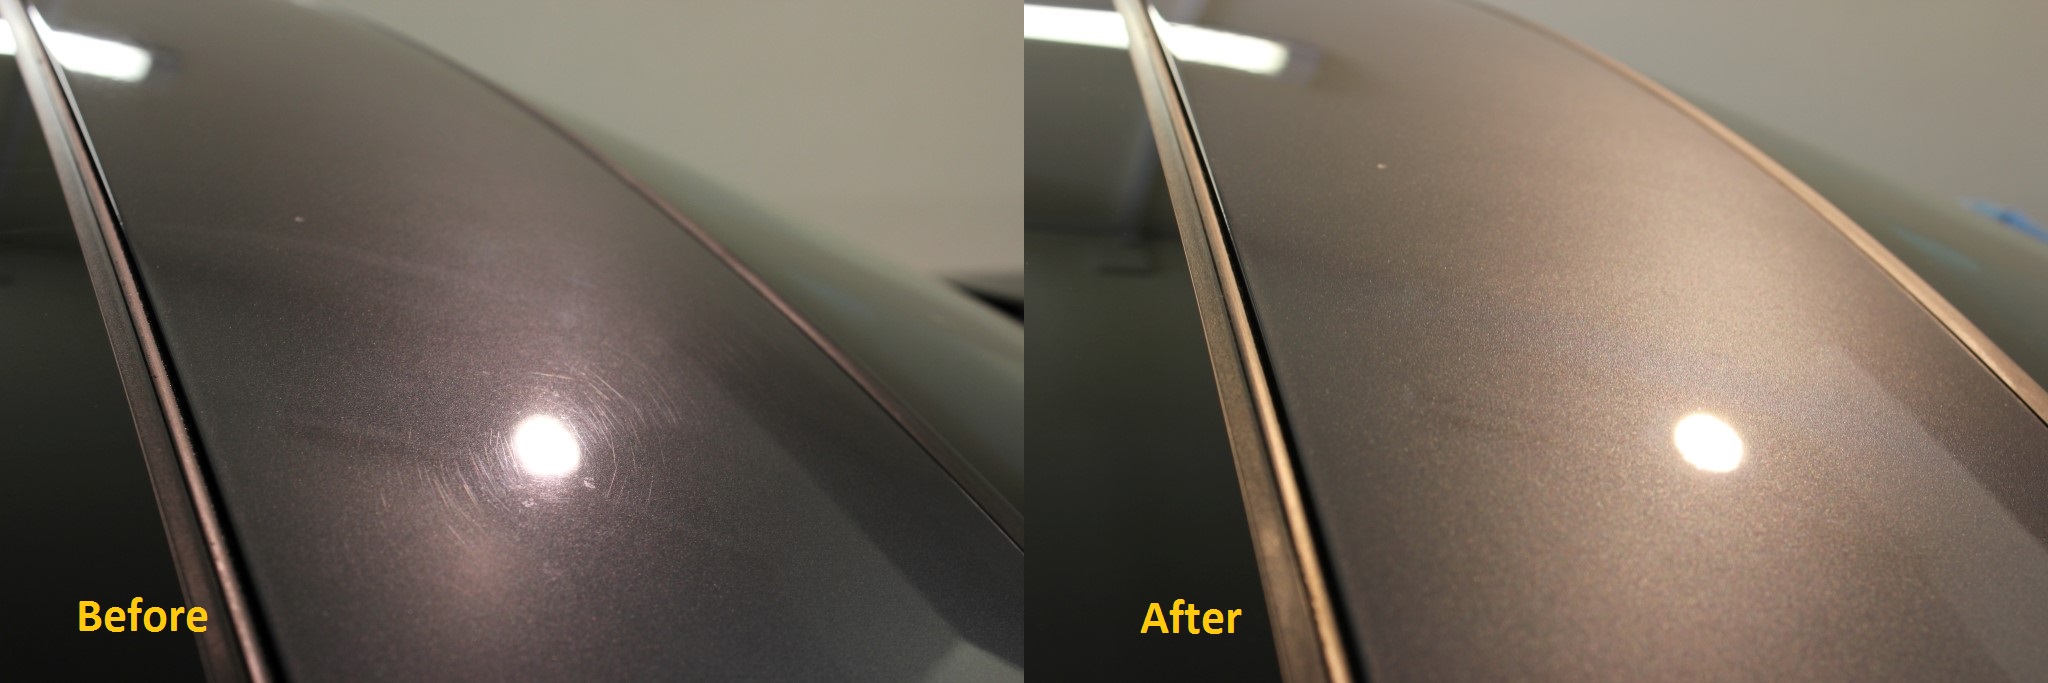
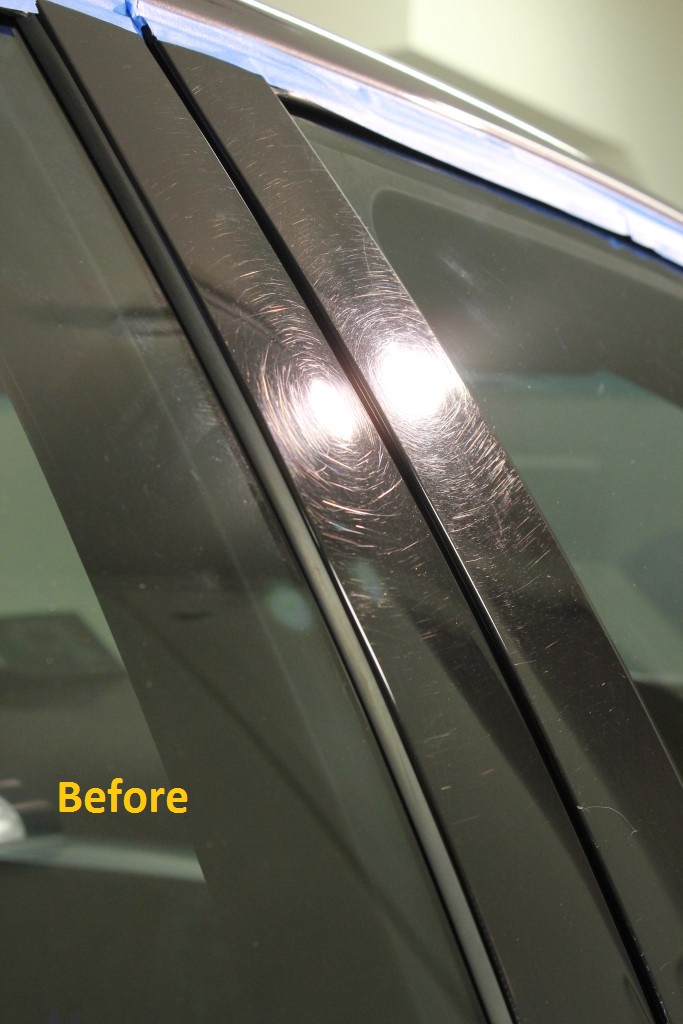
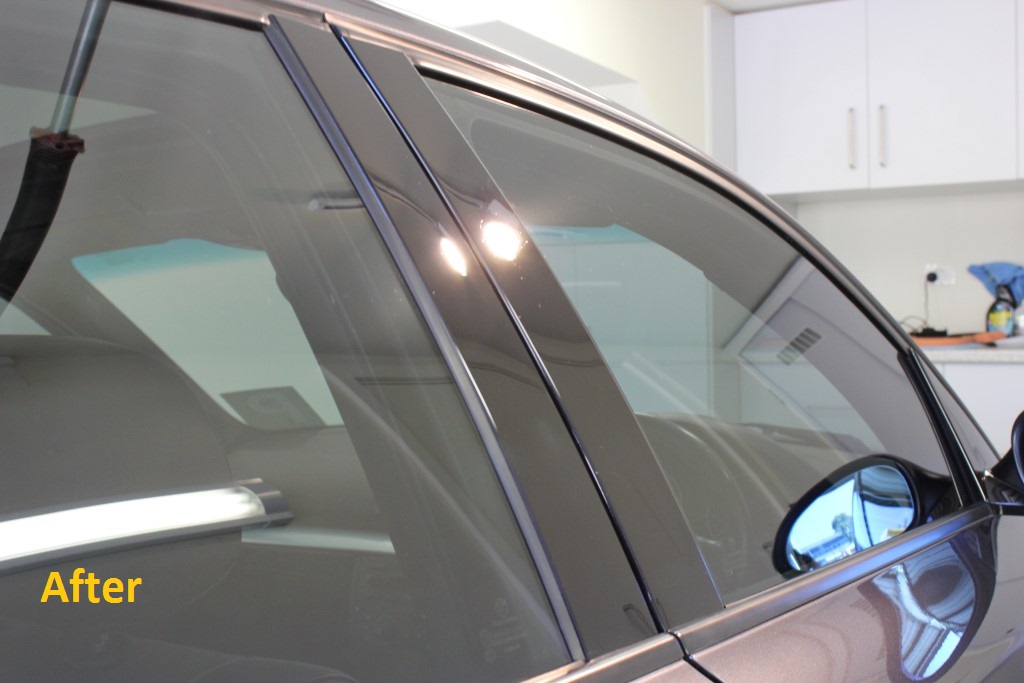
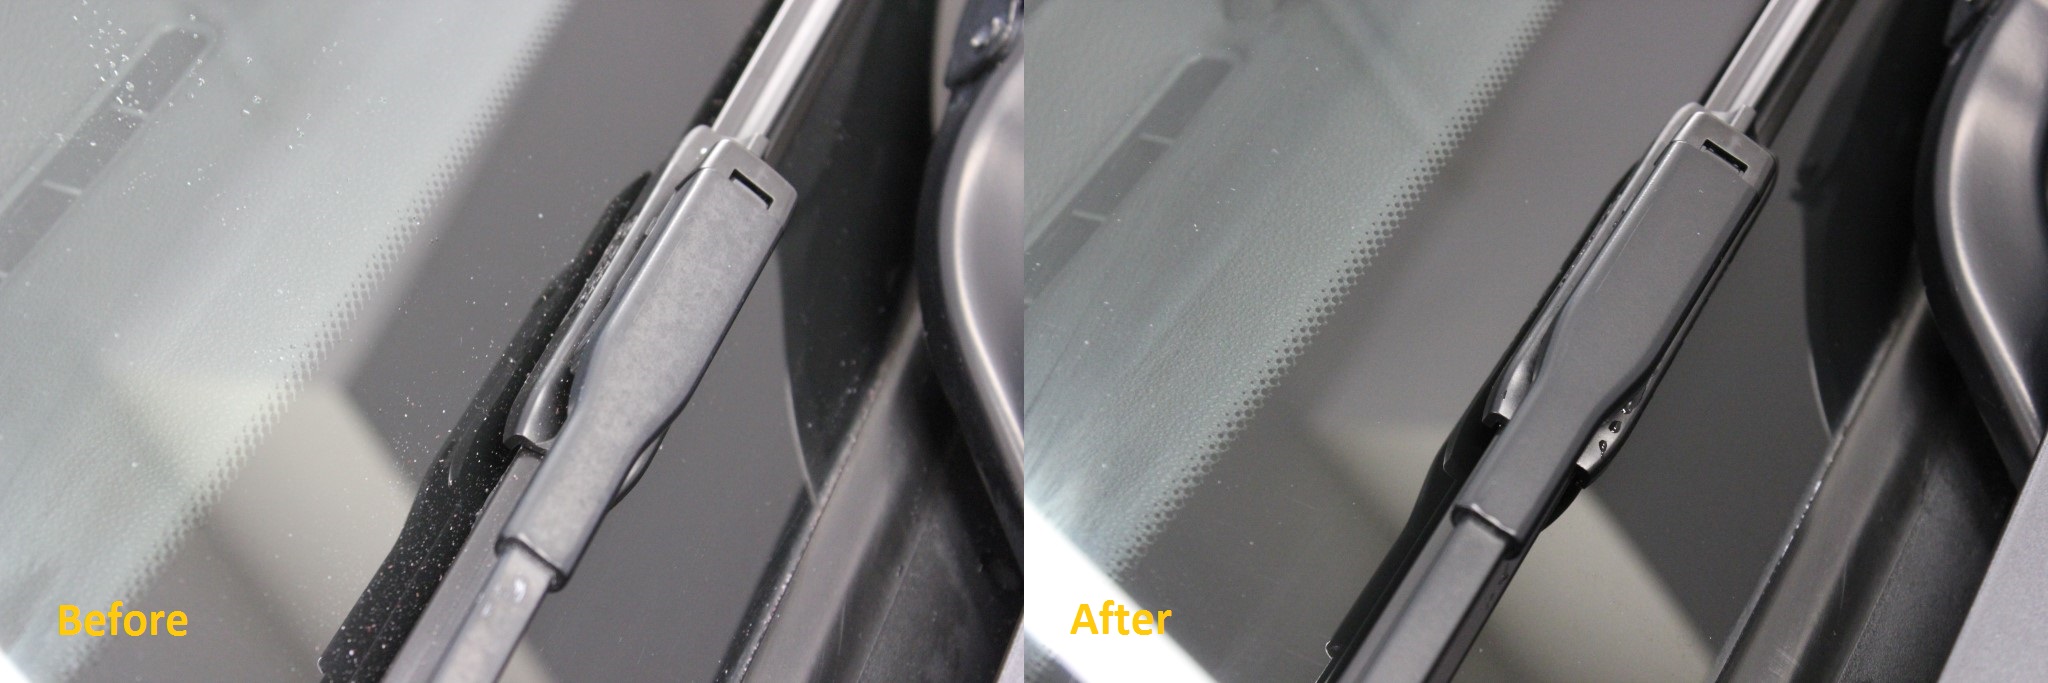
- Professional Detail by Dan from Dan's Garage
Dan is one of the best detailers in Victoria and has detailed a couple of cars from the 1addicts community. My car was no exception and he spent a total of 16 hours meticulously going through every detail. I've included some highlight photos courtesy of Dan, but all the photos and the full write up he did
is here on detailers paradise if you're interested.
2 stage paint correction with OptiCoat Pro+


I wanted darker tint to compliment the changes that were completed. The factory tint is good, but doesn't have as much of a visual factor.
Deciding between Octane and Formula1 at Tint-a-Car wasn't too hard, while Formula1 has greater UV and heat rejection, it has a more grey tone. I went with Octane as it is the blackest tint you can get from Tint-a-Car.
I have to say, the service was top notch. I emailed through their website requesting a quote around 12pm, by the end of that business day, I had a reply from Peter with a quote for Octane tint, complete car. Rang them first thing the next morning and asked for a slot that day. No worries, dropped the car off and couple of hours later, picked it back up.
- BMWP (135i) Front + Rear Brakes + F30 Protection Plates
My car originally had the grey fronts done by the previous owner, but I was missing the rears. It's taken me ages to figure out how to get these on with the majority of members needing a hub conversion to 135i spec (due to 10mm more track on the coupes), but BMW used to sell a kit for e87's so I knew there must have been a more simple way. Turns out to solve the 10mm extra track problem, you will need the e87 BMWP rear rotors (PN: 34216795755) and to trim and man handle the rotor guards. Fits like a glove.
My first set of rears that I bought from
PeteA unfortunately was stolen from my underground storage cage, along with my old diff, pads, rotors and old brakes.

Lesson learned - Don't keep valuables in storage cages.
I managed to buy another set from
c0ris07, and decided to paint them and the fronts BMW Phoenix Yellow along with the decals that came on the BMWP set. Turned out great and really stand out on the car. A little different to all the red calipers I see around.
While I was at it, I replaced all bleed nipples and caps and installed the F30 Protection Plates (PN: Left - 34116792237, Right - 34116792238). Just like
here in this thread, the plates only needed a slight trim of the top corners to fit the caliper mounting bracket - The larger scoop area will pull more air in to cool the calipers.
What it looked like:

 The Process:


 What it looks like now:


- ECS Stainless Steel Brake Lines + Cool Carbon Pads
While I was having a crack at the brakes, changed over the old lines to Stainless Steel. Came as a kit from ECS tuning and fits perfect with grommets for the hangars. Cool Carbon Pads were also on sale and thought i'd give them a shot. Hopefully increased stopping power over stock and less brake dust from the 6 pots!


- 3M 1080 Gloss Black Roof and Mirrors Wrap
All the stone chips on my roof and patches of eaten away clear coat from bird droppings were getting to me, so I decided to wrap my roof including rails and mirrors in gloss black.
Made many noob mistakes, but now I know better, will be a pro come the next time around! Things I learnt:
1. Don't use a straight up plastic applicator like I did - Use the felt lined ones to avoid scratching your vinyl.
2. Remove the backing and lay the whole sheet on the panel you're wrapping, don't work your way peeling the backing as you go.
3. Tap the air bubbles towards and exit, don't try to squeegee them.
4. Overheating and overstretching wrap is a thing - try to go easy!
5. Magic tape really is magic.
6. Heating your vinyl slightly will remove some light scratches.


- 135i Exhaust + Resonator Delete + Custom Y Pipe
Thirsting for a deeper more pronounced exhaust sound, I started with just a resonator delete and
Golf Tee Mod. Sound was deeper and drone was minimal and could be quitened down on longer drives by removing the Golf Tee Mod.
I knew of people that had done swaps with a stock 135i muffler on other e87s with great results, but none that I had personally heard on a 130i. I kept an eye out for any that were coming up for sale, and when one did, I was beaming.
Exhaust World in North Melbourne are a fantastic bunch of guys and have always given me the best service. They fabricated a custom Y pipe and modded the hangars to make it all fit.
Sound is beautiful - deep with a nice touch of raspiness. Gurgling and popping it's way along on over run.
Here's a video of a moving soundclip from stock, resonator delete, and then the 135i exhaust retrofit.
- Carbon Parts Front + Rear Diffuser + Spoiler + New Plates
Found an eBay kit that came with all 3 pieces, was relatively inexpensive and looked the part. Arrived pretty quick from Taiwan and fitment was 90% as expected for non OEM parts.
The spoiler came with double sided tape that I didn't trust, so used a combination of Black Sikaflex and 3M tape (it's never coming off). Clamped it all on and left it for a couple of hours.


- Complete Interior LED upgrade
One map light blew and decided to replace all bulbs with LEDs as an update to the look. Ordered from Precision LED, these guys were great! Kit came with plastic trim tools too as a bonus!

- M3 Front Upper and Lower Control Arms + Rear Guide Rods + Wishbones + Subframe Bushings
Suspension and handling needed a tighten up and I opted for the popular conversions to M3 bits. Attempted to install the Subframe bushings myself but could only lower the subframe so far to fit the rear bushings in. The front subframe bushings install the opposite way to the rears (from the top) and required more clearance than I could provide without disconnecting the brake lines.
Left those and the front control arms to the pros at Active Autowerke! They did a brilliant job as per usual!
I completed the rear arms myself and was super quick and easy! You can see from the photo of the stiffness the replacement arms will provide over stock.
Caution if you are going to complete any arms by yourself. Have a read through
this DIY on what you need to know, it's from e90post for the fronts only, but it's virtually the same and translates to installation of the rear arms as well.


- M3 Tranmission Mounts + ZHP Shift Knob
Anyone with a 130i knows of the slight notchiness that these cars suffer from. I've changed over to Redline MTL and felt that improved shift feel, but needed more.
This DIY here explains the difference and pros and cons of a couple of types of transmission mounts with M3 ones being the compromise between feel and vibration.
I also opted to change my worn out MSport knob for the weighted ZHP knob. I'm still getting used to it, but first impression is it's definitely worth it for the feel alone! ZHP knob is a straight swap over, but you will have to modify your shift boot, unless you get the Alcantara replacement.
- Blackvue Front and Rear Dash Cameras
With all the crazy drivers and people in general on and off the road these days, you can never be too safe. After looking at heaps of different cameras, I settled on Blackvue DR650GW which has the front and rear cameras.
They are both sleek and very subtle, can barely tell they are in the car which is what I wanted. Full HD and wide capture angle topped it off as the camera for me.
I also wanted the cameras to activate by motion even when the car was off and read up on the PowerMagic box, but decided to get the VicoVation Power Plus instead as it looked like a more polished unit.
Install and routing the wires I followed
this DIY here.
- ECS Billet Aluminium Oil Filter Cap + Painted Engine Cover
While I had the car up in the air to install rear arms, I did an engine oil change which also included a swap over from my old oil filter cap to this new one. Fit was perfect and has the benefit of a nut on top. No more wrestling the old cap with quick grips to get it off!
At the same time as the brakes were getting a lick of Phoenix Yellow, I thought i'd give the engine cover a spray as well. While I know it won't sit well with purists, I couldn't resist that brake matched colour combo! Once I give the engine bay a proper clean, should look even better!


- Yokohama Advan RS-D + Motorsport Hardware Stud Conversion
Originally I had wanted to get my stock 208M wheels refurbished as they were rashed severly, but I ended up buying some replica Volks TE37SL from another e87 owner.
I lasted a little in these wheels, but always had the urge to ditch the reps.
I finally pulled the trigger and bought some Yokohama Advan RS-D wheels, in Matte Black, staggered paired with Pirelli P Zeros that I already had.
Tyres: 225/40/18 all round (stretch on the rear, until I wear out these tyres and get new ones in wider width)
18x8.5 +35 on the front
18x9.5 +35 on the rear
Special thanks to Traction Tyres and More Rowville and TyerPower North Melbourne for all their help with the Advans!
Also purchased a stud conversion kit from the guys at Motorsport Hardware with titanium nuts to fit. Light and strong!
Super stoked with the Advans, even though the centre caps cost an arm and a leg!
Stock
 Volks Reps
 Yokoham Advan RS-D


- LCI BiXenon Headlights + Air Intake Scoops
Managed to get my hands on some LCI Headlights and couldn't be happier. I've wanted these lights as long as i've had the car, and finally can tick it off the list! IMO it's the best looking headlights for the 1 series. No aftermarket, DEPO or otherwise comes close! Now I don't have to settle to that sticker to emulate the eyebrow!
Removal of the front bar is necessary to remove the lights, it wasn't too bad expertise wise, but will take about an hour. Lots of DIYs out there, but followed
this one in particular.


Because my pre-LCI car doesn't have the correct pin out to power the eyebrow, I had to splice some power from the angel eyes. Post #6
in this thread has a good picture of where to splice the wires.
I've always been taught to solder when possible. It's cleaner, stronger and guarantees a good connection. The red wire below is the jumped one.

Glad to be rid of the low powered H7 bulb that were powering the angel eyes on my old headlights and replace them with these - 80W HID H8 CREE LEDs.

Had to drill a hole in the headlight cover to thread the heatsinks outside of the unit. Worried about water ingress so used a rubber grommet to plug the hole and then some silicon around the wires. A quick tidy up, and this is what they look like from the rear.

While I had the intake accessible, I installed some air intake scoops. Theoretically, these are suppossed to force more cold air up into the intake, but I don't think there's really much performance gain, if any at all. Mainly for looks - i'll get around to colour matching it with the Phoenix Yellow calipers and engine cover.

All done, everythings coming up Milhouse!

- Varta E38 74Ah Silver Dynamic Battery
Cranks were getting a little bit long on cold starts. As far as I could tell, alternator and fuel pump were OK, engine not misfiring, coils OK and the spark plugs had just been changed not long ago. So had to be the battery.
Was deciding between this one and a Bosch S5. Everybattery was close to me and had the Varta in stock so went with that one. The extra amps should really kickstart the cranks.,

- Carly for BMW, NCSExpert, NCSDummy and INPA
Decided I wanted to code in my LCI Tail Light retrofit properly, so bought a DCAN/KCAN OBD2 cable and got to learning.
So many DIYs out there, but
this one on e90post is by far the best. Helped me when no others could.
I also gave Carly for BMW a shot. The android version is best and I was able to program the car using an OTG Cable and the DCAN/KCAN OBD2 cable. Carly is great if you can't be bothered learning NCSExp and only want to code some of the highlights i.e DRLs. NCSExp is better for if you want complete control.
So far I have coded:
- Angel Eyes as DRLs
- Comfort key FOB eject
- Windows continue after door open
- Lights stay on until car locked (if on auto)
- Higher voltage on Angel Eyes
- Low beam lights auto off when car off
- Coded new battery
- Read, clear, reset service intervals
- LCI Tail lights Retrofit
 Old Car Photos
Some photos that were taken close to when the car was stock


 More Recent Photos


 Photos by NM Photography
Under the Bolte in Melbourne. A challenging place to shoot due to all the different coloured lights bouncing all over the place, but I think they turned out nice. Here are a couple from the shoot!


 MCM Mini Meet #26
Met Tom and his E87 and Defiant Arts snapped up this picture, looking prime!
 Basement Photo
 Bonus!
Couldn't resist placing the newly acquired woman into the photo!
Yamaha MT07 in 60th Anniversary Yellow. I'm in love all over again!
 The End - For Now!