If you have been needing to crank on your parking brake lever to get it to hold it may be time to adjust the pads.
What you will need:
17mm socket
Various flat head screw drivers
Flashlight
Wheel chocks
Jack
First you will need to release tension on the cable. This is done by compressing a spring loaded tensioner located under the parking brake boot.
Pop up the rear of the leather boot with something that wont scratch it and then pull the rest of the assembly up and out of the way


I used a flat head with electrical tape on it

Now you need to compress this spring until a little latch grabs it. You will hear a click

To compress this spring, make sure the parking brake is released then stick a large screw driver in the little square notch on left side front of the mechanism and press towards the back of the car.


For the next step you can either jack up one side at a time or the entire rear end. Use wheel chocks on the front wheels. You only need to remove 1 bolt from each rear wheel. It doesnt matter which one. You will need the parking brake off and the transmission in neutral so you can rotate the tires.
Remove a bolt using a 17mm socket

Inside, there is a mechanism that can adjust the pads outwards as they wear.
It is part number 3 in this diagram. As the star shaped ring rotates the assembly expands and pushes the pads outwards towards the inside of the rotors. On my car I believe it was rotated in the opposite direction. This will change which direction you need to spin the star ring.

Here is how it was oriented on my car
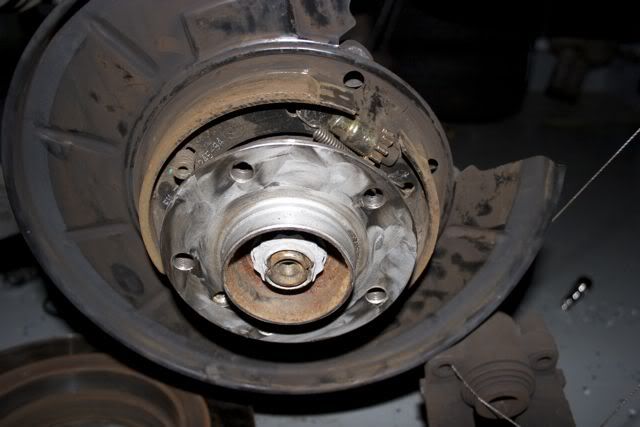
On the left side tire, the mechanism can be seen through the hole when it is at the 1 o'clock position.
Next you need to stick a screw driver into the hole and rotate the star shaped ring on the adjuster.
You need to go in the correct direction to expand the pads. On the left side, this means get your flat head under the bottom part of the star and flick it upwards and to the rear of the car. If you were to look at the assembly from the rear of the car, the star would rotate clockwise.
Wedge the flat head under...

pry upwards by pushing the handle down

Make sure not to get caught up on the spring located right under the assembly. It can be hard to tell if you are rotating it, just keep at it. After a while test to see if the tire still spins. When the pads move far enough out to prevent the tire from rotating, spin it the opposite direction for about 8 clicks to leave a small gap and you are done with this side. Replace the bolt and lower it back down.
On to the right side. Here is the location for the mechanism on the right side.

This time you are doing the opposite motion. Get the flat head on top of the star and rotate it down and to the front. Again, if you were looking from directly behind the rear of the car it would be rotating clockwise.
Flat head starting position

Ending position

It takes some force to get it spinning. Keep at it until this tire stops rotating freely and then back off a few clicks. Put the lug bolt back in and lower it down.
Here are the two types of flat heads I used

Last step, you need to release the spring located under the boot.
It looks like a J in this picture. I used a dental pick to pry it out and to the right side of the car. The spring will release.


Put the boot back on starting from the front and you are all done. You should now start to engage after about 5 clicks and not have to pull it up quite as far.