Thanks to
ilikebmxbikes,
Sk8fe,
Venom,
EINSER M,
Mybad135,
Tony135, uberschnell, and a few others for answering my questions in regards to this project. Not reinventing the wheel here, just another boring 1M conversion -- haha! Hopefully some of the pics will help the next guy in line -- so lets get to it.
Note: I broke this build into different sections/threads. The page was getting so big that even I had trouble following or finding things at times. This conversion has many phases. I've done my best to group them in a manner which is easy to understand and navigate.
Navigation: Conversion & Parts List
•
Home Page & Main Build Thread
•
Front <
•
Rear & Quarters
•
Battery & Exhaust
•
Ducts & PPK2
----------------------------------------
In this post you'll find:
• Water Tank Removal
• 1M Side Marker Mod
• 1M Front Fender Installation
• Headlight Bracket Adjustment/Differences
• Headlight Washer & Nozzle System Options
• Headlight Washer Removal Mod
• 1M vs. 135i Wheel Cover & Underhood Shield Comparison
• 1M Horn Relocation
----------------------------------------
//////////////////////////////////////////////
Front Parts List
=========================

Thanks again to ilikebmxbikes & Sk8fe for compiling/gathering the part numbers:
Required:
51118057717 - Front Bumper (ordered w/out light-washer holes)
51117900764 - Front Bumper Grill
41358052625 - Fender L
41358052626 - Fender R
51138051817 - Fender Side Marker Mount/Bracket L
51138051818 - Fender Side Marker Mount/Bracket R
61678051590 - Windshield Reservoir Tank
51748051605 - Air Duct L
51748051606 - Air Duct R
51648051987 - Headlight Bracket L
51648051988 - Headlight Bracket R
51718051591 - Front Fender Liner L
51718051592 - Front Fender Liner R
51718051595 - Cover, Wheel Housing Front L
51718051596 - Cover, Wheel Housing Front R
51758051609 - Underhood Shield
May not be needed:
51118051613 - Front Bumper Tow Hook Cover
(*1)
51718045553 - Front Fender Liner Cover L
(*2)
51718045554 - Front Fender Liner Cover R
(*2)
51778052517 - Supporting Ledge L
(*3)
51778052518 - Supporting Ledge R
(*3)
Optional Parts:
51748051604 - Air Duct, Bottom
(*4)
51138051601 - Chrome Side Marker L
(*5)
51138051602 - Chrome Side Marker R
(*5)
=======================
Notes & Updates:
(*1) My front bumper came with this. Order the bumper first.
(*2) Liners did not come with covers, however, after comparing them -- they are identical. You can reuse the old covers.
(*3) Compared parts -- they are identical. You're current parts can be reused.
(*4) Optional if you're running an aftermarket inter-cooler that required cutting.
(*5) These part numbers are for OEM chrome side markers. They run about $30/each. Not a big fan of chrome, so I ordered ind-distribution markers in flat-black.
//////////////////////////////////////////////
08/03/14 - WATER TANK
=========================
Note: Some of the extra wiring that you see with florescent-pink tie-wraps are not OEM. Prior to starting this project, I was using a 1M-Style replica bumper with fog-lights. What you see here is fog-light wiring harness. It will be removed...
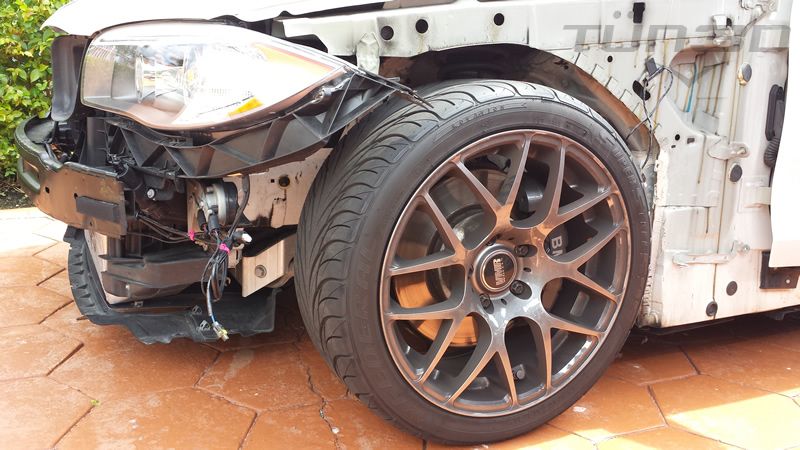 So naked...

 Easiest way I found to drain the tank fluid, was to disconnect the right light-washer hose...
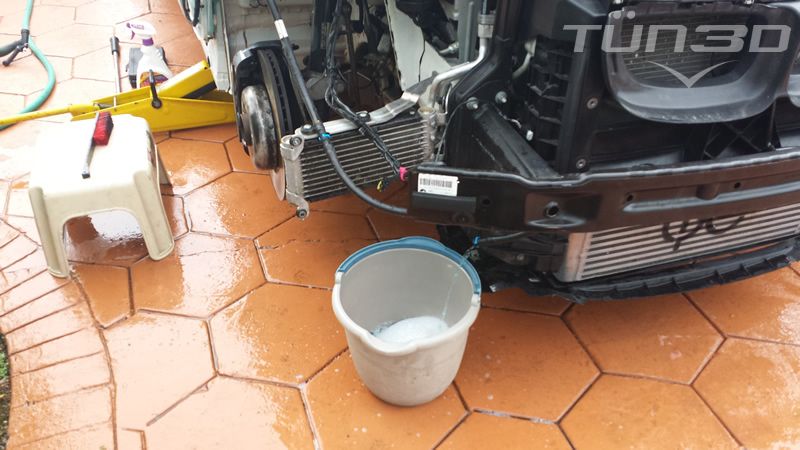 Draining! I took this time to clean the crap out of the inner fender...

 Comparing tanks -- just in case anyone wants to see the difference. You can see the 1M fender shape in the new tank...
//////////////////////////////////////////////
08/03/14 - SIDE MARKERS
=========================
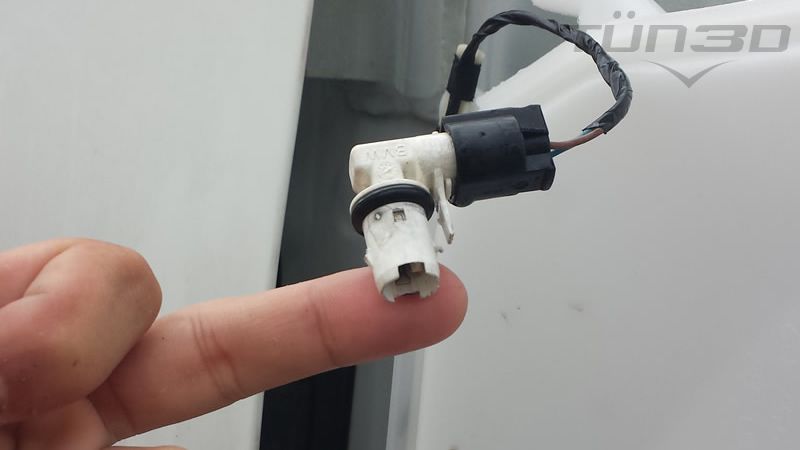 Here's a little something for you guys in regards to the side-markers. The 1M side-markers, WILL NOT work by simply connecting them. You have to invert the wires on the harness. Grab yourself a tiny flat-head screwdriver. You don't need the white connector I'm touching for the 1M markers. Take it off...
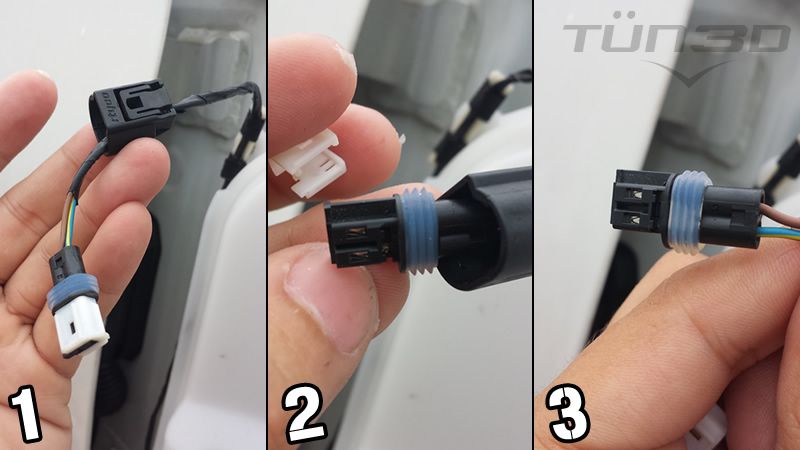
1) With a small screwdriver, find the harness cap lock-tab, gently apply pressure while simultaneously sliding it back.
2) Remove the white clip to expose the pins.
3) Apply pressure to the pink lock-tab and slide them out.
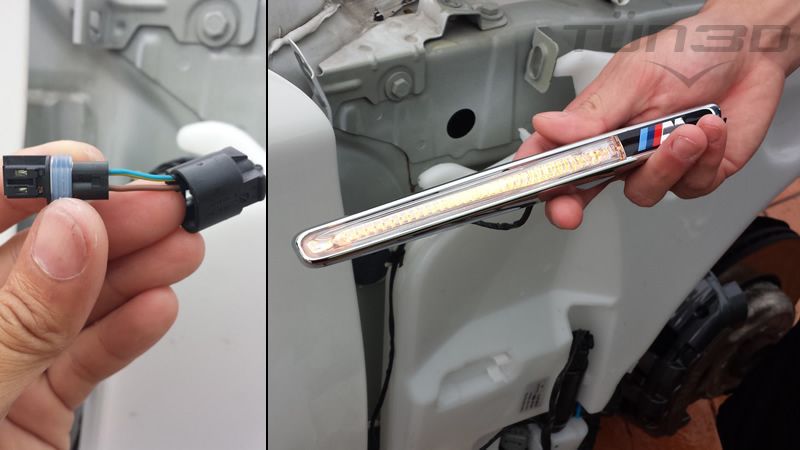 Invert the wires, reverse the steps, connect, and test -- money$$!
//////////////////////////////////////////////
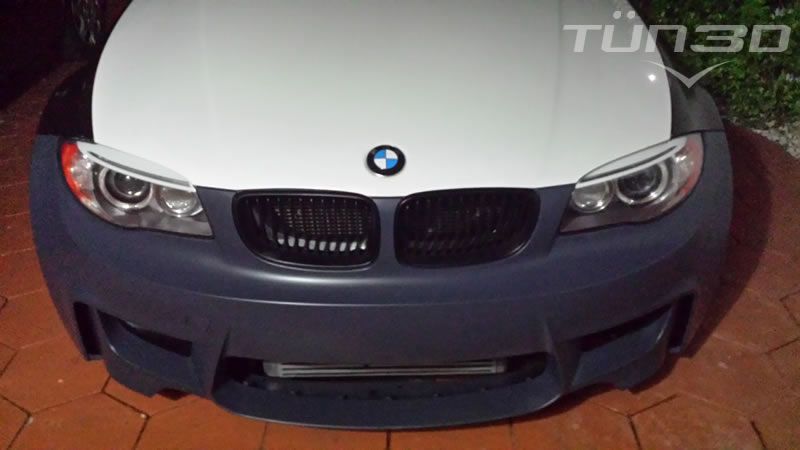
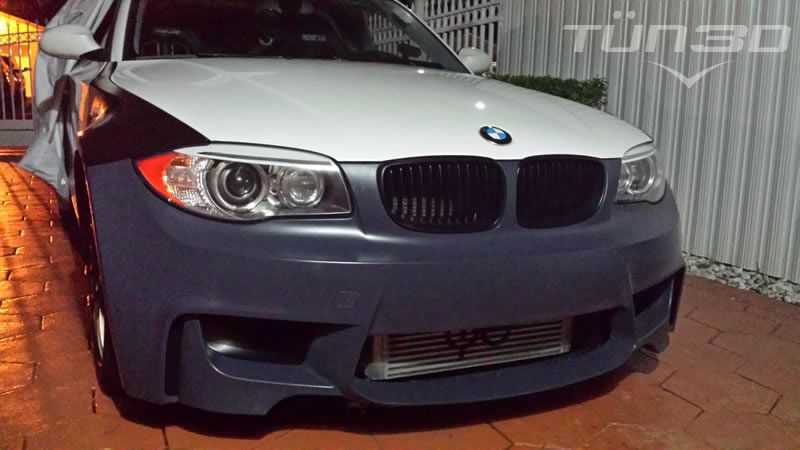
08/07/14 - FENDERS
=========================
 Time for new wheels...
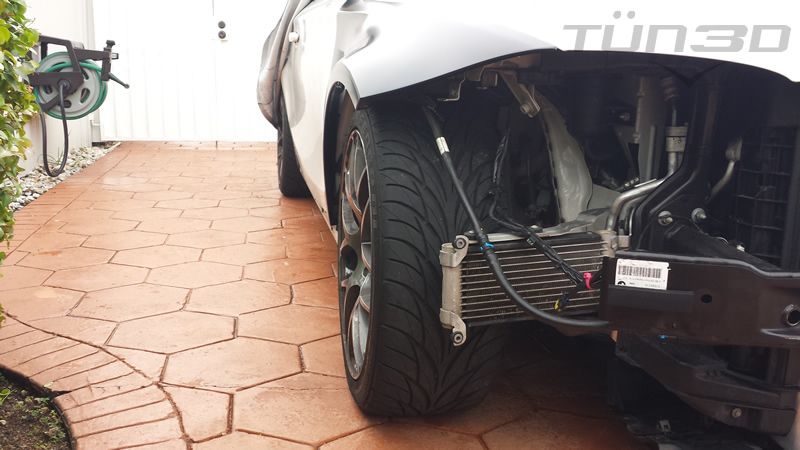 Tank connections and fender removal/install are really straight forward...
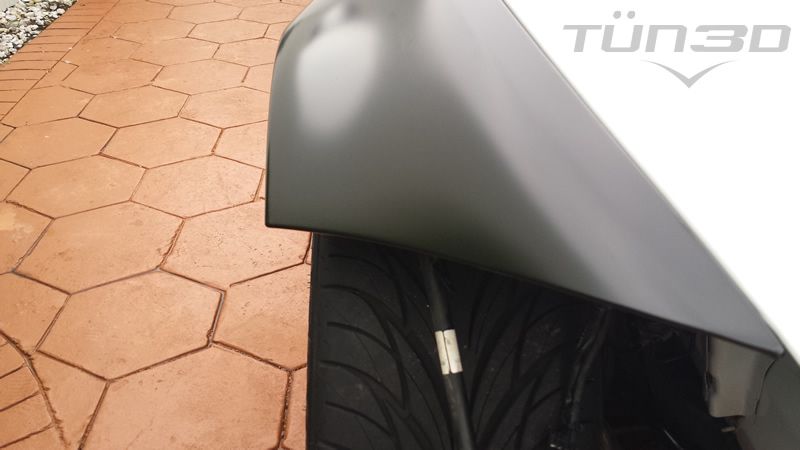
 Word to the wise, don't COMPLETELY bolt down your new fender without making sure that it lines up well (consistent gaps) and that you can close the hood properly...
//////////////////////////////////////////////
08/09/14 - LIGHT BRACKETS
=========================
Note: In this section, I show you how to transfer your high-pressure nozzles onto 1M light-brackets. Please read the "HEADLIGHT-WASHERS" update above before transferring these -- no sense in working twice.
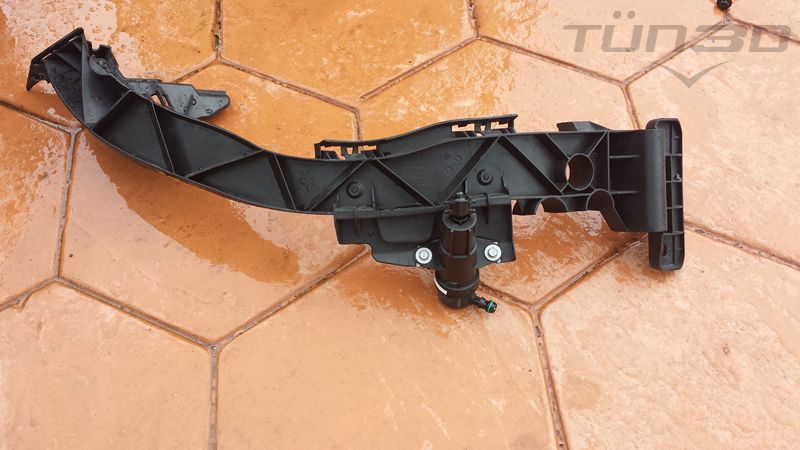
 Headlight brackets are identical, with the exception of the fender mounting points. 1M mounting points are much smaller, less pointy and different in shape...
 Here is the side-by-side view of the pieces we're transferring...
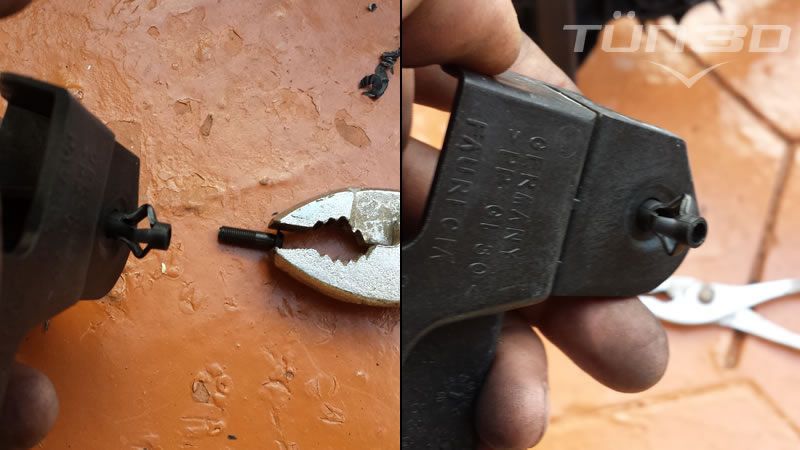
 Grab a Phillips screwdriver and apply lots of pressure to the center pin until it pops. Turn over the bracket and pull it out with some pliers...
 Once the pins are out, with your finger, gently work the expanding clips and make then as as possible. At this point, you should be able to simply pull out the entire washer assembly. If its not easily coming out, work the expanding clips a little more. The clips are pretty fragile, so DO NOT go to work on them with pliers -- you'll break them...
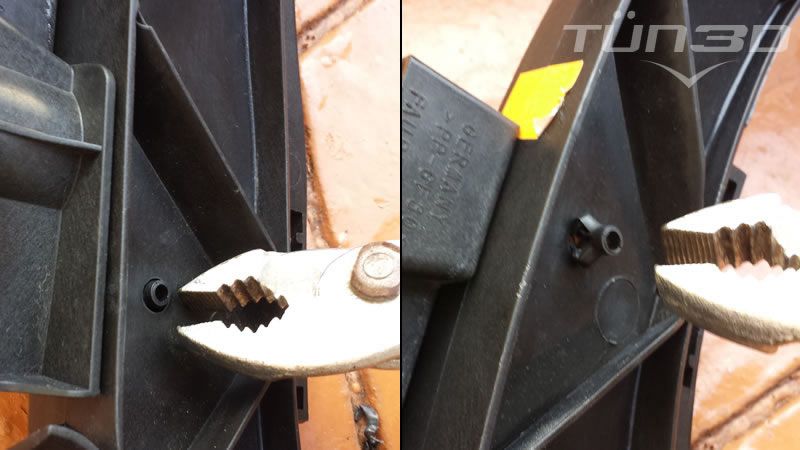 With the washer assembly out, line up the clips onto the new bracket. Grab your pliers and gently push them thru. Insert the pin with your finger and you're done...
//////////////////////////////////////////////
08/09/14 - HEADLIGHT-WASHERS
=========================
 135i headlight-washers become obsolete with a 1M bumper. 1M's removed the bulky high-pressure nozzle(s) and replace it with a much smaller spray nozzle(s). That said, and in most cases, high-pressure nozzles need to be removed...
REMOVE the high-pressure nozzle system if:
135i headlight-washers become obsolete with a 1M bumper. 1M's removed the bulky high-pressure nozzle(s) and replace it with a much smaller spray nozzle(s). That said, and in most cases, high-pressure nozzles need to be removed...
REMOVE the high-pressure nozzle system if:
1) You ordered the 1M bumper WITH nozzle openings AND you're buying the 1M nozzle system.
2) #1 is true AND you're doing a PPK2 AND you're relocating the horns to 1M location(s).
3) #1 is true you're relocating the horns to 1M location(s).
Note: If you ordered the bumper with nozzle openings, I'm assuming that you're also buying the 1M nozzle system. In this case, there is just no need to keep those bulky high-pressure nozzles attached to the light-brackets...
KEEP the high-pressure nozzle system if:
1) You ordered the 1M front bumper WITHOUT nozzle openings AND they are coded out/disabled.
2) #1 is true AND you're doing a PPK2 AND you're relocating the horns according to the PPK2 installation manual, non-1M location(s).
3) #1 is true AND you're not doing a PPK2 AND you're not relocating the horns.
Note: If you ordered the bumper without nozzle openings, and don't want to get rid of the 135i's native high-pressure nozzle system, make sure they are coded out/disabled. You certainly don't want them popping up, banging against the inside of the bumper, and spraying washer-fluid inside the bumper. In this case, the only time where you'll need to get rid of them is if you relocate the horns to 1M location(s). To see horn positioning options, please see the "HORNS" update...
//////////////////////////////////////////////
08/10/14 - SHIELDS
=========================
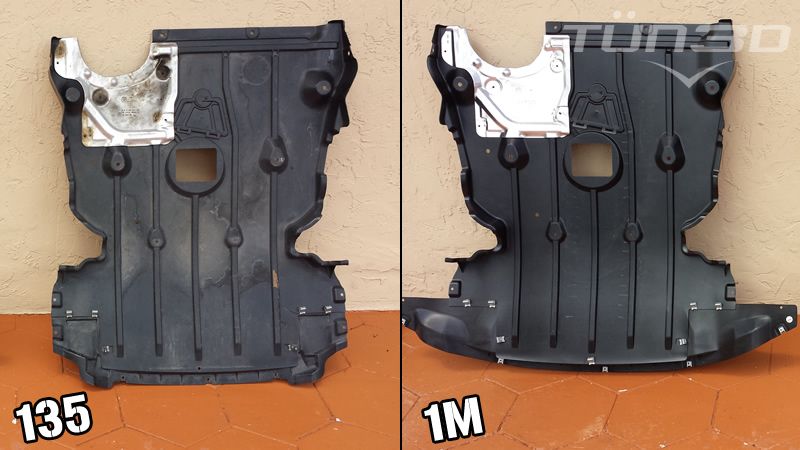 Here are the underhood shields side-by-side...
//////////////////////////////////////////////
08/10/14 - FRONT WHEEL COVERS
=========================
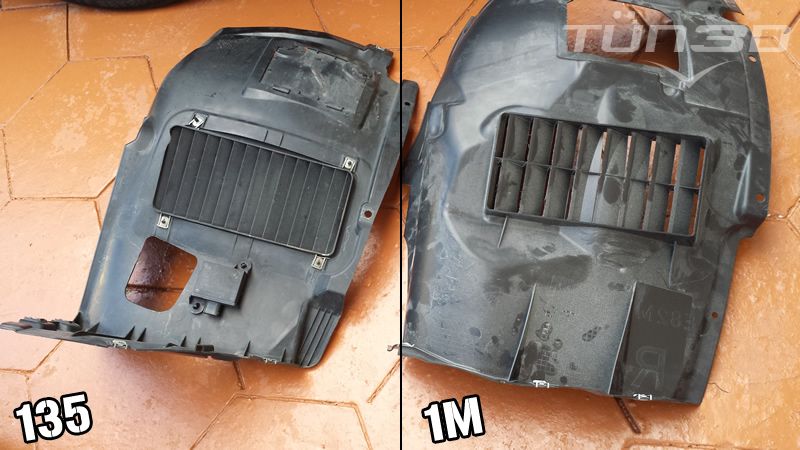 Here are the front wheel covers side-by-side...
//////////////////////////////////////////////
08/27/14 - HORNS PART 1 (HEADLIGHT-WASHERS & TANK)
=========================
Note: After a shit-ton of research, here's a little write up in regards to relocating your horns and removing the headlight washers. These two go hand-in-hand as you will see. If you're asking yourself why this needs to be done, checkout the "DUCTS & PPK2", "HEADLIGHT-WASHERS", & "LIGHT BRACKETS" updates...
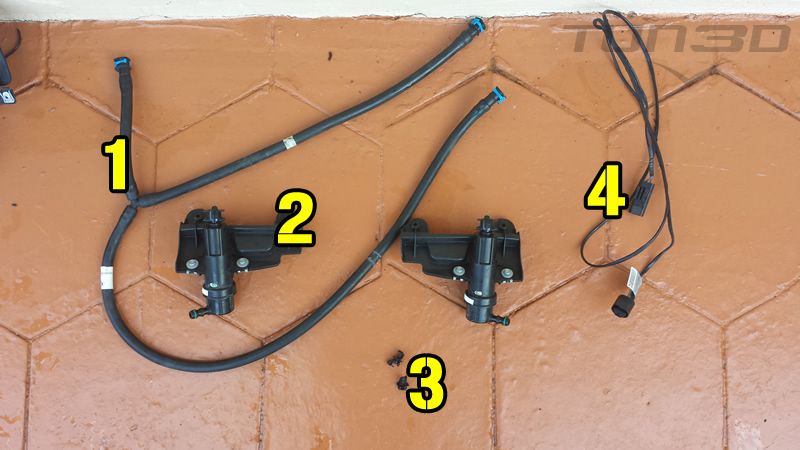
This is what you need to remove in order to relocate the horns:
1) Hose, headlight cleaning system
2) Housing, high-pressure nozzle(s)
3) Tie-wrap clips (on the back of the bumper carrier)
4) Horn electrical extension
Note: To completely remove the system, you also need to remove the pump and it's connecting hose which runs underneath the right headlight. Removing the items above will allow you to mount the horns, however, you still need to cap the tank. Please see the solution below...
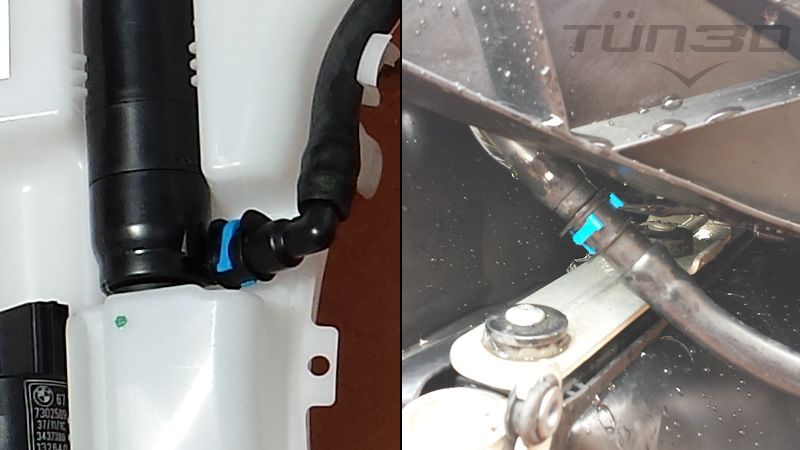 If you're not running any of the headlight nozzle systems, the line needs to be capped -- either at the pump or light bracket...
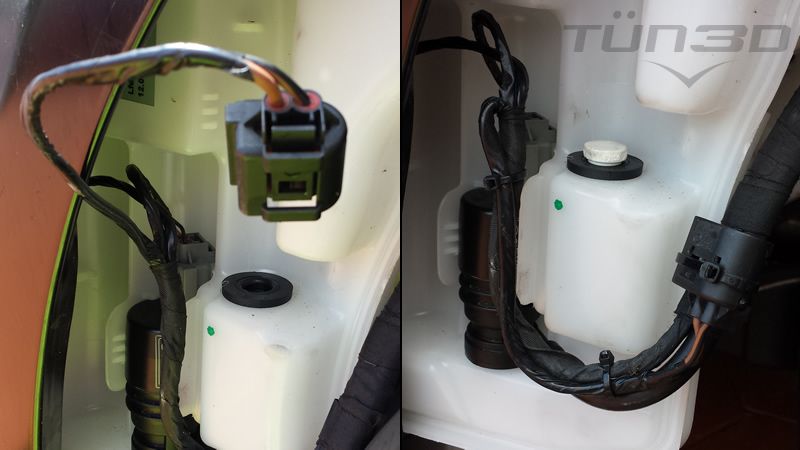 I disconnected/removed the pump & main line that feeds the light washers. Turned on the car and checked for codes/errors -- none! Tested the main washers -- perfect. Plugged the tank -- done! I also zip-tied the connection to keep it from banging around. For the plug, I used a 1/2" Poly Alloy Test Plug from http://www.apolloflow.com. Item #APXPAP1250PK. You can pick these up at Home Depot or Lowes...
//////////////////////////////////////////////
08/27/14 - HORNS PART 2 (RELOCATION)
=========================
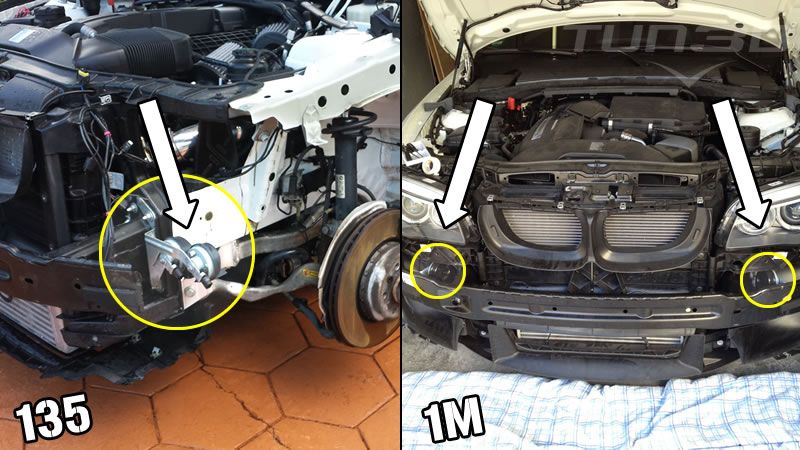 Lets start off by understanding the difference. 135i's have both horns (high/low pitch) located inside the left fender. 1M's moved their horns underneath each headlight to accommodate the PPK2's left radiator and air-duct...
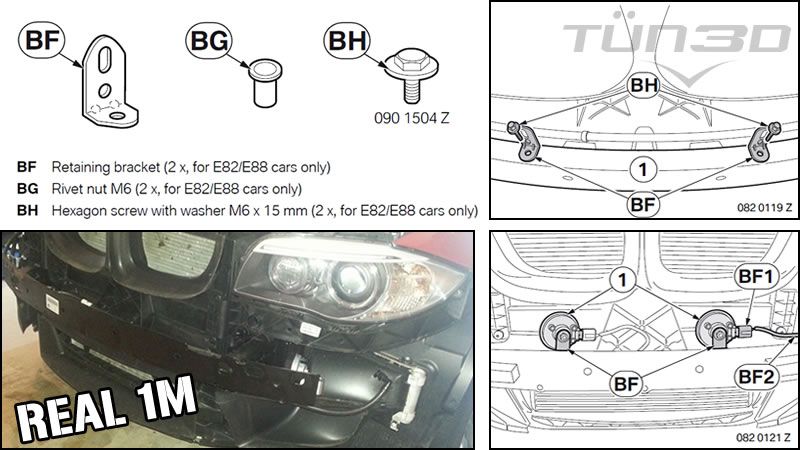 If you're doing the PPK2 and relocating the horns according to their instructions, here is where they go. Keep in mind that you will have to drill the bumper carrier...
Note: If you buy the PPK2 parts individually (like I did), then you WILL NOT be able to buy the hardware for relocating the horns from BMW. The retrofit/relocation hardware comes with the kit. There are no individual part numbers for the brackets themselves. If you have better luck finding them, let me know...
If you're doing the PPK2 and relocating the horns according to their instructions, here is where they go. Keep in mind that you will have to drill the bumper carrier...
Note: If you buy the PPK2 parts individually (like I did), then you WILL NOT be able to buy the hardware for relocating the horns from BMW. The retrofit/relocation hardware comes with the kit. There are no individual part numbers for the brackets themselves. If you have better luck finding them, let me know...
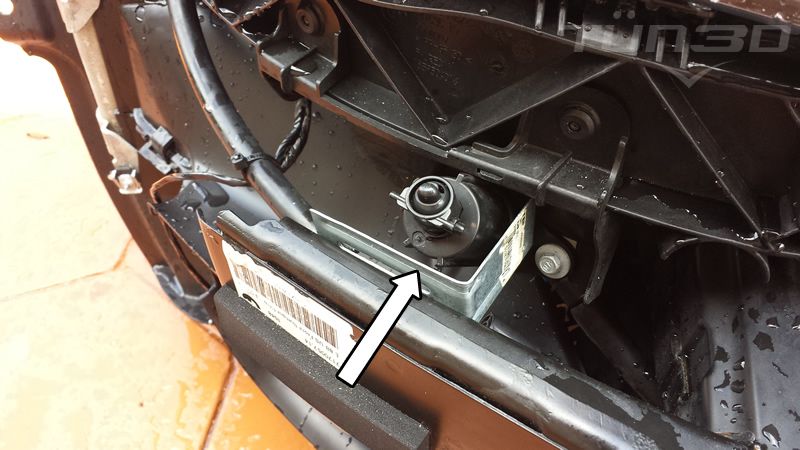
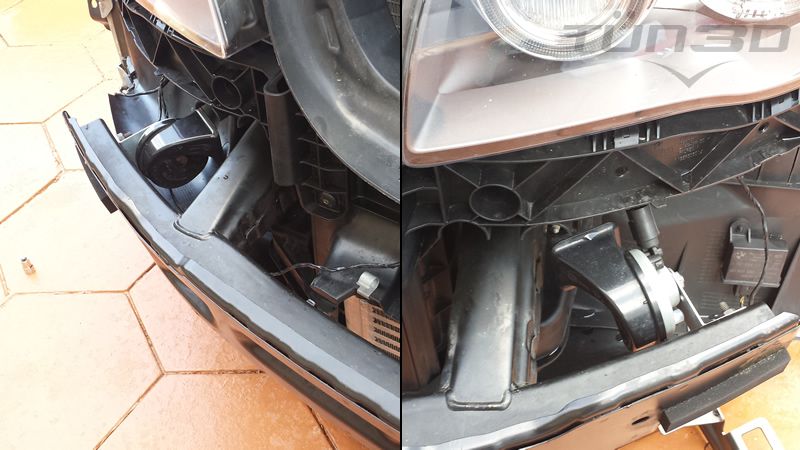
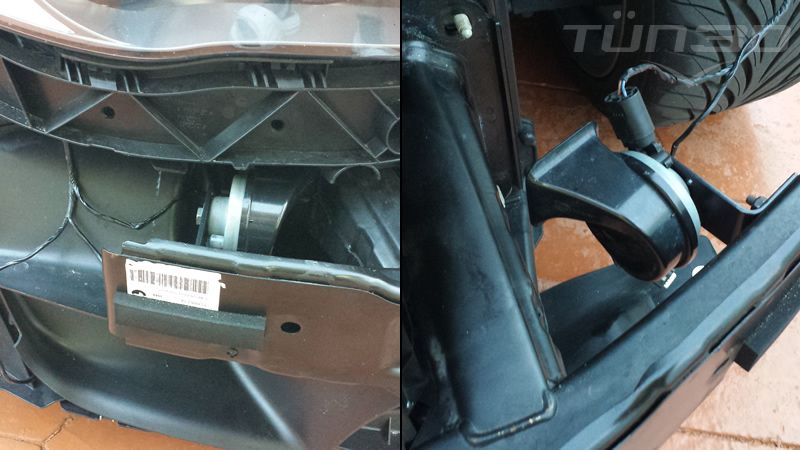
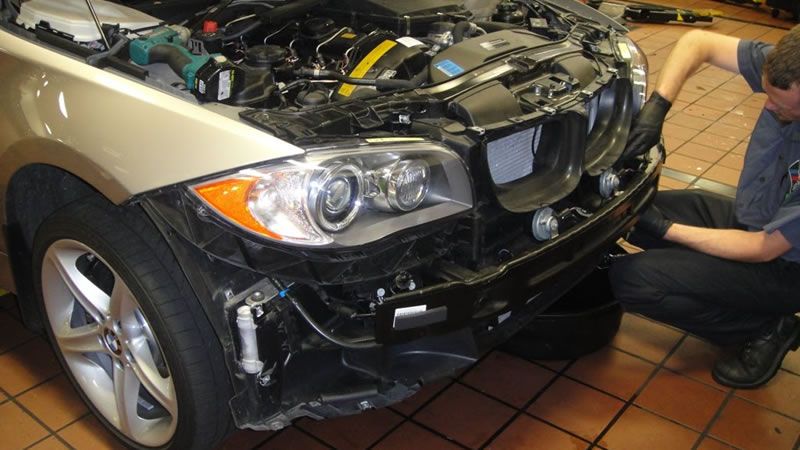 Here's a live view of where BMW wants you to put the horns...
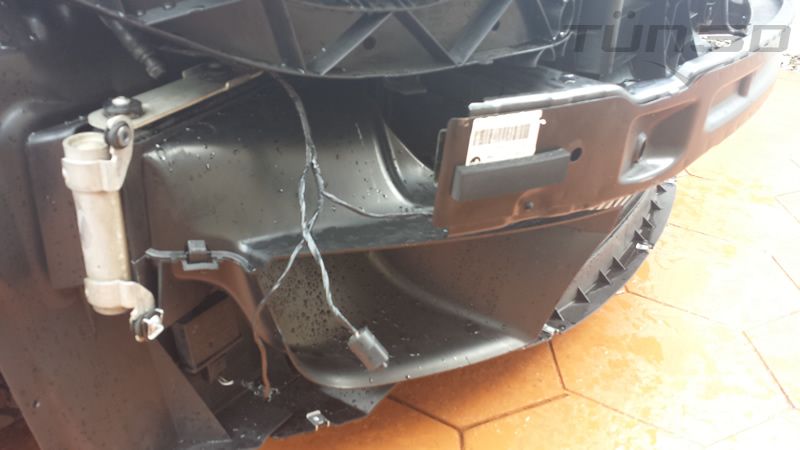
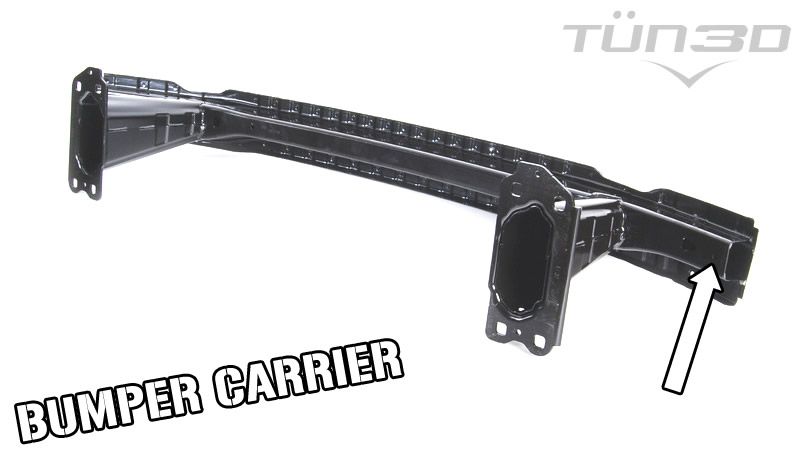 The bumper carrier already comes with the necessary holes to relocate the horns...
Note: You'll have to remove the "tie-wrap clips(s)" that go inside these holes. They are used to mount the relocation brackets...
The bumper carrier already comes with the necessary holes to relocate the horns...
Note: You'll have to remove the "tie-wrap clips(s)" that go inside these holes. They are used to mount the relocation brackets...
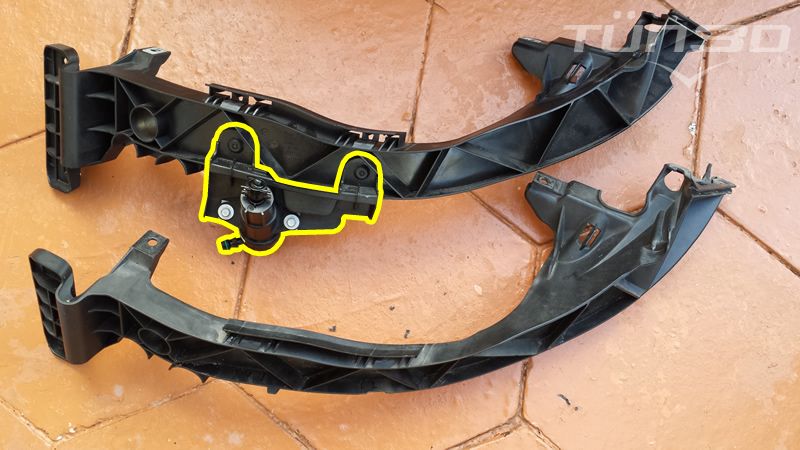
 I created this outline of what the 1M's horn bracket/mount looks like. Unfortunately, it's nowhere to be found. Both the dealer and all online catalogs only offer the 135i's dual bracket/mount. The solution -- we make or buy our own brackets...
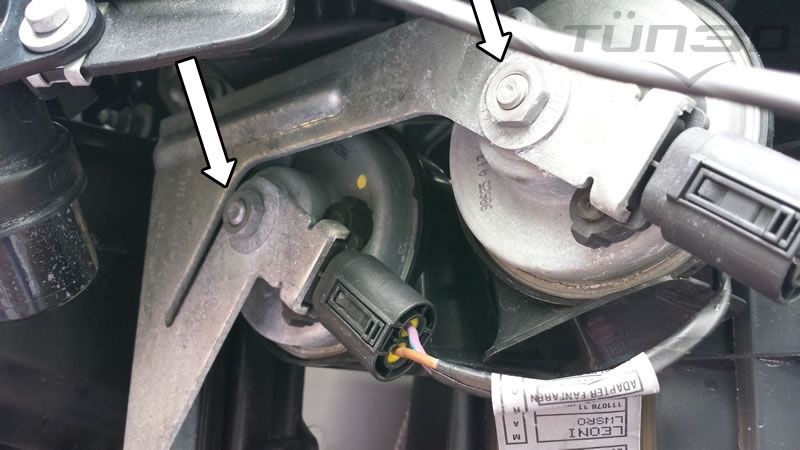 To remove the horns, take out these two nuts...
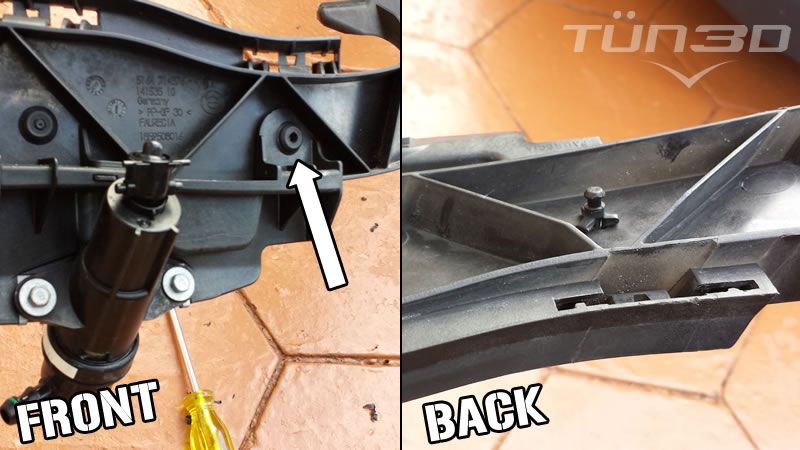
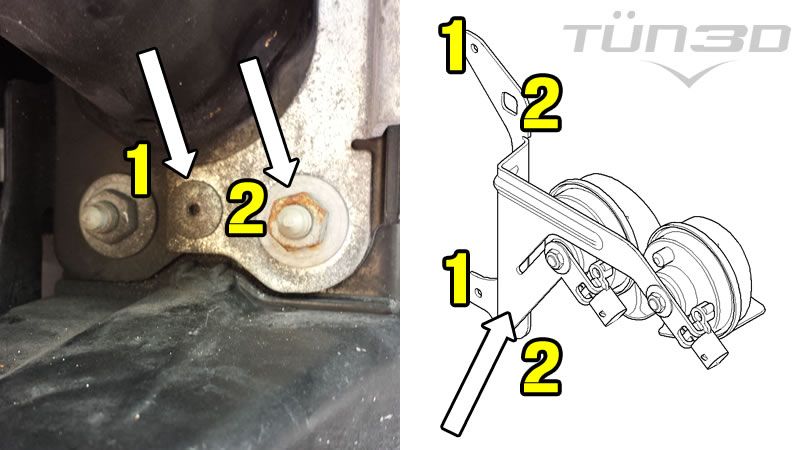 The bracket consists of two bolts and two rivets. To access the top rivet, you will need to remove the headlight...
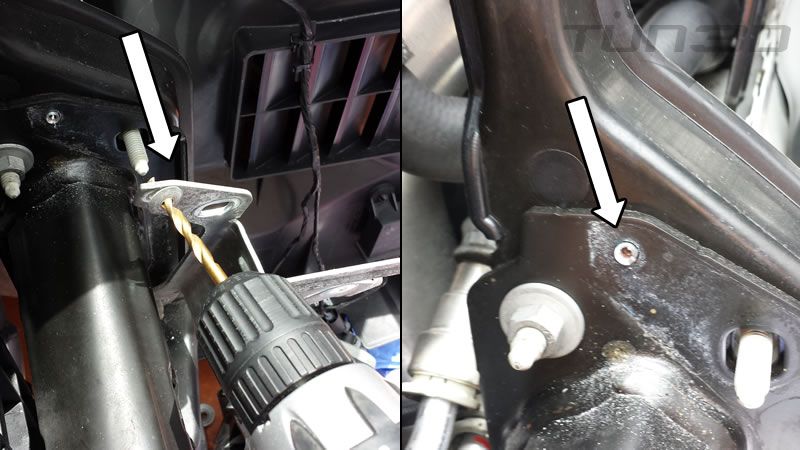 Drill out the rivets and hammer out the stubs...
 If you're moving the horns to 1M location(s), this is why you can't keep the high-pressure nozzles...
 After removing the extension, this is what you're left with. It's the perfect length for the new horn position...
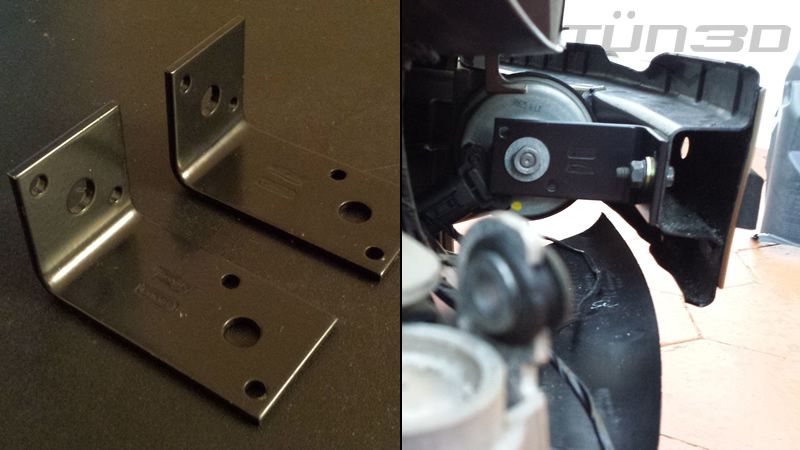
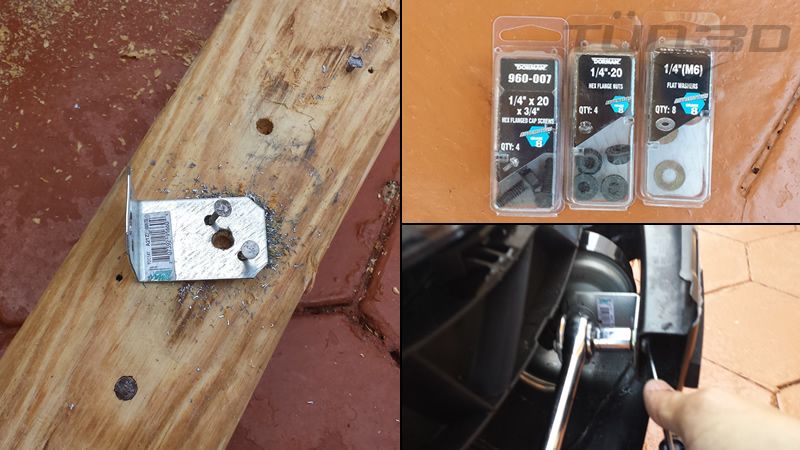 I bought some "temporary" brackets and drilled two 5/16 holes on each leg. You can reuse the same washer & nut from the old bracket. For the bumper carrier, I bought 1/4" x 20 x 3/4 bolts, washers, and nuts...
 Here is the temporary solution I came up with -- mounted...
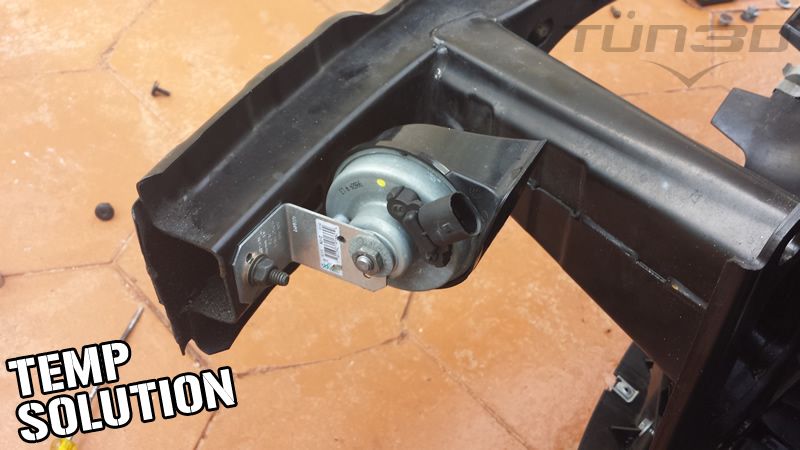 A rare view of the back-side...
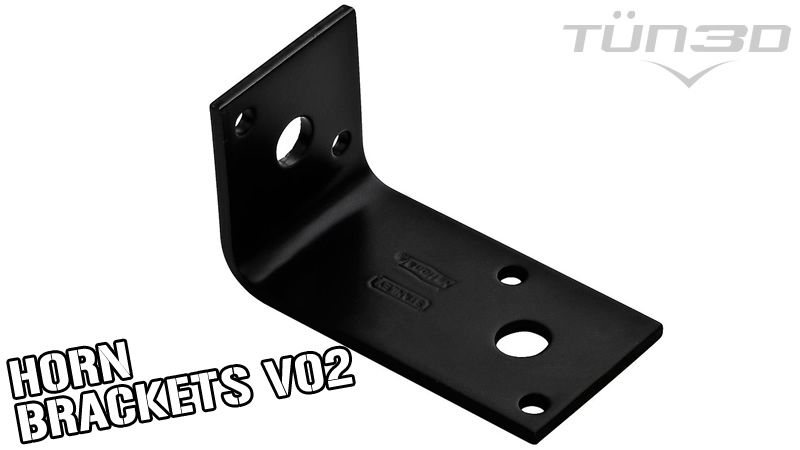 Took me a while, but this is the bracket I ordered. I wanted something professionally done. The dimensions are 2.94" x 1.7" with 5/16 holes. Ordered it from www.hardwareworld.com. Item #9W78U6, UPC: 886780005844...
 Here are the new brackets. Finish looks awesome -- perfect clearance. Couldn't be happier...
 More pics of the final product...