I never thought that replacing a battery could be so complicated. BMW: why do you have to make the battery system so complicated!

When my car died last week, I thought I could just replace the battery with whatever's available in an auto parts store. Then I found out that there are different types, Ah, CCA's, etc. I also found out that each car from the exact same model and exact same model year could have different batteries!!! I was literally doing this -->

So it's best to stick with whatever battery specs you have installed in your car unless you are planning to code it.
I tried searching the forum on how to replace the battery but I didn't find any. For some, this process might be simple but I just wanted to help out anybody who's intimidated by changing the battery because of the system complications and how much stuff the battery has on top of it.
On to the DIY...
First check your battery specs. I have a lead-acid battery with 80Ah and 640CCA. Like I said earlier, try to keep the specs the same as your old battery unless you're planning to code it. My old battery's part number is 61 21 7 604 815. Jason @ Tischer helped me out a lot and he said that this battery is obsolete and that the new replacement part number is 61 21 2 353 808. If your current battery has different specs, ask Jason or your local dealer what your replacement part number is. Unfortunately, batteries can't be shipped out because it's considered hazardous material so you have to buy this from your local dealer if you choose to stick with OEM.
Here's a list of tools you'll need:
- Rachet
- Rachet Extension
- 10mm socket
- Screw Driver

*** Please ignore the 13mm socket. From other videos I watched, they said you needed a 13mm. I didn't use it anywhere.
Your battery is located in the trunk. Pop the trunk and pop the carpet in order to expose the battery. Here's what you'll see:

*** Image taken from the web because my image came out blurry...
First step is to remove the 2 10mm nuts holding that black curved bracket.

Once you have this bracket removed, you'll now have access to the entire battery as shown:

Second step is to remove the battery's negative terminal using your 10mm socket and rachet. You don't need to completely remove the nut. Just loosen it enough to be able to remove the terminal.

Once you have the negative terminal removed, set it aside so that you don't accidentally hit it with anything.
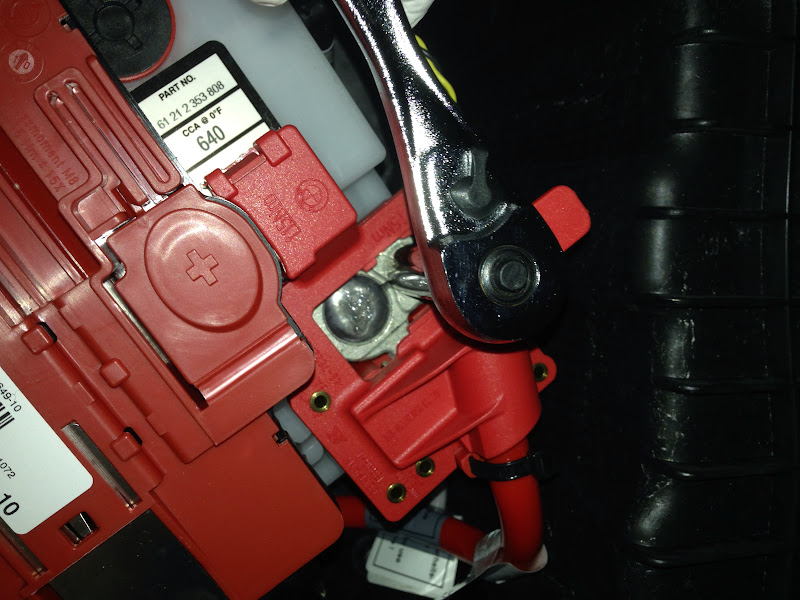
Next step is to remove the battery's positive terminal along with that big red box on top of the battery. Flip up the cover as shown below to expose the positive terminal of the battery.

Again, use your 10mm socket and rachet to loosen this nut. You don't have to remove it. If your rachet is all metal like mine, make sure you don't hit any metal part of your car or it will cause a big short.
After loosening the positive terminal's nut, you now have to release the clips holding the big red power box to the sides of the battery. This is where your screw driver comes in. There are clips on either side and you just position your screw driver as shown below and pop them out.

After releasing the 2 metal holders, your entire red power box should come loose.

Next, remove the vent tube on the side of the battery near the positive terminal.

Next step is removing the metal plate near the negative terminal that holds the battery down to the car. In my case, there was just a bolt towards the bottom of the car. On other cars, there's a long bolt that goes all the way up to the same height as the terminals. So for my case, I needed to use an extension.

You can also see that there are 2 other holes near that plate. That's for accomodating different size batteries to your car.
Once all these steps are done, you are now ready to remove your battery. Just move everything to the side as much as you can and lift up your battery and out of the car. Please be careful as the battery is heavy.
Here's a comparison picture of my old battery and the new battery. As you can see, the size is different between the two.

Pop the new battery in place. Towards the front of the car, make sure that the lip at the bottom of the battery goes underneath the holder as shown below:

While you're at this step, connect back the vent tube to the battery as well.
Next step is to re-install the metal bracket beside the negative terminal that holds your battery in place. As you remember, the new battery is wider than the original battery and as a result, I had to use a different screw hole to install the holder.

After this, your battery should be bolted down to the floor securely and it shouldn't move. Give the battery a few tugs just to make sure it doesn't go anywhere.
Re-install the red terminal to the positive node of the battery. Tighten the screw down using your 10mm socket and rachet. Re-secure the metal tabs on either side of the battery as well. You should hear a clicking sound. Once these are done, the big red power box shouldn't move at all.
Re-install the negative terminal to the negative node of the battery and tighten the 10mm nut down. Mine sparked a little when I connected the terminal to the battery's negative node.
After, re-install the curved metal brace on top of the battery and secure it with the 2 10mm nuts.
Once you're done, you have to register your battery to the car. There are certain tools that do this. Or you can bring your car to an independent shop or dealer to have your battery registered.
Hope this helps out my fellow 1 series owners!
***DISCLAIMER: I will not be responsible for anything that happens to you or to your car when you perform this DIY. This is an article to help out fellow forum members on how to replace the battery. If you are uncomfortable doing this, bring your car to an independent shop or to the dealer and have them perform the work.***