

|
|
|
|
|
| 05-25-2010, 02:52 PM | #23 | |
|
Private First Class
 17
Rep 109
Posts |
Quote:
|
|
|
Appreciate
0
|
| 09-11-2010, 06:54 PM | #24 |
|
Lieutenant Colonel
 693
Rep 1,608
Posts |
Do we have any consensus here as to which bolts need to be removed: 10mm allen bolts on top of the caliper, or the standard hex bolts that hold the caliper bracket to the steering knuckle ? Is there really a 'right' or 'wrong' choice here? And what about torque specs? I had read that the bolts holding on the bracket to the steering knuckle gets 63 ft lbs, but what about the Allen bolts? Sure wish we had a bentley manual for this car!!
Re the locktite, it wouldnt surprise me at all if Both pairs of those bolts should get blue locktite.
__________________
Boostm3
'18 LBB MT M2 Exec pkg, Moonroof, Production 7/6/17  Last edited by boostm3; 09-13-2010 at 12:59 PM.. |
|
Appreciate
0
|
| 11-08-2010, 06:57 PM | #25 |
|
Member
38
Rep 392
Posts |
Since Boostm3 asked, I should post this for everyone. According to my service technicians (at the BMW dealership) when replacing the front pads they will remove the caliper using the allen bolts described in the original post in this thread. They do not remove the entire caliper bracket. Still never checked the appropriate torque spec, but I make them tight and haven't had any loosen up at all. It seems like there was some sort of Locktite originally, but since I'm removing the calipers fairly frequently I don't use any.
__________________
2009 135i
Dinan Stuff |
|
Appreciate
0
|
| 11-08-2010, 11:50 PM | #27 | |
|
Lieutenant Colonel
693
Rep 1,608
Posts |
Quote:
http://www.pelicanparts.com/bmw/tech...Brake_Pads.htm. What makes this 135i brake pad replacement thread so valuable is that these are Unique brakes, both front and back, and with the paucity of literature out there on the 1 series in general, the value of this thread becomes very evident!
__________________
Boostm3
'18 LBB MT M2 Exec pkg, Moonroof, Production 7/6/17 |
|
|
Appreciate
0
|
| 11-10-2010, 08:45 PM | #28 |
|
Lieutenant Colonel
693
Rep 1,608
Posts |
I want to give mad props to Brian (Ruffan) re the write up, pics, and general help with brake pad installs. I had been planning to do mine from before I took delivery of my 135i on 11/02 even, and today I pulled the trigger. I hate brake dust... Really hate, I mean. Ive changed out the pads on every european car Ive owned. I had decided to replace my stock pads, which, btw, are stamped Jurid, which as we know, make really good dusty street pads, before I put any serious mileage on the car because I knew from prior experience that once the calipur and rotors get permeated by brake dust, pad changes become much more problematic with high potential for squeeling, juddery outcomes. Since I feel my track days are pretty well behind me, I wanted a performance street pad which had to stop well, and also had to have much less dust than stock.. I settled on the Centric Posi Quiet semi metallics.
I started the job on the passenger side front. Jacking the car was a snap with my new Harbor Freight 17" lift jack, my stands, and my new jack point insert tool and jack stand adaptors. I jacked up at the rear jack point and was able to do one whole side from that one jacking point, although I used a jack stand on the front jack point to lessen the stress on the jack while I was doing the front. So, I started in... After loosening the 3 torx screws I was planning on removing, I tackled the Allen bolts.. When Brian said he thought these might be reverse threaded, I know what he means.. They used some serious thread lock on those puppies. So much so that I wound up braking my 1/2" Crapsman ratchet, but not before I luckily was able to finish the job. I wound up torquing the allen bolts to about 75 ft lbs which Im hoping is ok.. Since there is no separate part number in the ETK for these allen bolts which are treated as part part of the caliper itself, its going to be hard to track down the 'official' torque spec.. But 75 lbs seems good.. I have a tendency to overtorque, with more than one snapped or stripped bolt as a result. This time, I decided to play it safe. Used a bit of blue locktite on them as well just for good measure.. I have no idea what kind of thread locker they came with, but it felt like it might have even been the permanent 'red' stuff, although the color was certainly not that. I had the worst time with the driver side front, the last pad I did...One of the two allen bolts was Really tough to remove.. My ratchet by this point was slipping gears badly. Every time I pulled up on it to try and loosen the bolt, it would skip with a large clunk, making me fear id not be able to complete the job without finding someone with a working ratchet. . But by holding the tighten/loosen lever in place, and trying to work as slowly and steadily as possible, i was just able to back that sucker out.. The other allen bolt on that caliper came out alot easier (less locking compound) Long story medium, I finished the job in about 3.5 hrs, for all 4s. I wound up tranferring the backing plates from the stock rears to my Posi Quiets, which, btw, come with weights attached just like the stockers! I think I could probably take almost an hour off my completion time with a proper ratchet and the experience I gained doing it once. I took her for a 25 mile drive afterward, and I was really happy... the Centrics stopped really well, and were much easier to modulate.. Cold stop seemed good as well. As for the dust, while not as clean as my M3's Metal Masters, theyre close, and way better than stock in this regard; not dustless, but low dust, and thats a huge improvement. Thanks to Ruffan for his advice, and for this thread..
__________________
Boostm3
'18 LBB MT M2 Exec pkg, Moonroof, Production 7/6/17 |
|
Appreciate
0
|
| 11-10-2010, 09:22 PM | #29 | |
|
Colonel
 
219
Rep 2,233
Posts |
Quote:
|
|
|
Appreciate
0
|
| 11-11-2010, 01:08 PM | #30 |
|
No fast lane bandits allowed
7
Rep 338
Posts |
BoostM3,
Great to see you got the job done. Yes the 10mm allen bolts on the sides top/bottom are the correct ones to remove the caliper. They were the same size bolts that were on my Porsche Brembo calipers. Per my previous post the torque specs are 85 n-m or 63 ft-lb. Also, don't use a rachet for this job. I used a 1/2" breaker bar and it was not that hard of a job to break the bolts. More length (leverage) and no mechanical rachet to fail. Once you break the bolt you can use the ratchet. Tighten with a ratchet then use the torque wrench. I did not use any locktite. I have never used locktite on any caliper bolts of any of my cars. I also have tracked many cars and never any issues. Brad |
|
Appreciate
0
|
| 04-17-2011, 09:35 PM | #31 |
|
Cone Cruncher
34
Rep 534
Posts |
Hey, late to the party, but great writeup. I just slapped cool carbons on and it was a breeze.
Seriously, this was way easier than expected. I budgeted 5 hours of sunlight and it only took 2.5 to do all 4 pads. The one thing I'd like to add is that I'd recommend that anyone doing brakes gets new torx bolts for the front calipers. Mine underwent some minor stripping getting them gut-un-tight. Next Time I do the swap: new screws and new brake sensors. |
|
Appreciate
0
|
| 04-18-2011, 07:56 AM | #32 |
|
Colonel
111
Rep 2,696
Posts |
It took me 2.5 hours to do all the brakes, flush out all fluids and put in a new sway bar.....easy stuff.
__________________
Faster, faster, faster, until the thrill of speed overcomes the fear of death
Hunter Thompson
|
|
Appreciate
0
|
| 05-03-2011, 09:47 PM | #33 |
|
Redline Addict

22
Rep 783
Posts |
I installed my hawk track pads tonight, snapped a few pics:
Tools for the job: Big ass zip ties Breaker bar Torque Wrench 10mm hex T40 torx (optional) Clamp Jack pad adapter 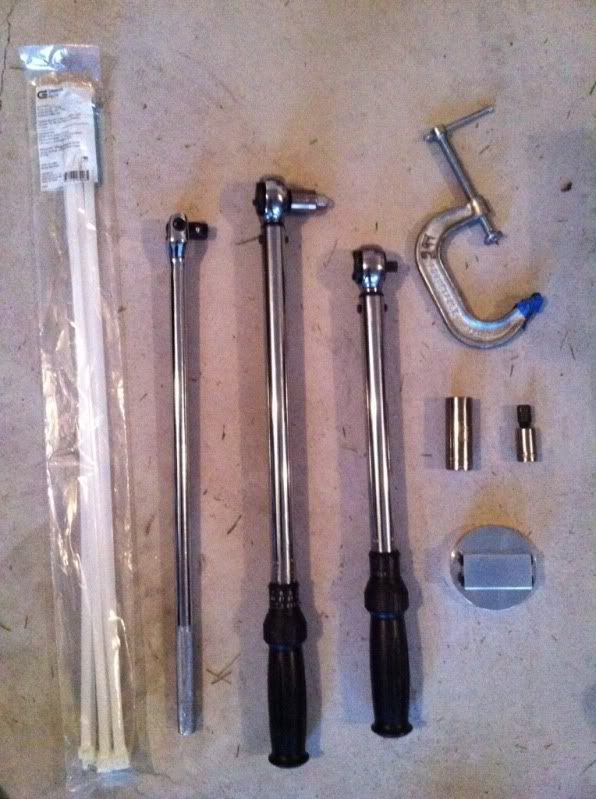 These bolts were not very difficult to break with the breaker bar: 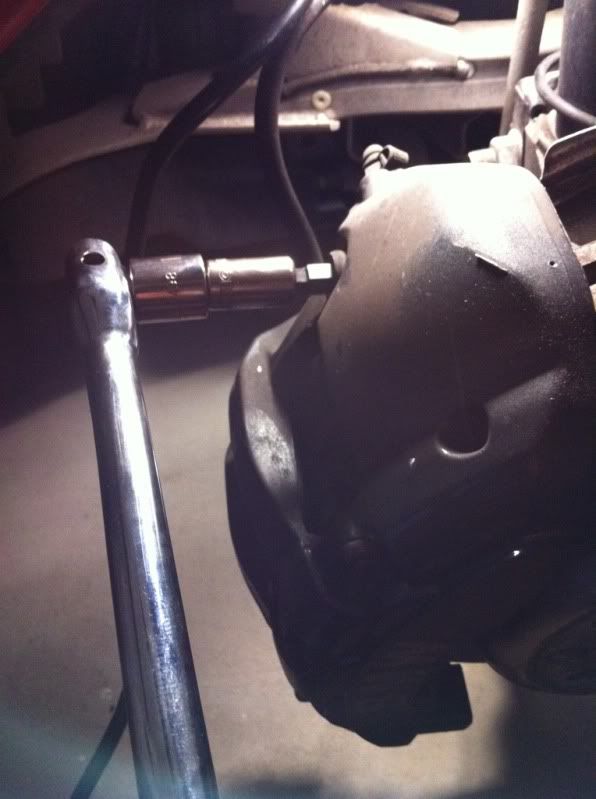 CLamped the tab on the brake pad against the torx bolt to press the pistons in, made removal easy 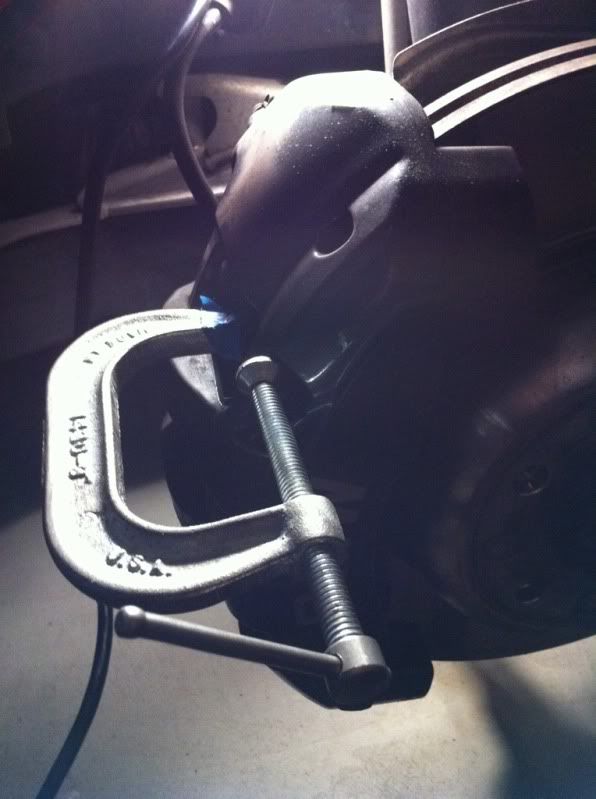 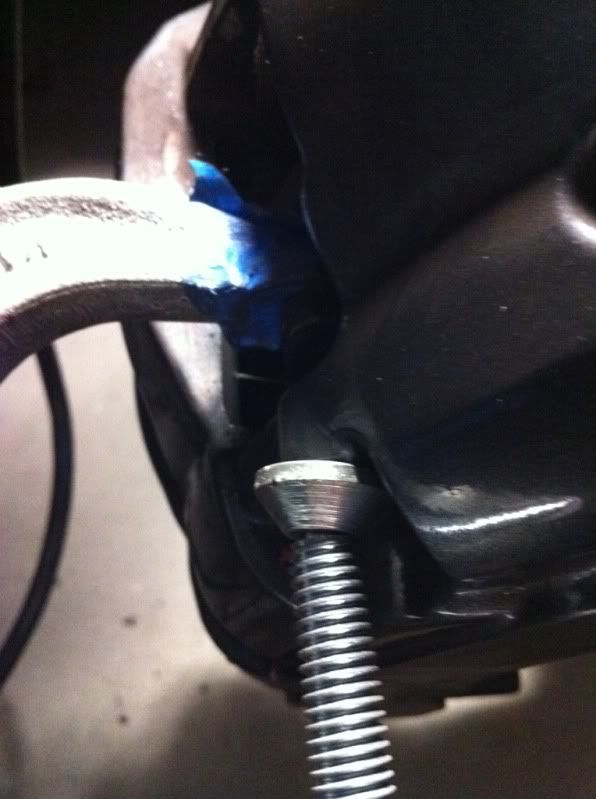 You can see the sensor on the bottom of the brake pad, it's held in by a little clip, just pull it straight out (to the right in the picture) 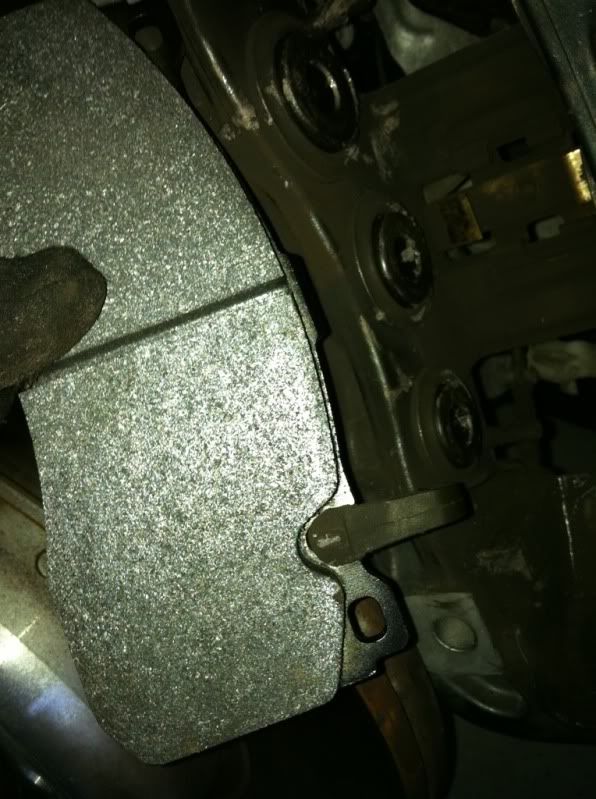 |
|
Appreciate
0
|
| 05-03-2011, 11:04 PM | #34 | |
|
Lieutenant Colonel
693
Rep 1,608
Posts |
Quote:
__________________
Boostm3
'18 LBB MT M2 Exec pkg, Moonroof, Production 7/6/17 |
|
|
Appreciate
0
|
| 05-04-2011, 07:57 AM | #35 | |
|
Redline Addict
22
Rep 783
Posts |
Quote:
 |
|
|
Appreciate
0
|
| 05-04-2011, 08:33 AM | #36 |
|
Colonel

119
Rep 1,998
Posts |
a little tech trick...
although Zip ties are great for the job... and they could be fun in a wierd way  ..... lots of guys just go to the .99 cent store and buy a pakage of small bungee cords.... they are reuseable, disposable and you can hang the caliper 1 handed as opposed two needing 2 hands to lock in the zip tie.. ..... lots of guys just go to the .99 cent store and buy a pakage of small bungee cords.... they are reuseable, disposable and you can hang the caliper 1 handed as opposed two needing 2 hands to lock in the zip tie.. they work great !! great info here for the Novice..
__________________
X1, R58 JCW, M2 in my future if planets align
|
|
Appreciate
0
|
| 01-23-2012, 07:01 AM | #37 |
|
Boooooost!
5
Rep 73
Posts |
Great write-up. I referred to this over the weekend when I installed my Cool Carbons. Good. Mother. Of. God... those big allen bolts were tight on my car. I was even using my Craftsman breaker bar and I was still having a hard time. Thought that bitch was going to snap the bolt. All good in the end, and I love the feel of the new pads!
__________________
09 135i, A6, Monaco/Coral Red, M-Sport pkg, Premium pkg, Hi-Fi sound,
|
|
Appreciate
0
|
| 01-24-2012, 11:56 AM | #40 | |
|
Colonel
119
Rep 1,998
Posts |
Quote:
 ( BMW Perf brakes ( BMW Perf brakes  ) )
__________________
X1, R58 JCW, M2 in my future if planets align
|
|
|
Appreciate
0
|
| 05-22-2012, 09:12 AM | #41 |
|
**************
30
Rep 190
Posts |
I just finished installing Cool Carbon pads and had a few "tips". First, apologies, there are no photos. I went out to the garage planning to follow the instructions in this thread, so I didn't bring a camera. Second, all this applies to Cool Carbon pads. Others should be the same, but I haven't installed them.
First thing that I would highly recommend is to follow the advice in post #10 and remove the calipers with the mounting bracket attached. After starting to remove the 10mm allen bolts, it seemed apparent to me that they were not designed/assembled to be taken apart for regular maintenance like swapping pads. They are locked in TIGHT, and it doesn't get any better after the initial turn. On the other hand, the 18mm hex bolt attaching the bracket to the knuckle breaks free with a turn or less (the 110nm torque is about the same as a lug bolt), then can literally be removed by spinning them with your fingers. (While supporting the caliper with your other hand.) They go back on just as easily; it really seems like this is what the engineers had in mind. It helps access to the back of the caliper if you turn the steering wheel all the way in the opposite direction. Second thing is that there is no reason to remove ANY of the retaining pins. Again after starting to remove one and running into the same situation as the allen bolt, it seemed that these weren't really meant to be removed for simple maintenance. If you look at the backing plate on the front pad, you will see a small (maybe 2cm) tab with a wedge shaped profile. This tab catches on the retaining spring. To remove the old pads, first remove the caliper (with bracket). Then press the outside pad away from the pistons with your fingers. It takes a bit of pressure, then you will hear/feel the tab on the pad click over the retaining spring. Now just wiggle the pad free of the retaining pins. Repeat with the inside pad. (the bracket side) To install the new pads, start with the inside pad. Angle it toward the "corner" of the inside piston face and the back of the caliper and hook it, just barely, over one of the retaining pins. Now press and wiggle it inward until the tab clicks over the retaining spring. Now you can press the pad slightly down to engage the second retaining pin. At this point, it can very easily be pressed into place over the pins and flat against the pistons. Now repeat with the outside pad, then reinstall the caliper. The bolts again twist in with your fingers. They seem sturdy enough, and unstressed enough, to reuse, but that's strictly up to you. Someone said earlier that replacement is advised. I would recommend doing the inside pad fist, otherwise you have less room to work with between the installed outside pad and the mounting bracket. I did it that way on the first side, it can be done, but it is easier to do the inside first. I fumbled with the first caliper for a while, but took about 20 minutes or so on the second, from removing the caliper to reinstalling it. |
|
Appreciate
1
c0bra186.00 |
| 05-22-2012, 11:02 AM | #42 | |
|
Colonel
37
Rep 2,084
Posts |
Quote:
|
|
|
Appreciate
0
|
| 05-22-2012, 01:14 PM | #43 |
|
Brigadier General
 373
Rep 3,550
Posts |
For those situations where you need a little more torque on a stubborn fastener, I use an extendable 3/8 ratchet I got from Harbor Freight for a few dollars. I keep it in the bimmer for removing wheels. You can extend it with one hand, break the fastener loose and then put it back in to speed up removal. Harbor Freight is certainly a "no prestige" brand but I haven't broken anything yet. I can't say that about Craftsman. I have a 1/2 break over bar but I haven't used it since getting the extendable from Harbor Freight. I also use HF's click type torque wrenches. I'm sure they are not as accurate as something like a SK but I think they are good enough. I didn't pay more than about $15 for any of the torque wrenches or the extendable ratchet.
Jim
__________________
128i Convertible, MT, Alpine White, Black Top, Taupe Leatherette, Walnut, Sport
Ordered 5/22/09, Completed 6/4/09, At Port 6/9/09, On the Georgia Highway 6/13/09, Ship Arrived Charleston 6/24/09 at 10pm, PCD 7/21/09 |
|
Appreciate
0
|
| 06-02-2012, 11:48 PM | #44 |
|
Major
 
100
Rep 1,092
Posts
Drives: F82 M4 CP
Join Date: Jul 2009
Location: Brisbane, Queensland
|
Did the front pads this morning. Super easy. The infamous 10mm bolts were super easy to get out. Just leaned on them with a short breaker bar and they loosened. Didn't need to take the T40 bolts out either. Maybe I was just lucky but it wasn't the tough task that I thought it was going to be.
__________________
2017 BMW M4 Competition - Mineral Grey
2009 BMW 135i - Titan Silver - SOLD |
|
Appreciate
0
|
Post Reply |
| Bookmarks |
|
|


