|
|
|
|
|
| 06-12-2013, 05:44 PM | #1 |
|
Brigadier General
 1700
Rep 3,282
Posts |
My HID Retrofit Build Thread
Hey 1 addicts,
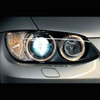
1 YEAR UPDATE: No water ingress, high beam functional, angel eyes have had 0 problems, fully functional. Drove next to a 335i (F30) with the LED headlight option, the LEDs appear whiter but mine project light wider and further. Still a head-turner. I just uploaded my album of all the pictures I took during my HID retrofit process. I will be updating this thread as often as possible as it was about two weeks worth of work that was put into this project. I would like to share with you my journey in making this headlight dream of mine come true! If you contemplate doing this as a project, feel free to pm me and we can also exchange phone numbers to get in touch with me faster for those questions/problems that need a quick answer. There was always something I never liked about our generation headlights, the halogens were not good enough for me and the xenons I felt just wasn't me. Could I have gotten used headlights on eBay and changed the AE's to Lux...yeah sure, but I wanted something better. I knew I could do it, but I didn't know how yet. So I started doing some research at hidplanet.com and talked back and forth to theretrofitsource.com about what my capabilities were. I have the LCI headlights and currently there was no LED strip on the market until I heard from the retrofit source that they were going to produce one. At that moment, I knew this had to be done. So I started doing some initial measurements, as best I could, on this little sunshine:  I measured the diameter of the low beam and the high beams for my angel eyes and the length of the vacant strip for my LED strip. I happened upon a group buy during that time and ordered right away from TRS (The Retrofit Source) and bought: Bi-xenon FX-R Stage III Kit with 100mm angel eye rings, Iris shrouds and Morimoto 35W 5000K HID bulbs. I added on the 80mm angel eyes onto the order. And so the wait began for my LED strips to come out for the eyebrow. It was nearly a 2 month wait and received them end of April  So when the day finally came where my parents went on their 25 anniversary trip I went into the garage and began my project, in secret. The first night, I came home from work at 8pm and immediately took the battery from the tractor that we use to mow the lawn and connected it to my ballast which will power the HID bulb.   The HID bulb was inserted into the projector, and then there was light!        I wonder what my neighbour's were thinking when I had this running near midnight haha. That was the end of the first night, I went to bed excited and extremely nervous for what was to happen the next morning.
__________________
2012 BMW 128i 6MT Deep Sea Blue Metallic
Last edited by Gray_Panther; 07-10-2014 at 08:20 PM.. |
| 06-12-2013, 11:02 PM | #2 |
|
Brigadier General
1700
Rep 3,282
Posts |
I remember waking up Saturday morning and getting straight down to business. I began by organizing my garage so the only goal is to get these headlights done. I cleared the work bench, cleared another bench, brought up another table and got all my gear out.
This is all that's needed for to complete your HID retrofit. It is a lot more than expected, but it is all cram packed in a tight area. The two standing white boxes are the projectors, the 2 white flat boxes are the ballasts, the 2 smaller white boxes have HID bulbs, the 2 brown boxes are the angel eyes, the gray bag has the LED strips and the rest contain the wiring harness needed.  My laptop, I needed it so much for quick references  Tools needed     Before starting the surgery, I turned on my low beams and marked the original cutoff, like so  At this point, I fired up my Asus notebook and went straight to this link http://www.1addicts.com/forums/showt...t+bumper+cover provided by ilikebmxbikes. He was really cool to talk to and gave me some extra pointers. Thanks man! After about a couple hours I ended up with this  And then it was easy to take out the headlights. Although they were a pain to do so.  Good job BMW, I really enjoyed the engineering that went into this car. All very simple and easy, and it all makes sense. Can't beat those Germans! I spent a good 5 hours learning the headlight unit, I grew very intimate with it. I took out all the bulbs and began my battle with perma-seal. I wish I took more pictures but really nothing came of it. Perma-seal won. Whoever signed off on perma-seal won. Bastards. But if there is a will, there is a way. I clearly remember that point of the project where I thought to myself, "F*** it, I'm cutting this B**** open." I plugged in my dremel and cut all the way around the lens. I kept it as close to the edge as possible but I got it open! I was so relieved. Before cutting, I removed the clip for the bulb, two screws are found on the back and then it just comes right out  So now came, as retrofitters call it, the point of no return. I began cutting and trimming away at the low beam reflector housing to fit the projector in. It's hard to see, but at the bottom of the reflector there is a line that shows the center of the headlight. This point is imperative for lining up the projector.  This is what I ended up with  After fitting the projector and lining it up I drilled three holes in each reflector and used long screws and washers and nuts to hold the projector it. This method is credited to JNC on HIDplanet, extremely informative link found here: http://www.hidplanet.com/forums/show...-Capability%29 Here is my version of it:     Do a lot of testing at this point, when you feel confident, tighten it down, try it out again then use 100% silicone to hold the nuts in place. It works, trust me.
__________________
2012 BMW 128i 6MT Deep Sea Blue Metallic
Last edited by Gray_Panther; 06-12-2013 at 11:07 PM.. |
|
Appreciate
0
|
| 06-14-2013, 07:19 PM | #3 |
|
Brigadier General
1700
Rep 3,282
Posts |
At this point I was about 4 days into this project. That damn perma-seal took me forever to figure only for me to end up cutting the lens around the border. After getting projector fixed down it was time to add the angel eyes.
For some reason I was being dumb at this stage. I used caulk  to hold them down as is shown: to hold them down as is shown: So here I am, holding the angel eyes in place for an hour like an idiot. I gave up on this method and removed the caulk that I had applied, a painstaking process. At that point I youtube'd a video on how to hold them in place without using an adhesive. My research led me to this https://www.youtube.com/watch?v=ywW5ZMXPBZ0 When I saw this video at midnight in bed, I was struck by how simple it was. I slept another restless night and enduring another day at work, waiting until I could work on these bad boys again. When I got home after work, I began immediately. This was my result:  This got me thinking, if this technique worked so well with the angel eyes, why can't I do the same for my shroud that will cover the projector. So I planned it out in my head and everything clicked. I went for it! I drilled about 5-6 holes on the innards of the shroud where the 28 gauge wire would pass through. I drilled 4-5 holes on the actual reflector so i could wrap and tighten the wires that hold the shroud in place.  When that was done I drilled four holes on the shroud for the wires to hold the second pair of angel eyes down. I put this together and put the housing and lens back on to see what it would really look like:   I was ecstatic! The housing and the eyebrow hid the top of the angel eyes where the positive and negative wires feed in to the circuit. Not only that but the housing was so tight you couldn't see any of the 28 gauge wires that held the shroud in place! I used the same technique immediately on the eyebrow. Which was disappointing to me. It was crooked. The eyebrow is not as straight a line as I thought it would be. I will let the picture do the talking...  After I was finished putting the eyebrow and the housing back together (Read: Not the lens yet) I began with the wiring. This was fun for me. I was coming to a close on the first headlight! I did not want DRL angel eyes, thought it would be too flashy for my taste so I decided to tie my low beams to my angel eyes and eyebrow. This was simple, all the red wires are tied together and all the black wires are tied together. I soldered the connections and attached them to the connectors that TRS provided me.  In this picture you can see that the angel eyes and eyebrow are tied together. Each pair (2 in total) would connect to their respective end of their splitters.  What you can't see is how I connected my high beams to my solenoid to activate the shutter to enable high beams on my bi-xenon connector. I did this by cutting the high beam purple (positive) and brown (ground) and splicing one end of each to the solenoid wires. The solenoid wires have no polarity so it doesn't matter on the FX-R projectors. So when power is sent to high beam bulb, the solenoid actuates the shutter and BOOM...DOUBLE HIGH BEAMS BITCH! I'll explain this part as best I can, until I draw up a circuit to visually see what I mean. The positive and negative of the low beam are connected to a special circuit. BMW uses CANBUS, which you can read here http://www.theretrofitsource.com/trs..._harnesses.php or google. Basically, you can't tap into the +12V post becauses everytime you turn on your low-beams, the car will not sense the voltage going into the low beam (Because you disabled that option). Instead TRS put together a circuit of a relay, fuse, resistor and capacitor. The resistor is used to fool the car thinking that there actually is a bulb there. The capacitor is used in reference to ground to allow current to continuously flow through while the ballast is initially powered. At first, there is not enough voltage charged up so it needs the current in the beginning, by the time it reaches its fifth time constant the current tapers off and the ballast becomes powered solely by the voltage being provided from the low beam. Anyways, sorry for the digression, the other end of the CANBUS connects to splitters. One end connects to the CANBUS trickery device, one end connects to the angel eyes + eyebrow, and the last end connects to the ballast which ignites the xenons. Here is the plug that connects to my D2S bulbs  At this point I ran into a problem. The plug for the HID bulb stuck out too much to reattach the back cover. So my nifty solution was to cut a hole on the back cover. One hole to fit the plug, and the other to feed the plug and wires through. TRS provided a gasket for the hole that feeds wires and plug through.  You can see I outsmarted my plug problem by taking some ABS plastic. Cutting and then bending it into shape then siliconing it down.  Finally I began reassembly. And for those who don't know, Goo Gone followed by an IPA/Water mixture does wonders on cleaning chrome. Since I cut the housing tabs off, I used JB weld to cold-weld them back on, after that cured I siliconed the lens back on and clamped it down.    Assembled in, and done with headlight number 1! 
__________________
2012 BMW 128i 6MT Deep Sea Blue Metallic
Last edited by Gray_Panther; 06-16-2013 at 09:03 AM.. |
|
Appreciate
0
|
| 06-15-2013, 12:43 PM | #4 |
|
Major
 
120
Rep 1,002
Posts |
Props dude, really impressive work! Must have bucket loads of patience and knowledge!
Did they not have angel eyes that are white when the LED's are off instead of the yellow? That would be my only personal gripe! Otherwise they look really great. |
|
Appreciate
0
|
| 06-16-2013, 09:06 AM | #5 | |
|
Brigadier General
1700
Rep 3,282
Posts |
Quote:
TRS sells angel eyes that are white when turned off, however when you turn them on they are amber coloured. I could have went that route, but then my headlights would look like they came from Tony Stark haha
__________________
2012 BMW 128i 6MT Deep Sea Blue Metallic
|
|
|
Appreciate
0
|
| 06-16-2013, 09:25 AM | #6 |
|
Brigadier General
1700
Rep 3,282
Posts |
After I finished my first headlight, I used the same process for the second. I was really down in the dumps before I started my second one. It took a toll on me and I was exhausted. Thank God for man's best friend to be there for me and lift my spirits
 And So when I finished and assembled everything back together, I turned on my lights. Got out of the car and checked that everything was good. Pulled out of my garage to go on its maiden voyage, but before leaving I checked them again. One of the angel eyes went out. Shit.  I contacted TRS and they sent me a regulator for free. I probably damaged the regulator when I was doing some voltage testing on it back in April. But the damage was done and I needed to replace it. All my hard work and expected joy ruined for one freaking angel eye. When the replacement driver arrived I spent my time getting back to this point: I took the headlight out and replaced the driver. Put the bumper back on (I am an expert on this now. It takes me less than an hour to disassemble and reassemble) and turned the lights on. Everything worked! No condensation for the past week it has been raining, Everything turns on, LEDs shine brightly and my HIDs illuminate everything. It is so unfair to halogens. I don't think I'll ever stick with a halogen headlight again.   Thanks for reading. I am so happy I am finished with this! It's addicting driving at night.
__________________
2012 BMW 128i 6MT Deep Sea Blue Metallic
|
|
Appreciate
0
|
| 06-17-2013, 01:49 PM | #8 |
|
General
2070
Rep 25,981
Posts |
Great work! The finished product looks awesome.
__________________
VMR|Wheels | 714.442.7916 |
sales@velocitymotoring.com | www.velocitymotoring.com | facebook | flickr | Instagram |
|
Appreciate
0
|
| 06-17-2013, 02:47 PM | #9 |
|
Colonel
 

198
Rep 2,239
Posts |
Looks amazing! I just wish the outer angel eyes were bigger than the inner ones, but thats all personal preference. The workmanship looks amazing. I'd never attempt this myself hahah.
__________________
08 e93 335i MT
|
|
Appreciate
0
|
| 06-18-2013, 09:41 AM | #11 |
|
Lieutenant General
11696
Rep 11,175
Posts |
A very cool project! It looks like you spent an awful lot of time putting this all together. Was it not easier to get OEM HIDs with the correct eyebrow strip? Unless I missed something, what you built is also HID but the eyebrow strip doesn't look like it's a good fit.
|
|
Appreciate
0
|
| 06-18-2013, 10:36 PM | #13 | ||
|
Brigadier General
1700
Rep 3,282
Posts |
Quote:
Quote:
I'll be looking forward to it. My knowledge of these headlights is immense now and I would love to share it with all who care to listen. Gratitude for the kind words everyone, I am really humbled to receive such praise. I'll take my friend out for coffee one day in exchange for a proper photoshoot!
__________________
2012 BMW 128i 6MT Deep Sea Blue Metallic
|
||
|
Appreciate
0
|
| 06-30-2013, 10:04 PM | #14 |
|
Brigadier General
1700
Rep 3,282
Posts |
I been meaning to post final adjustments but I was way too busy enjoying these headlights. Drove past a LCI 135i, there is no competition. Mine project light wider and further and my LED angel eyes and strip are clearly defined.
So last night I drove to a wall to show some final adjustment pictures that are perfect for me. There are two hex key (Also have a philips on the inside to adjust with a screwdriver, but it is easy to strip.) adjusters found on top of the headlight unit. They are cream coloured. They may have a spherical cap on them, just take pliers and yank them out. I think its to prevent people adjusting their headlights. You are able to adjust them just by opening the hood. No need to remove anything.  So if you want to adjust your own headlights you are able to!  You can see how far and wide (Even though my iPhone couldn't capture all the light) they project light with a sharp cutoff.   Here is with my double high-beams activated. You can see the border between darkness and where my HID's shine through along the trees.  Some more pictures:  
__________________
2012 BMW 128i 6MT Deep Sea Blue Metallic
|
|
Appreciate
0
|
| 07-16-2013, 10:56 AM | #15 |
|
Brigadier General


316
Rep 4,040
Posts
Drives: 130i coupé ;)
Join Date: Nov 2011
Location: Bimmerpost
|
bookmarked

__________________
128i Sport 6MT converted to Euro 130i spec, 3.73 diff, tuned by evolve ~220 whp 207 wtq(ft-lb) SAE
In-progress: //M front arm, M3 rack, e36M lip Wishlist: Coils, n55 mnts, headers, LSD, e60 finn diff  "The 1-series is the last car that BMW engineered before the Germans, as a car-making culture, fell out of love with driving." - R&T 2013 135is |
|
Appreciate
0
|
| 02-20-2014, 04:58 PM | #17 | |
|
Brigadier General
1700
Rep 3,282
Posts |
Quote:
__________________
2012 BMW 128i 6MT Deep Sea Blue Metallic
|
|
|
Appreciate
0
|
| 07-09-2014, 04:06 PM | #19 | |
|
First Lieutenant
24
Rep 387
Posts |
Quote:
|
|
|
Appreciate
0
|
| 07-09-2014, 04:07 PM | #20 |
|
First Lieutenant
24
Rep 387
Posts |
Also, FYI to anyone who may be interested in this...
It looks like TRS came out with new Angel Eyes that do not look yellow when the light is off! http://www.theretrofitsource.com/led...l#.U72se_ldV8E |
|
Appreciate
0
|
| 07-09-2014, 09:57 PM | #21 | ||
|
Brigadier General
1700
Rep 3,282
Posts |
Quote:
I used Morimoto DSP ballasts from TRS. Figures they come out with white coated angel eyes two years after I completed mine. I might use them on my parents 1er if I decide to retrofit those in September.
__________________
2012 BMW 128i 6MT Deep Sea Blue Metallic
|
||
|
Appreciate
0
|
| 07-10-2014, 08:15 PM | #22 | |
|
Brigadier General
1700
Rep 3,282
Posts |
Quote:
 
__________________
2012 BMW 128i 6MT Deep Sea Blue Metallic
|
|
|
Appreciate
0
|
Post Reply |
| Bookmarks |
|
|