

|
|
|
|
|
| 02-29-2012, 07:12 PM | #1 |
|
Private First Class
 
44
Rep 159
Posts |
Let's adjust the parking brake
If you have been needing to crank on your parking brake lever to get it to hold it may be time to adjust the pads.
What you will need: 17mm socket Various flat head screw drivers Flashlight Wheel chocks Jack First you will need to release tension on the cable. This is done by compressing a spring loaded tensioner located under the parking brake boot. Pop up the rear of the leather boot with something that wont scratch it and then pull the rest of the assembly up and out of the way   I used a flat head with electrical tape on it  Now you need to compress this spring until a little latch grabs it. You will hear a click  To compress this spring, make sure the parking brake is released then stick a large screw driver in the little square notch on left side front of the mechanism and press towards the back of the car.   For the next step you can either jack up one side at a time or the entire rear end. Use wheel chocks on the front wheels. You only need to remove 1 bolt from each rear wheel. It doesnt matter which one. You will need the parking brake off and the transmission in neutral so you can rotate the tires. Remove a bolt using a 17mm socket  Inside, there is a mechanism that can adjust the pads outwards as they wear. It is part number 3 in this diagram. As the star shaped ring rotates the assembly expands and pushes the pads outwards towards the inside of the rotors. On my car I believe it was rotated in the opposite direction. This will change which direction you need to spin the star ring.  Here is how it was oriented on my car 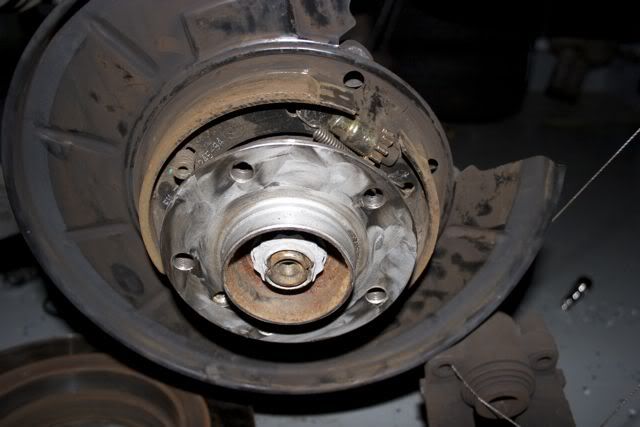 On the left side tire, the mechanism can be seen through the hole when it is at the 1 o'clock position.  Next you need to stick a screw driver into the hole and rotate the star shaped ring on the adjuster. You need to go in the correct direction to expand the pads. On the left side, this means get your flat head under the bottom part of the star and flick it upwards and to the rear of the car. If you were to look at the assembly from the rear of the car, the star would rotate clockwise. Wedge the flat head under...  pry upwards by pushing the handle down  Make sure not to get caught up on the spring located right under the assembly. It can be hard to tell if you are rotating it, just keep at it. After a while test to see if the tire still spins. When the pads move far enough out to prevent the tire from rotating, spin it the opposite direction for about 8 clicks to leave a small gap and you are done with this side. Replace the bolt and lower it back down. On to the right side. Here is the location for the mechanism on the right side.  This time you are doing the opposite motion. Get the flat head on top of the star and rotate it down and to the front. Again, if you were looking from directly behind the rear of the car it would be rotating clockwise. Flat head starting position  Ending position  It takes some force to get it spinning. Keep at it until this tire stops rotating freely and then back off a few clicks. Put the lug bolt back in and lower it down. Here are the two types of flat heads I used  Last step, you need to release the spring located under the boot. It looks like a J in this picture. I used a dental pick to pry it out and to the right side of the car. The spring will release.   Put the boot back on starting from the front and you are all done. You should now start to engage after about 5 clicks and not have to pull it up quite as far. Last edited by Ihave1; 02-29-2012 at 07:33 PM.. |
| 03-06-2013, 01:02 PM | #2 |
|
Private
 
10
Rep 87
Posts |
Excellent clear post. I looked at somebody else's post last night and couldnt get it to work. Thought i must have snapped a cable. turns out they had missed out the cable tensioner piece inside the car. argh .Looked at yours tonight and did it in 10 mins flat. Great info and thanks. Feels like new again. Bestvregards Paul
|
|
Appreciate
0
|
| 09-16-2013, 03:19 PM | #5 |
|
Lieutenant Colonel
 

84
Rep 1,623
Posts
Drives: Alpine White 128i Cabrio
Join Date: Jun 2013
Location: Toronto, Ontario, Canada
|
I am planning on doing this next weekend.
 thanks! thanks! |
|
Appreciate
0
|
| 06-29-2014, 12:54 PM | #6 |
|
Major
 124
Rep 1,021
Posts |
did this yesterday but i tightened the drivers side a little too much. i thought it rotated but after a drive i smelt brakes and the driver rear ri had a decent amount of break dust. while driving there was a hum so i puled up on the brake and it went away after a few light pulls while driving around 50. it does still vibrate if i pull it while driving. got home and yanked it up and down a few times and now it feels as it did before i adjusted it. any suggestions?
thanks |
|
Appreciate
0
|
| 06-29-2014, 02:07 PM | #7 |
|
Private First Class
44
Rep 159
Posts |
You may have burned up the pads or gunked up the mechanism inside the rotor if you drove too long with it partially engaged. It may be a good idea to pull off the brake rotor and take a look. Just remove the wheel and there is a hex bolt that holds on the brake rotor. Be careful since the head strips easily. Hit it with some PB blaster before you go at it. If it strips you need to drill out the head. I replaced mine with stainless steel so that they wont strip again. That single screw is all that holds the rotor on since the wheel lug bolts do the actual holding. The rotor will then slide right off and you can check out the parking brake pads. You can probably clean out some of the gunk. If you use any chemicals make sure not to get lube on the pads. I would just blast it out with brake parts cleaner. Don't breathe in the dust!
|
|
Appreciate
0
|
| 10-26-2015, 07:25 AM | #12 |
|
Private

2
Rep 52
Posts |
I just changed my rear pads and rotors this weekend -- this post was a life saver! Thank you for taking the time to put it together.
This may be my lack of ability to translate (this was my first time doing brakes) but is it possible to use the Driver Side / Passenger Side terminology in describing the wheel? If it helps, I have attached a picture of the passenger side wheel showing the spring location.
__________________
Laura
2011 135i, 6-Speed 2007 328xi, 6-Speed (Retired) |
|
Appreciate
0
|
| 10-26-2015, 07:37 AM | #13 | |
|
Private First Class
44
Rep 159
Posts |
Quote:
|
|
|
Appreciate
1
Blau401.50 |
| 10-26-2015, 10:57 AM | #14 | |
|
Private
2
Rep 52
Posts |
Quote:
Thanks! That really helps. DIY car maintenance is new to me, so this was a great clarifying point!
__________________
Laura
2011 135i, 6-Speed 2007 328xi, 6-Speed (Retired) |
|
|
Appreciate
0
|
| 10-29-2015, 09:15 PM | #16 |
|
Private First Class
44
Rep 159
Posts |
Glad I can help out. Just FYI I made it a little to tight on my first adjustment and it would stick and make a loud pop when I first started driving. If this happens to you, just loosen off each e-brake pad a bit.
|
|
Appreciate
0
|
| 05-15-2017, 02:06 PM | #20 |
|
Major General
 4342
Rep 6,196
Posts |
Going to do my car this weekend. Main reason is I am tired of the squeaking noise when the parking brake is applied, and I get in and out of the car. A little dab of moly grease between the shoe and the backing plate where they make contact will get rid of that noise.
|
|
Appreciate
0
|
| 03-18-2018, 02:59 PM | #21 |
|
Is it the shoes!?
3892
Rep 5,111
Posts |
Thanks for this guide. I didn't have a long enough screwdriver, so I ended up removing the wheel entirely to do it. I found it very helpful doing it that way for the first time, since it was much easier to see if I was actually moving the star wheel. Now that I know what to feel for, I can do it without full removal.
|
|
Appreciate
1
AndyW697.00 |
| 03-21-2018, 08:17 PM | #22 |
|
Supreme Galactic Commander (one galaxy over...)
697
Rep 1,784
Posts |
Thx for this thread. Kinda frustrated. Had the dealership adjust this today, among other things. Heard some rubbing on the drive home but didn't sound catastrophic. When I slowed down into my drive there were clunks and squeals coming from the rear and when I stopped, the passenger side rotor was too hot to touch. I released the tension on the spring (as in step one above) and removed the wheels. Both sides sound like something is scraping and "not right". I also can't seem to see the adjustment knob through the wheel bolt holes. Problem now is that I want to remove the rotors to inspect before I take it back to the dealer, but I can't even get the one off that wasn't as hot (drivers). I've removed the caliper and the allen bolt...no joy. Tried a number of impact blows...no joy. Any advice on how to get a stuck rotor off?
I am pretty pissed...once I am convinced it is safe to drive, I am taking it back to the dealer and having them replace everything associated with the parking brakes in each rotor. Should I have them inspect/replace the wheel bearings? Anything else?
__________________
Best,
Andy  '12 E82-PS2,Stoptechs,Clubsports+M3 bits,Accusump,Wagner DP+EVO III FMIC,ERCP,BMS Intake,Mason Strut Bar,Wedge Tune |
|
Appreciate
0
|
Post Reply |
| Bookmarks |
| Tags |
| adjust, brake, emergency, parking |
|
|


