

|
|
|
|
|
| 08-14-2020, 04:14 PM | #1 |
|
Supreme Galactic Commander (one galaxy over...)

666
Rep 1,777
Posts |
Seibon GTR hood and trunk install
So, I recently installed a Seibon GTR hood and trunk on my 2012 135i. I also installed the low profile aerocatches and some have suggested I post the photos of the process as a DIY of sorts, so here it is.
My 135i is my track car so I wanted to both lighten the car as well as get a vented hood. This was more inportant than consmetics to me, but a good looking hood and trunk would be preferred, all things being equal. I also knew I wanted to paint them the color of the car....don't go for the raw carbon look, in general. But I ended up compromising...more below...  I didn't want to get a cheap Chinese one off of ebay, given the fitment horror stories, so began looking for used hoods and posted a WTB post here. A fellow forumite here, who was relatively local, sold me his Seibon GTR hood in awesome condition...he had it wrapped and it only had one minor ding and the price was right so I got it. He removed the wrap for me also. Thx what have i got into ! Here is a pic on arrival: 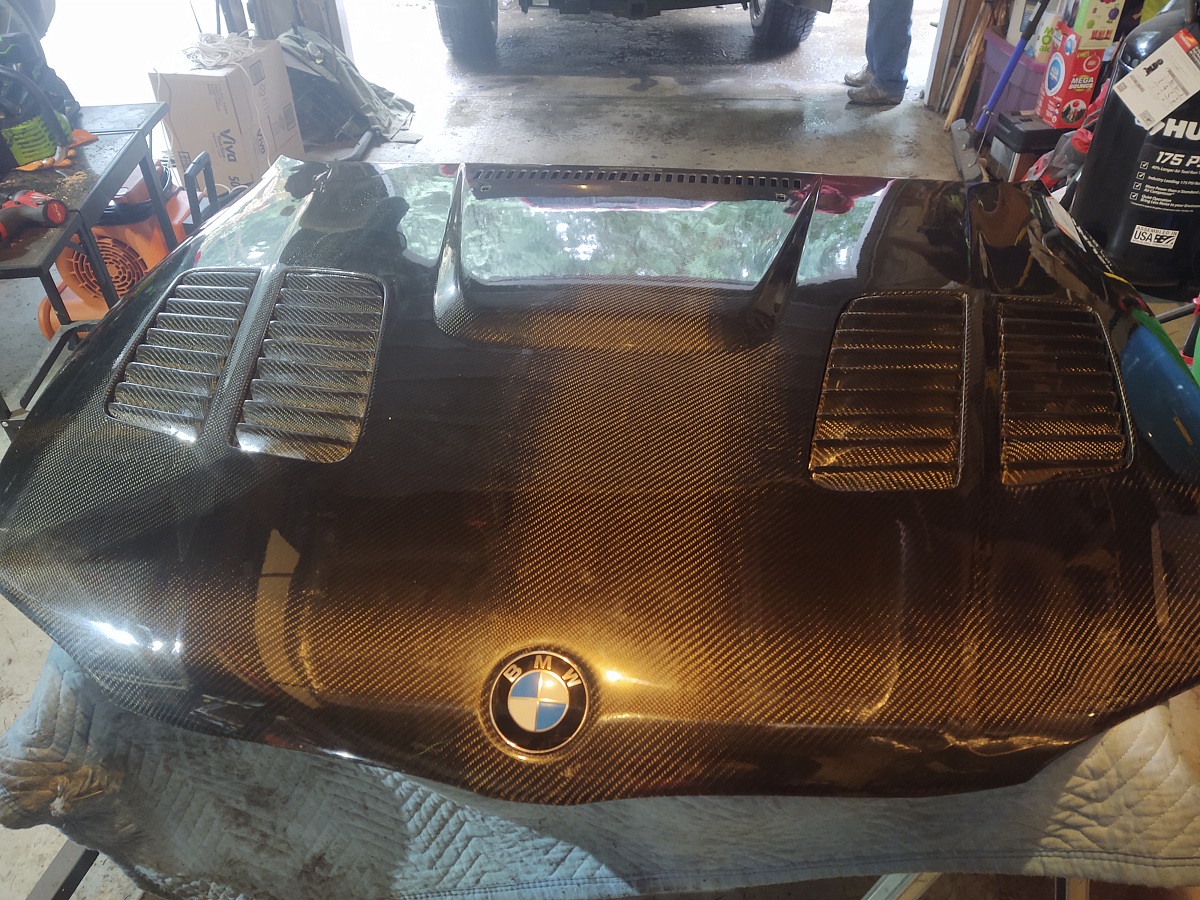 The vented sections were facades...no actual vents, and were removable so I intended to make them vented, despite my trepidation about cutting on carbon fiber! Here is the hood with the vented sections removed. 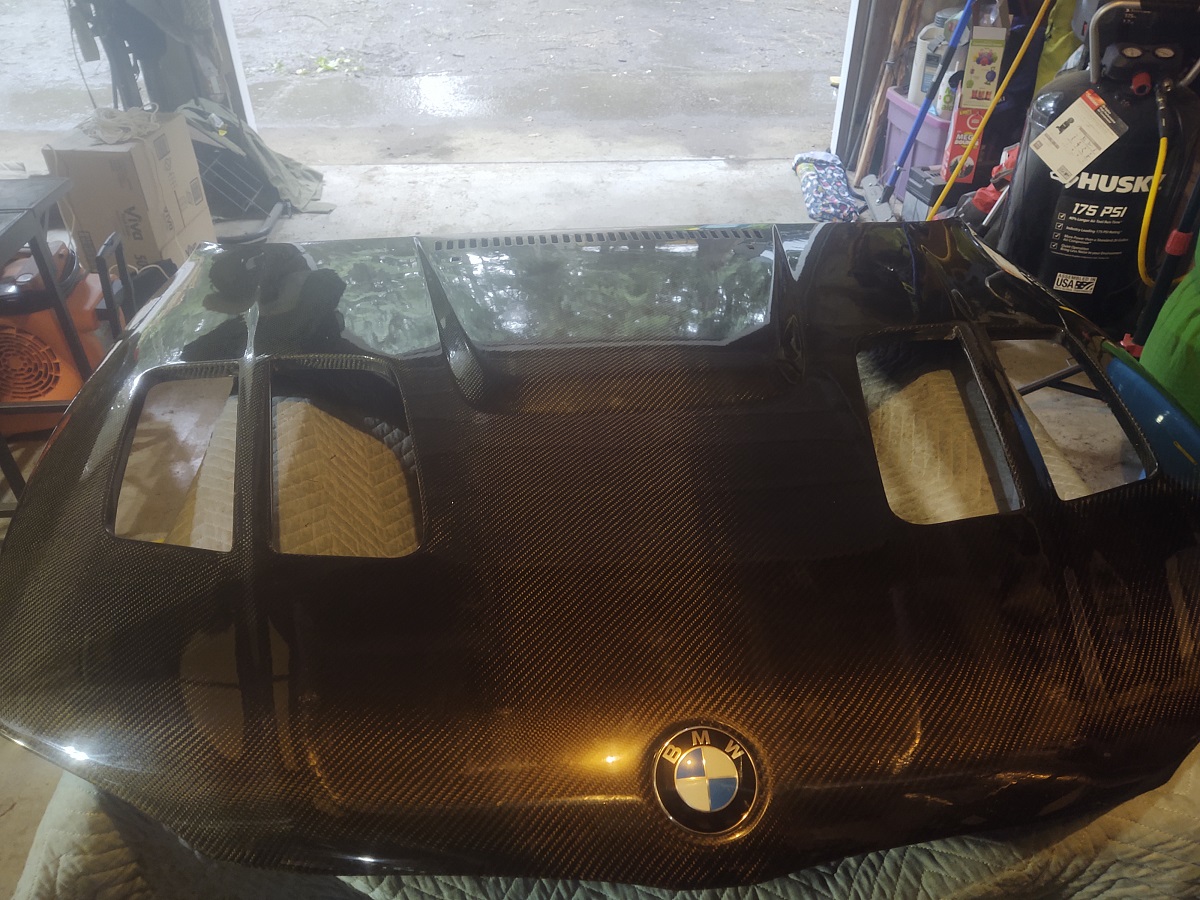 I got to work cutting horizontal slits in the vertical portions of the ramps. First lesson learned...don't use a drill bit to make a "starter hole" from which to dremel the small rectangle out! The CF cracked and almost irredeemably marred the piece...I was lucky. Did the rest by doing two dremel cuts and then grinding out the corners and smoothing the edges with the tapered bit as shown. Went through 5 or six of those bits doing all of these. Use tape to protect the CF you don't want to cut! 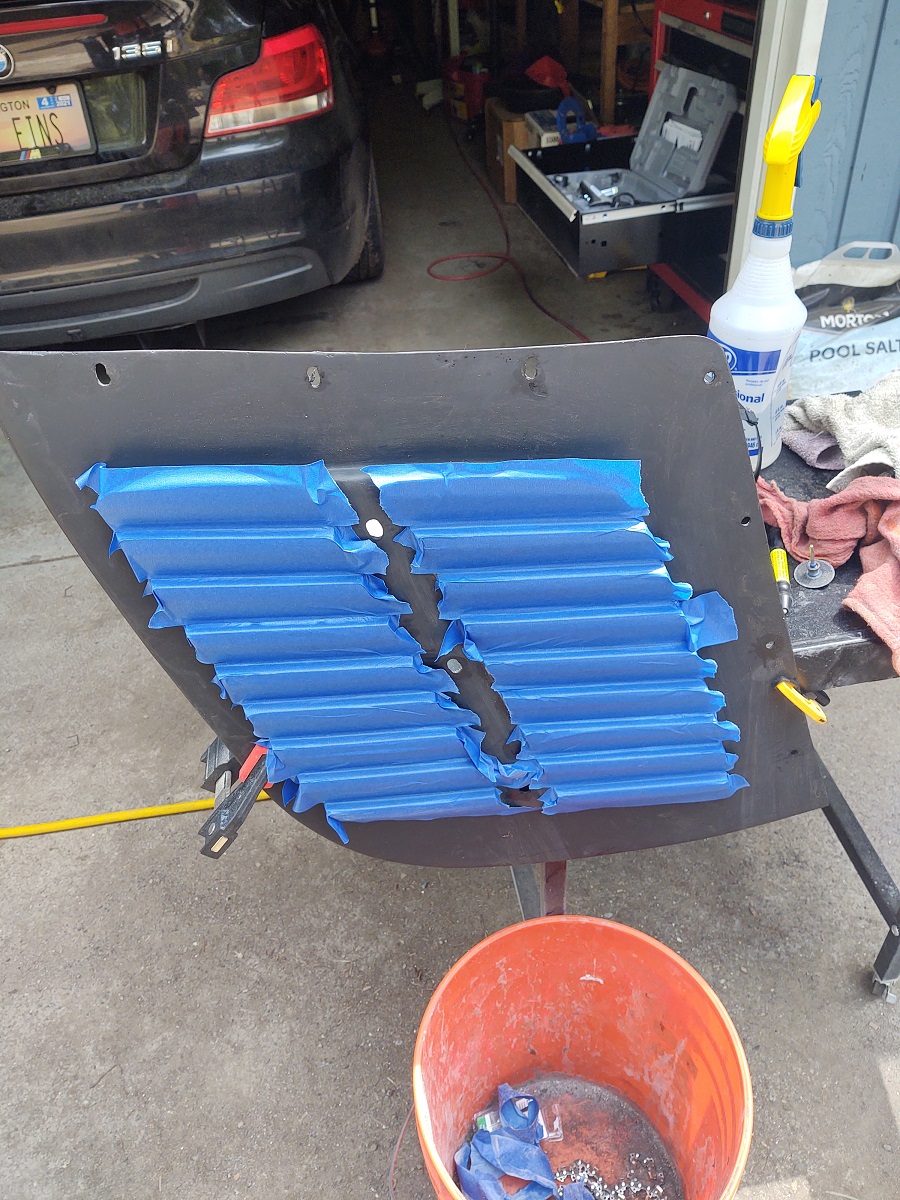 Here is a comparison with one side of one vent piece done and one not done. Just be patient and take your time! 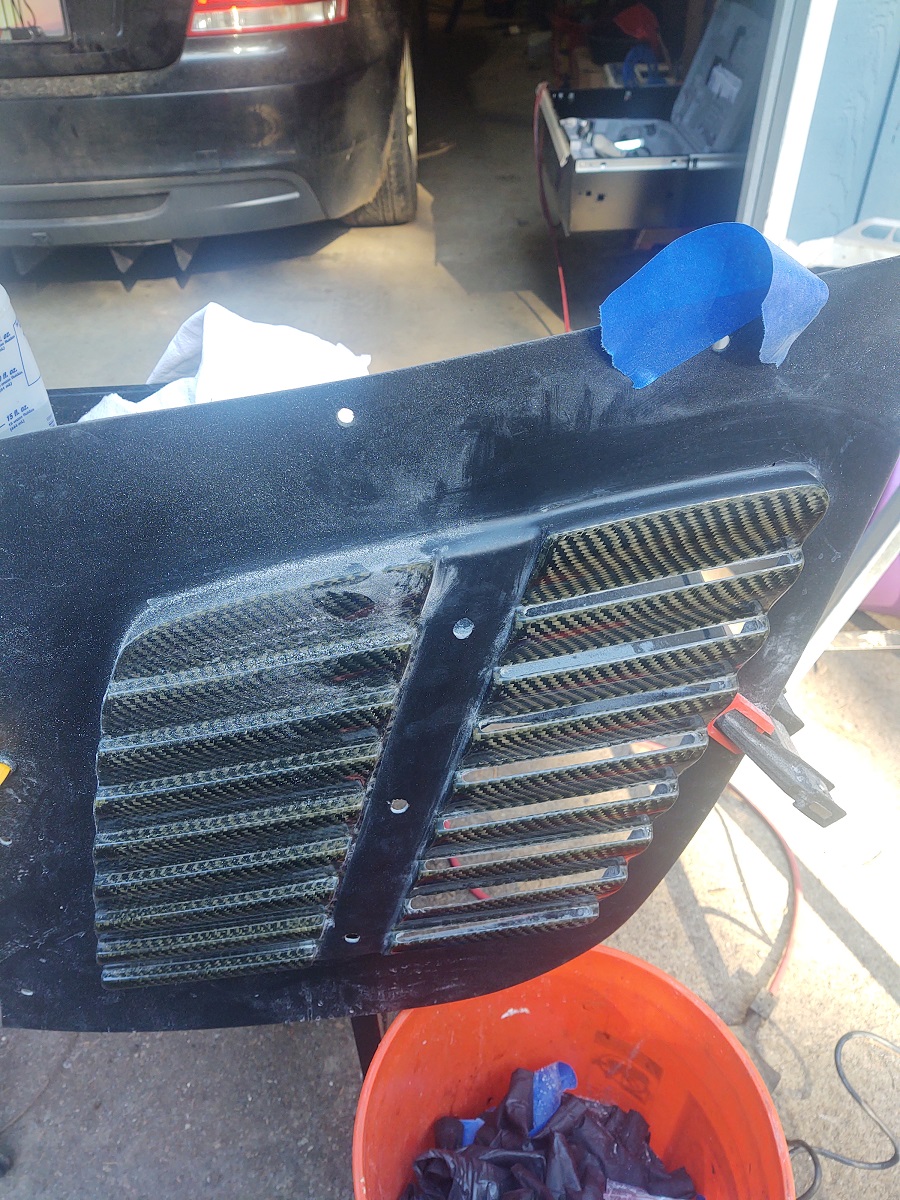 Here is the bit I used. 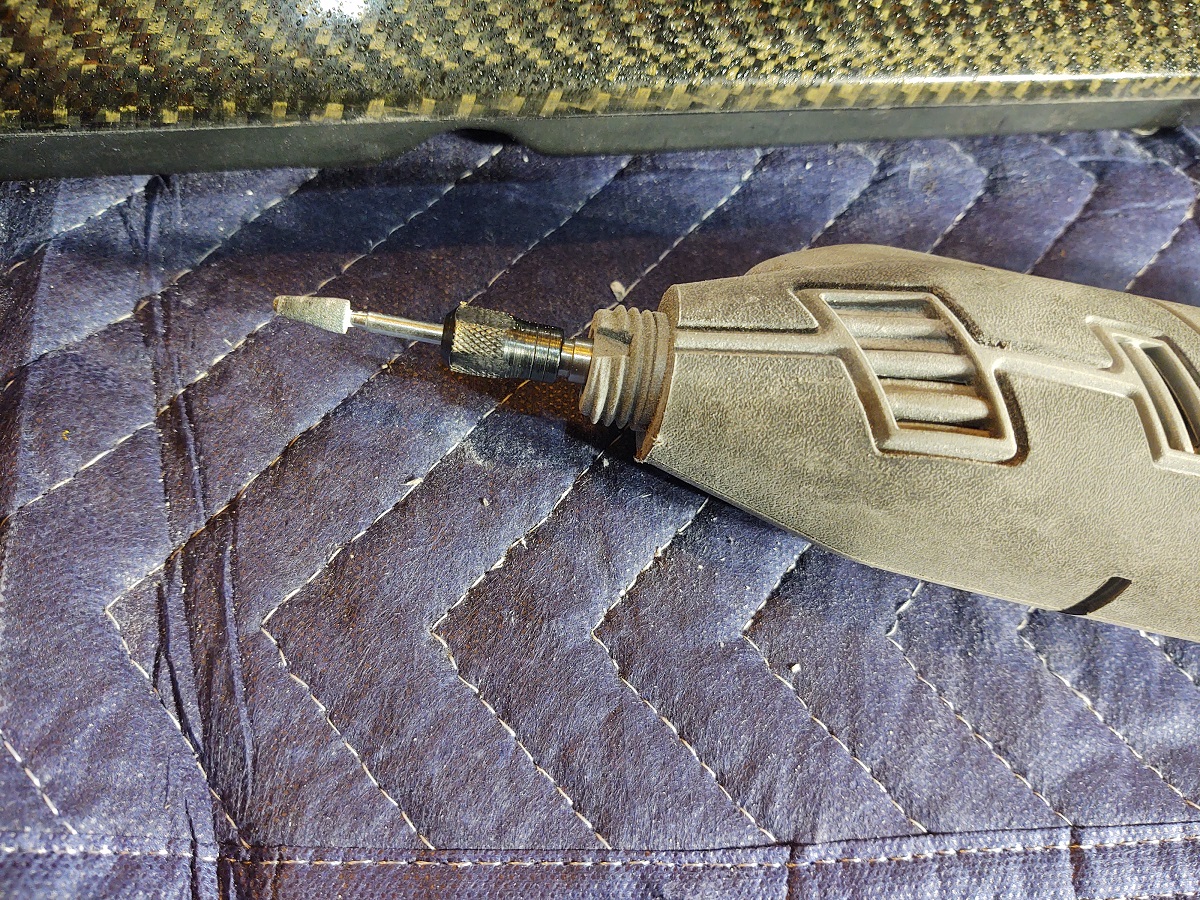 I used a good epoxy and some small format expanded metal grille material (labeled as for motorcycles) and fitted a small grille piece for each opening. 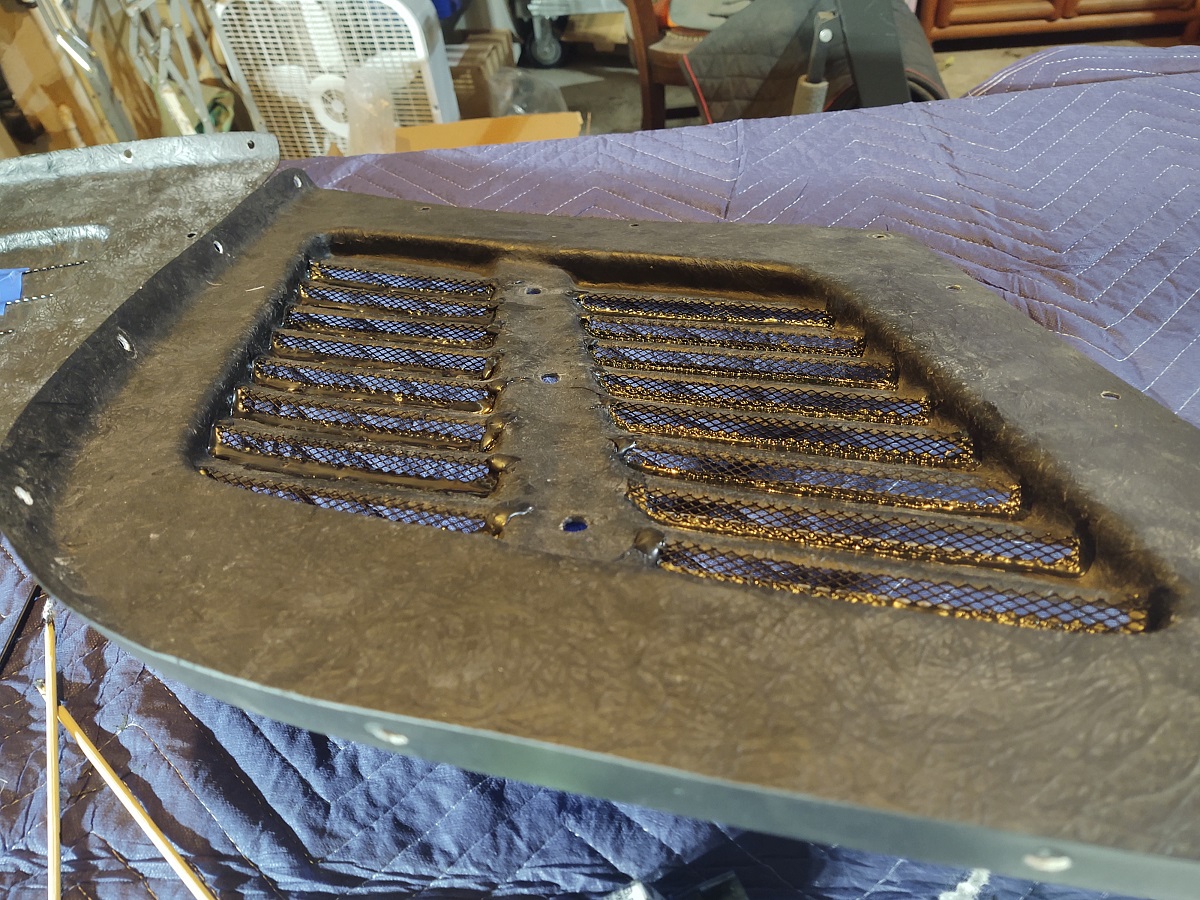 The hood was going to be professionally painted so I went to remove the BMW emblem...turns out it was glued on, so I ended up needing to grind down some material to make it flat. No worry since this would be a non-visible area. Did I mention you should make liberal use of painters tape? 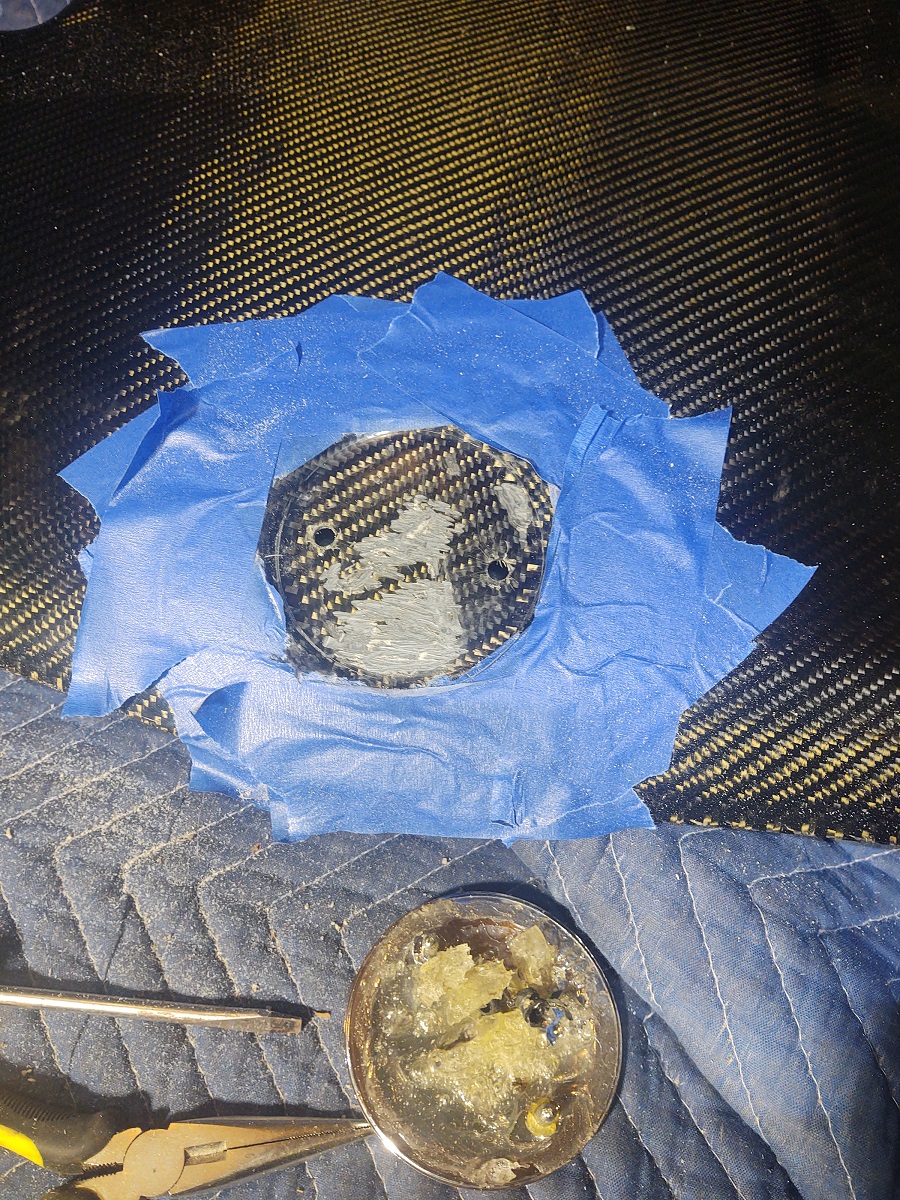 I got a good deal from TGS on a GTR trunk so I purchased it. Thx Jeff@TopGearSolutions ! 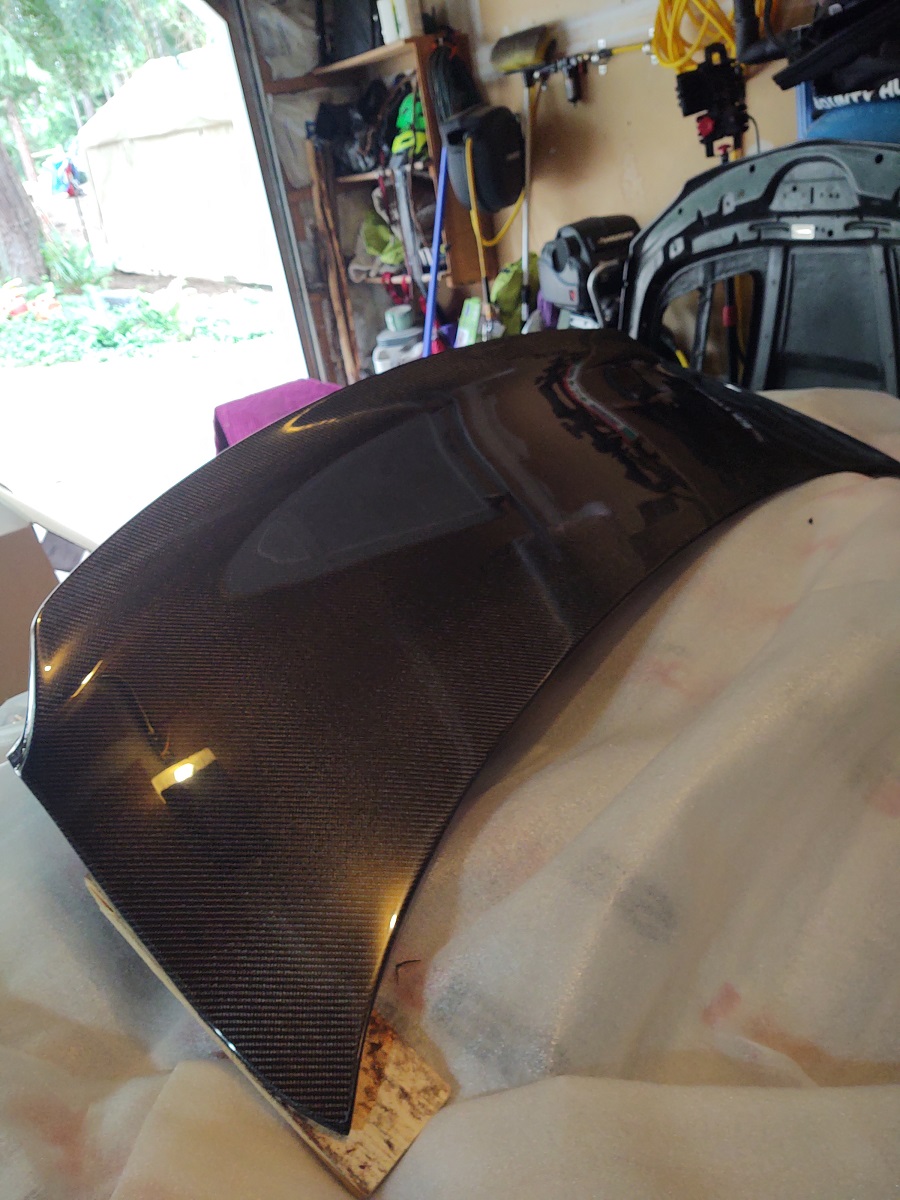 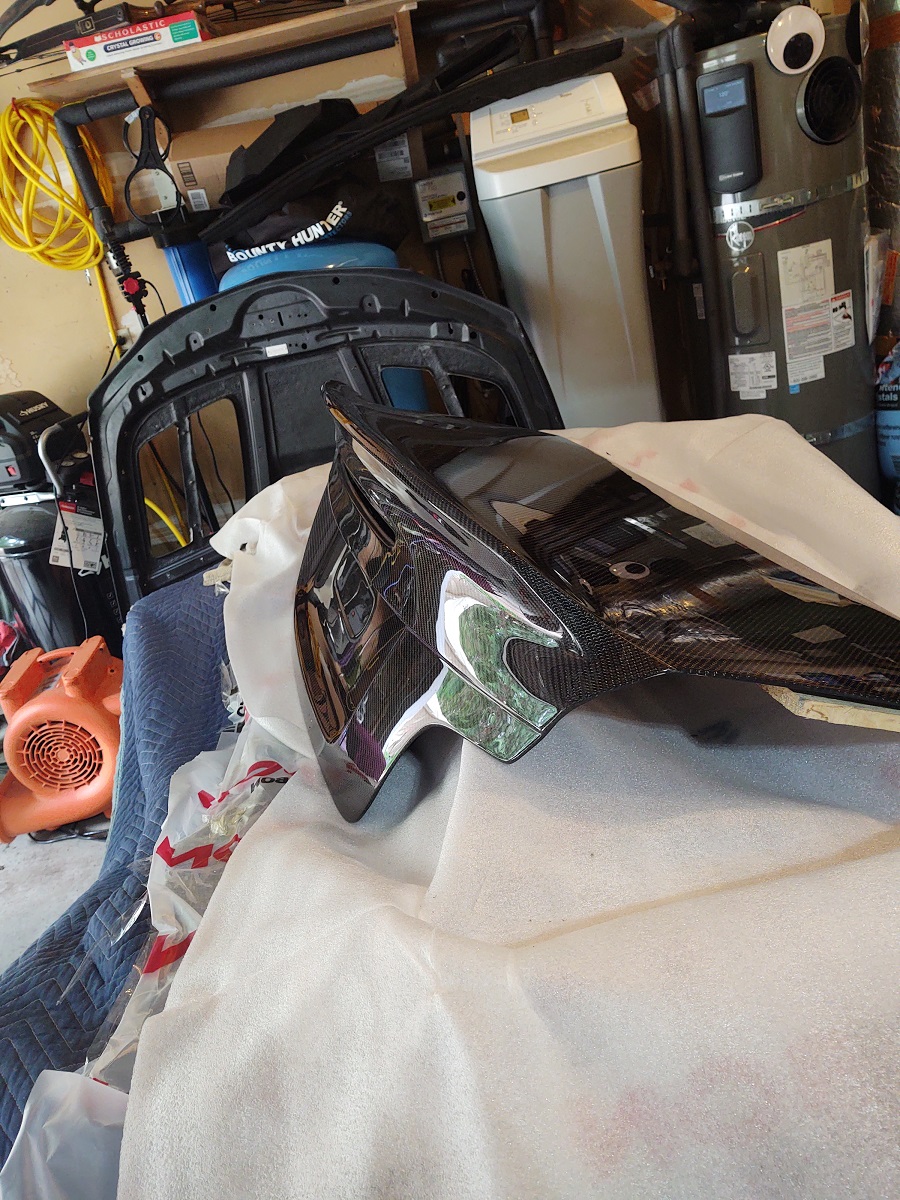 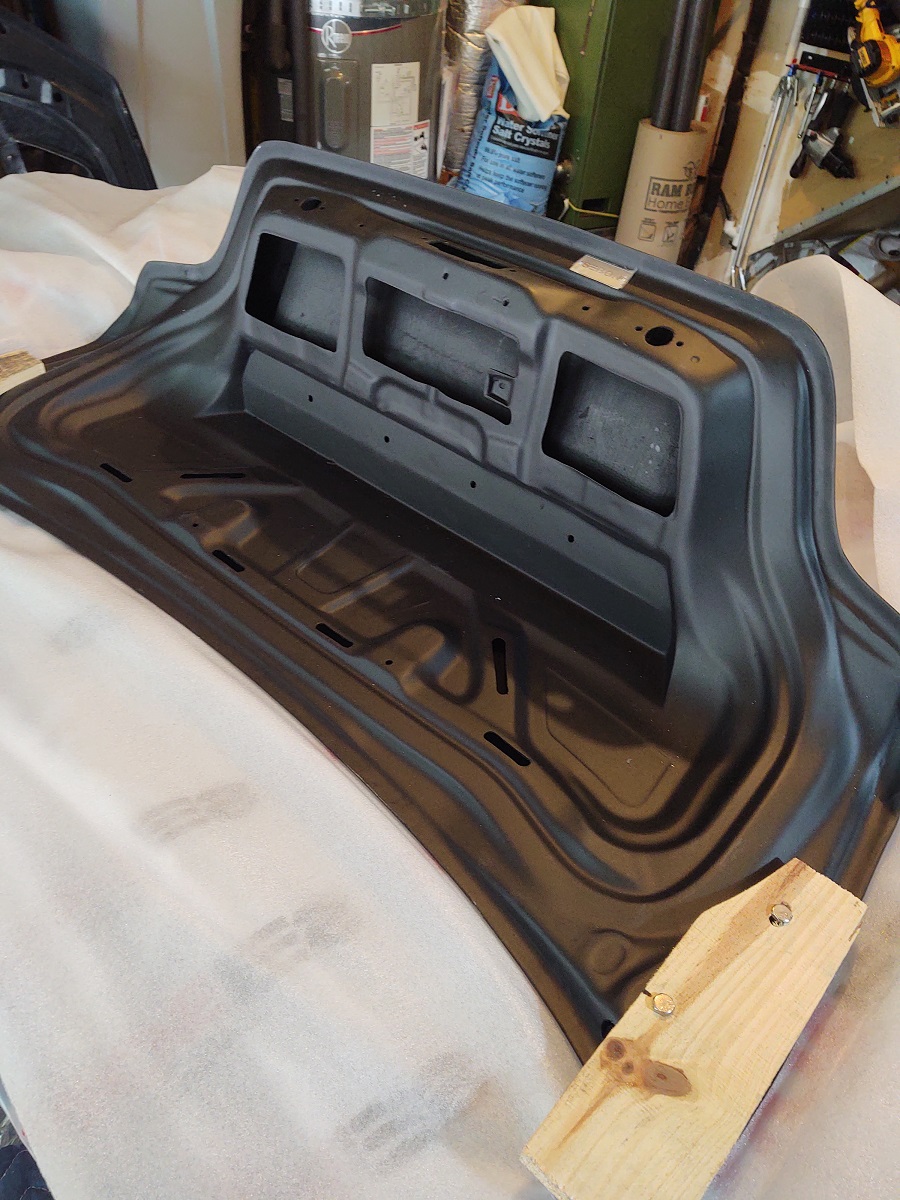 If the hood had been as blacked out as the new trunk I may have considered staying with naked CF...but I also know greenification is the natural progression so...I moved on to other prep before paint. One of the things I wanted to do with both the hood and trunk is make them "hot-swappable" with the factory pieces, so I obtained a whole new set of hood and trunk parts (mix of both used (Thx TUN3D ! and a few new). One modification that would be needed was plugs for the wires to the heated spray nozzles and disconnect for the fluid hose for the hood. I would also need a plug for all the wires for the trunk. I used wire identifiers to keep everything straight before I cut. One challenge I ran into was that the used harness I got for the trunk had more wires than the one in my car...apparently there was a design change between N54 and N55 year model 1ers. I have knowledge of electrical wiring so I was able to sort it out. I also used the new heat shrink tubes with the solder in the middle for all the connections. Those things are awesome! 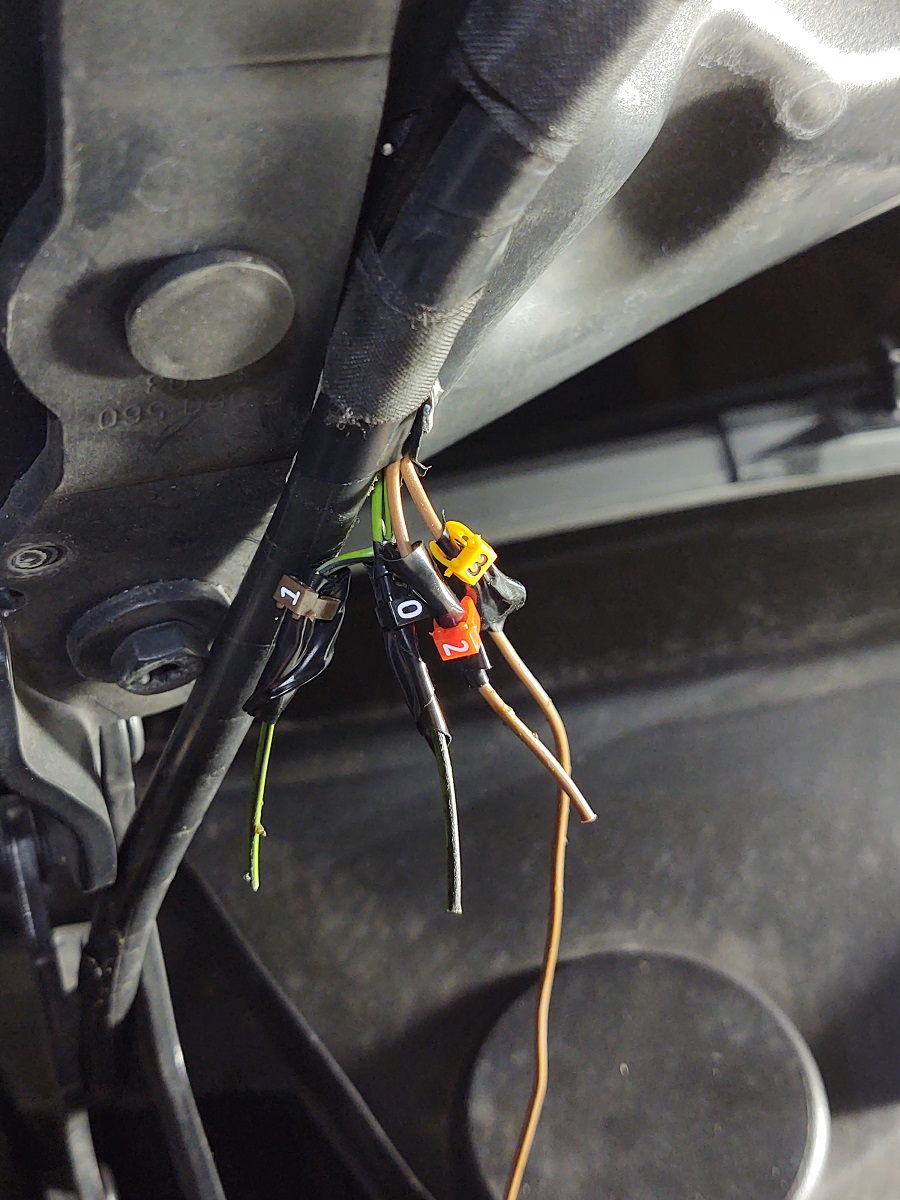 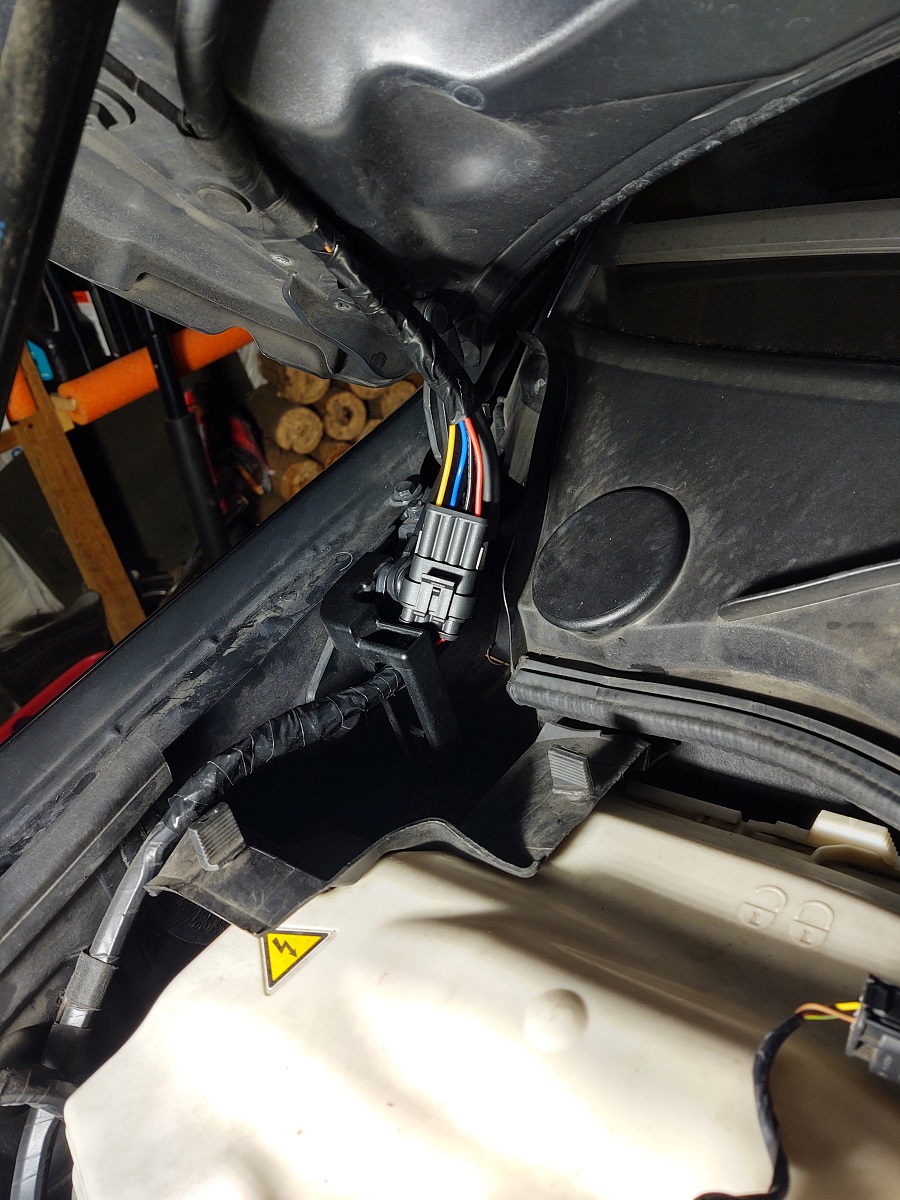 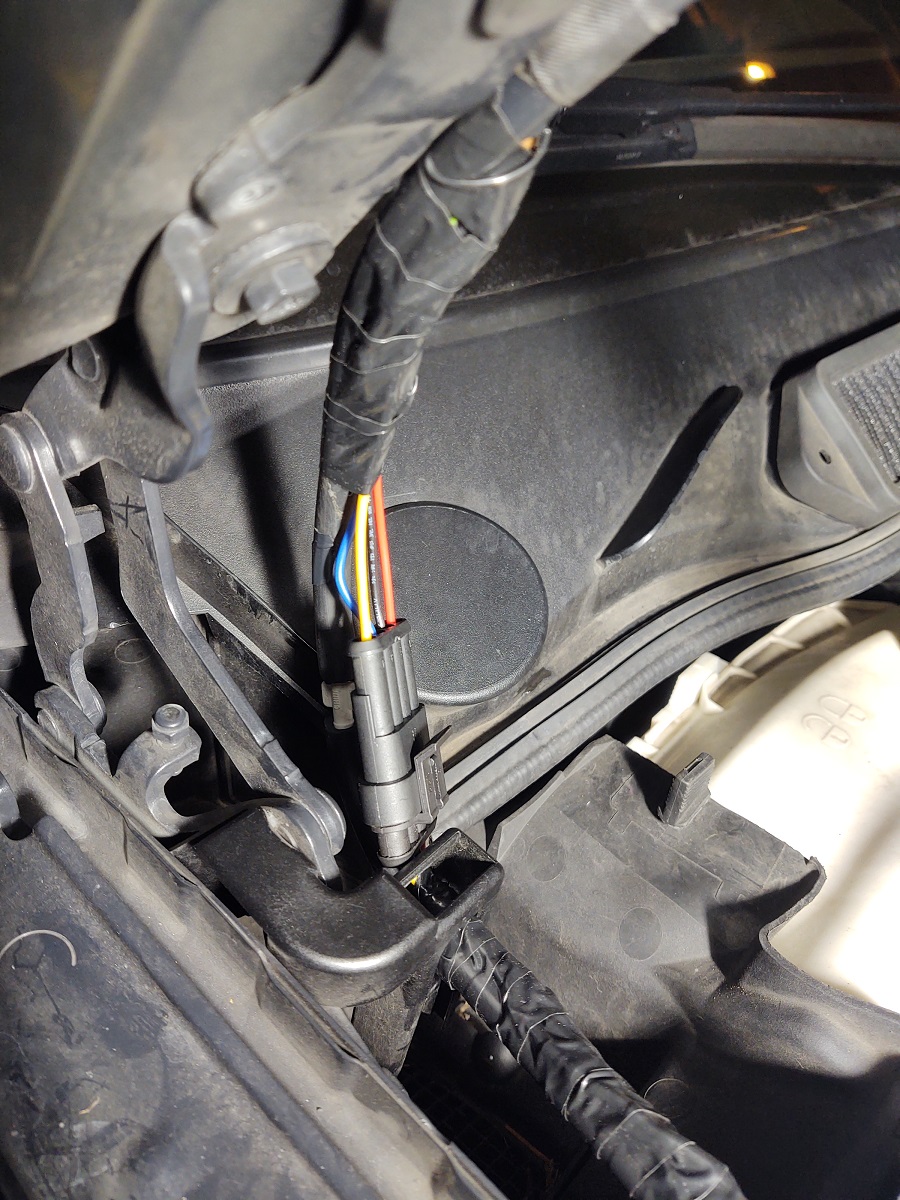  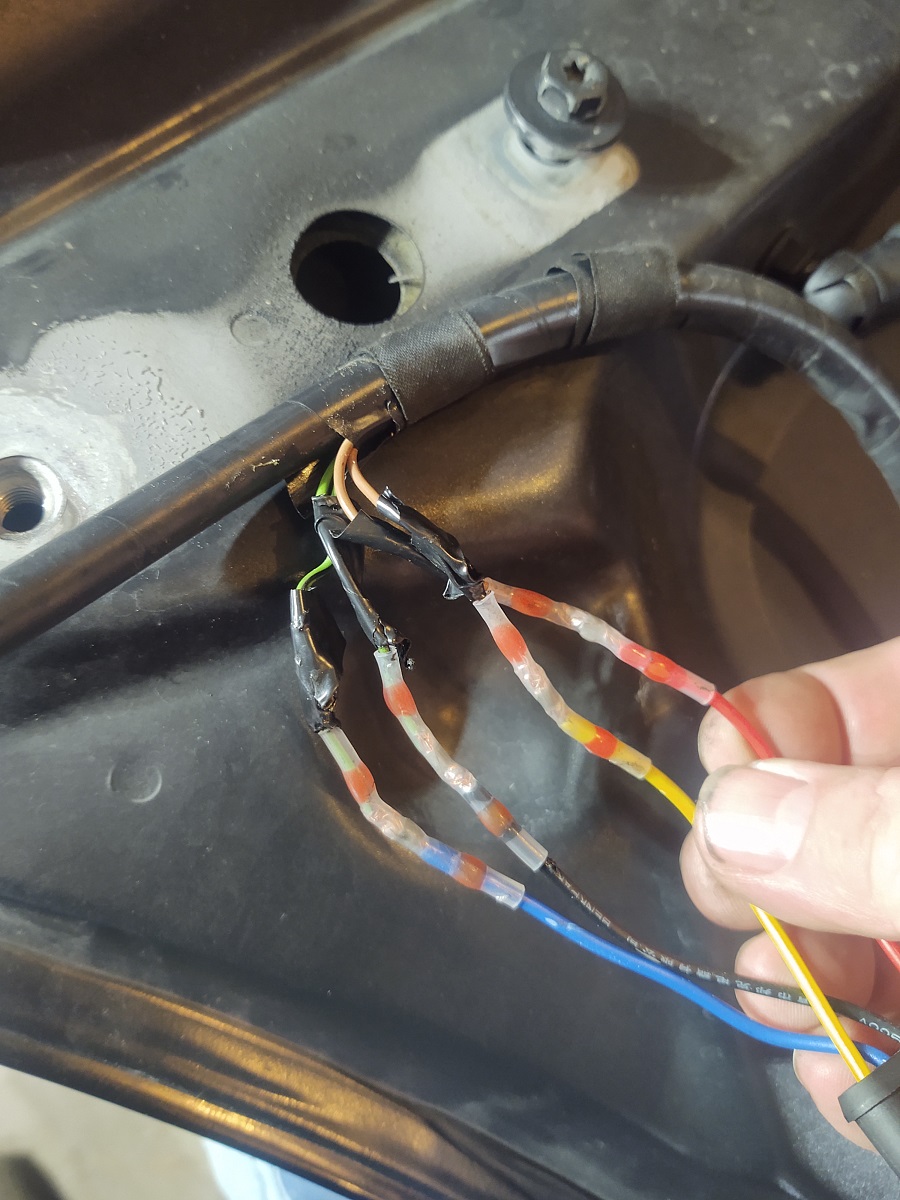 I didn't take a pic, but for the trunk I was able to use two 4 lead PC CPU connectors and was able to stuff them and excess wire into the trunk hole so that I could reconnect the rubber seal piece. https://smile.amazon.com/gp/product/...?ie=UTF8&psc=1 So both trunks and hoods have full sets of hardware and plug connectors that mate to the plugs on the car. Before going to paint, I needed to fit up the aerocatches so I could cut the holes for them. This is a track car so these were a must. I went back and forth on whether to get the normal or low profile ones. i really liked the sleek look of the low profile but the normal ones have the piece on top that looked more secure, but could also cover up any mistakes I made in the cut. I ended up deciding that I would attempt the low profile, and if I screwed up the cut, I would shift to the normal. I also decided to attempt a "no screws/bolts" method by using a tough epoxy. If it failed, I'd add the included bolts for the low profile one. Basically a three tiered strategy...attempt epoxy, if that failed, use low profile hardware, if that wasn't doable since i screwed up the cut and needed to "cover" the error, sell the low profiles and get the regular profile aerocatches. After a bit of research, this is the epoxy I used: https://smile.amazon.com/gp/product/...?ie=UTF8&psc=1 The first thing to do was to figure out where on the car to mount the latch pins. Really, only one place works on a 1er easily. Here: 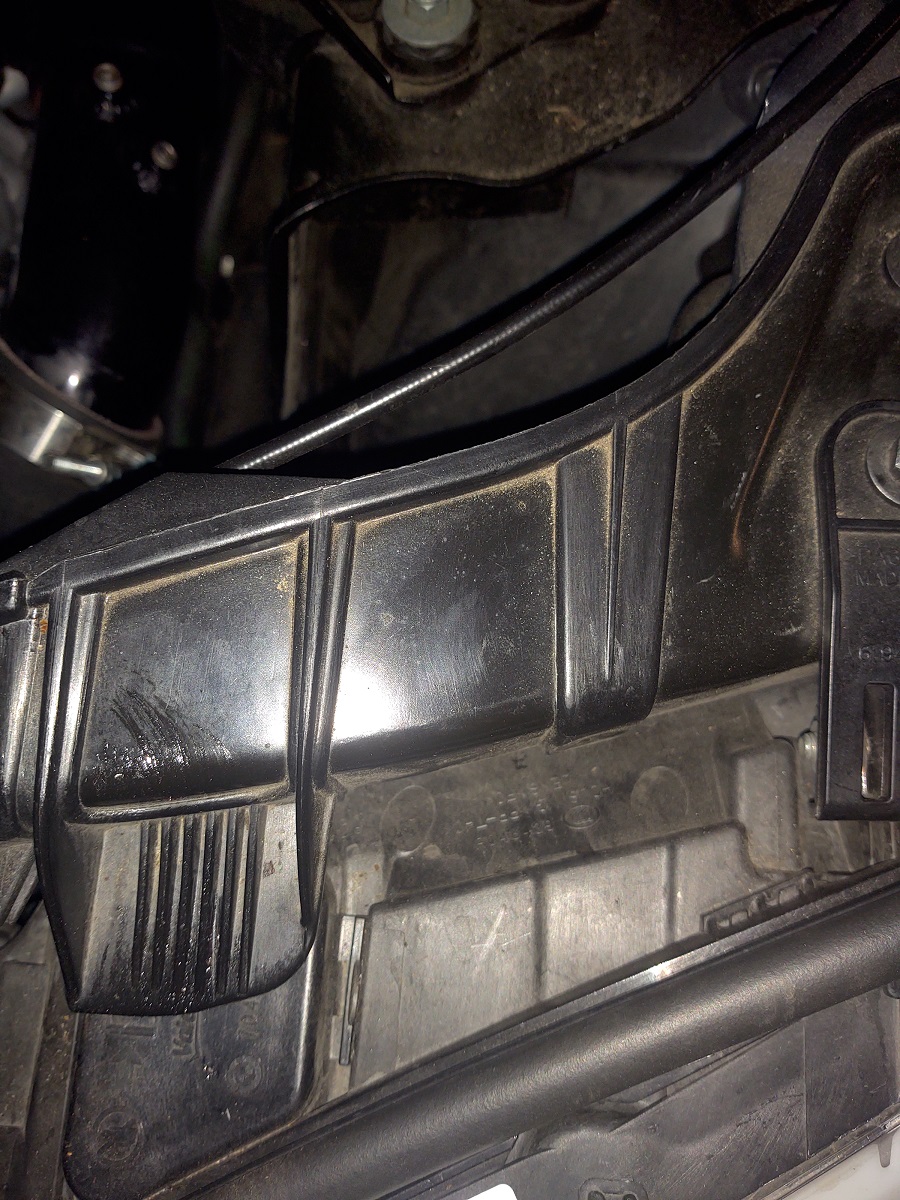 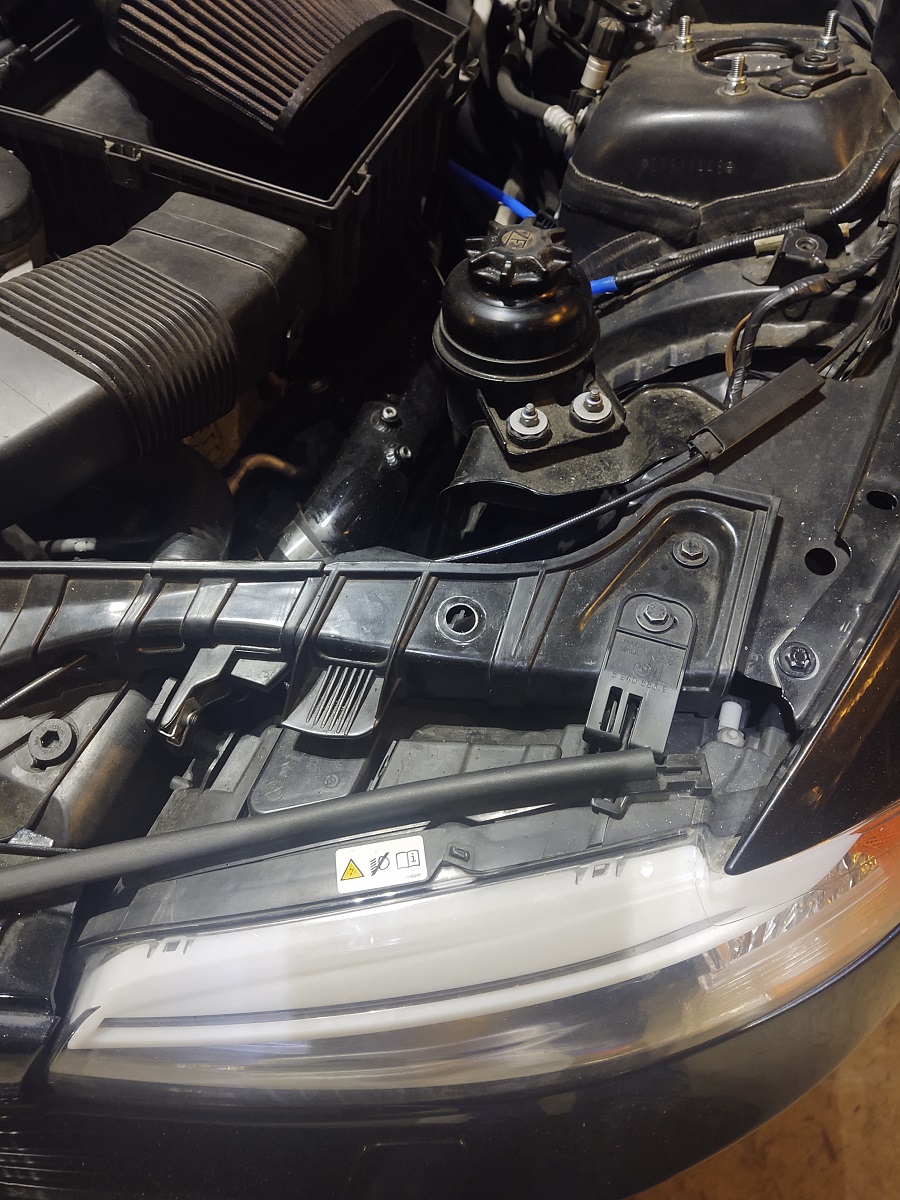  Astute observers will notice the hole is bigger than necessary...this was because I intended to use a rivet nut initially vice the provided dual nut arrangement provided with the aerocatch, but this failed as the car metal at that point is thin and I couldn't get the rivet nut to "catch" properly and it started to bend. So I used the provided hardware, just with bigger holes. This ended up being a blessing as it made the pin location a little adjustable which made getting symmetry easier. I also had to cut the pins down to fit properly. 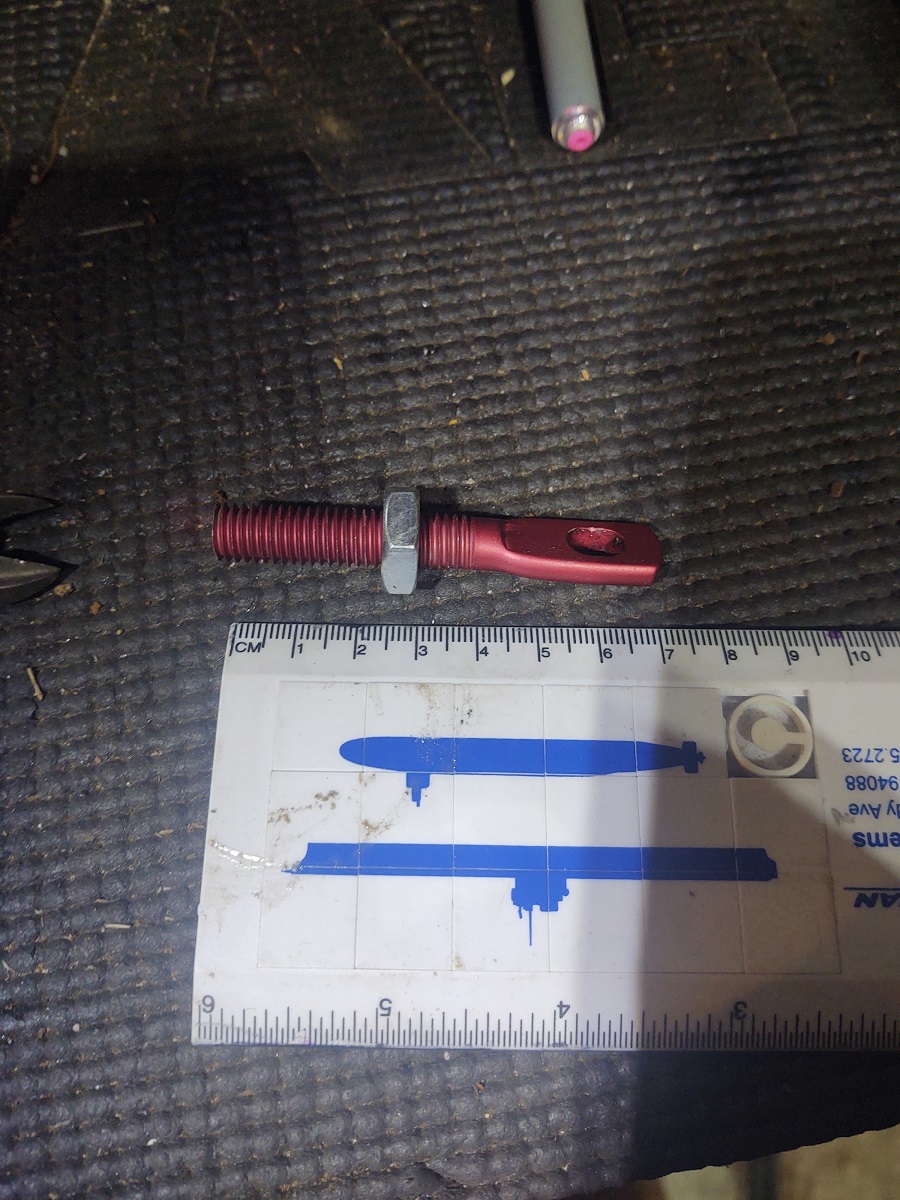 Installed! 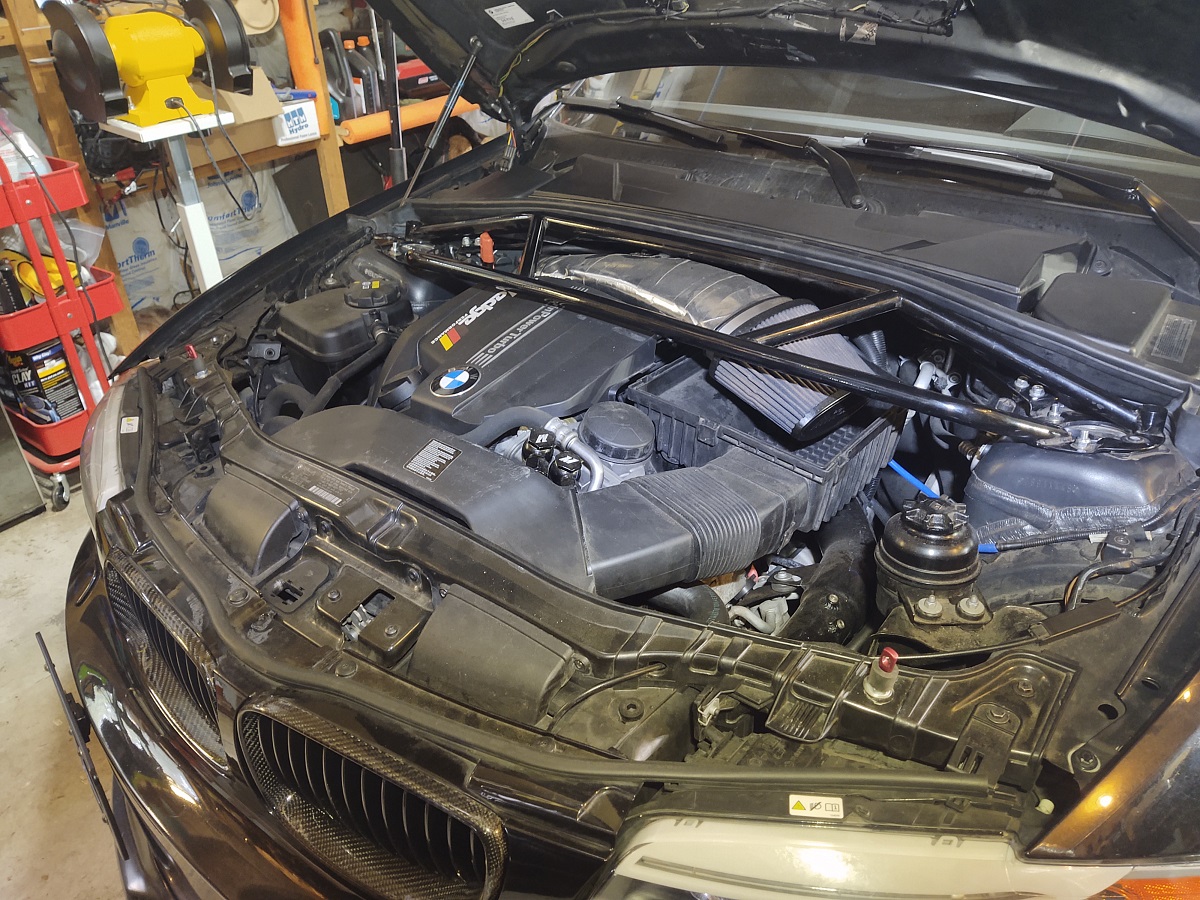 I then got my wife's help and mounted the CF hood. You want to get it mounted exactly how you want it in order to properly mark the drill points for the aerocatches. My hood needed a couple of washers on the rearmost boltholes to be "correct" fore to aft angle. I superglued those washers to the hood so the fix was permanent. I used the rear corners at the windshield to help with fore/aft and equal spacing on the sides as well as the alignment of the front with the "points" on the fender piece above the lights. Once the hood is aligned, make sure your latch pins are as symmetrical as possible and then start closing the hood with grease on the top of the latch pin and mark where it makes contact with the hood. This will be a two step process as the hood at that point has a FRP layer at that point so it conforms to the factory hood dimensions, before you can get to the actual CF hood material (pics below). You will end up cutting a good bit of that FRP layer out to fit the aerocatch so don't worry if your initial hole is messy. I used a diamond drill bit here to minimize the chance of the CF cracking. I didn't do an in process pic, but here is what the cutout looks like at the end. Note that you will end up cutting a "square" out of the vent inserts as well. 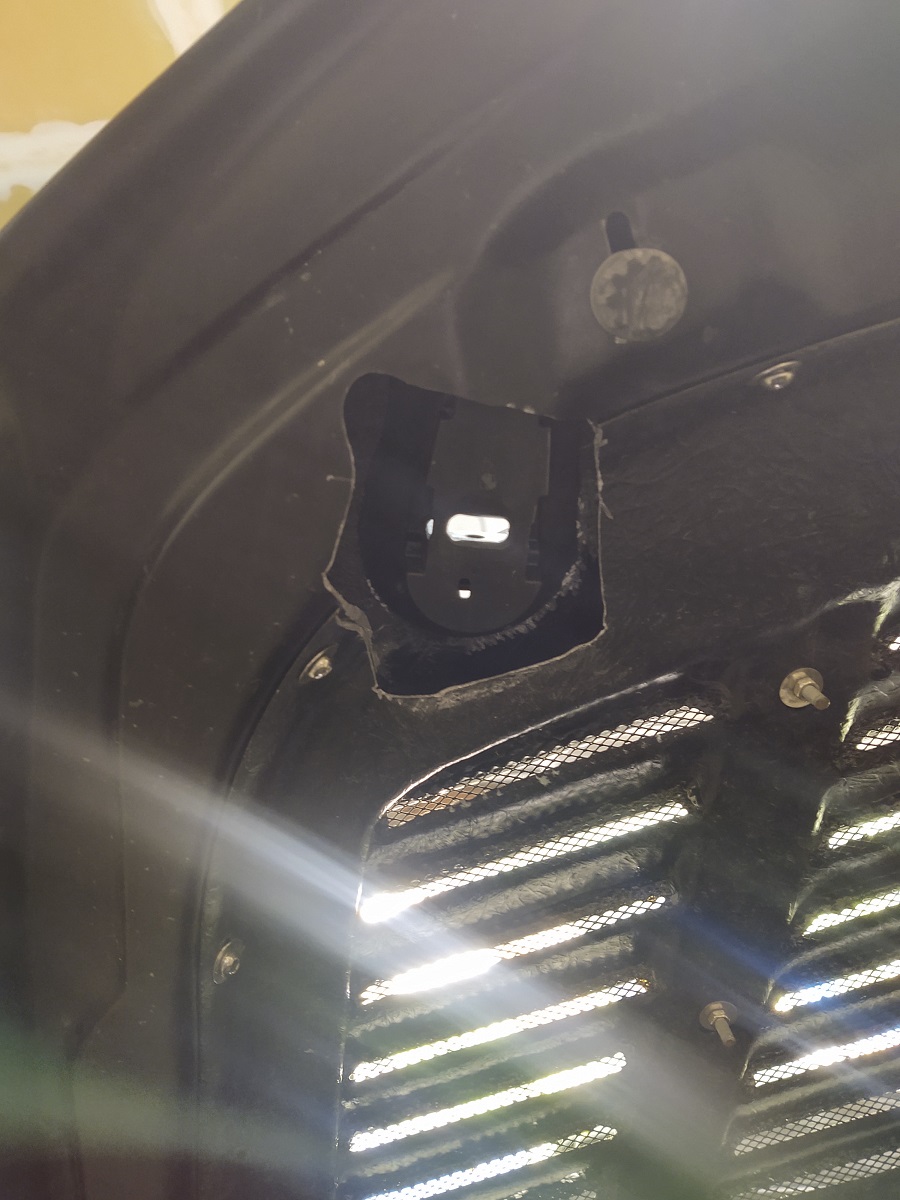 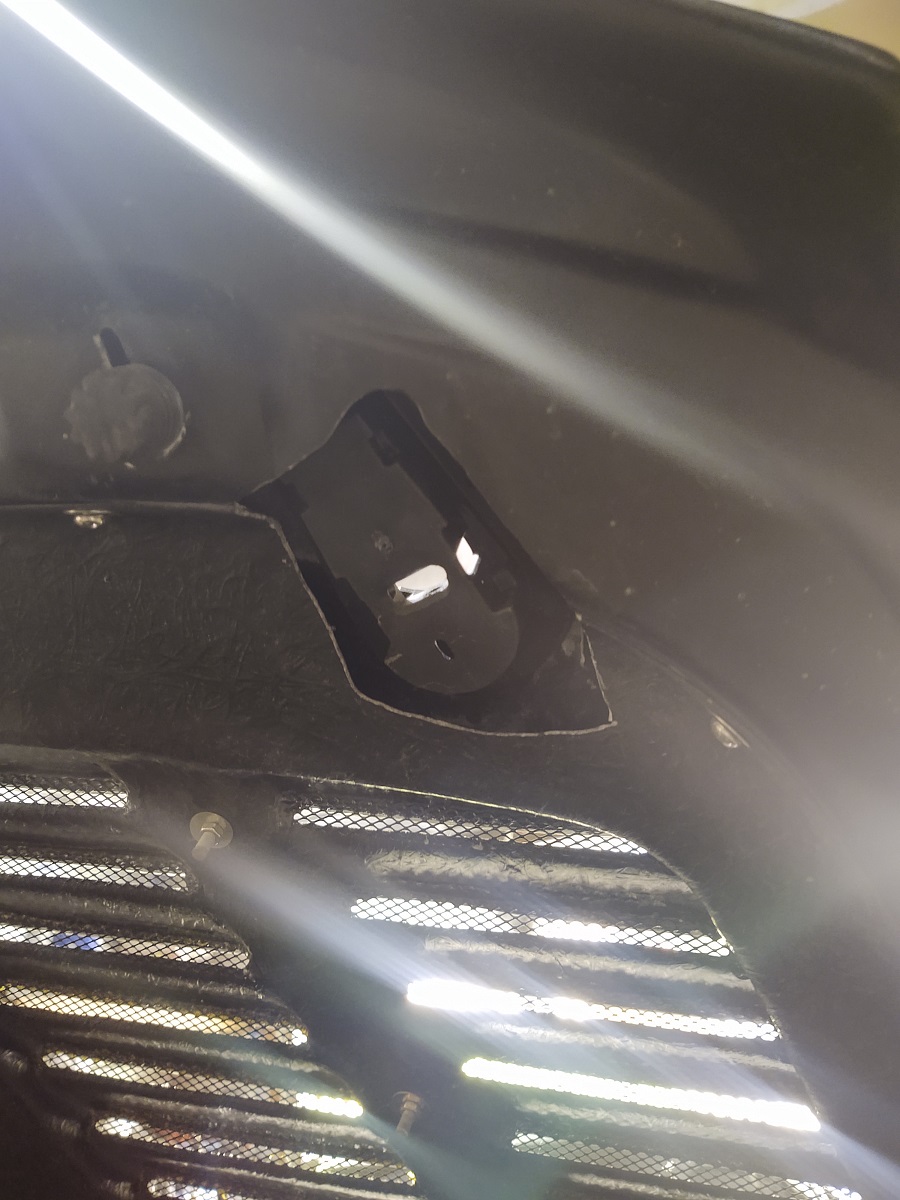 Keep in mind that only the symmetry of the holes for the latch pin matters at this point and, since the holes in the car for the pins allowed adjustment, the exactness of the holes you drill through the FRP and CF hood can be imperfect. Get the initial hole as right as you can and worry about the aerocatch centering and angle later. The aerocatch centers around the latch pin so, in the end, that does have to ultimately be perfect. But the initial hole does not. I did the latchpin holes in two stages...first with a diamond drill bit, then with a larger diameter diamond hole saw. This gave me a hole larger then the latch pin so it could stick through and i could get to the work of getting the center correct and the height close to correct (you'll only be able to het height correct once the aerocatch is installed).  I used a lot of tape for protection and mockup fitting. Measure 20X. From multiple reference points. cut once. LOL. 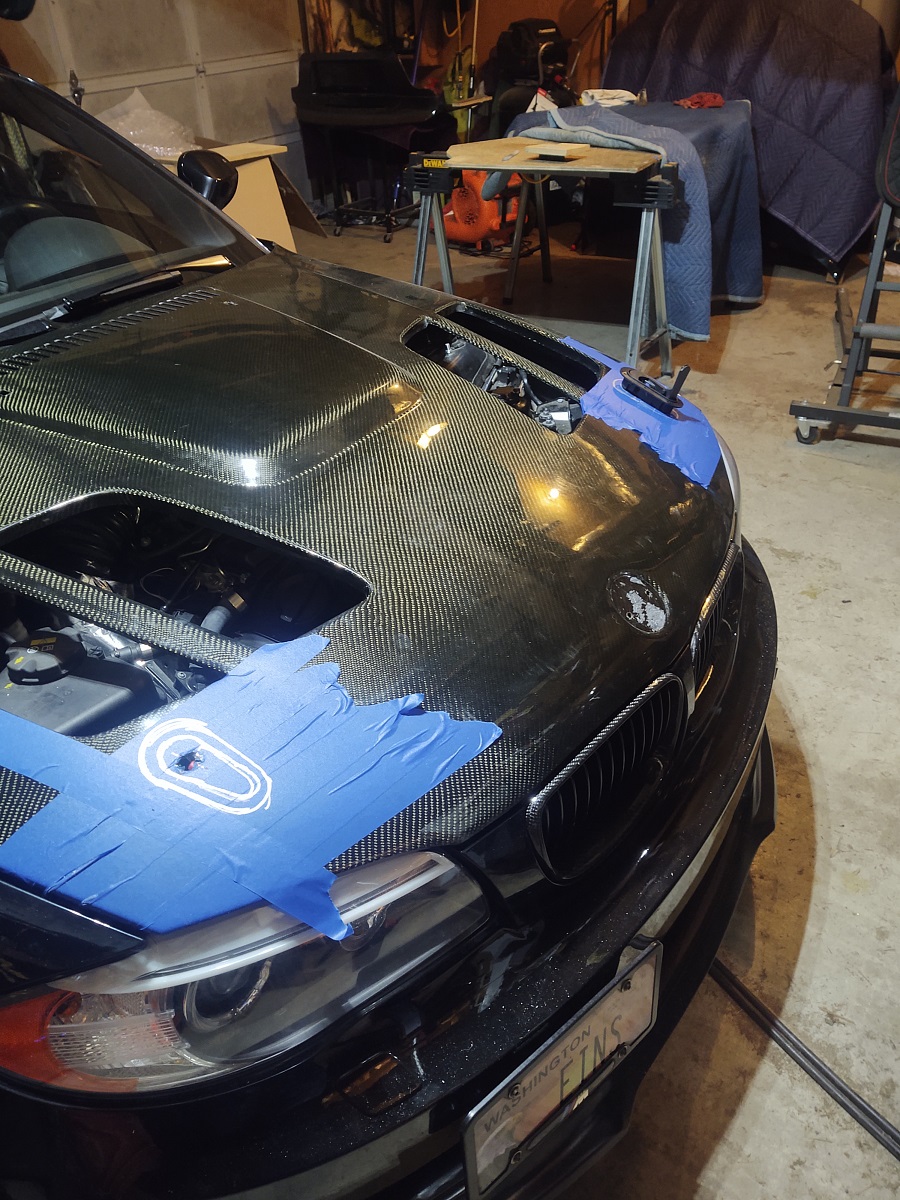 The process is a continual adjustment process for latch pins until you get the center of both sides in the same position symmetrically . This MUST happen before you do any actual cutting for the aerocatch hole. Anyway, once you are comfortable marking (on the tape) where the center point of your latch pins go, and that they are both symmetrical to fixed points on the hood (I used the corners of the vent insert holes and measured, fiixed points on the side and front of the hood), you can move on to figuring out how to mount your aerocatches. I did rough marking using the tape as shown above, then used my printer to make a full size paper template for the aerocatch using the underside piece for the aerocatch bolts. 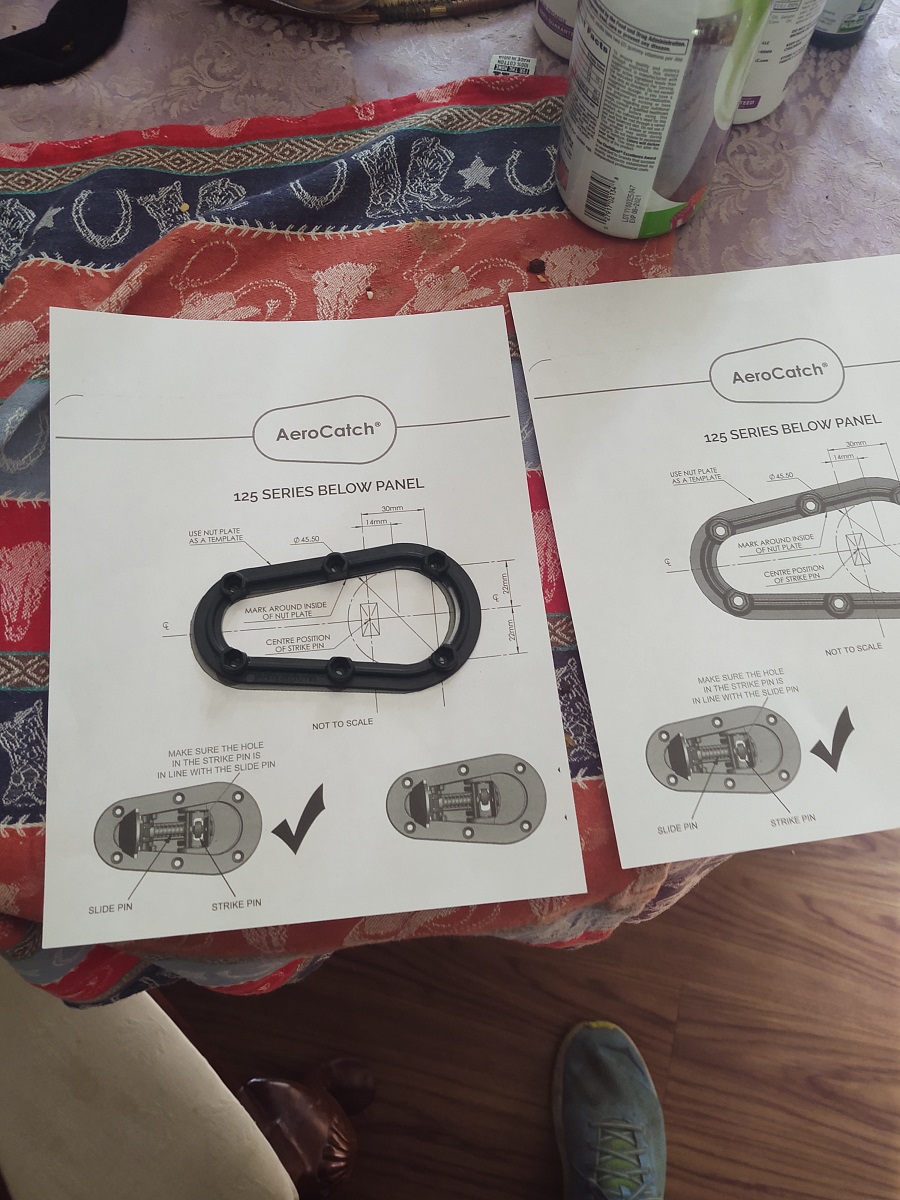 This is the most stressful cut so you need to get where your template lays down as perfect as possible. Take your time and remeasure a LOT! 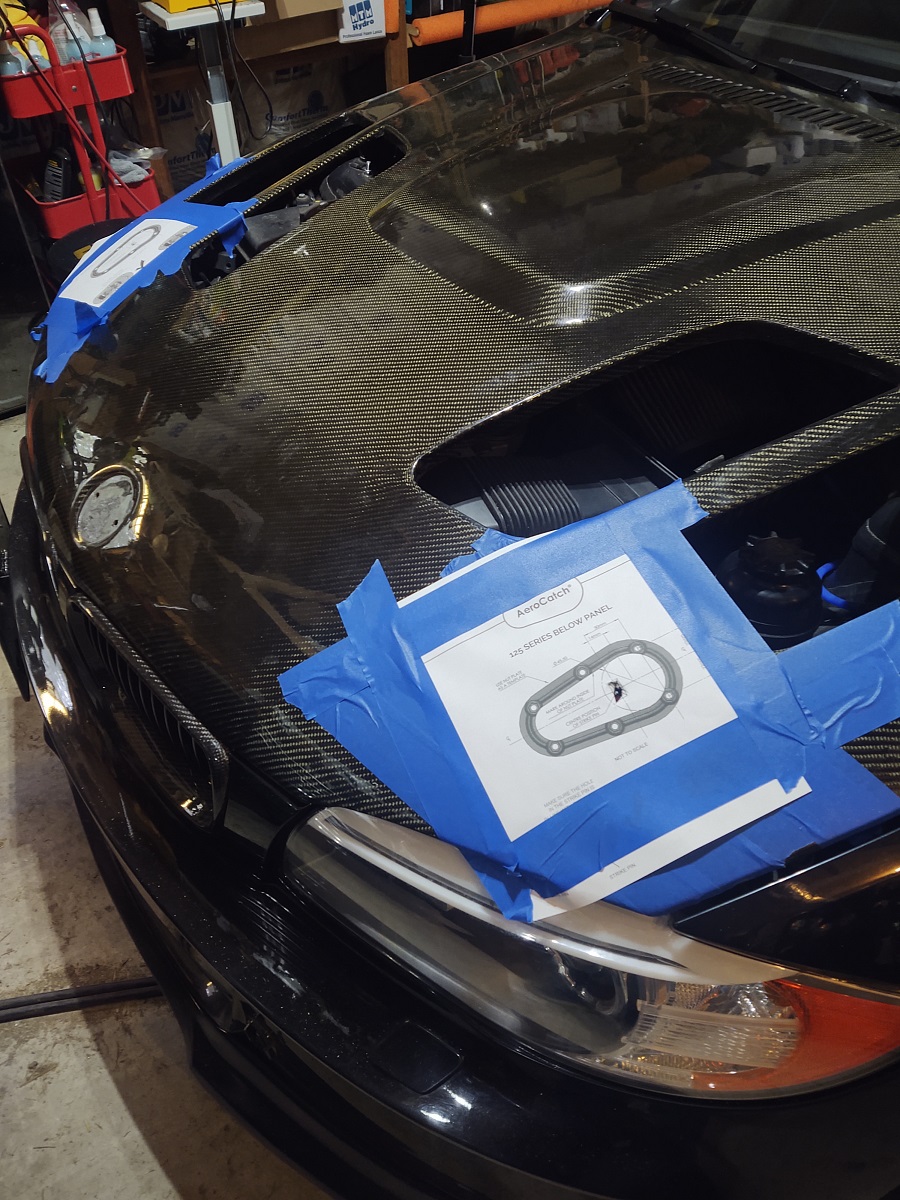 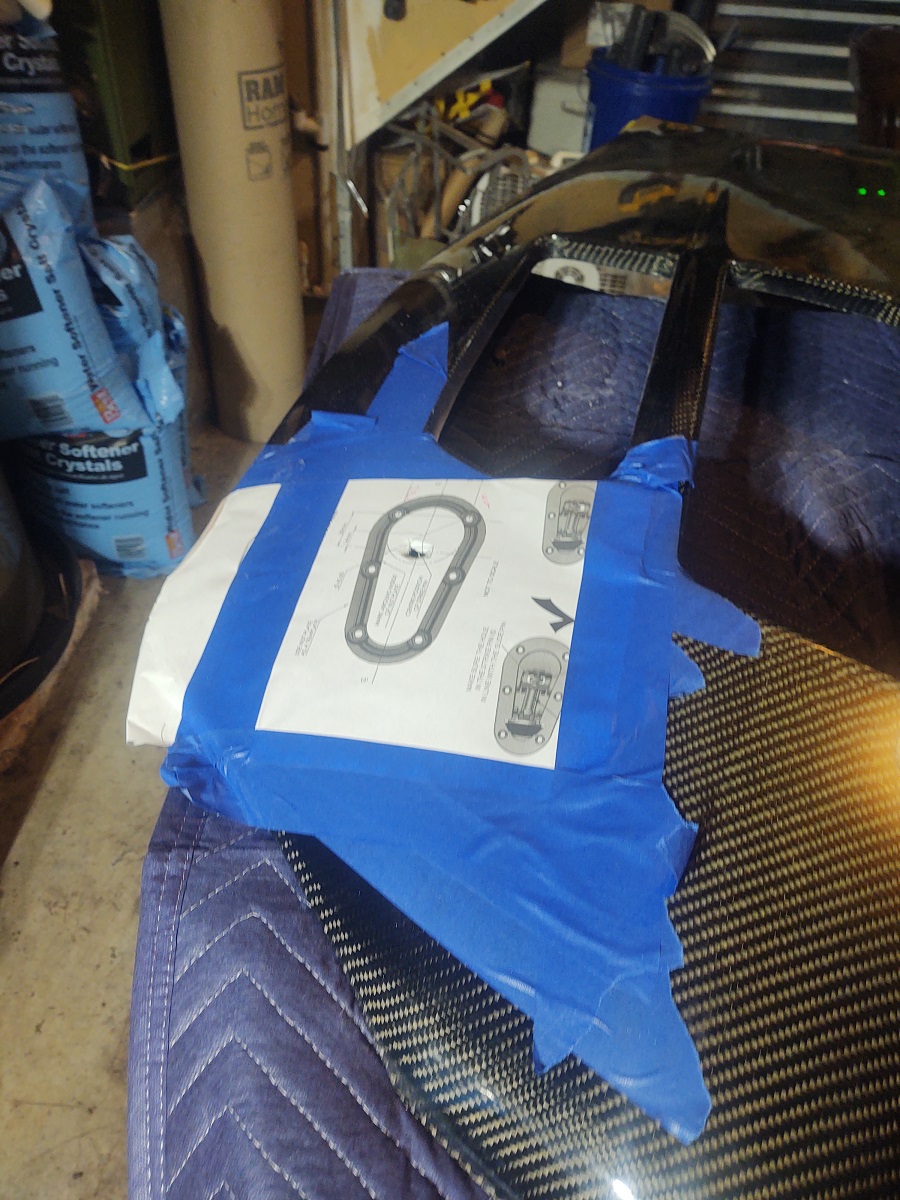 In the end, I elected to make a jig using the actual aerocatch to make the first cuts for the aerocatch holes in the hood. I made it out of wood and used three different diamond hole saw bits for the initial cuts, then the previously mentioned dremel bit to smooth it all out. It was the most stressful cutting process I've ever done! 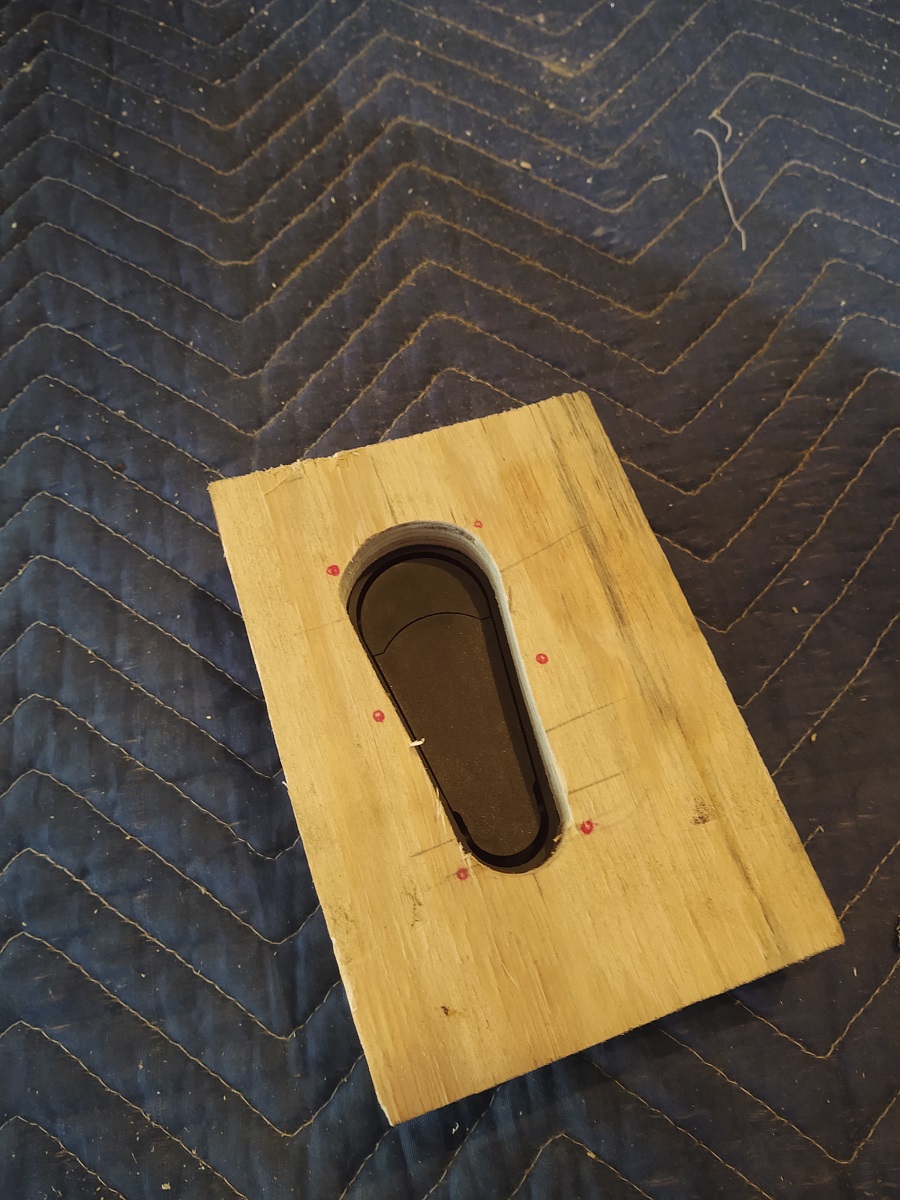 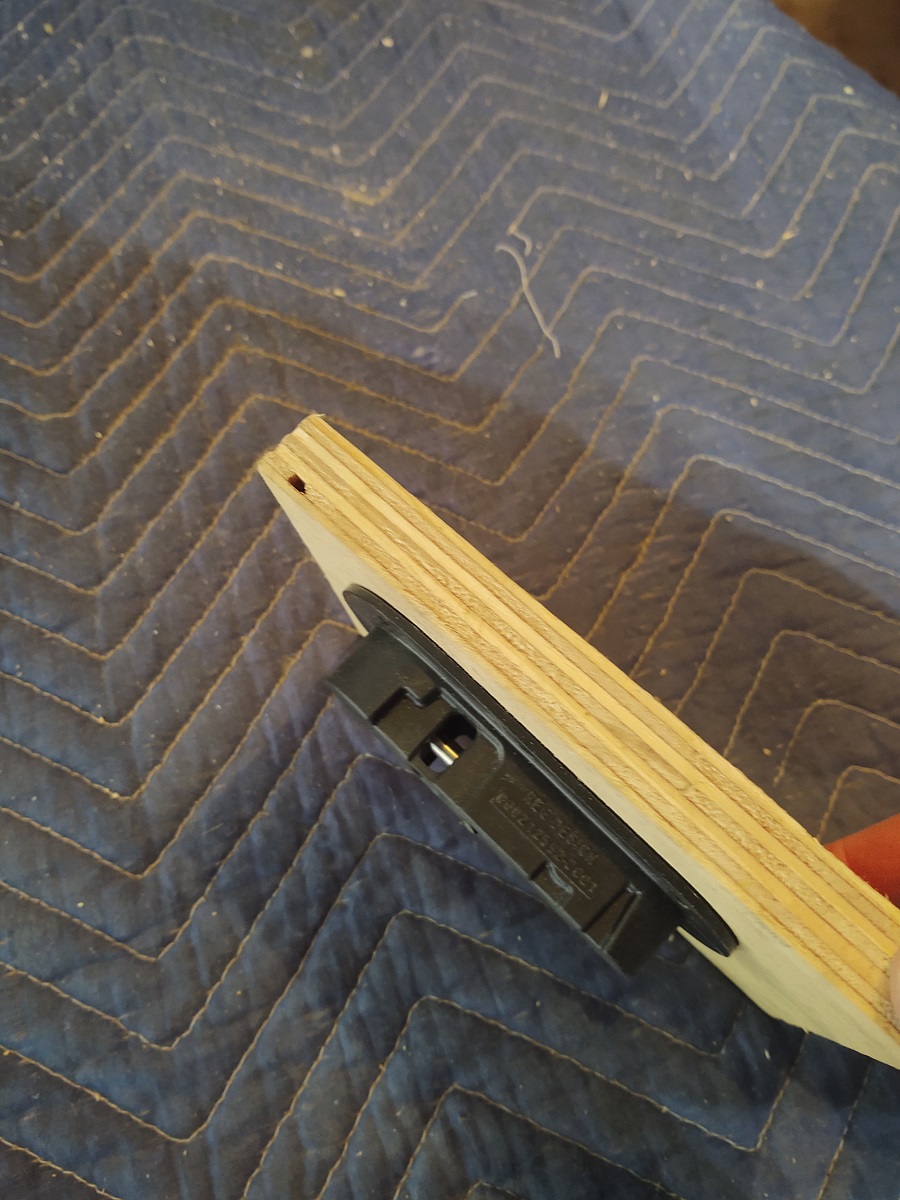 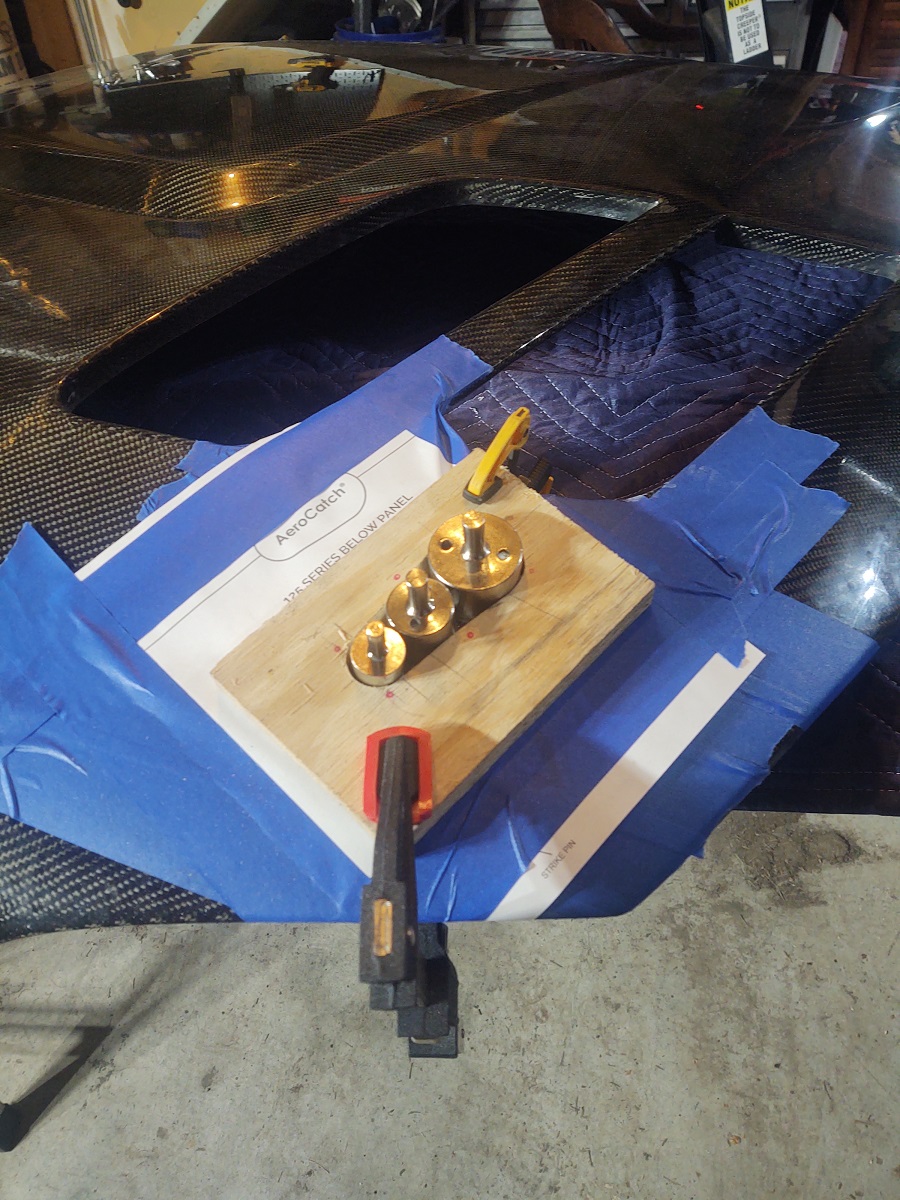 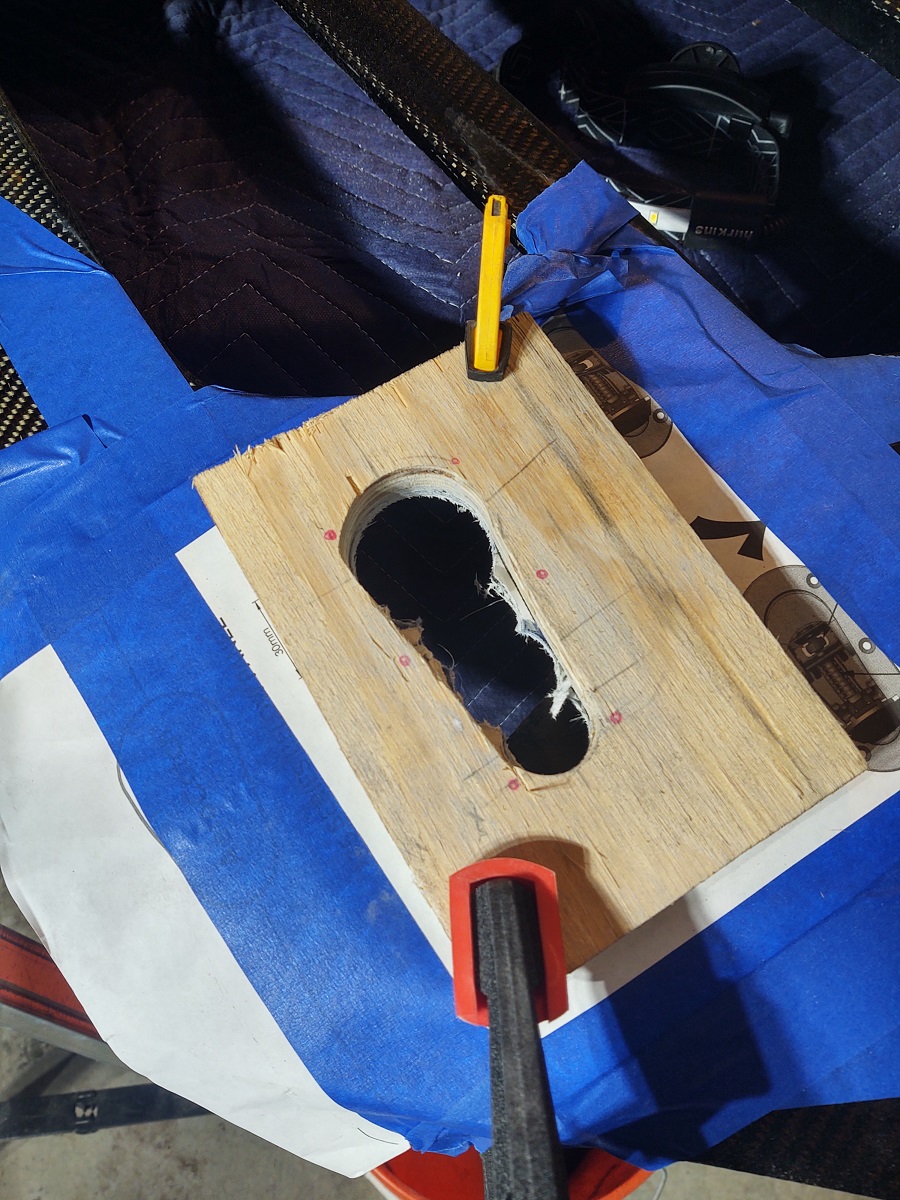  I then went through an iterative process of fitting the aerocatch and using small hand files to make final adjustments. 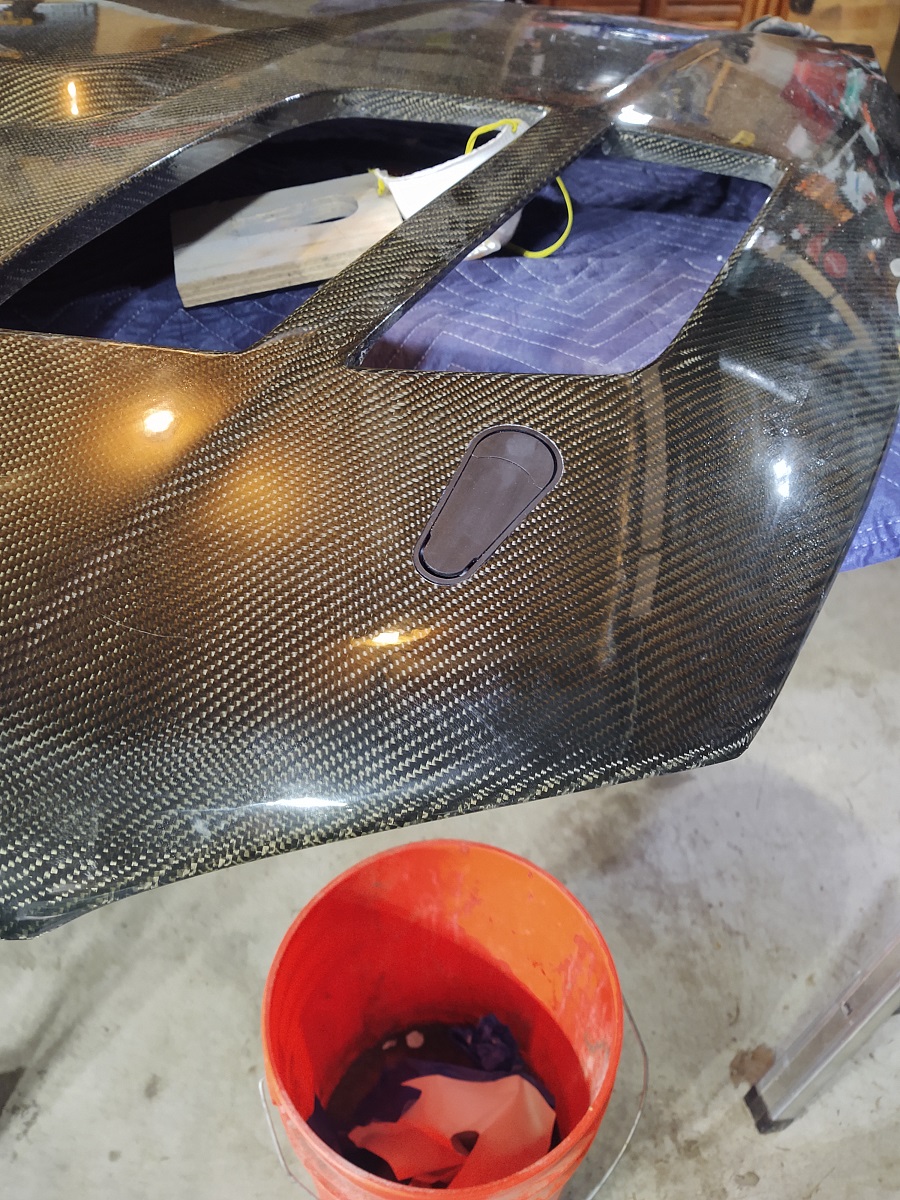 The end result was that the holes were tight enough to hold the aerocatches in. I wasn't sure how much the paint layer would be a problem later but I elected to go smaller vice larger and figured I could sand down the paint, if needed. In the end, it only needed a little sanding to fitup after painting. 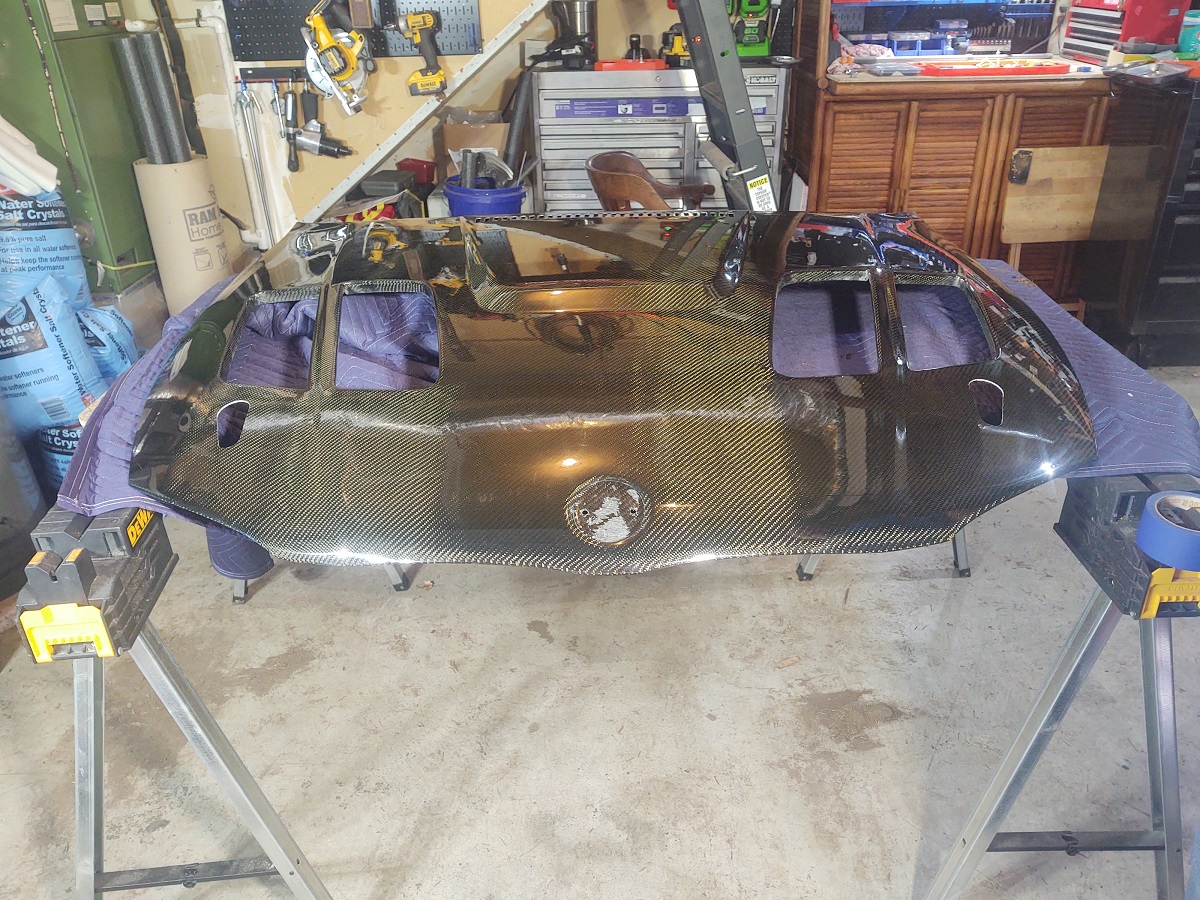 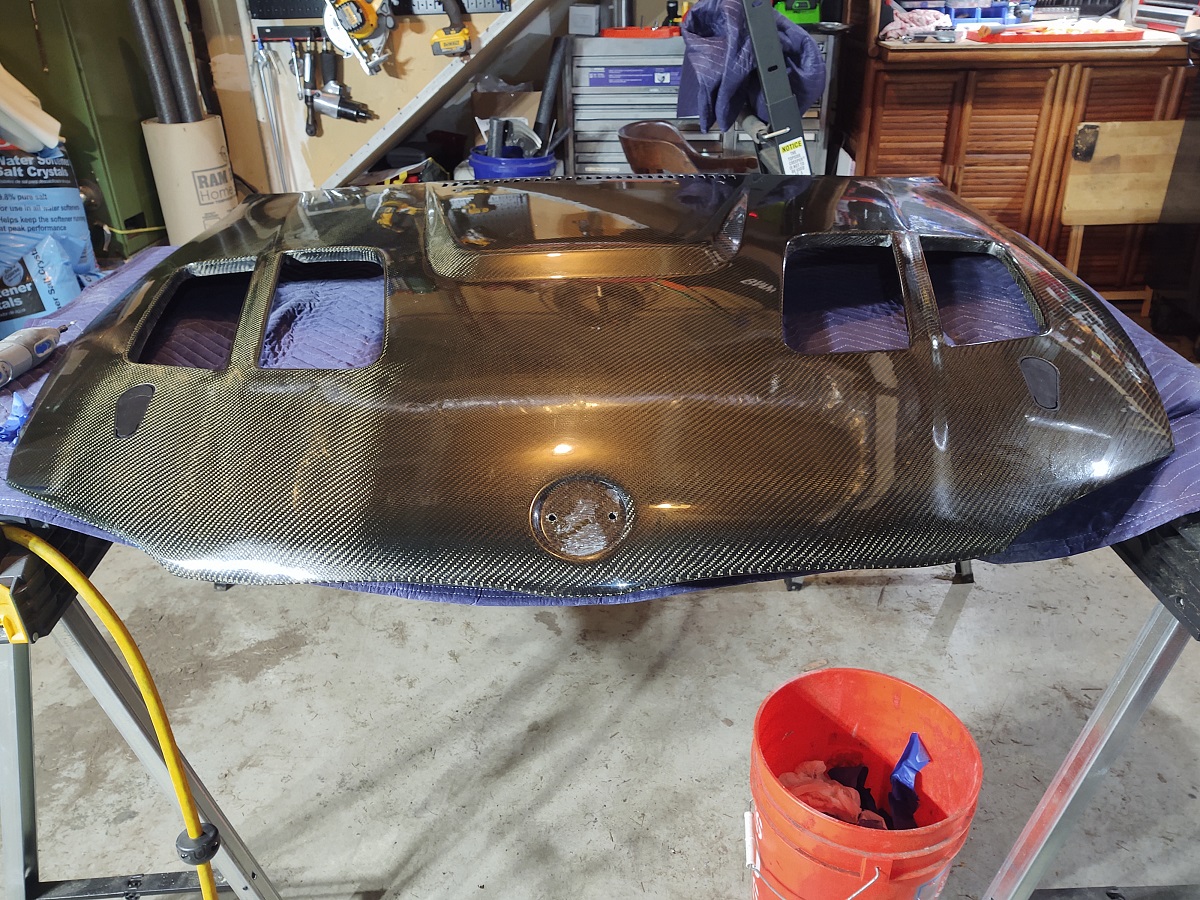 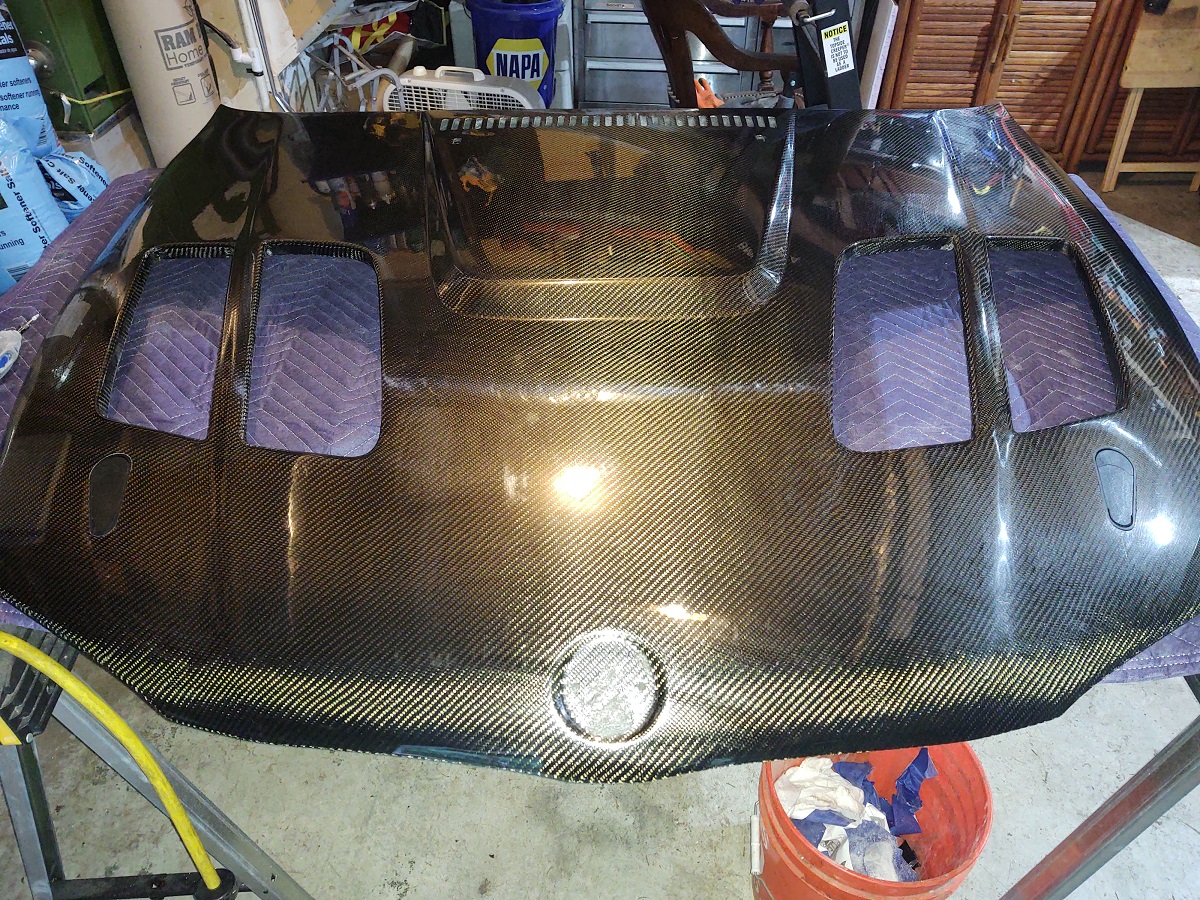 When the hood came back front paint, after cleaning up the holes a little with light sanding, the aerocatches fitted up, it was time to do the epoxy. I got to get some new tools (the cool locking clamps) and repurposed a piece from a dent-puller kit to get-r-done. I did get some epoxy on the paint side (it squeezed under the tape and I didn't see it) that I was able to remove with several iterations of cutting polish. Was scared there for a bit that I wouldn't be able to get it off! 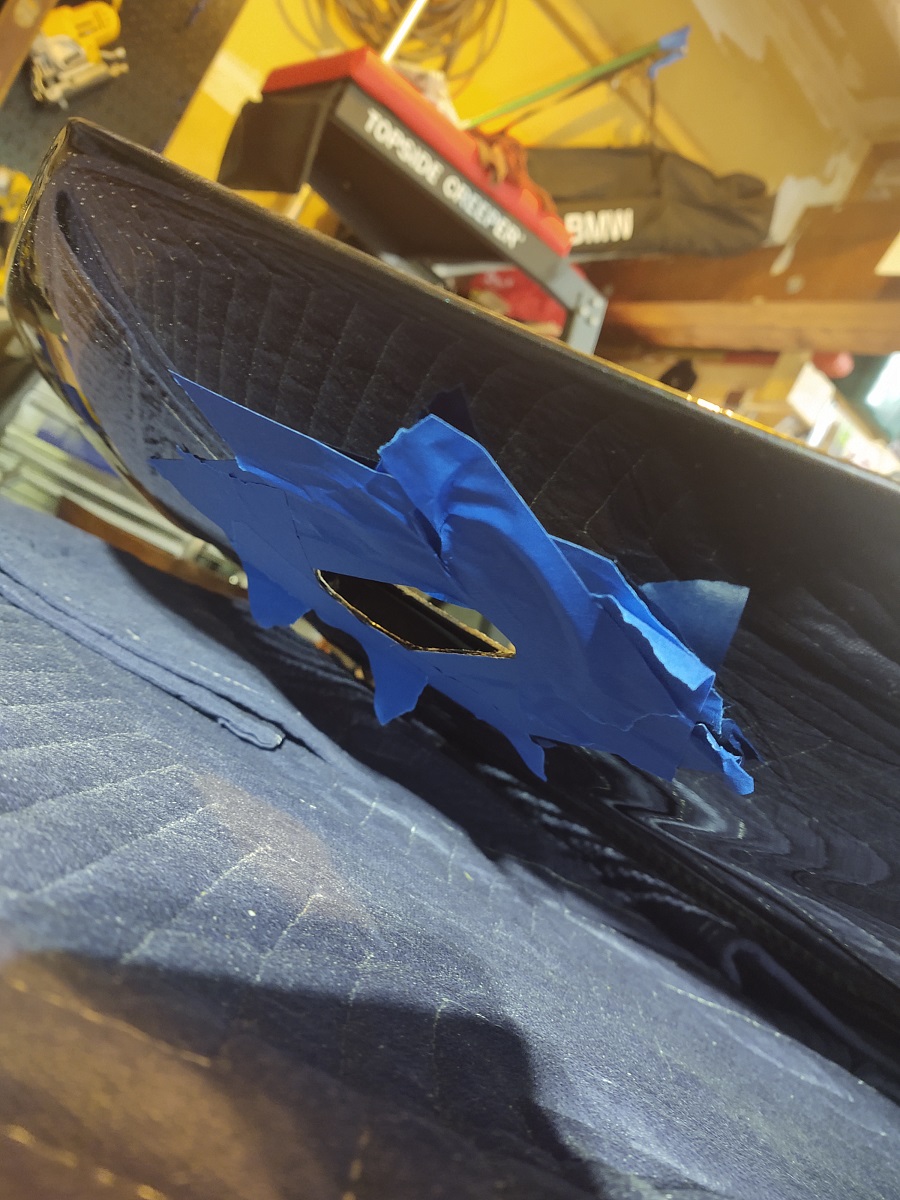 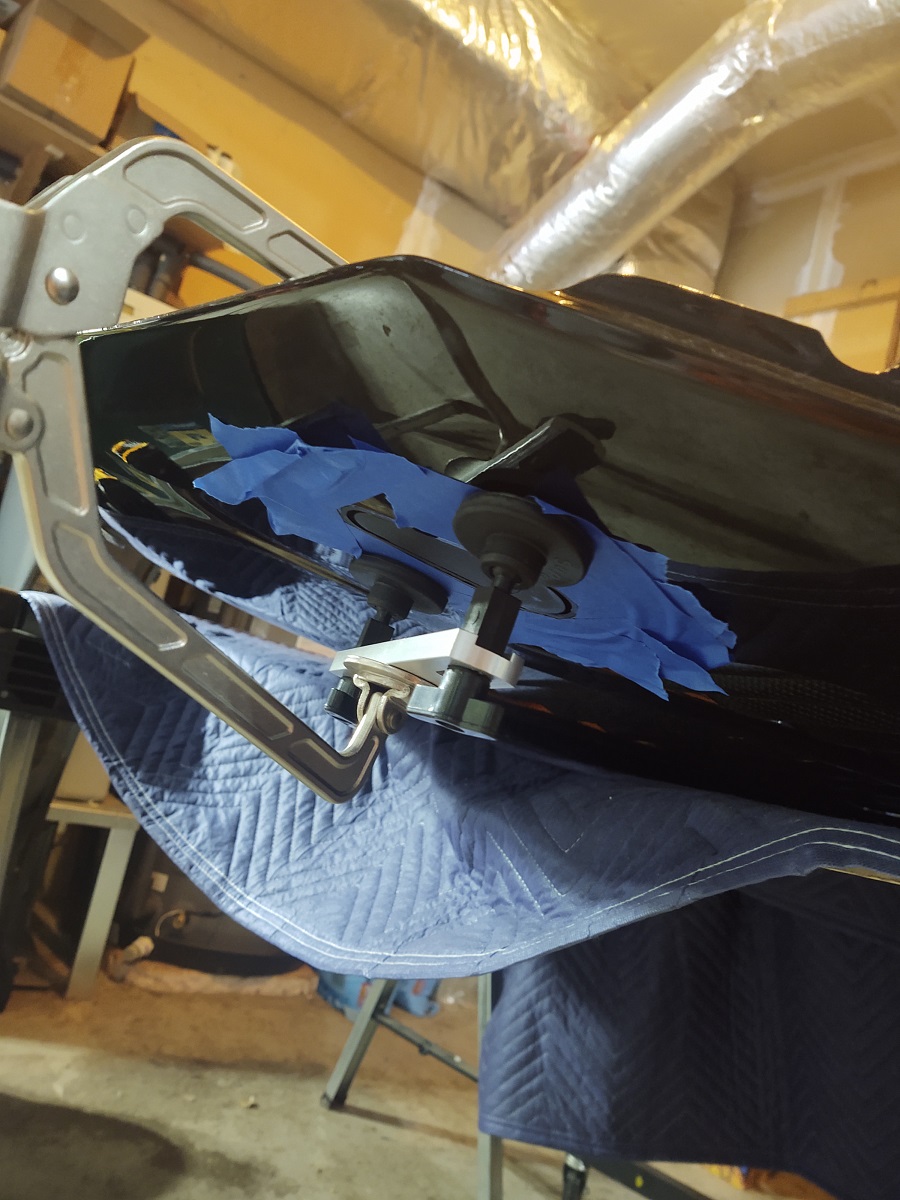 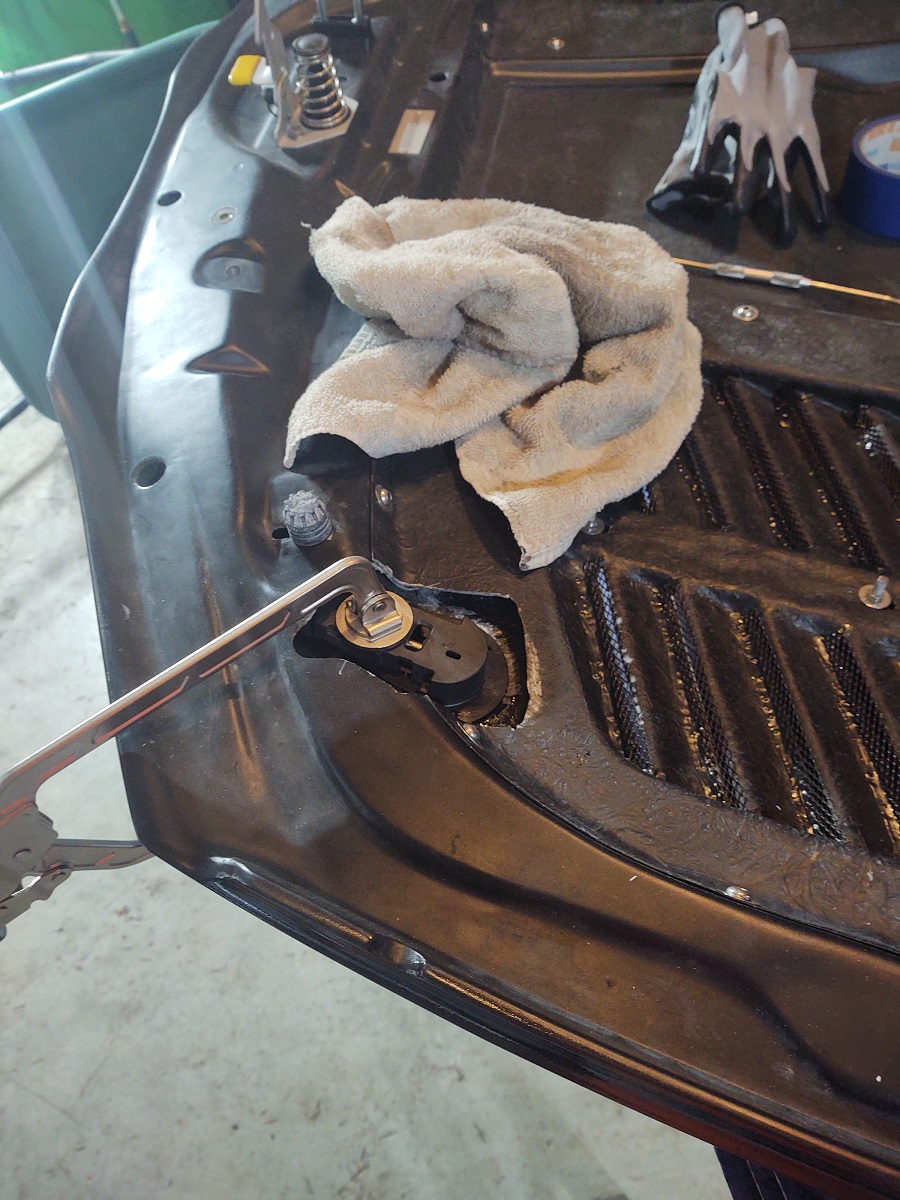 And the final reveal...and here is my CF compromise...after I cleaned up the vented inserts and put a coat of clearcoat on them to shine them up, i decided to leave them CF as accents for the hood. I think it looks awesome. YMMV, of course. 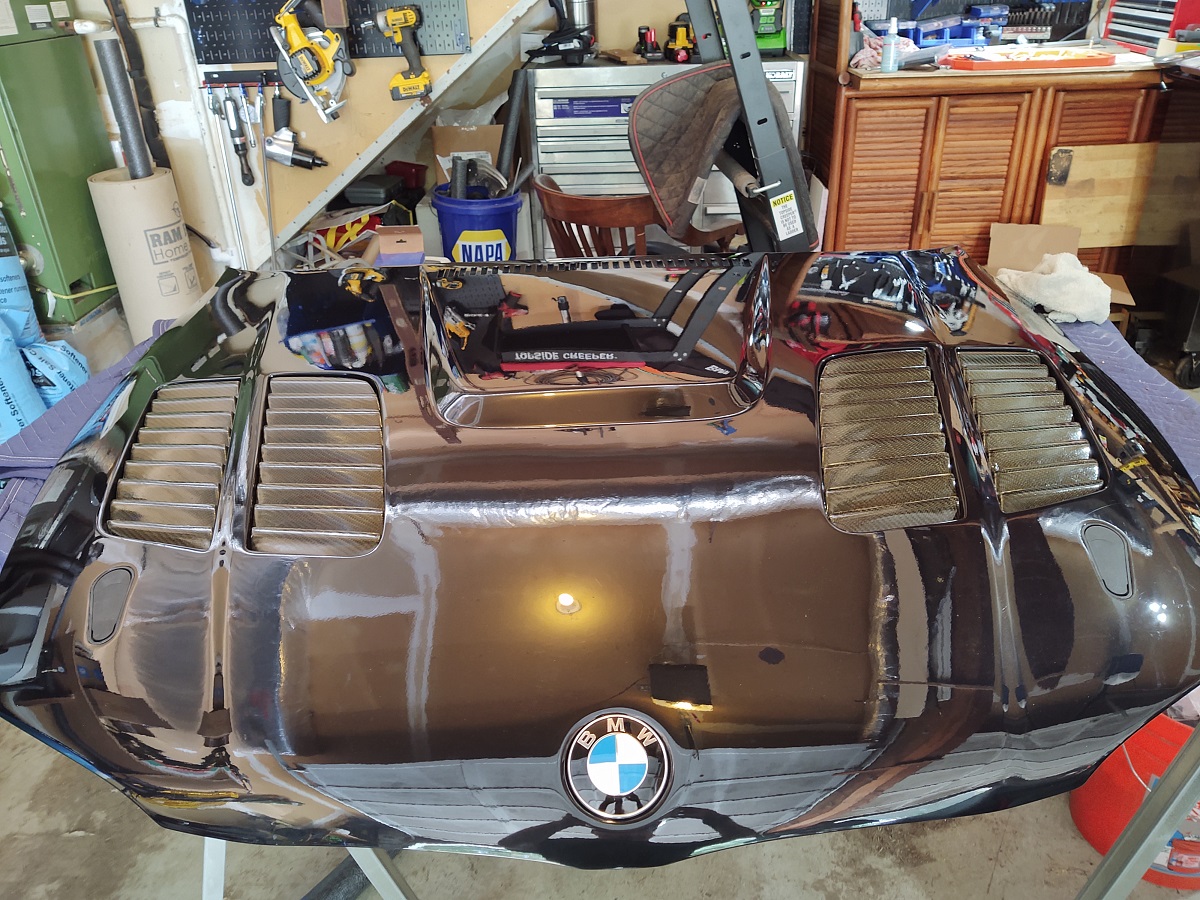 Here it is on the car. 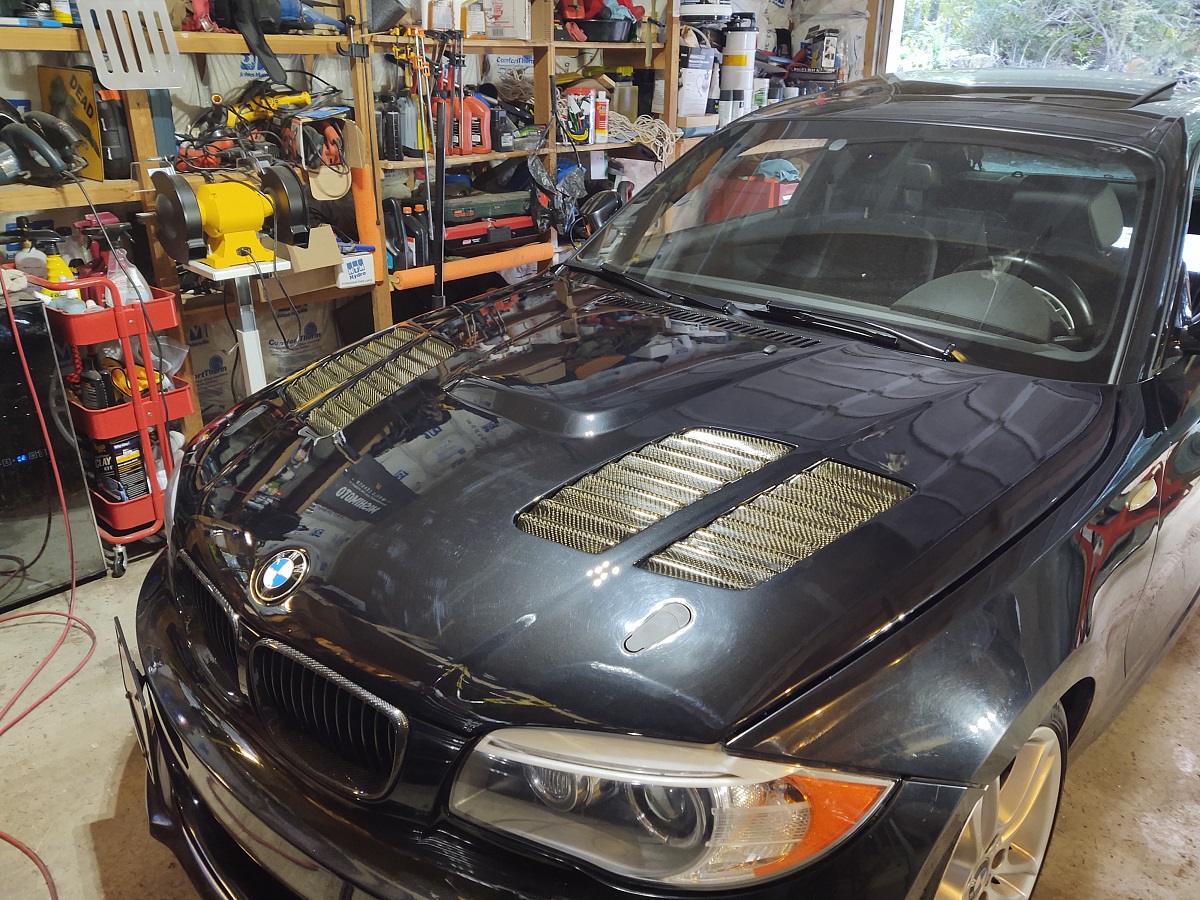 Note: the larger space to the fenders is not a fitment issue with the hood...I have pulled my fenders out to max to make room for my 255 track tires. I did put heat reflective material in the center section. This also shows a limitation of this hood..it doesn't seal to the cowl like the factory hood. I ended up making my own solution with a length of pipe insulation, but you should be aware of that limitation with this hood, because of the M3 "bump". 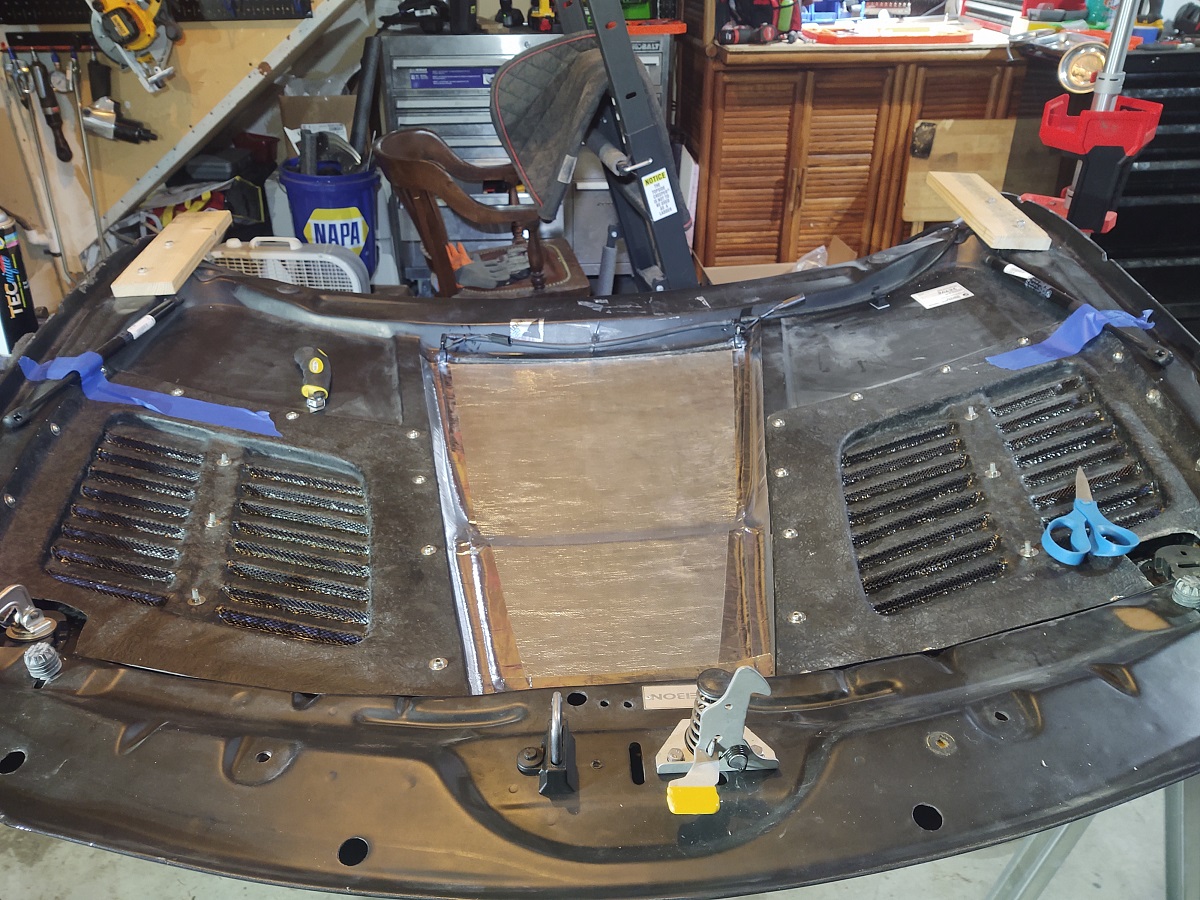 The trunk was more straightforward, but there were several issues. One, the holes for the license plate lights and the trunk handle switch were the wrong size! I ended up getting a partial refund from Seibon as well as purchased their CF license plate for material to epoxy them in to make it work. Basically made a CF insert with the correct inner hole size and expoxied them in. Somewhat frustrated that I didn't check this fitment before it went to paint but it worked out in the end. 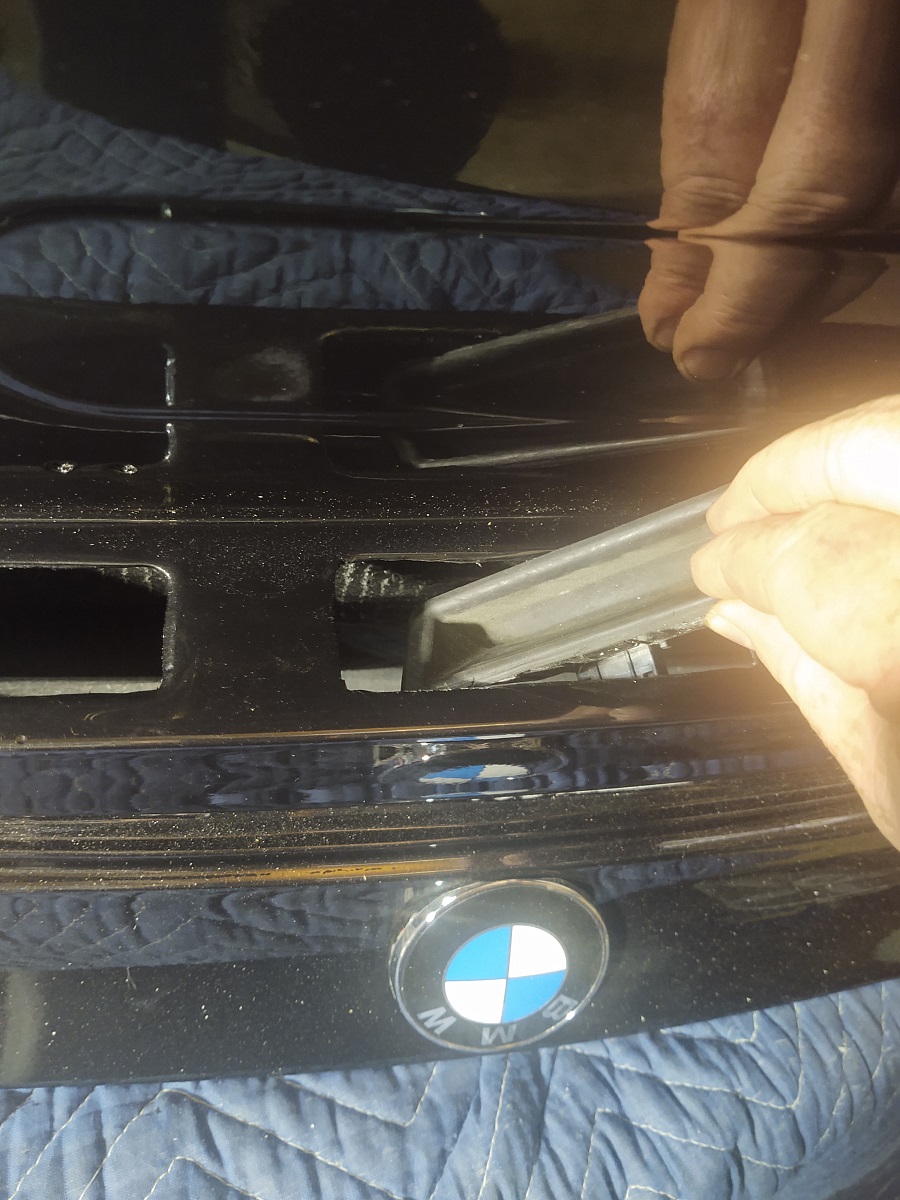  The other issue is that the roundel and "135i" cannot fit in the same place on the GTR trunk due to the way the whale tail goes up. On the stock hood the roundel fits under the 3rd brake light. On this car that was no bueno. I elected to file and sand the replacement roundel and then use 3M tape to get it to fit above the 3rd brake light. It works. You also have to figure out a different spot to put the "135i" if you are putting one on (I dislike debadging so, I figured out a spot... ).Stock 135i placement... 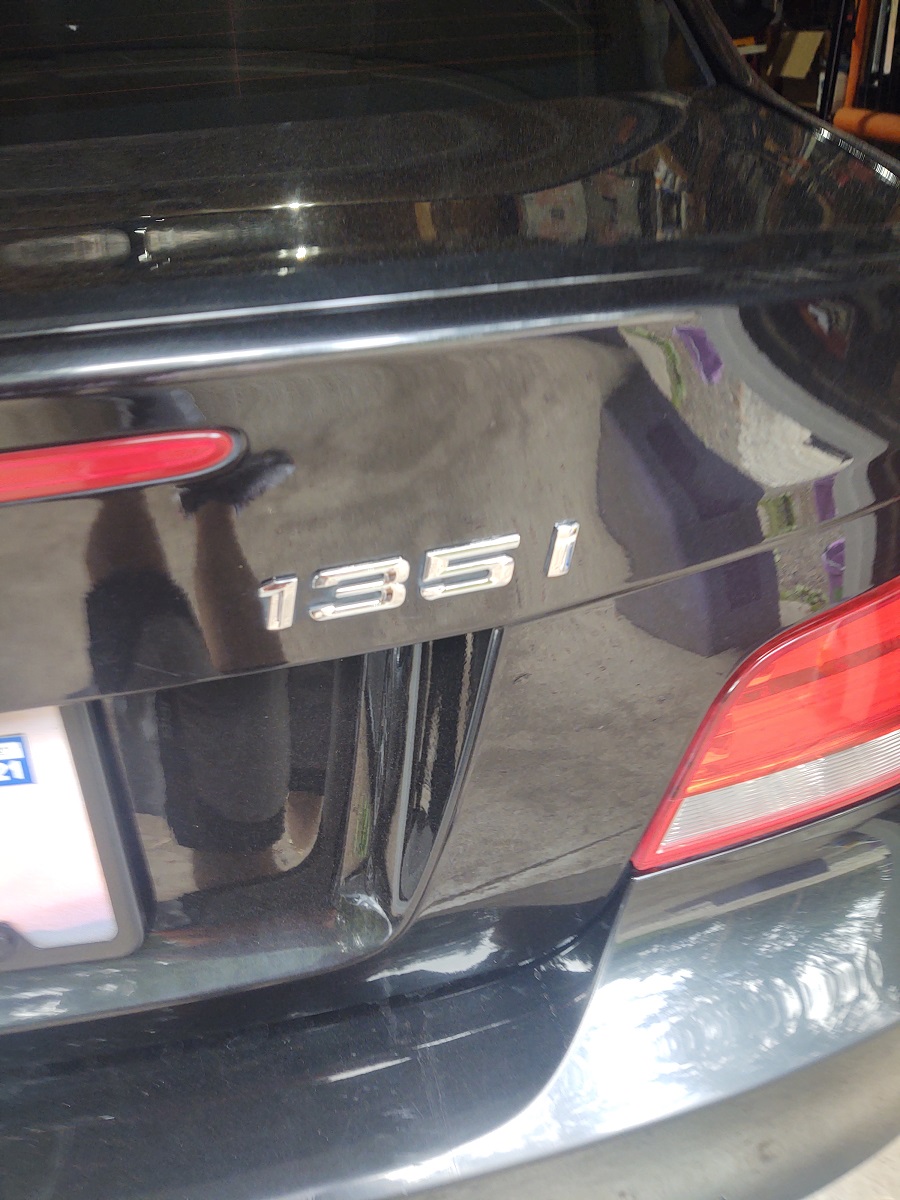 New trunk roundel and "135i" placement. 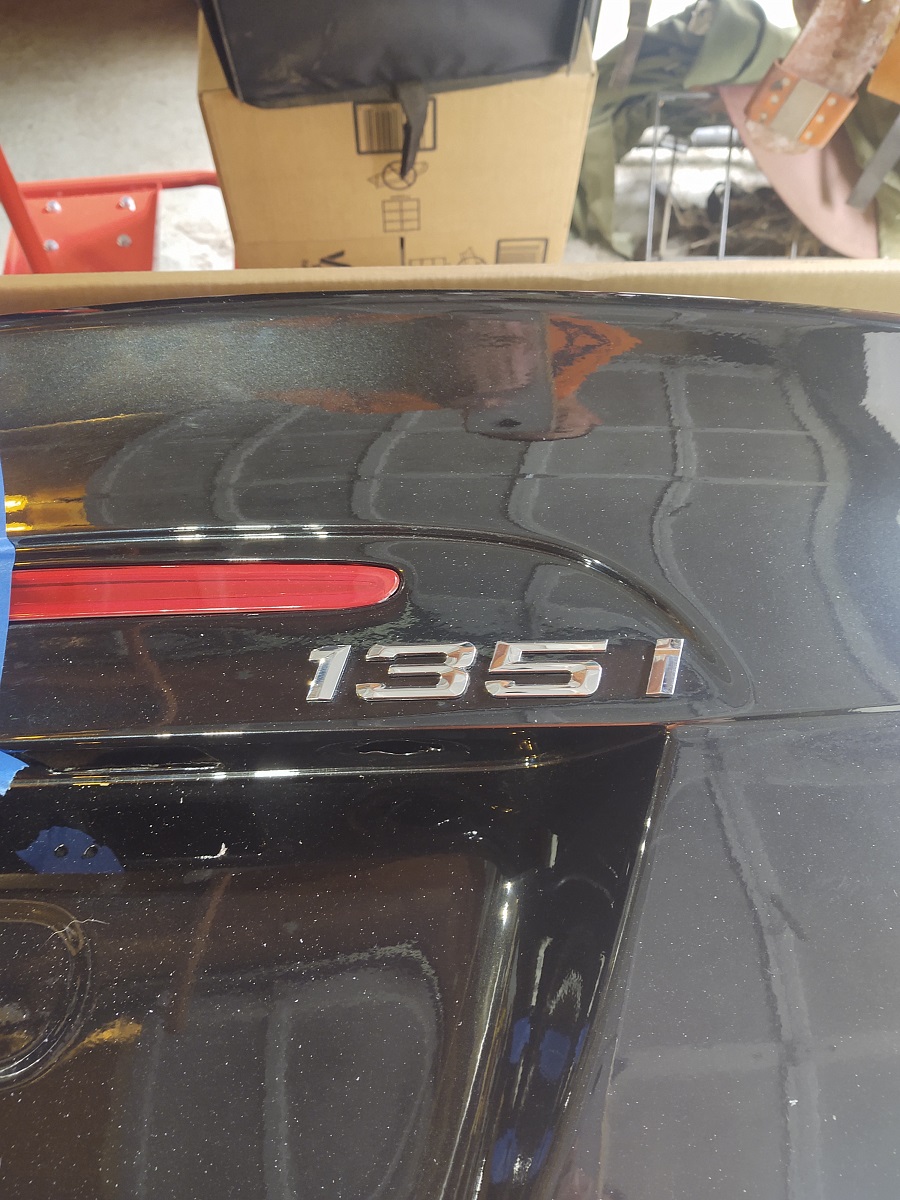 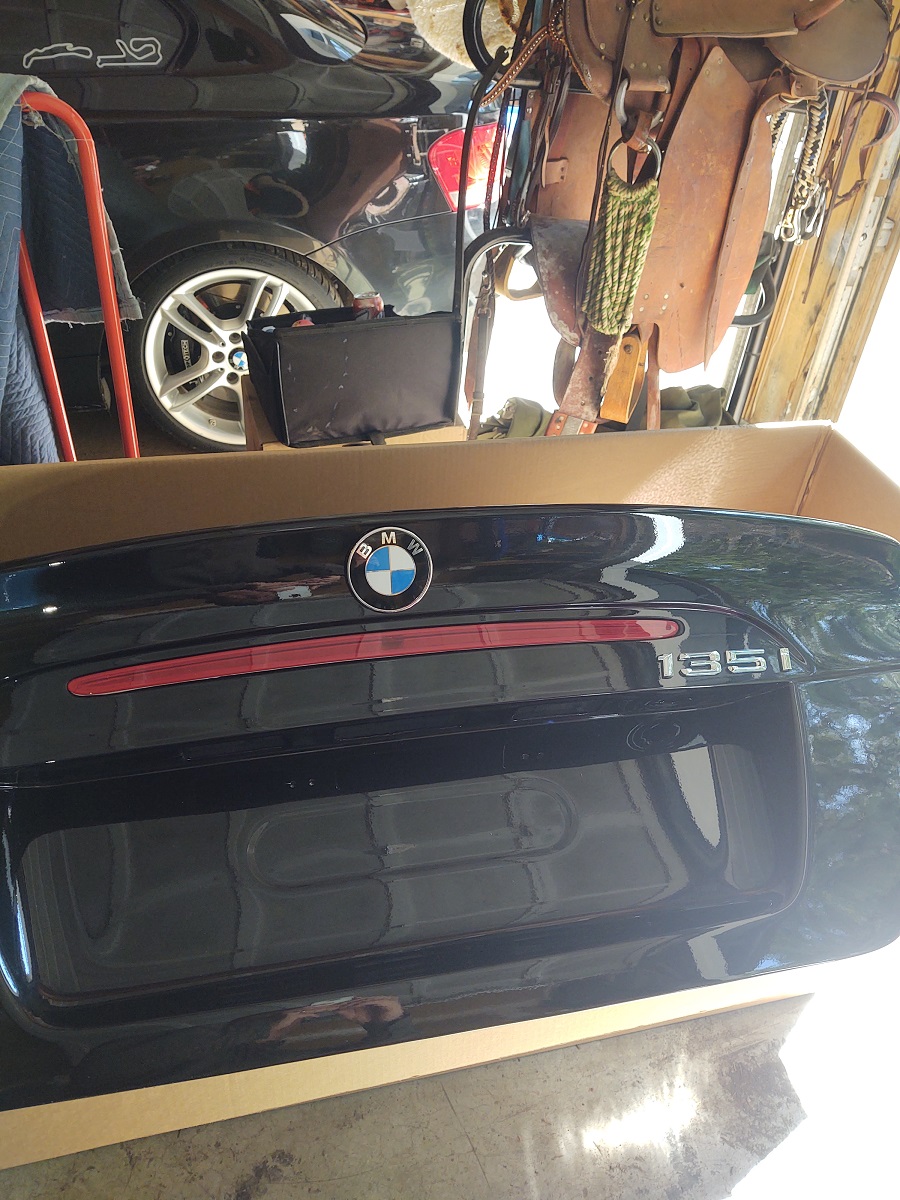 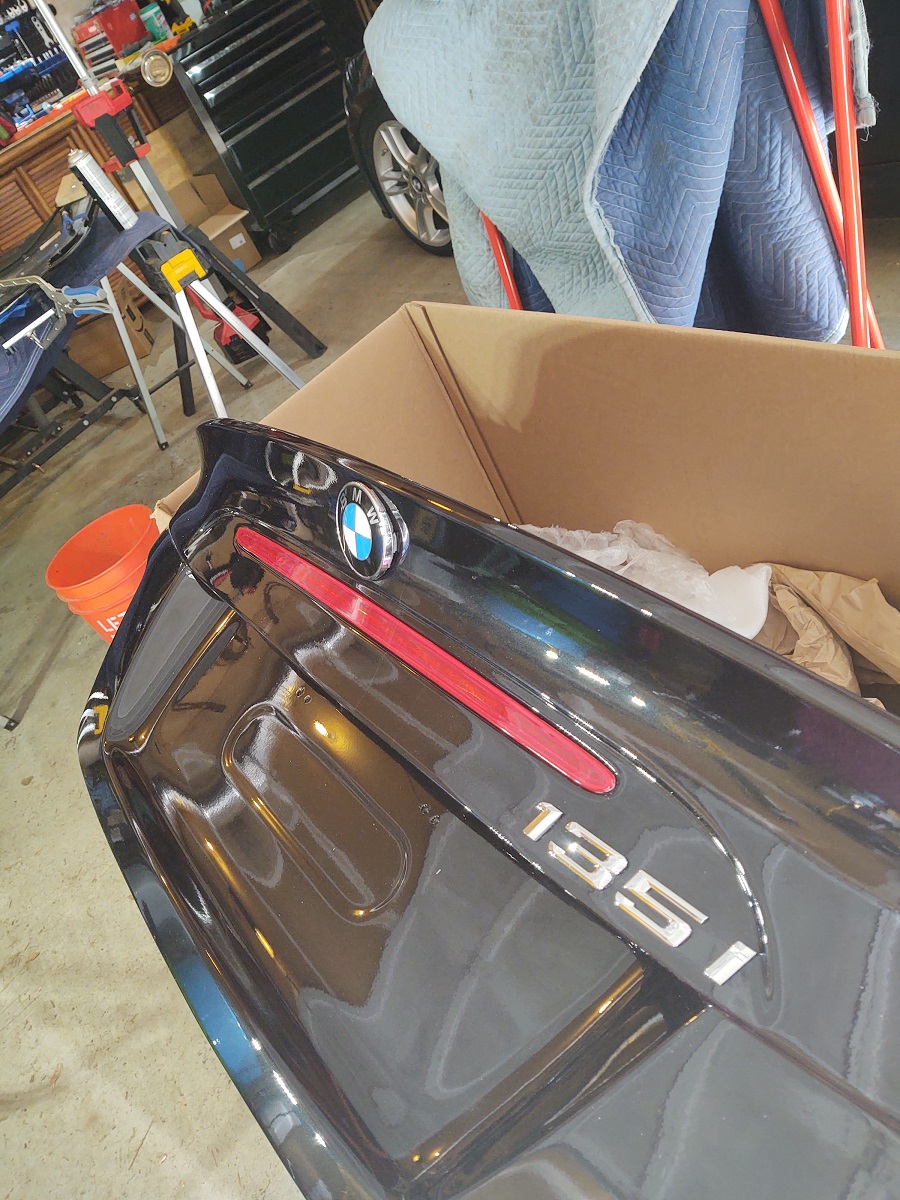 Routing the wiring and hooking up everything for the trunk was pretty straightforward. The hood has a hole for a manual key but my car didn't have one, so I repurposed that hole to epoxy in the mic I used to hang out of my trunk for exhaust noise for track video recording. I routed this cable with a plug set as well so it is easy to disconnect if you need to remove the trunk. You can see the mic in the keyhole in one of the trunk pics above. I ended up getting used M3 shocks off ebay for the hood and went down to one shock for the trunk. Seems to work OK. And finally...vanity shots... 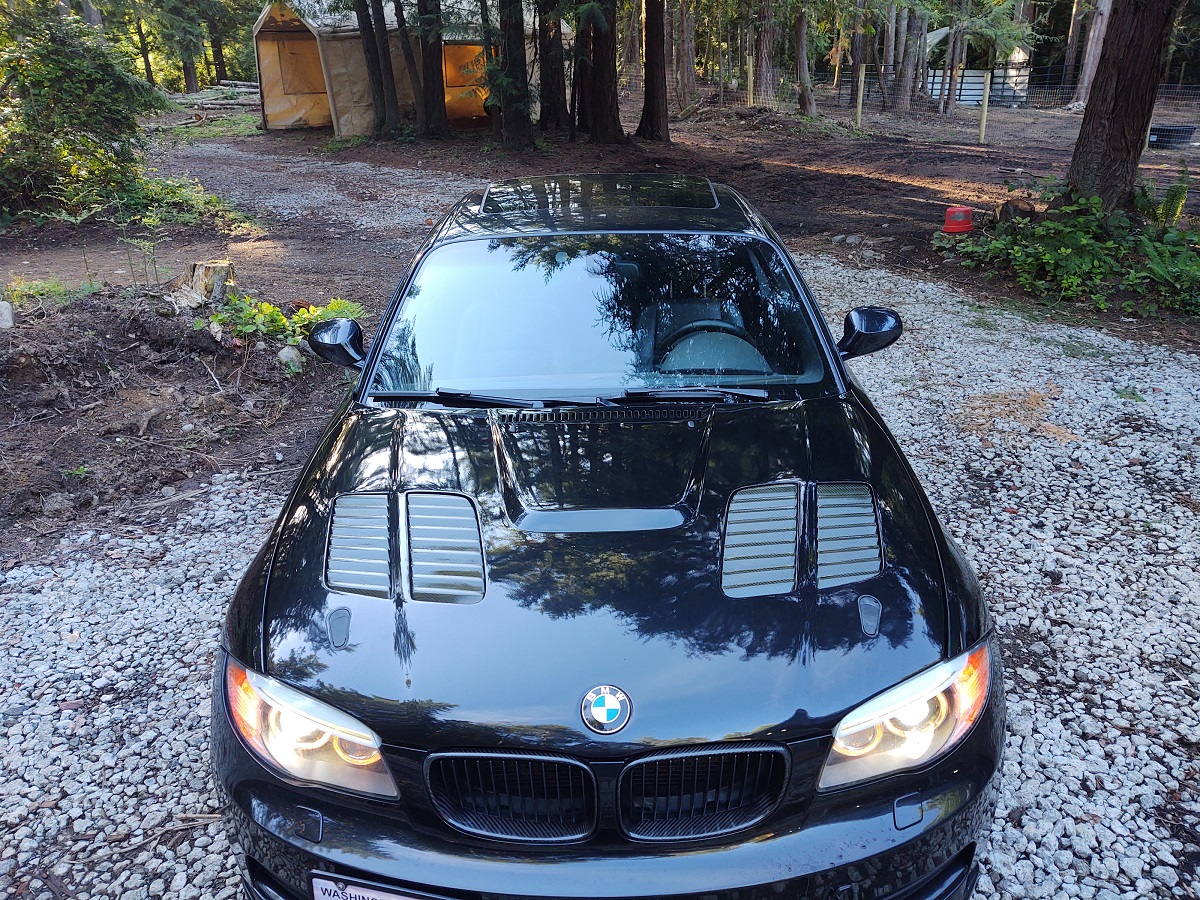 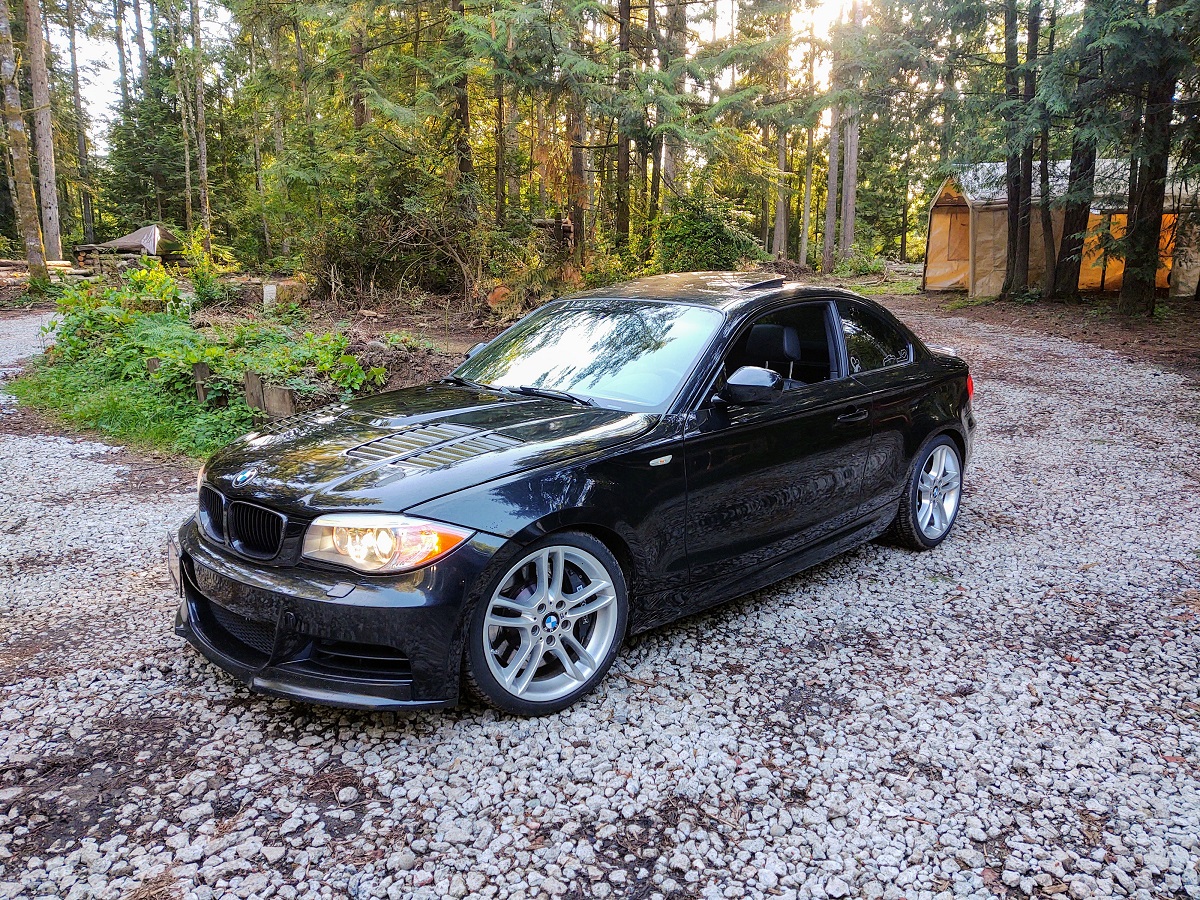 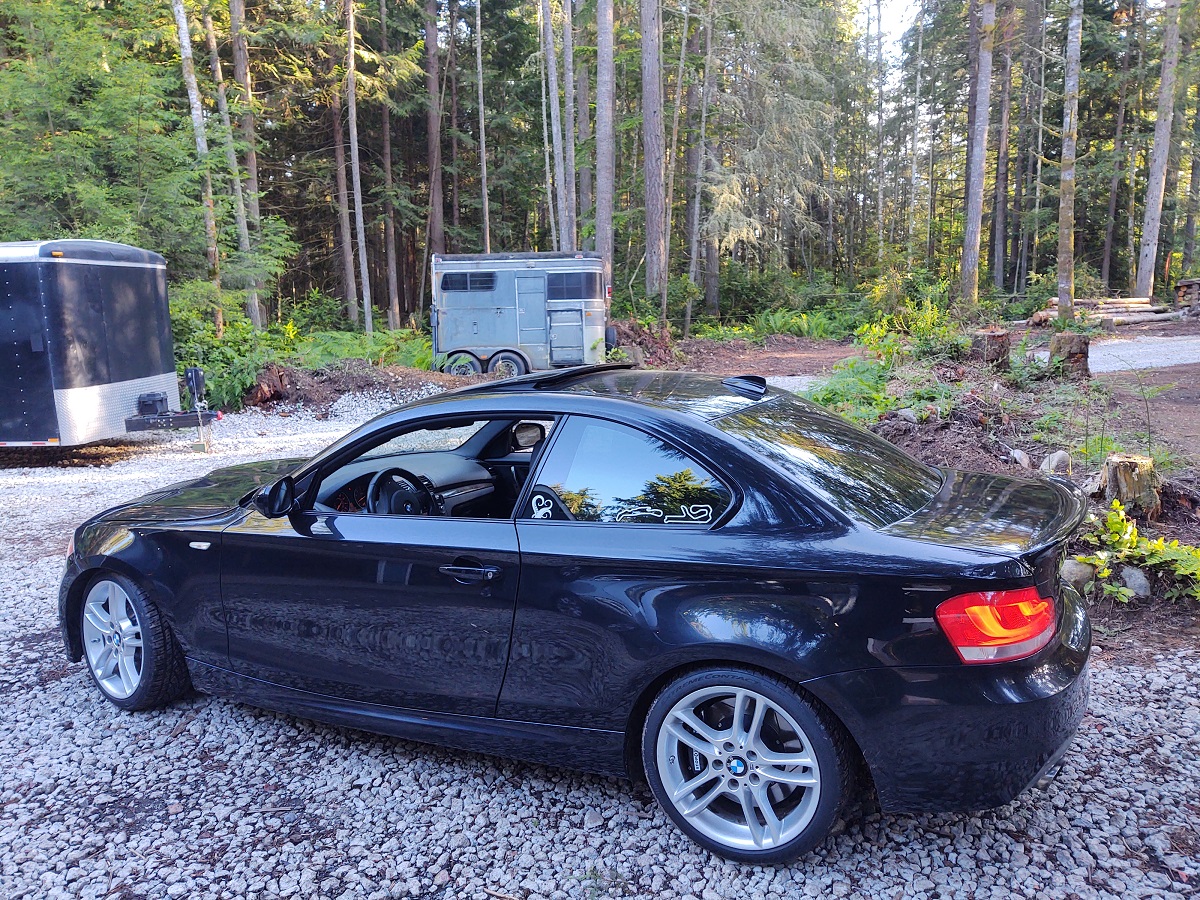 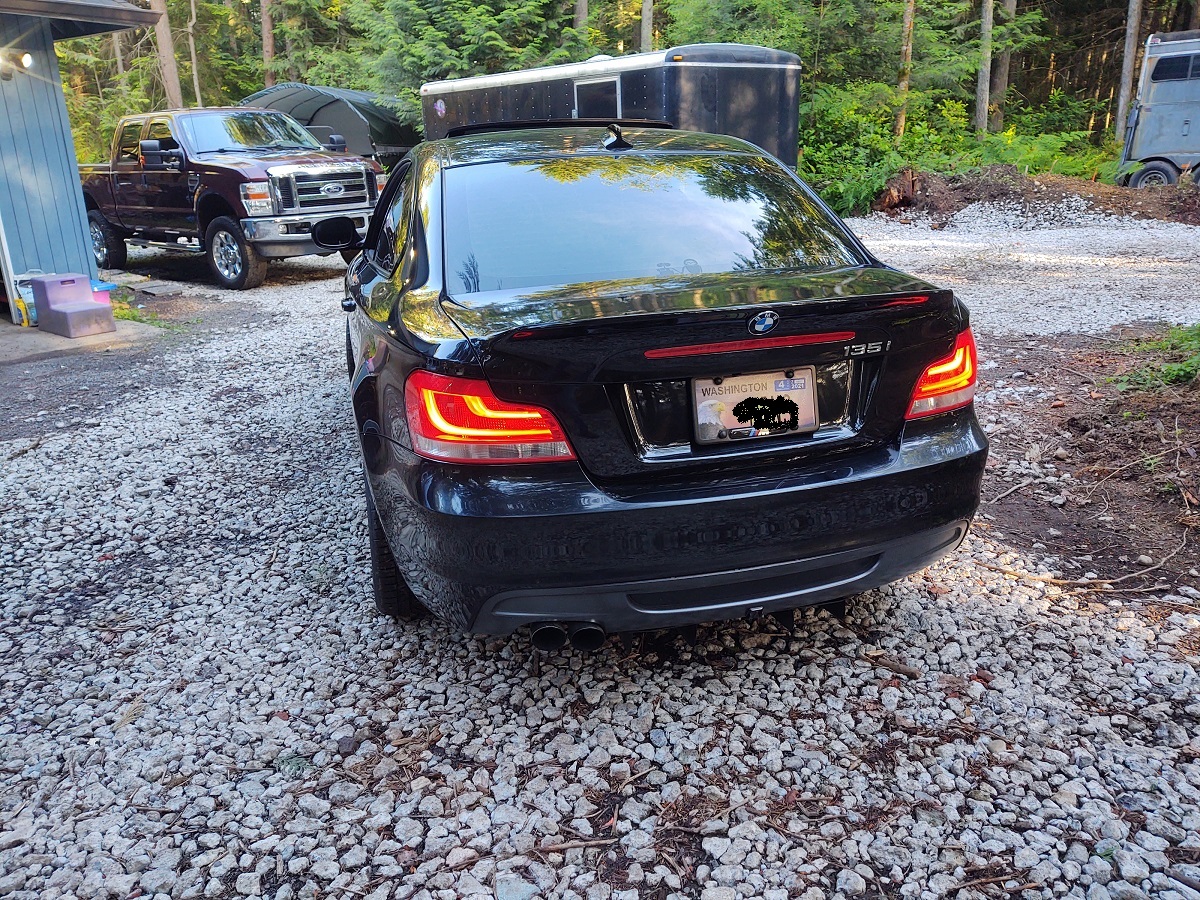 All in all, a somewhat challenging project for me but am really happy with the result. The epoxy mounted aerocatches are holding fine after 4 track days. I love the clean lines! 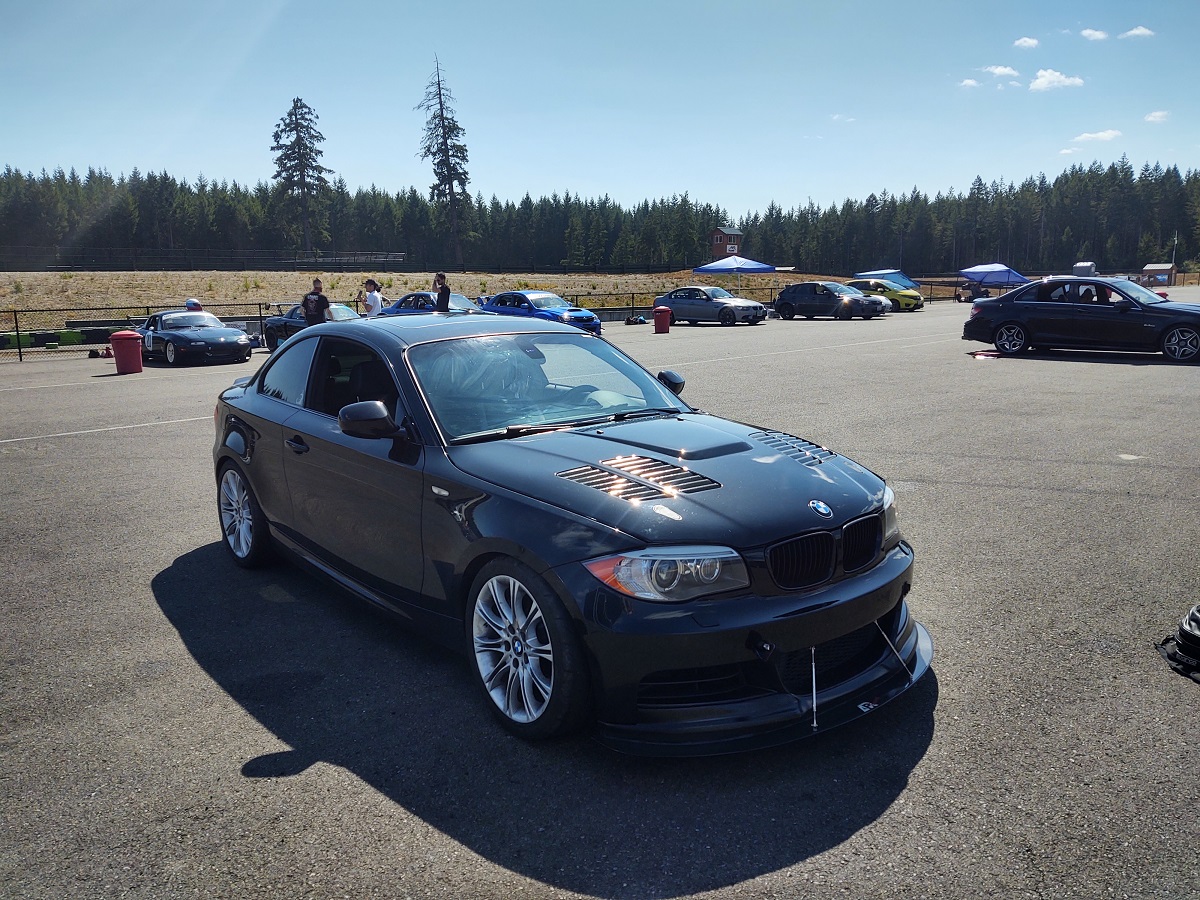
__________________
Best,
Andy  '12 E82-PS2,Stoptechs,Clubsports+M3 bits,Accusump,Wagner DP+EVO III FMIC,ERCP,BMS Intake,Mason Strut Bar,Wedge Tune Last edited by AndyW; 08-14-2020 at 04:22 PM.. |
|
Appreciate
8
|
| 08-14-2020, 08:29 PM | #2 |
|
Loves me some MHD!
1855
Rep 1,718
Posts |
Very nice!
Can't decide if I like the aerocatch install or the work to make things swapable the best... So much to like here and, you know, it ain't ugly either 
__________________
1and1
135i - E82.N54 2009 BSM - MHD / xHP / DCI, PR CP & 7.5" Race IC / N55 mid & Borla . . WL RSFI, Koni, Eibach & Dinan CP's, M3 CA's / EBC Red's & Firehawk 500's X1 - E84.N20 2013 MGM - JB4 - The Wife's, now with new turbo & ewg |
|
Appreciate
1
AndyW665.50 |
| 08-14-2020, 09:24 PM | #3 | |
|
Supreme Galactic Commander (one galaxy over...)
666
Rep 1,777
Posts |
Quote:
The areocatches or something similar is a must if you will track the car. Hood will lift at triple digits. If you are never going back, moving everything over is the more traditional route. |
|
|
Appreciate
0
|
| 08-14-2020, 10:19 PM | #4 |
|
Second Lieutenant
 235
Rep 260
Posts |
That latch instal is so clean. I did mine, but it's not the shaved look you did on yours. I couldn't find any info on that style of latch. Would you mind sharing any info? Here's mine
|
|
Appreciate
0
|
| 08-14-2020, 11:52 PM | #5 | |
|
Supreme Galactic Commander (one galaxy over...)
666
Rep 1,777
Posts |
Quote:
It's the model 125 from aerocatch. I just didn't use the fasteners, just the epoxy. |
|
|
Appreciate
0
|
| 08-15-2020, 07:41 PM | #6 | ||
|
Second Lieutenant
235
Rep 260
Posts |
Quote:
|
||
|
Appreciate
1
AndyW665.50 |
| 08-26-2020, 11:33 AM | #8 |
|
Lieutenant
311
Rep 469
Posts |
I don't see the pictures
__________________
 Current: 13' C2S 911 / 11' 135i / 05' Xrunner/ 10' X5D (Youtube: Peepshit Studios) Past: 1991 325ix Coupe Turbo / AP2 05' S2K / 981 Boxster/ 2007 Z4MC/ S13 240SX/ 2002 S2000/ 2004 350Z/ E39 1999 528i/ E46 2004 SC 325CI/ E30 1989 325i Vert/ 1987 E24 635CSI/ 2012 135I |
|
Appreciate
0
|
| 08-26-2020, 01:57 PM | #9 |
|
Loves me some MHD!
1855
Rep 1,718
Posts |
Still working for me-
Here's a direct link to one of em as a test http://www.drivehq.com/file/df.aspx/...k/newhood2.jpg
__________________
1and1
135i - E82.N54 2009 BSM - MHD / xHP / DCI, PR CP & 7.5" Race IC / N55 mid & Borla . . WL RSFI, Koni, Eibach & Dinan CP's, M3 CA's / EBC Red's & Firehawk 500's X1 - E84.N20 2013 MGM - JB4 - The Wife's, now with new turbo & ewg |
|
Appreciate
0
|
| 09-29-2020, 11:26 AM | #10 |
|
Second Lieutenant
55
Rep 277
Posts |
That is so clean looking
 . .Does the "grill" in the back of the CF hood serve a purpose or is it cosmetic? I'm just wondering if it would be pulling a vacuum (at speed) at the air filter area if it isn't sealed off? If that makes any sense. Is there anyway you can Make the BMW emblem on the trunk more flush? Like pull the bottom out or add some kind of spacer so it looks more level? The slightly downward facing angle would bug me ever so slightly, but knowing it's CF and probably removes 10lbs of weight more than makes up for it  What kind of front strut tower bar is that? M |
|
Appreciate
1
AndyW665.50 |
| 09-29-2020, 10:53 PM | #11 | |
|
Supreme Galactic Commander (one galaxy over...)
666
Rep 1,777
Posts |
Quote:
Grill at back is cosmetic. There is a "tub" under it that is connected to the sides of the hood for drainage, but it is non-functional as a grill and doesn't interfere with the normal design flows. Strut bar is a Mason. Rear roundel was definitely a compromise. There really is no place to put the stock piece as it is angled to fit into the shape of the stock trunk. My wife suggested putting it flat on the other side of the brake light, basically symmetrical with the 135i emblem. I ended up wanting it is the center and this was the best I could do at the time with the 3M tape I had. You could make it vertical, but you'd have to build and attach a cylindrical structure to the trunk to do so. I wasn't willing to do that. For the record, not all BMW rear roundels are flat... 
__________________
Best,
Andy '12 E82-PS2,Stoptechs,Clubsports+M3 bits,Accusump,Wagner DP+EVO III FMIC,ERCP,BMS Intake,Mason Strut Bar,Wedge Tune |
|
|
Appreciate
0
|
| 10-04-2020, 08:18 PM | #12 | ||
|
Second Lieutenant
55
Rep 277
Posts |
Quote:
|
||
|
Appreciate
0
|
Post Reply |
| Bookmarks |
|
|


