

|
|
|
|
|
| 09-06-2010, 02:22 PM | #69 |
|
Brigadier General
 
189
Rep 3,435
Posts |
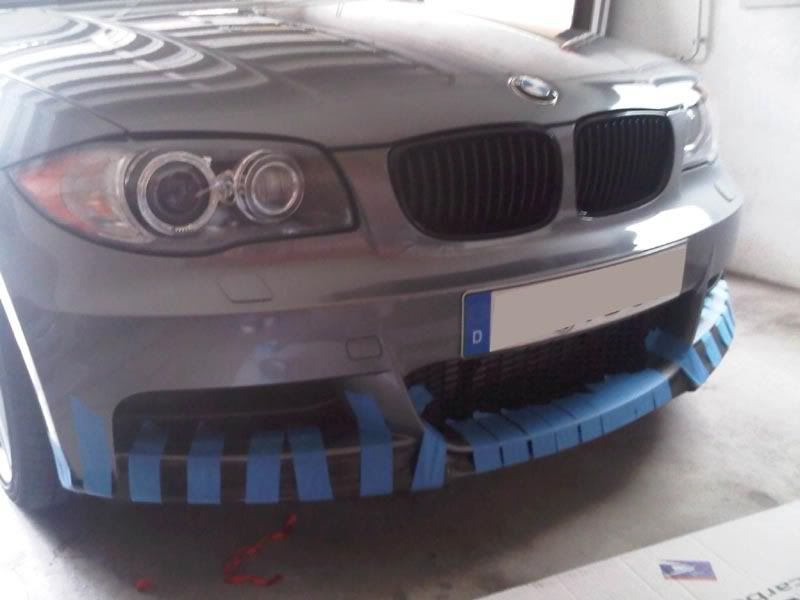
Giving it another shot, this time with 3M tape brought in from the US. I stuck the center on first, and as I was working on the ends the center pulled away from the bumper almost instantly. I have it as close as I can get it to the bumper, pretty sure the tape is in full contact with the bumper. I'm going to let the car sit for 24 hours, I'll let you guys know how it goes.
 |
|
Appreciate
0
|
| 09-06-2010, 03:31 PM | #70 | |
|
M Power

41
Rep 1,469
Posts |
Quote:
This was posted on 7/26/10. I guess one needs to define terms, such as what "soon" means. In relation to the expected life of our sun, soon could be 100 years.
__________________
 |
|
|
Appreciate
0
|
| 09-06-2010, 06:51 PM | #71 |
|
Colonel
 
153
Rep 2,757
Posts
Drives: 2017 Audi A4
Join Date: Nov 2009
Location: Arden, NC
|
Honestly, if something like this was THAT much of a bitch to install with that little reliability, would def not be on my list of cosmetic mods
 |
|
Appreciate
0
|
| 09-07-2010, 11:19 PM | #72 |
|
Lieutenant
 
26
Rep 513
Posts |
I had my car in at a bodyshop today getting a scratch on a brake caliper fixed, and they refused to fit this lip as it wouldnt fit.
Took it to another shop to get a quote, and they also refused as it wouldn't fit correctly. Would love to see this video to show how to do it correctly? |
|
Appreciate
0
|
| 09-08-2010, 11:16 AM | #73 |
|
Second Lieutenant
11
Rep 295
Posts |
Guys,
The lip needs to be installed in the middle first, clamps or tape used to apply pressure upward and hold the middle in place, and then the sides are installed. That is how the middle stays on flush. Furthermore, please remember the middle sits under the outer lip of the front bumper. Ive attached some pics for reference. We also advise to use thicker Automotive 3M tape (60 or 90mm) or if you really wanted to some sort of adhesive as almost all other lips/pieces including OEM ones advise. Although, weve had many successful installs without any additional use of tape or adhesion other than what is on the piece. Out of the 150 or so lips in circulation right now, only a very select few have had issues being installed, and all of them were self installs (not professionally installed) until Michaels above. Its very possible that the shops have not had experience doing this kind of install, dont like to do this sort of thing, or some other variables unknown. We have had many successful installs on LHD cars, RHD cars, cars in Europe, Asia, Australia, Canada, US, the works, which also leads us to believe that its not an international thing, a RHD thing, or anything in between. Since a very small percentage of people have had issues, this leads us to believe its an issue with the way they are being installed, because we have installed plenty, as have several VERY-well recognized shops that are dealers for our products, and all of them have raved about build quality, ease of installation and fitment, specifically when compared to other products (including ones costing twice more). The nature of our design is a little bit complicated to install because it doesnt hide or create new lines, but rather hugs and accentuates already existing ones, which is hard to do. If we made a bulkier design that covered more, installation would be a cinch and it would just kind of plop over the bumper but we didnt want that. We wanted something sleek and beautiful, and if it requires a little know how to get perfect, thats something were willing to live with. An installation guide and video is VERY overdue, mainly due to the fact we need a local car that has no mods done to the front end. Weve had one lined up forever, but the guy hasnt been able to stop by and our car is always taken apart in pieces. I guess were just going to have to do it on our car as a guideline to show people what to do and how to do it. We will film it tomorrow just to have something to give you guys, the iPhone 4 camera is pretty damn good and will have to do just to get something up now. If you guys show photos of the attempted install, Id love to take a look and show you were it went wrong I can assure you its an installation problem when only a very small percentage of people have had issues during installation. Its very hard for us to account for all sorts of variables like intercoolers, bumpers being taken off/on, being hit, misaligned, or banged up, etc. I think this problem would be fixed with including an installation menu in every box were going to start doing that. Please let me know and lets get this figured out. Pics attached for reference:    
__________________
|
|
Appreciate
0
|
| 09-08-2010, 01:33 PM | #74 |
|
Brigadier General
189
Rep 3,435
Posts |
Ok, I took the painter's tape off today, and the center seems to be sticking well. I can see only 2 very small areas in the center where the tape is starting to pull off the bumper, but a little press with my hand and it sticks back on. I did 90mph on the autobahn and it lived, although I dont feel it could take 90+ too many more times though.
However, once again this install did NOT go perfectly. The center (the old problem area) seems to be resolved, however now the problem area is the driver's side. The area of the lip that meets up with the wheel well isnt sitting flush at all. There is a good 1/2 inch gap, I even had to add 3M tape to the front leading edge to get that to stick at all. This gap won't be an issue with the lip falling off, but its isnt exactly pleasing to the eye. I'm going to talk to Andy directly, show him some pics and see what he says. I'm not exactly thrilled with the way this lip is fitting this time (main difference now is the use of 3M tape instead of the German stuff here), but the fit is a little better. Still not perfect. |
|
Appreciate
0
|
| 03-23-2011, 02:20 AM | #76 |
|
Captain

170
Rep 955
Posts |
this lip is doomed. by pushing the fangs in it makes the center wavy and and not touch the center part of bumper. im just gonna run with a gap in the center. thug life
|
|
Appreciate
0
|
| 03-23-2011, 10:26 AM | #77 |
|
Brigadier General

279
Rep 3,465
Posts
Drives: 997.2 GT3, '17 G30
Join Date: Apr 2006
Location: NJ
|
I also have elected to live with my gap in the center, because the upper right and left sides are "hellaflush". You don't really see the gap anyway unless you are right on top of the lip on the ground.
I do also now see that my 3m Adhesive installed almost a year ago is now started to pull away slightly on the driver side right after the center.
__________________
ig: 0verrev
|
|
Appreciate
0
|
| 03-23-2011, 11:49 AM | #78 |
|
Second Lieutenant


7
Rep 233
Posts |
I have the same problem as you. The ends of my lip line up perfectly but the center has pulled away but I have a 1/2" gap and it is very noticable. I have reviewed iCarbons install video and can't see that I did anything different. I know that if the center of the lip is flush the ends will protrude past the bumper. Not sure what to do anymore.
|
|
Appreciate
0
|
| 03-27-2011, 01:54 PM | #79 |
|
Colonel
210
Rep 2,233
Posts |
Just installed my second iCarbon lip after cracking my first one on a curb a month ago. I don't know if they made an adjustment to the design but this one did not pinch in the center like the first one. I followed the tips in their install video, leaving the tape pre-peeled and sticking out. The end result is much better than my first.
|
|
Appreciate
0
|
| 03-27-2011, 05:56 PM | #80 |
|
Colonel
121
Rep 2,037
Posts
Drives: 2008 135 blk, blk, step
Join Date: Jan 2009
Location: Atlanta, GA
iTrader: (0)
Garage List 1994 Porsche 968 Cab [0.00]
2017 AMG GTS [0.00] 1994 Porsche 968 Coupe [0.00] 1977 Mercedes 450SE ... [0.00] 2008 135 [8.00] |
That looks promising Ulrichd, hopefully the tape will hold.
I never really did a good job installing mine. I asked Topspeed to reinstall it for me since their 135 also has the same lip and theirs fits great. Topspeed never got around to it so I'm like a few others above and just running with a tiny gap in the center. It's barely noticeable until a piece of trash or something gets stuck in it. I'm planning to put three screws in it sometime soon. I figure I might could get a reinstall to work, but for sure the screw will work. Modding is a lot of work..lol.
__________________
Injen, RR OCC, MadDad Whisper, donut spare, 19x8.5et43fr 19x9.5et45r Volk LE37's, rear fenders rolled/pulled, PSS4S 225/35fr 255/30r, KW V1's, AR coated catless dps, Cross strutbar, CF grills and license plate holder, iCarbon diffuser, ETS black anodized FMIC, M3 control arms, Quaife, ER chargepipe, ForgeDV's, Topspeed Custom Tune, V3sims, Braille, Andrey_GTA rear hub mod, Ebay Mstyle front bumper and performance style side skirts.
|
|
Appreciate
0
|
| 03-27-2011, 08:40 PM | #83 |
|
Colonel
153
Rep 2,757
Posts
Drives: 2017 Audi A4
Join Date: Nov 2009
Location: Arden, NC
|
See thats what keeps me from doing any front end mods like that, unless theyre made for the bumper and bolted on, no fuckin way. With wind pressure and speed against it and things flying thru the air catching in it possibly, etc. No damn way Id install something on the front end thats held on even partially by tape.
The carbon lips look alright but its just nowhere near nuff for me to go thru the work, money and stress of it coming off or cracking, etc. |
|
Appreciate
0
|
| 03-27-2011, 08:58 PM | #84 | |
|
Colonel
210
Rep 2,233
Posts |
Quote:
|
|
|
Appreciate
0
|
| 04-01-2011, 06:00 AM | #85 |
|
Captain
170
Rep 955
Posts |
So a little trick I did. I had tape on the center that I didn't untape. So I ran with a center gap for a week. But I use painter tape to hold up the center piece hoping that the gap will be very narrow instead of wide. So yesterday I took painter tap off the center and I was moving up and it would touch the front bumper. So the 3m tape I didn't untape came in to play. I took the tape off the center and pushed it to the bumper and then used painter tape to hold it there. I'm gonna leave on for a week to let it form and I tape
The fangs too in case they pop out. Lip still sucks but yea |
|
Appreciate
0
|
Post Reply |
| Bookmarks |
|
|


