

|
|
|
|
|
| 06-11-2011, 11:08 AM | #1 |
|
Private First Class
 
14
Rep 121
Posts |
Badge Template
I just got my 1 a few weeks ago and discovered this forum last week. It has already been a fantastic resource, and I'm learning a lot.
One of the first threads I stumbled across involved swapping the stock chrome badges for matte black ones. I'm considering doing that but I wanted to try going badge-less for a few weeks first, which brings me to this post. In the thread I read most people are using painters tape to create a template for the new numbers. I didn't want to risk losing / crumpling the painters tape after pealing it off so I created a paper template. I figured it might be useful for others as well, so I'm posting it here. Start by downloading the template pdf. The verified templates have been confirmed to work by myself or other thread members. The unverified templates were created using the specs supplied by BMW, but have not been tested. The BMW specs do not indicate the thickness of the individual numbers. I was able to make the initial template by measuring the letters on my badge. Numbers other than 1,3,5, and i, may be slightly off. If you use one of the unverified templates and it works please post pictures in this thread. If you need a template made for your model please PM me. Disclaimer: If you read through the thread you'll see that there's variation in the position of the badge from the factory. These templates were created using a combination of the BMW specs and measurements taken from my car. They should align the badge in the way the factory intended, but may not match your current badge position. Verified Templates: E82 135i Unverifed Templates: E82 123d Print it out from acrobat with page scaling turned off. Once you print it verify that it printed at the correct size using the ruler scale on the left. You can then cut it out -- an xacto works best, but scissors would be fine too. It aligns with the edge of the CHMSL and the top and right edge of the license plate indent (see the photos). I set it up so that it aligns with the seams just where they start to curve away. Please let me know if you have any questions or suggestions. Last edited by panoz7; 12-30-2011 at 09:14 AM.. |
| 06-11-2011, 01:50 PM | #3 |
|
First Lieutenant
 
25
Rep 365
Posts
Drives: 2014 MB CLA Edition 1
Join Date: Jan 2011
Location: Philadelphia
|
You might want to post this in the DIY forum.
__________________
GONE
135i Vert-Montego Blue M-Sport-6MT, BMS DCI, JB+, CF iCarbon Spoiler, Matte black grills, stock diffuser mod, Ink Black powder coated 264s,  |
|
Appreciate
0
|
| 06-11-2011, 05:20 PM | #4 | |
|
Private First Class
14
Rep 121
Posts |
Quote:
|
|
|
Appreciate
0
|
| 06-11-2011, 05:45 PM | #5 |
|
Brigadier General
 744
Rep 3,281
Posts |
This is really helpful! Wish I had this when I put on my black badge a couple years back after a while of going badgeless
__________________
2022 X4 M40i - 2008 135i - 2015 F700GS On Order - 2024 i4 M50 Scruffy's gonna die the way he lived... Mmhm.  |
|
Appreciate
0
|
| 06-11-2011, 05:52 PM | #6 |
|
Colonel
 
215
Rep 2,228
Posts |
 DUDE!! thank you SOOO much! i bought some matte black emblems for my icarbon trunk and i've been waiting to install them because i want to get it right. i have the PDF from BMW that gives measurements on where to place them but i was still hesitant cause i want to get it perfect. DUDE!! thank you SOOO much! i bought some matte black emblems for my icarbon trunk and i've been waiting to install them because i want to get it right. i have the PDF from BMW that gives measurements on where to place them but i was still hesitant cause i want to get it perfect. |
|
Appreciate
0
|
| 06-11-2011, 06:35 PM | #8 |
|
Colonel
215
Rep 2,228
Posts |
just threw the template on my stock trunk that has matte black emblems installed and the cutout didn't match up perfectly with the characters. you'll see that the top of the cutout is overlapping the top of the emblems and the bottom of the cutout isn't even close to meeting the bottom of the emblems in the picture. i made THIS DIY so i know the matte black emblems are in the same exact spot as my stock emblems. could it be that every car's emblems are not exactly the same?
could some of you guys that have stock chrome emblems print out the template and confirm this please? thanks! 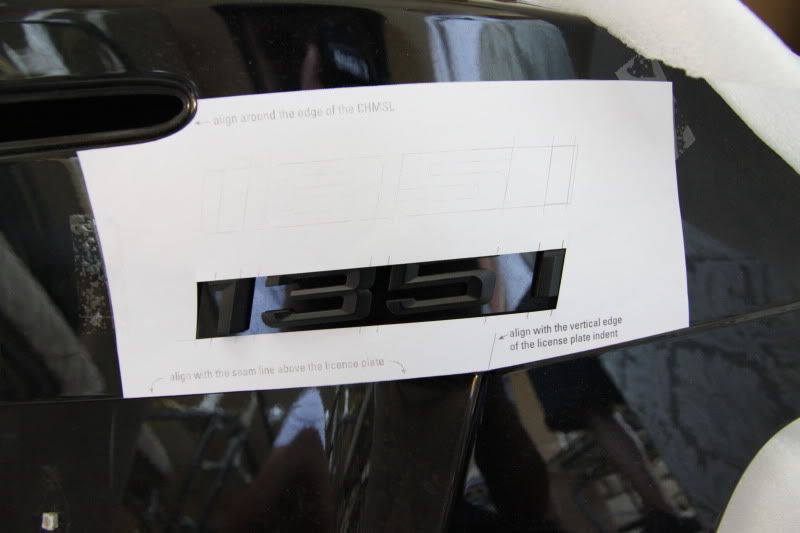 |
|
Appreciate
0
|
| 06-11-2011, 06:46 PM | #9 | |
|
Private First Class
14
Rep 121
Posts |
Quote:
It would be great if someone else could confirm that my template matches the badges on their car. My car was a CPO and I guess it's possible that the dealer removed the badges to detail it and didn't properly reinstall them. If that's the case I'll go by my local dealer, get the proper measurements, and upload a new template. P.S. Your DIY was incredibly helpful. Thanks for putting that together. Last edited by panoz7; 06-11-2011 at 06:51 PM.. |
|
|
Appreciate
0
|
| 06-11-2011, 06:54 PM | #10 | |
|
Colonel
215
Rep 2,228
Posts |
naww you didn't mess anything up for me
 , yeah all the markings line up correctly just the cutout didn't. , yeah all the markings line up correctly just the cutout didn't.hope to get the placement confirmed... Quote:
|
|
|
Appreciate
0
|
| 06-11-2011, 06:58 PM | #11 | |
|
Private First Class
14
Rep 121
Posts |
Quote:
|
|
|
Appreciate
0
|
| 06-11-2011, 07:16 PM | #12 |
|
Brigadier General
744
Rep 3,281
Posts |
Lol you guys are so anal. I did mine by eye and I think it came out alright.. at least nobody's said anything yet
  the cutout really woulda helped me back then!
__________________
2022 X4 M40i - 2008 135i - 2015 F700GS On Order - 2024 i4 M50 Scruffy's gonna die the way he lived... Mmhm. |
|
Appreciate
0
|
| 06-11-2011, 07:57 PM | #13 | ||
|
Colonel
215
Rep 2,228
Posts |
Quote:
Quote:
lol yeah i know it's nothing big but small things like knowing my badges aren't placed perfectly would bug the hell outta me  |
||
|
Appreciate
0
|
| 06-13-2011, 08:31 AM | #16 | ||
|
Private First Class
14
Rep 121
Posts |
Quote:
Quote:
|
||
|
Appreciate
0
|
| 06-13-2011, 10:25 AM | #17 |
|
Captain

63
Rep 616
Posts |
provides meassurement. see attachment
please tell me if your template is correct. i used to badge after the bmw instructions, but it takes alot of time doing it correct, therefore it would be nice to use your template.
__________________
f*ckin' love my car <3
|
|
Appreciate
0
|
| 06-13-2011, 12:16 PM | #19 |
|
Colonel
215
Rep 2,228
Posts |
yeah that is the PDF i was referring to in my OP, hopefully it will help you with getting the template made with the correct position. i have the one matt attached (in German) and one in English, here's the English one...
|
|
Appreciate
1
Almuliman559.00 |
| 06-13-2011, 01:11 PM | #20 |
|
Private First Class
14
Rep 121
Posts |
Thanks Matt, that was very helpful. According to those numbers the badge on my car is about 5 mm too low. I've updated the template accordingly and replaced the original PDF in the OP with the new (hopefully correct) version.
One thing that I'm still a little confused about is that in BSM 135i's photo it looks as if the cut out is not only too low but also somewhat crooked. Maybe that's just an optical illusion, but it would still be nice if someone could confirm that the template fits with their factory badges. Here's a screenshot of the updated template with a virtual piece of tape: |
|
Appreciate
0
|
| 06-13-2011, 03:16 PM | #21 |
|
Captain
63
Rep 616
Posts |
so you meassured the printed version and now your template is correct according to bmw install instructions?
because I want to badge my car tomorrow so I know if I have to take the long or short route anyways...did you thing about diffrences when people print it out? like a printer may zooms in or out? you should add a reference to your pdf! like two lines that have 10mm space (for people who use metric system like me) and two lines that have 1 inch space (for u.s.) like this: I I
__________________
f*ckin' love my car <3
|
|
Appreciate
0
|
| 06-13-2011, 03:45 PM | #22 | |
|
Private First Class
14
Rep 121
Posts |
Quote:
The positioning of the badge should be correct according to the bmw install instructions. The distance between individual letters on the badge may be off by a 10th of a mm or so. They don't match up exactly to what bmw specifies but I don't want to adjust them without knowing the exact width of the individual letters. I'm not sure if it would be possible to line up the letters with that much precision anyway, so I'm not going to worry about it for now. If anybody has some calipers and can measure the exact width of the letters I can update the template. I'm going to head over to my local dealer in an hour or so to see if the new template lines up, and I'll report back. EDIT: The forum won't seem to let me attach the newest template pdf so I uploaded to my webserver instead: http://griffinfriedman.com/pdf/debadgediagram_new.pdf Last edited by panoz7; 06-13-2011 at 05:54 PM.. |
|
|
Appreciate
0
|
Post Reply |
| Bookmarks |
|
|


 thx
thx


