

|
|
|
|
|
| 03-22-2021, 11:40 PM | #1 |
|
Supreme Galactic Commander (one galaxy over...)

666
Rep 1,777
Posts |
Wagner EVO III Comp FMIC
So I decided to go big. Will probably do an install thread as it is much more involved than a simple swap. Will require a change in my splitter mounting as well.
https://www.wagner-tuningshop.de/img...inkl.%20Z4.pdf
__________________
Best,
Andy  '12 E82-PS2,Stoptechs,Clubsports+M3 bits,Accusump,Wagner DP+EVO III FMIC,ERCP,BMS Intake,Mason Strut Bar,Wedge Tune |
| 03-23-2021, 11:52 PM | #2 |
|
Supreme Galactic Commander (one galaxy over...)
666
Rep 1,777
Posts |
Here is a comparison in size between the EVO I street and the EVO III comp.
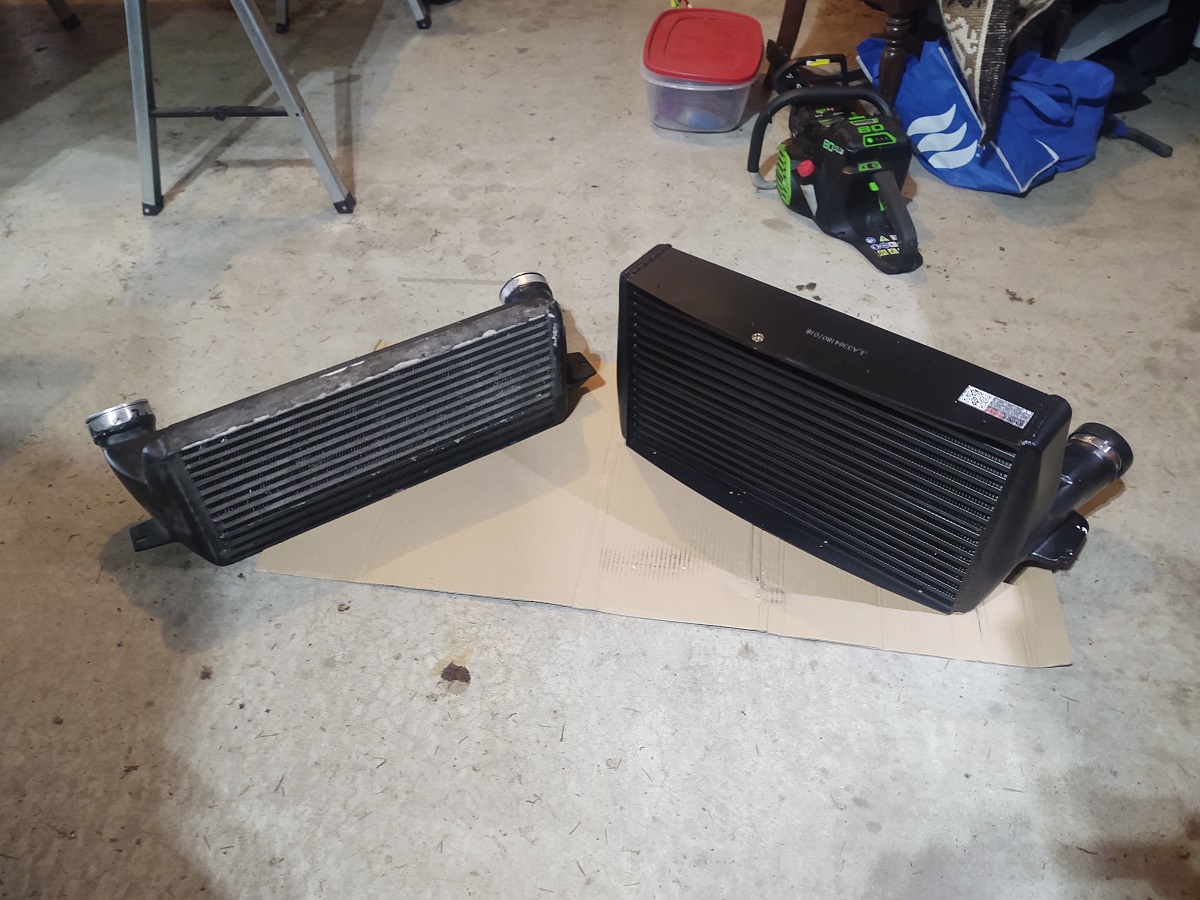 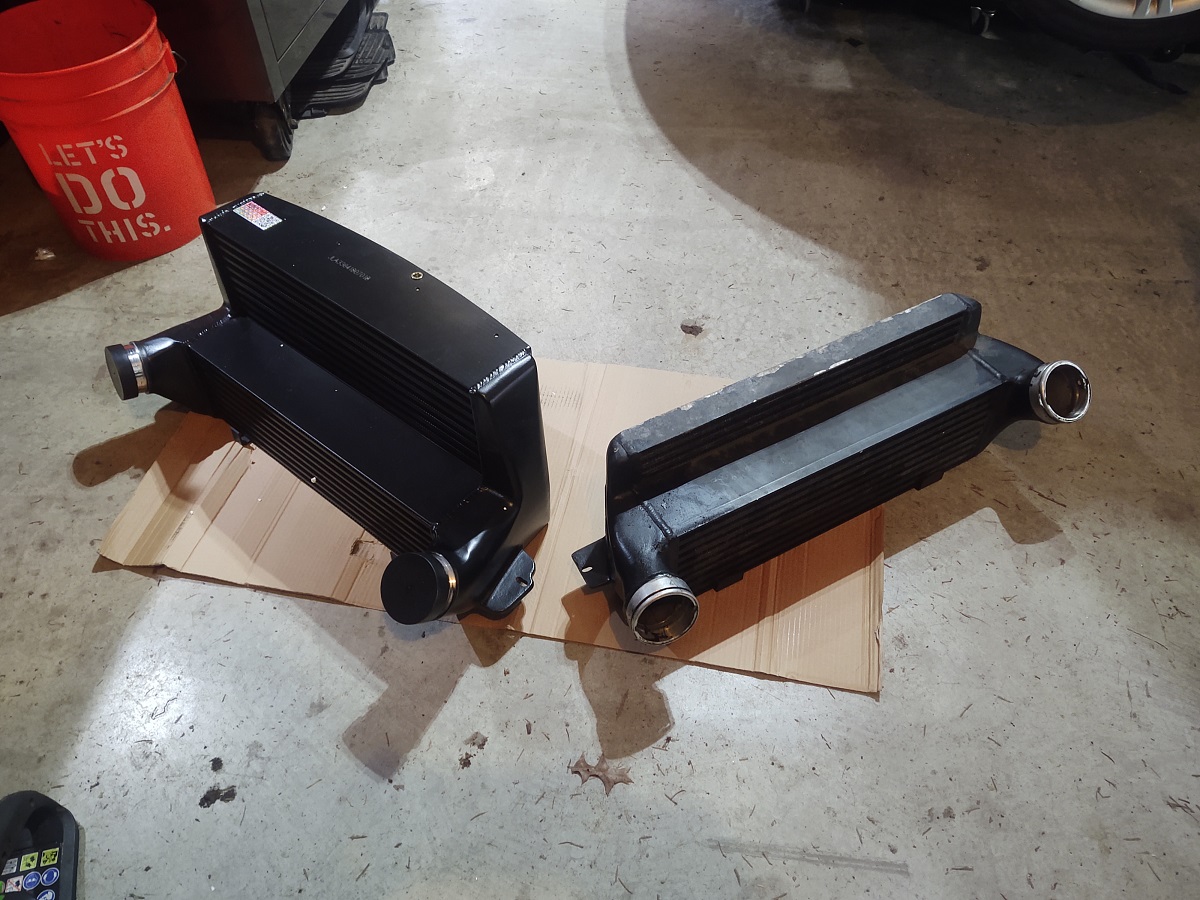 Biggest differences - Tube and fin vice bar and plate. - 1.8 times the volume but only 1.5 times the weight (EVO III is 10 lbs heavier, so there went my CF hood weight savings...lol) - requires a LOT of cutting of the plastic support material in the front to fit.
__________________
Best,
Andy '12 E82-PS2,Stoptechs,Clubsports+M3 bits,Accusump,Wagner DP+EVO III FMIC,ERCP,BMS Intake,Mason Strut Bar,Wedge Tune |
|
Appreciate
1
houtan705.50 |
| 03-25-2021, 09:03 AM | #3 |
|
Colonel
 706
Rep 2,444
Posts |
Looking forward to the install thread.
Is weight the main reason you went this route vice vrsf race?
__________________
|
|
Appreciate
0
|
| 03-25-2021, 08:35 PM | #4 | |
|
Supreme Galactic Commander (one galaxy over...)
666
Rep 1,777
Posts |
Quote:
__________________
Best,
Andy '12 E82-PS2,Stoptechs,Clubsports+M3 bits,Accusump,Wagner DP+EVO III FMIC,ERCP,BMS Intake,Mason Strut Bar,Wedge Tune Last edited by AndyW; 03-25-2021 at 08:41 PM.. Reason: correct info |
|
|
Appreciate
1
houtan705.50 |
| 03-28-2021, 04:01 PM | #5 |
|
Supreme Galactic Commander (one galaxy over...)
666
Rep 1,777
Posts |
Well, one thing I can definitely say...it requires a LOT more modification/customization than the instructions indicate...
|
|
Appreciate
0
|
| 03-28-2021, 05:33 PM | #6 |
|
Colonel
706
Rep 2,444
Posts |
Lol. Let’s see some pictures!
__________________
|
|
Appreciate
0
|
| 03-28-2021, 08:37 PM | #7 | |
|
Supreme Galactic Commander (one galaxy over...)
666
Rep 1,777
Posts |
Quote:
Such as: - The center support on my 135 which can't properly align with the FMIC installed so you have to reposition it. - the way the upper support for the FMIC attaches doesn't match the 135/1M or 335 pictures in the instructions. - the complications if you have headlight washers, relocated horns to the PPK2 position, or custom brake ducts (the reason I had to relocate horns...lol) The design also means that you can't access the upper FMIC mount without removing the bumper cover. Trying to see if I can cut a hole in the bumper cover that gives my access that I can then plug with a solid grommet. All I gotta say is that my IATs better be awesome! One piece of good news - all connections hold to 25# pretty well. |
|
|
Appreciate
0
|
| 03-29-2021, 11:32 PM | #8 |
|
Supreme Galactic Commander (one galaxy over...)
666
Rep 1,777
Posts |
Wagner EVO III Competition install
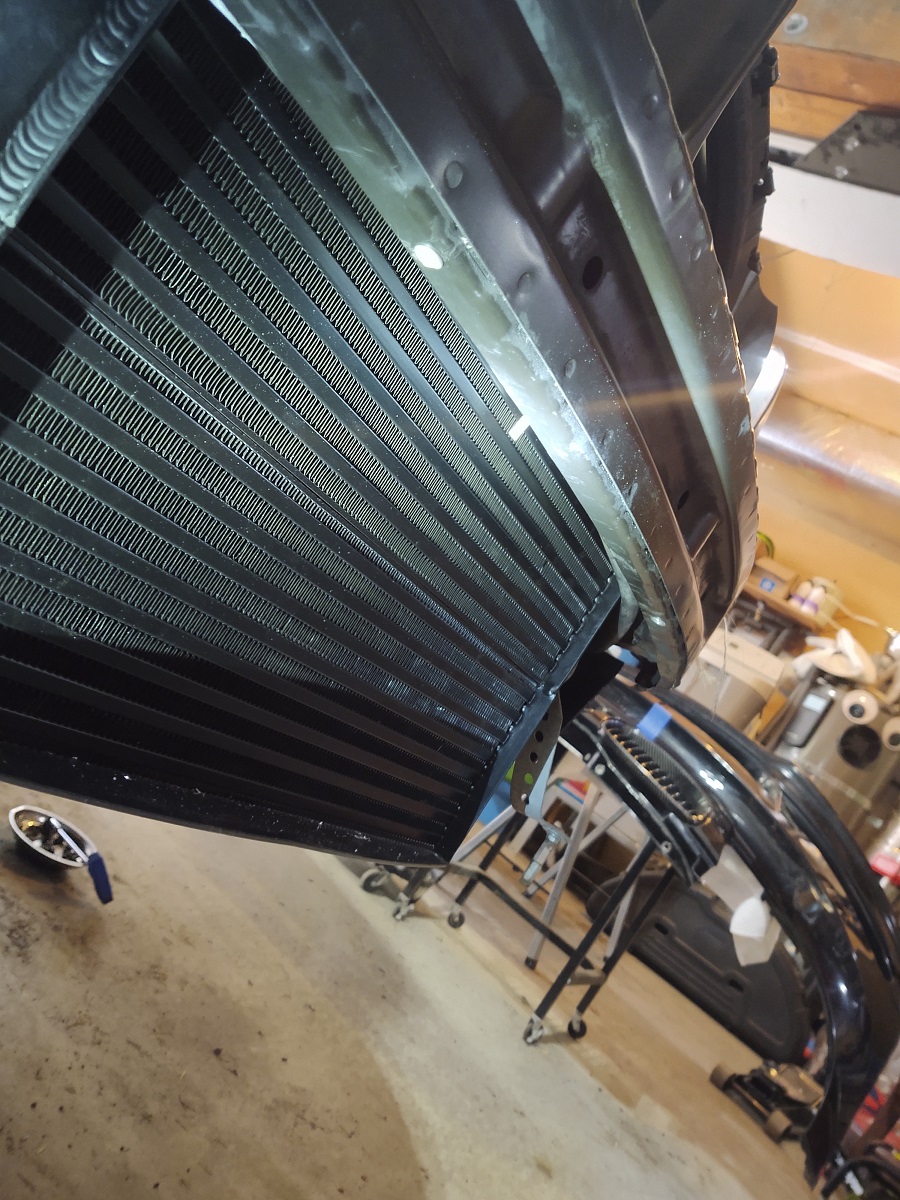
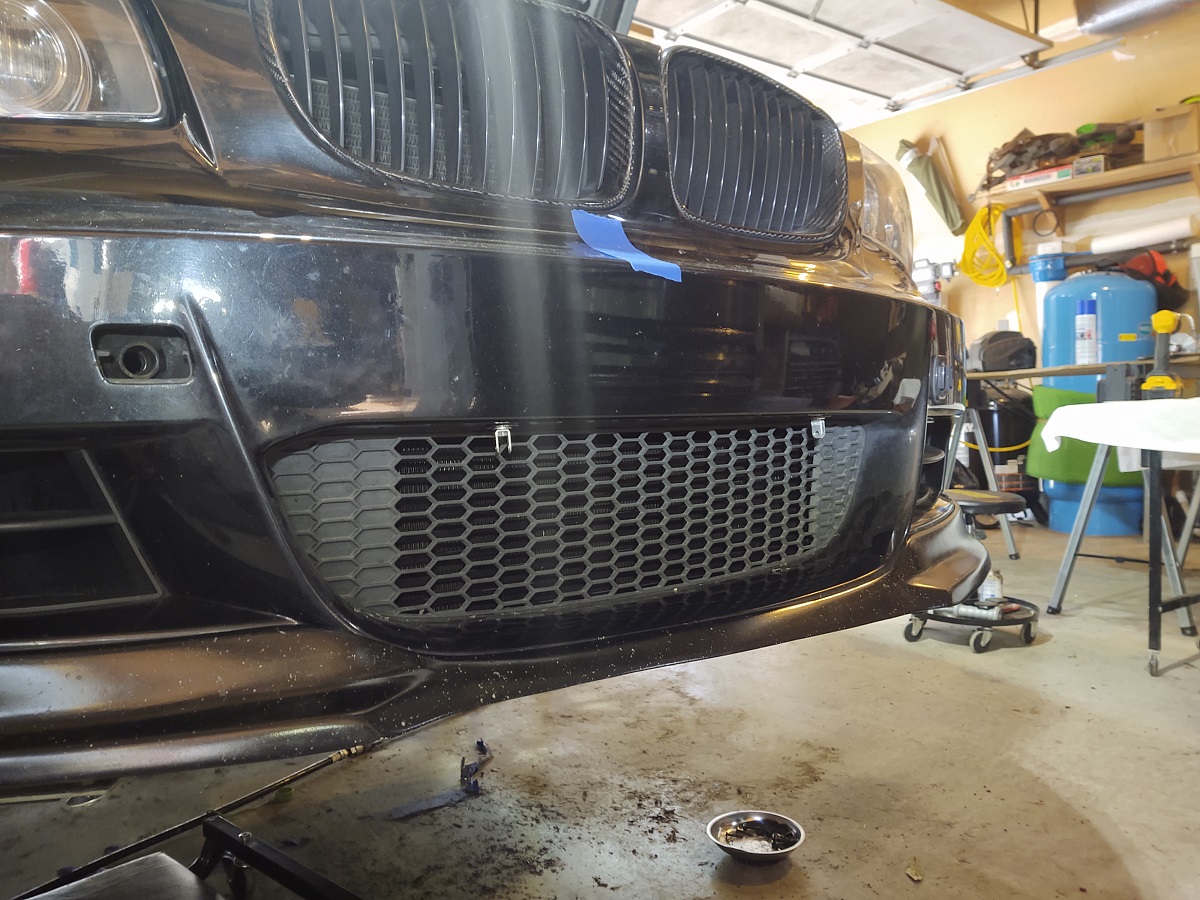
So, having run with an EVO I performance 5" FMIC for several years and having IATs higher than Id like, I decided to do this upgrade in conjunction with a number of other upgrades on the car (turbo, rod bearings, Stg 2 LPFP ,etc). To be clear, this is a car I run on the track regularly. It is definitely overkill for a street car. Thx to Jeff@TopGearSolutions for the great deal on the FMIC! I chose the Wagner for three reasons over other options on the market: 1. Size (largest?) 2. Tube and fin design 3. Wagner quality reputation Delivery was actually pretty quick. Less than a week by FedEx. After I opened the box and looked at the FMIC, it looked great. The box appeared to have sufficient packaging as well. When I took off the rubber inlet and outlet covers several days later, I was a bit disappointed. 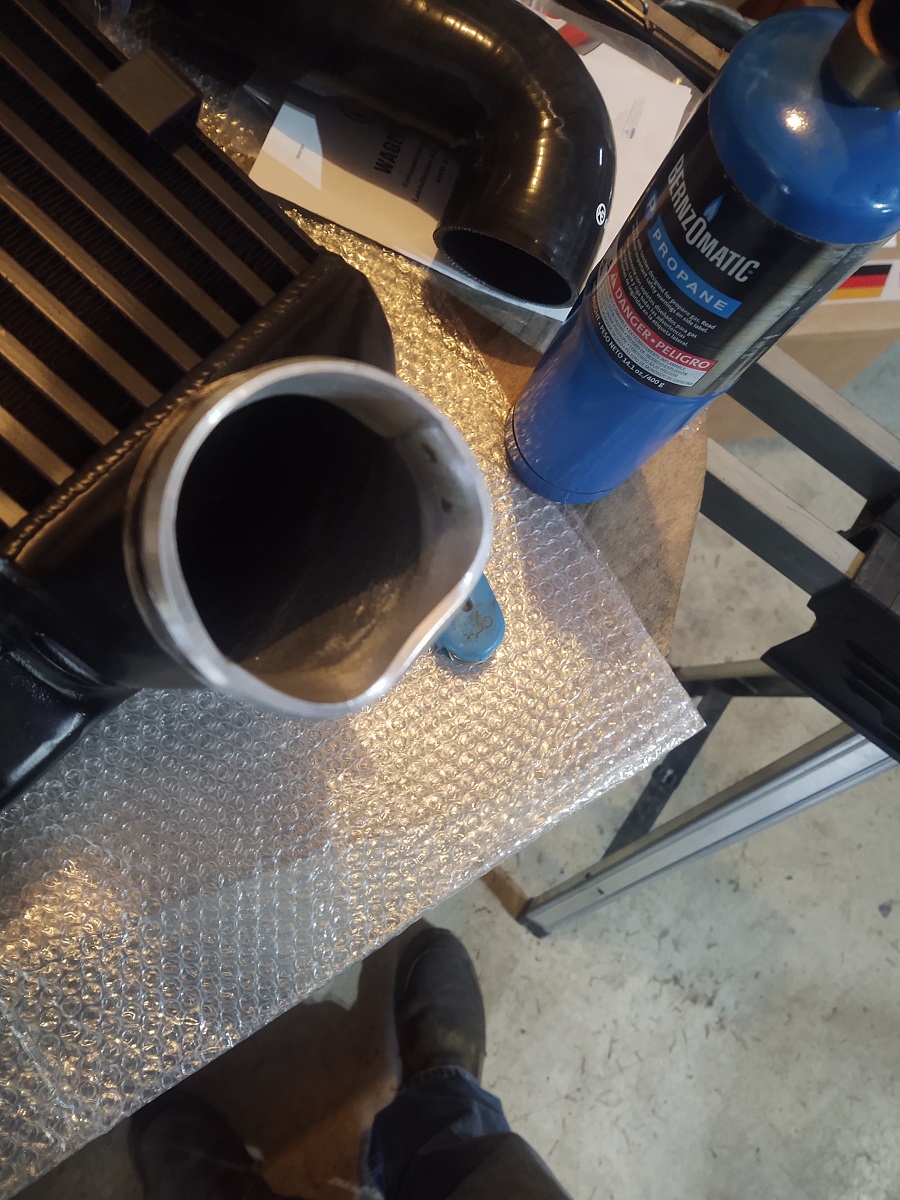 After getting over my initial "you've got to be kidding me", I had to decide between RMA and fixing what, honestly, was a small dent. After talking with TGS (who offered an RMA) I decided I didn't want the hassle and used heat, a wood block and hammer, and finally an exhaust spreader to get it back round. All's well that ends well, I suppose. 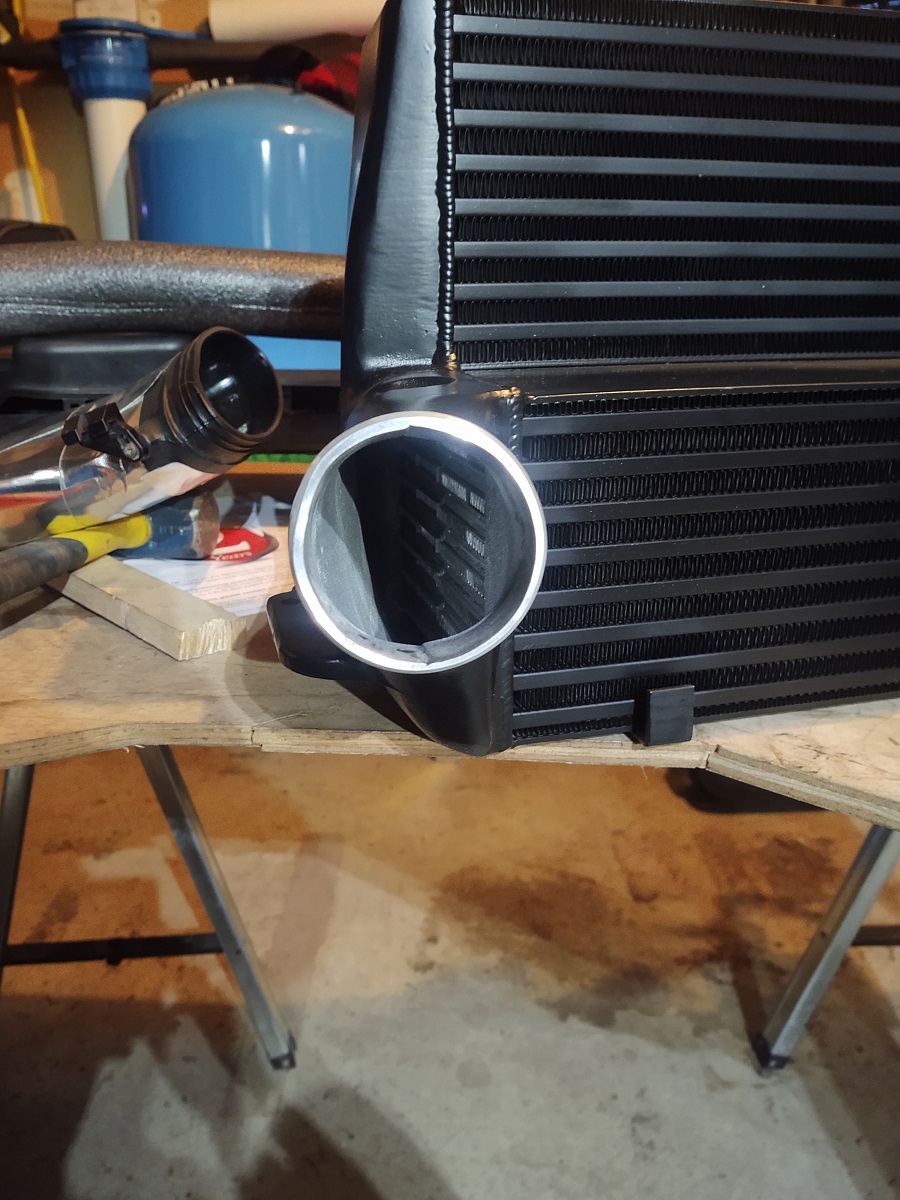 The tool. 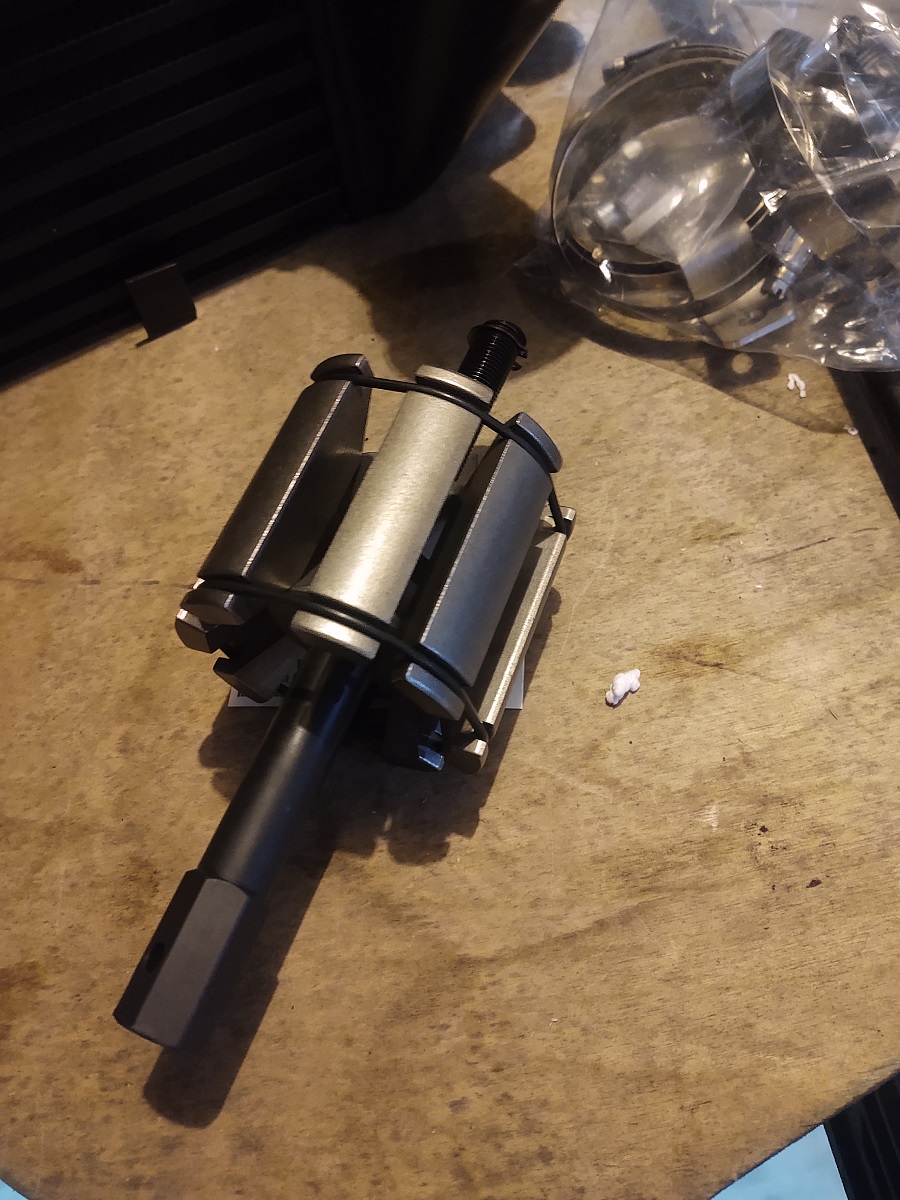 Then began the disassembly. The instructions are curt.. "You have to remove the following parts: Underbody, front bumper, cross member, the OEM intercooler." Well, it's actually a bit more than that. And apparently my car has some features that the manual is unaware of. So, I removed the bumper cover (not going to detail that here) and began inspecting what I would need to cut. I was hoping with my flexible dremel tool extension I wouldn't have to remove the front bumper, but it quickly became apparent that that was not the case, so I got to work removing the bumper. There are four 13mm nuts per side holding on the bumper...but wait, on my car, which has headlight washers and relocated horns (PPK2 style - supports drivers side oil cooler and brake duct), it becomes more complicated. You need to hand over hand the water lines and wires to the horns to pop out all the body connectors holding the cables and hose to the bumper. Once I had all that done, I unbolted the bumper and realized that I couldn't get it out because i have custom brake ducts that prevents you from pulling it straight out. So I disconnected those on each side (two bolts and some zip ties) and went ahead and disconnected the headlight washers just to give as much room as possible. I left the horns on the bumper because I didn't realize they weren't going to work yet. I didn't take a pic, but here are the mount locations from a later pic with the FMIC installed - clearly no room. Did I mention this FMIC is giant? And I remember having to hunt for those parts numbers when I relocated the horns...good times. 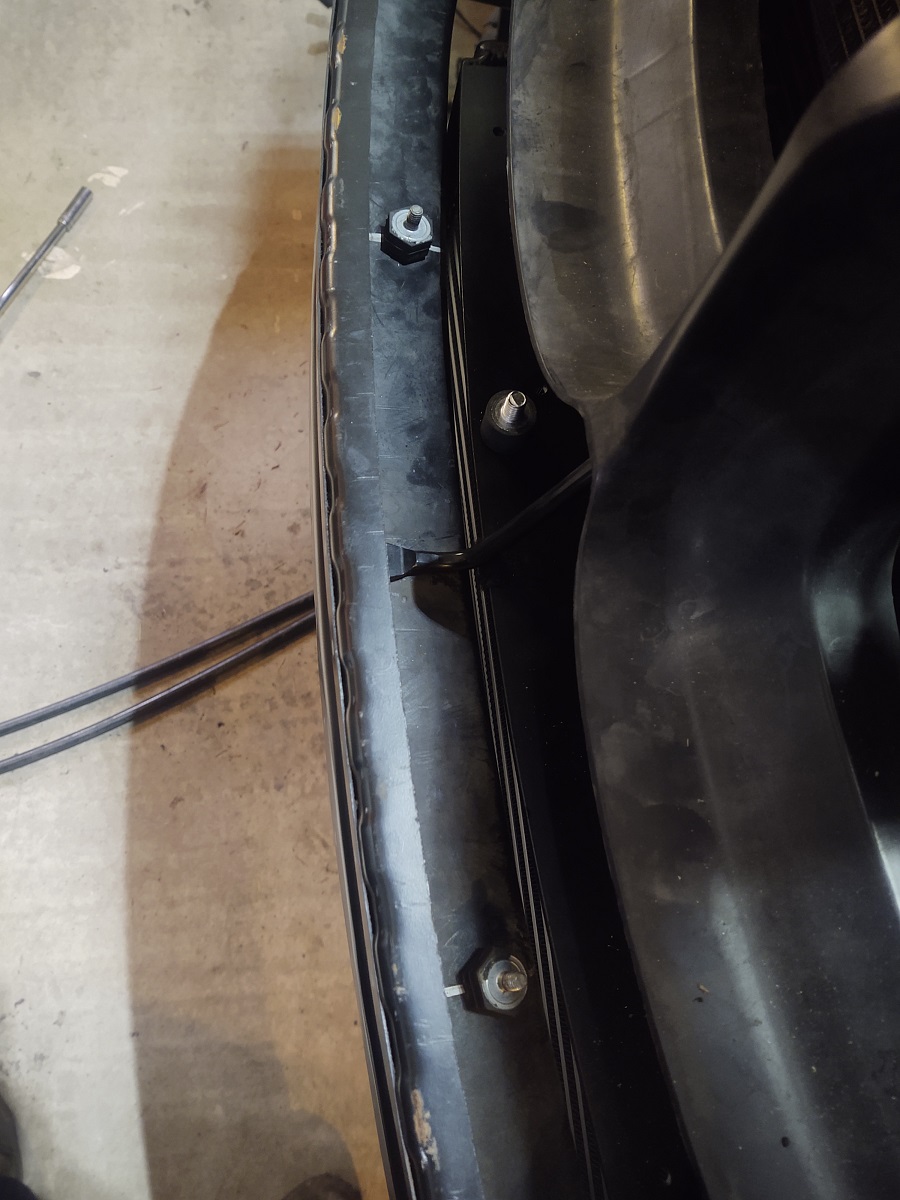 So, after getting the front of the car "open", it looked like this. Those custom metal pieces are supports for my splitter. 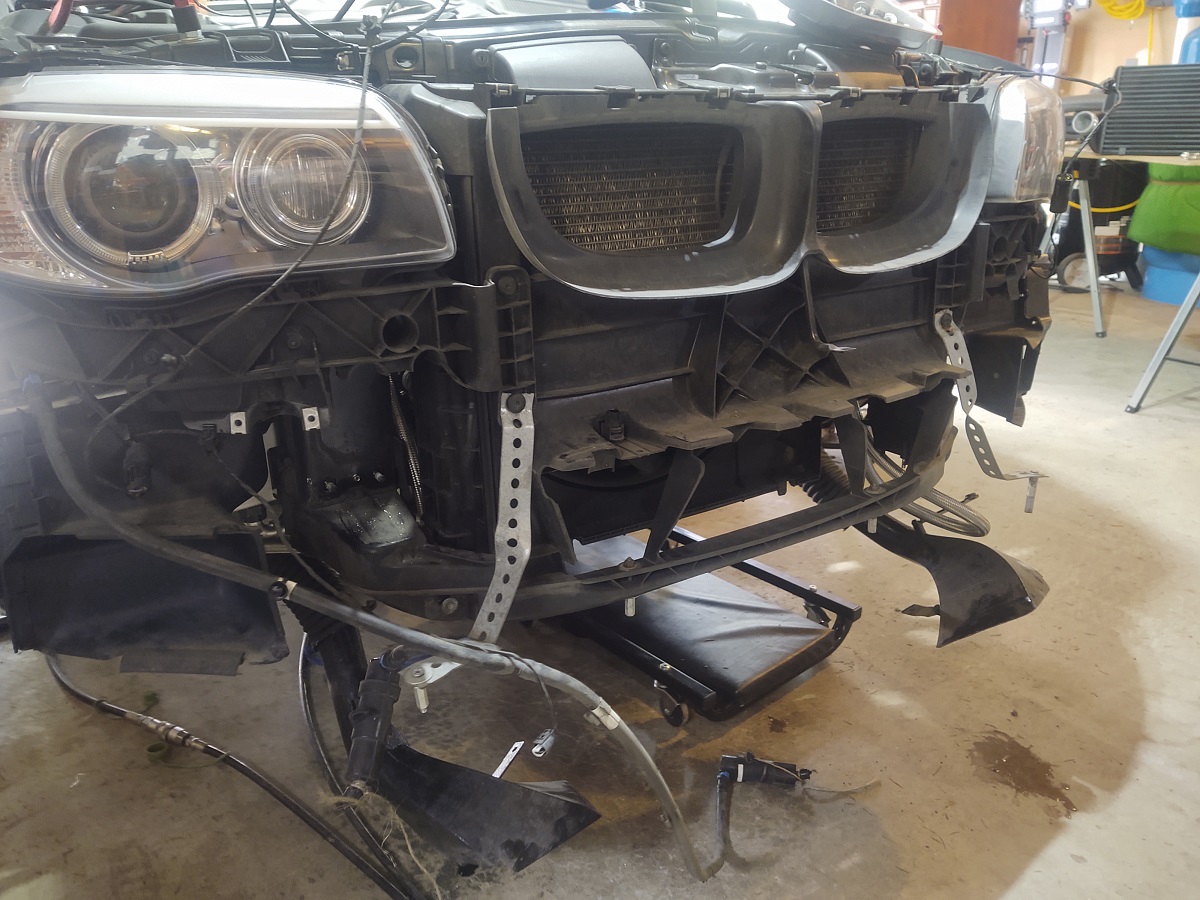 I then removed both factory FMIC couplings from the car. As those with upgraded couplers know, the passenger side it pretty straightforward - get it there carefully with the dremel, cut the band and pull the accordion coupler off. The new coupler for the Wagner goes on well. For the drivers side, getting the "S" pipe out was a PITA. You have to remove the intake and airbox, as well as the charge pipe to make room. Fortunate, I had already removed my Accusump. For the outlet, Wagner gives you a silicon S "pipe" and a double male adapter, as I guess they wanted to maintain compatibility with as many charge pipes as possible. At this point, I put in the Wagner S "pipe" and it looked like, with my ER Chargepipe, there wasn't going to be room for all those pieces. So I decided to leave out the extra coupler and see if I could get away with just the S "pipe". More on that below. Here is a pic of the "intended" sequence of components. A bit ridiculous IMO. I would have preferred Wagner just make an "S" pipe with a longer upper segment. 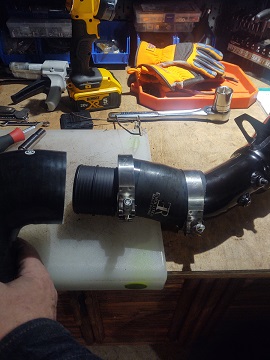 Finally time for cutting. But wait...make sure you disconnect and remove your ambient temperature sensor first! I used a small sawzall and a dremel. You need to be very careful to not overcut in some places as you could cut or puncture the P/S cooler. or even the AC radiator, depending on your saw. I actually put a small piece of wood behind the cut line for several cuts. I did it in sections, not all at once. Made it easer for tool access for the upper, more critical cuts. This pic is what is in the manual, and it is pretty much what I cut. Just take your time. (note the lack of a center support piece in this pic - will come up later)  I then installed the hanger bolts that come with the kit so that it makes bolting the FMIC into the stock locations much easier. 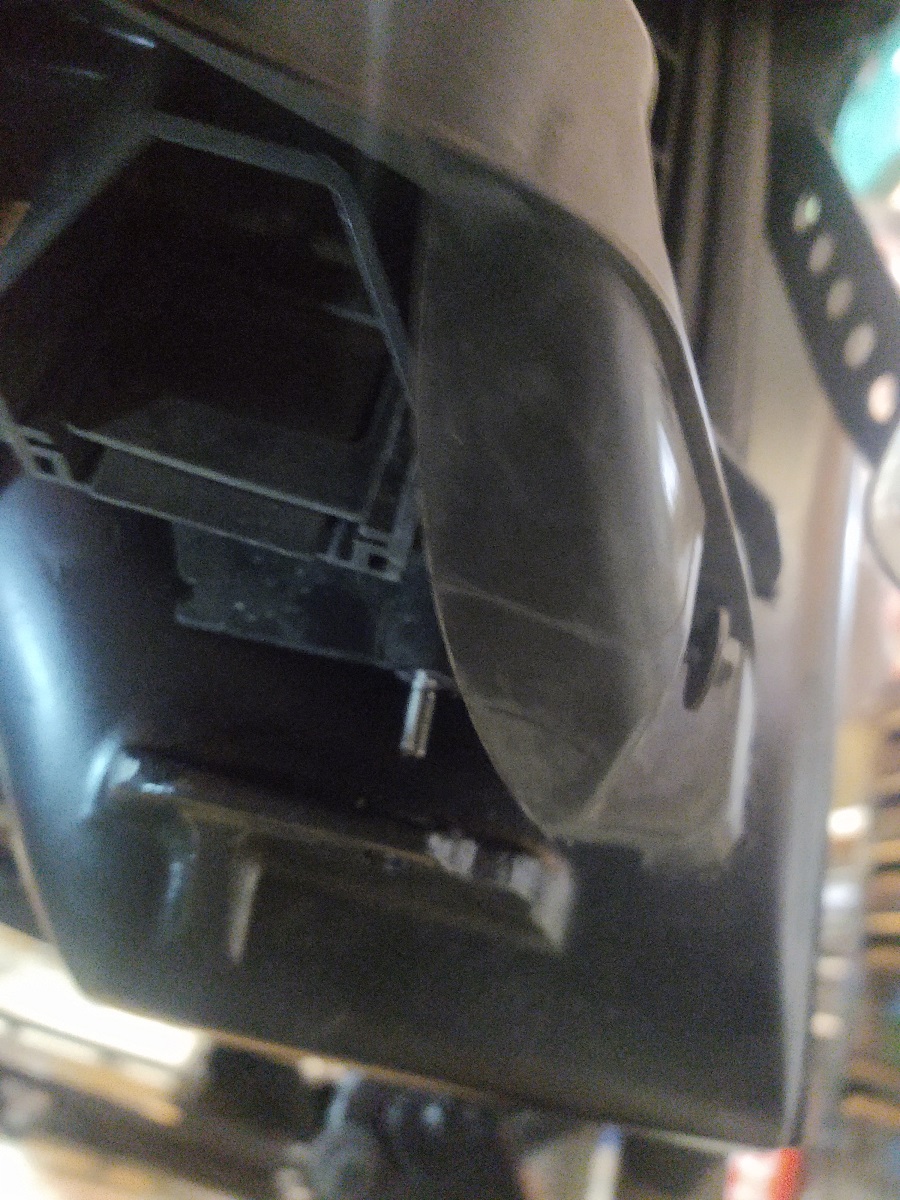 Then, the first fun fitup! I used a helper and a jack - thing weights 30#. 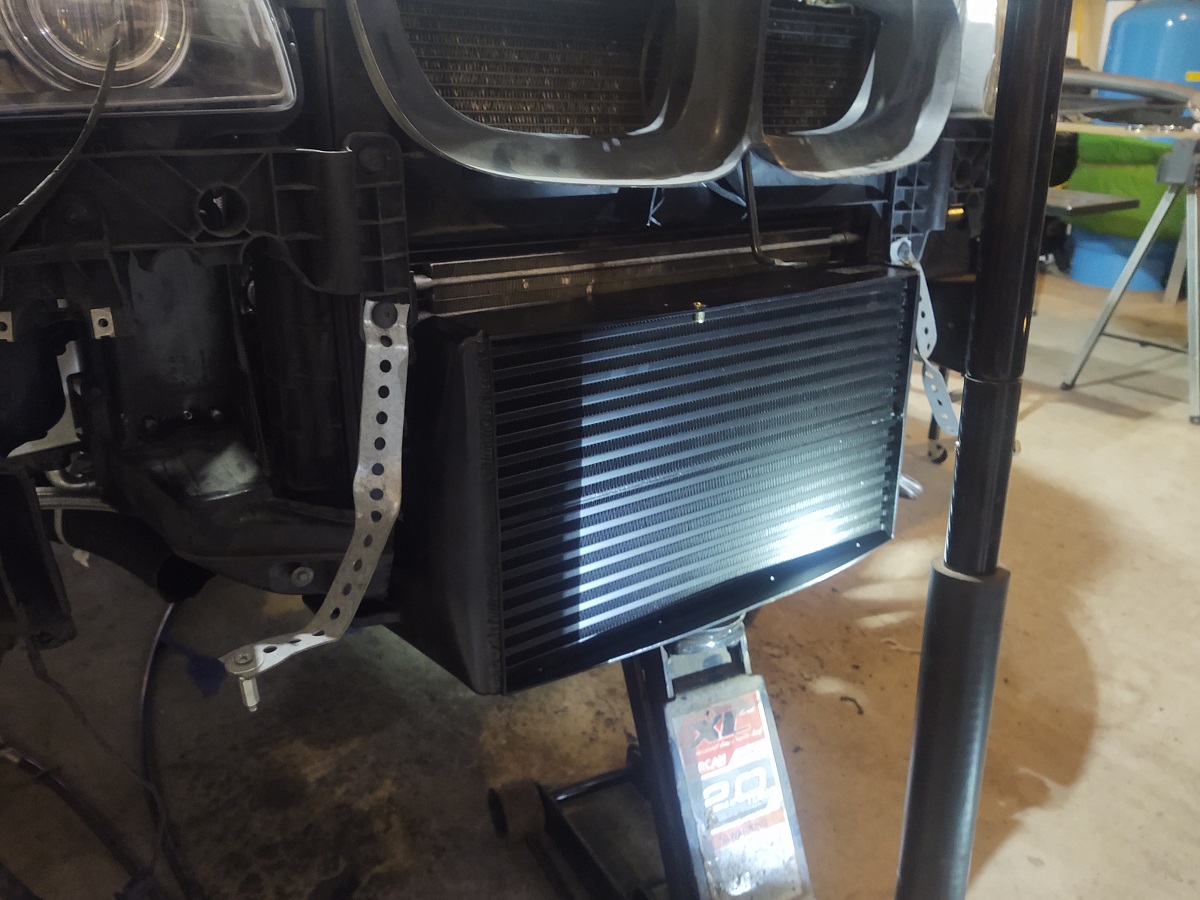 This actually required about 4-5 iterations, with me forgetting one of the cuts underneath (to be fair, it was in the instructions, I just didn't pay enough attention) and needing to cut away a bit more on the sides in the front. I also spent time finagling the couplers to ideal locations to mate up with the FMIC so the hose clamps would get a good "bite" on both ends. And after that...ta da...it fits! 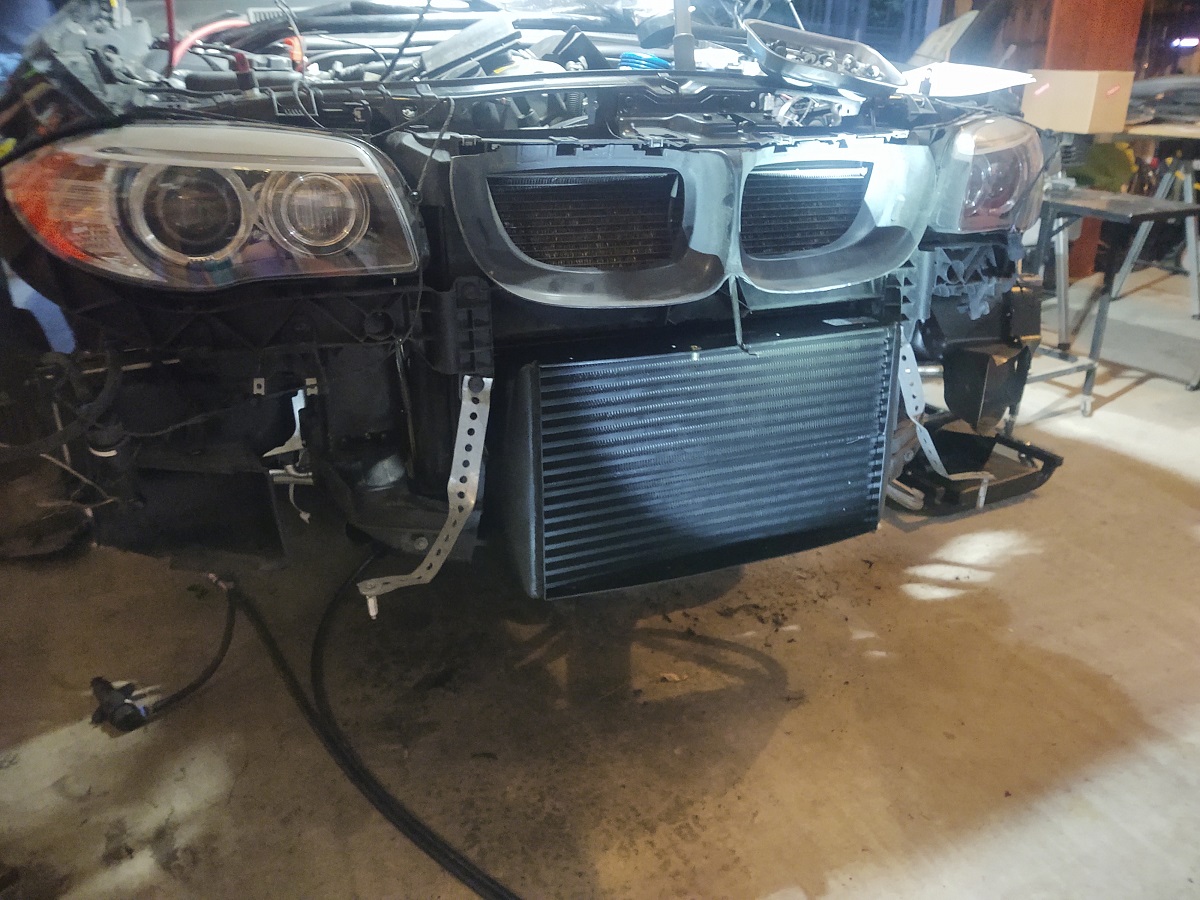 I even got the S pipe to hook up to my ER Chargepipe, but it was right at the end and I was a bit nervous that might pop off...but it held to 25# in pressure testing later. Time will tell if it will remain on since I know things move when you are driving. 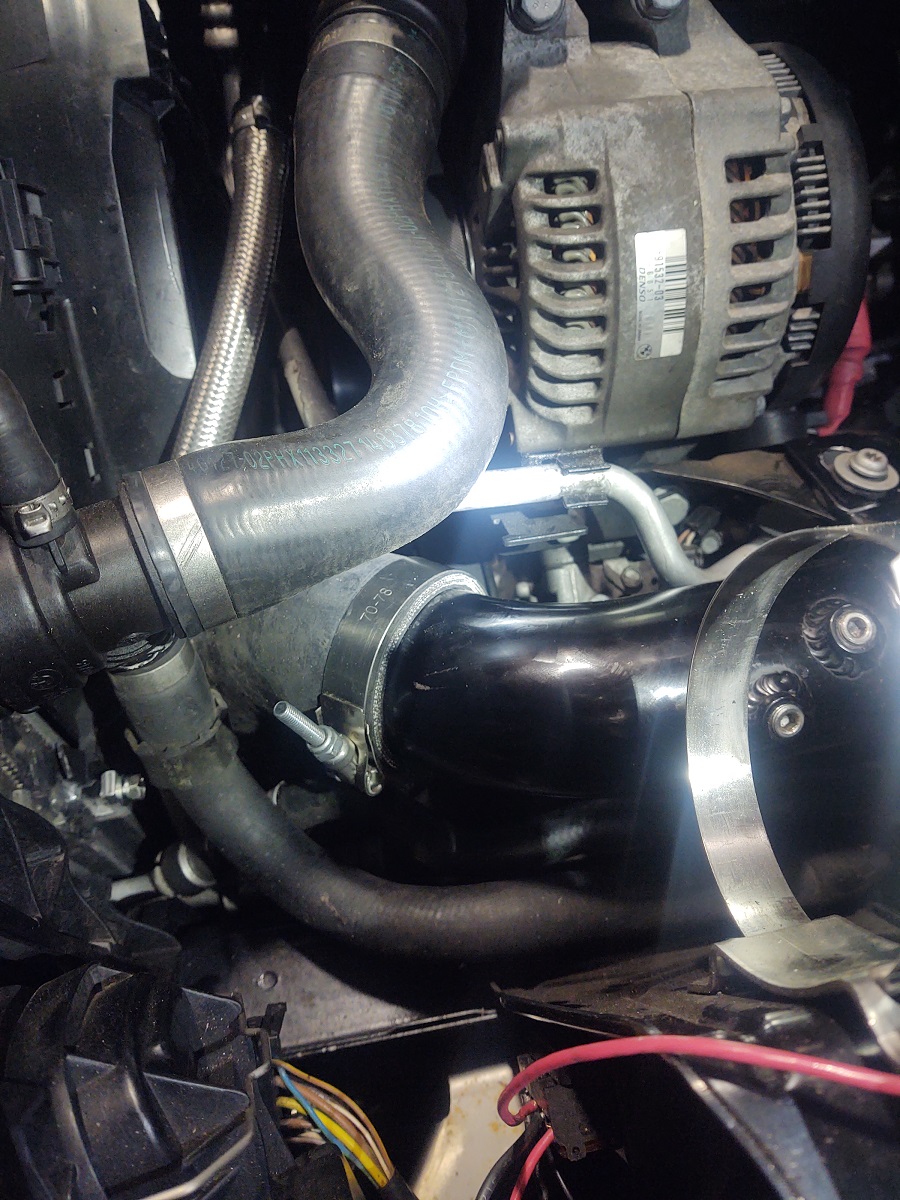 One of the problems immediately obvious was that my car has a center support piece that bolts to the bumper. This piece was pushed forward by the FMIC and there was no way it was going to bolt up without bending the support or making a cutout at the top of the FMIC hood. Neither option appealed to me.  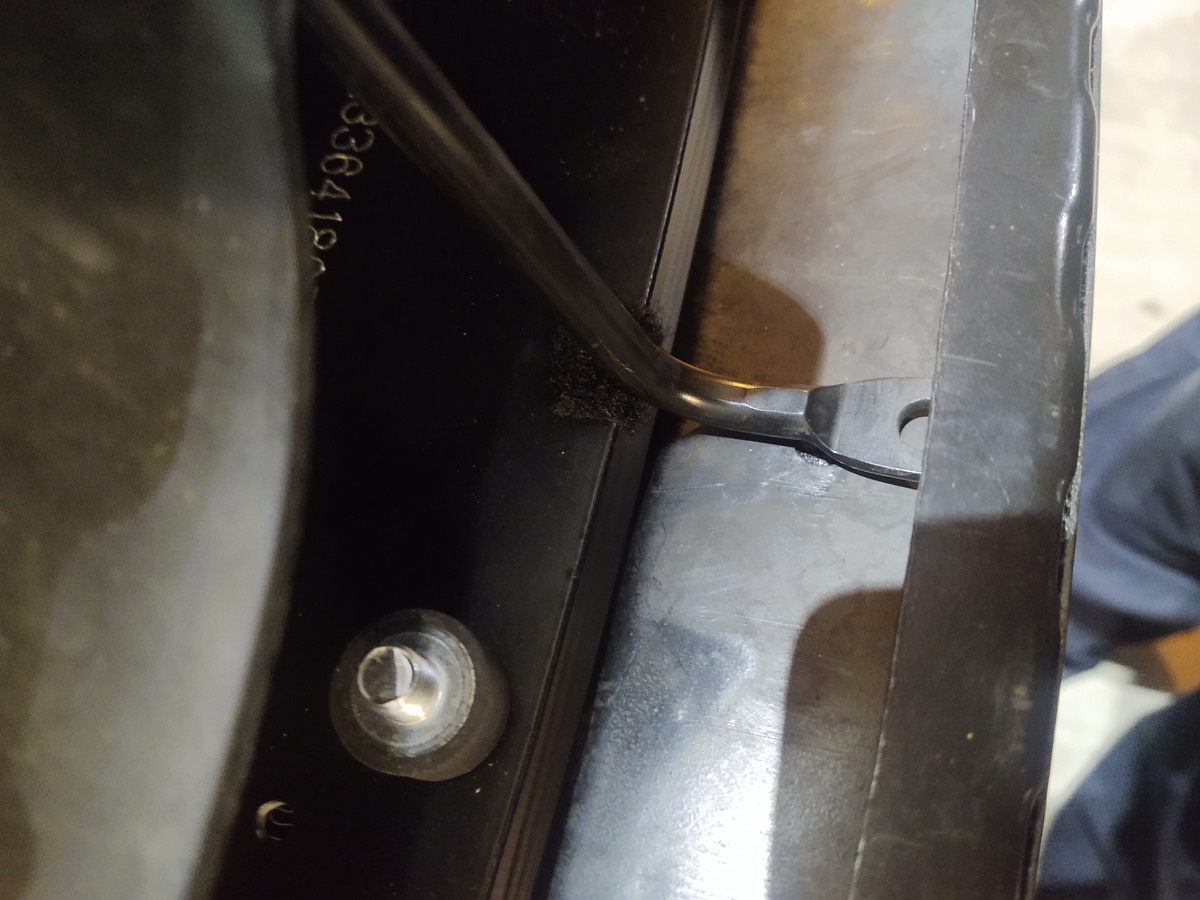 I am not sure why Wagner doesn't address this in the install manual - this is kind of a big deal and I imagine all US models have this. So I put a bit of Velcro on that part of the FMIC while I thought about other solutions. I came up with one that I'll discuss below. Now, I needed to remount the bumper so I could install what I think is one of the best features of this FMIC...a top bracket to bolt to the bumper. This prevents all the load from being on those two plastic factory locations underneath. it also meant you would need to remove the bumper cover to drop the FMIC, which seemed annoying so I am still designing a possible solution for that. But I had a roadblock, it was clear the horns wouldn't fit and I would need to come up with an alternative location. So I took them off the bumper. I played the "where can these fit?" game for a while. Once I stopped trying to mount them on the bumper, it became clear that the horns only fit comfortably in one location - bolted to the top of the left and right oil cooler shrouds! 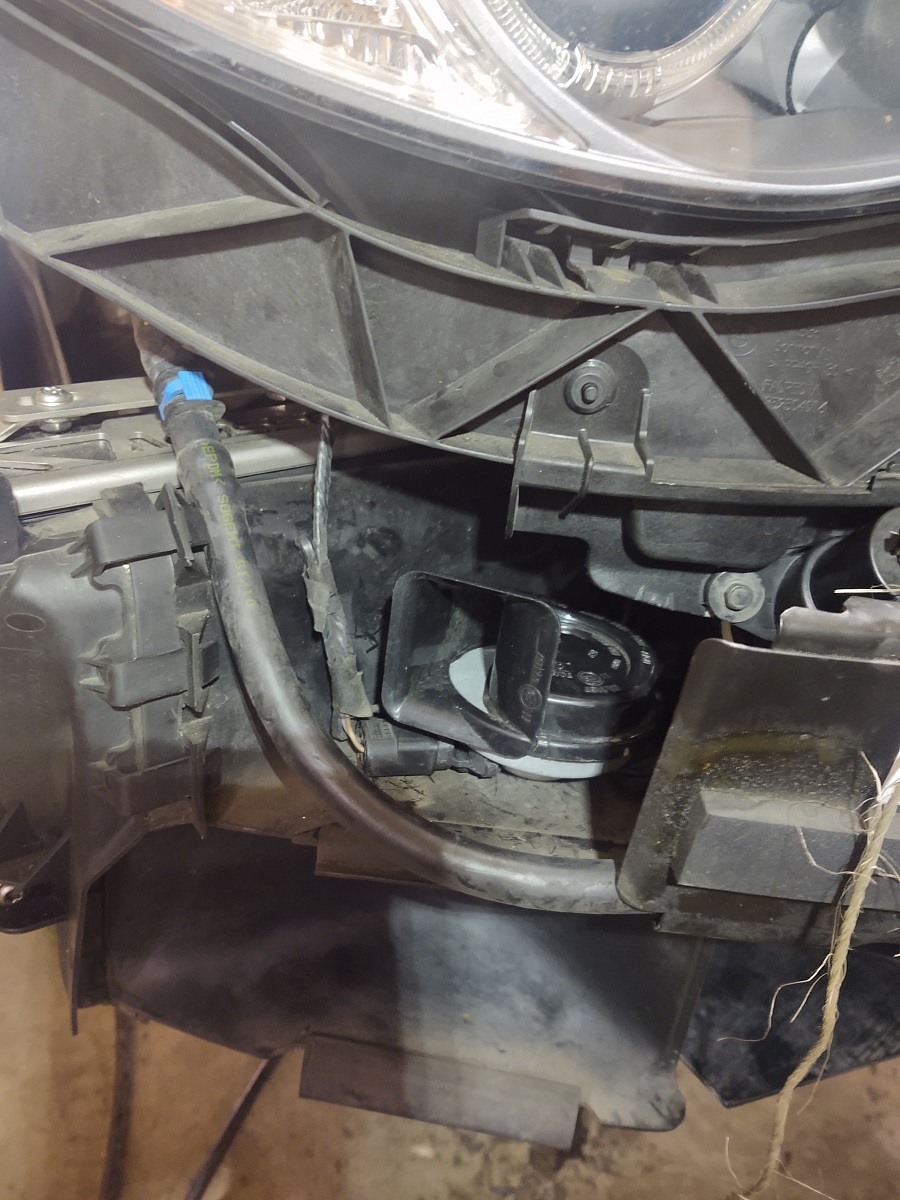 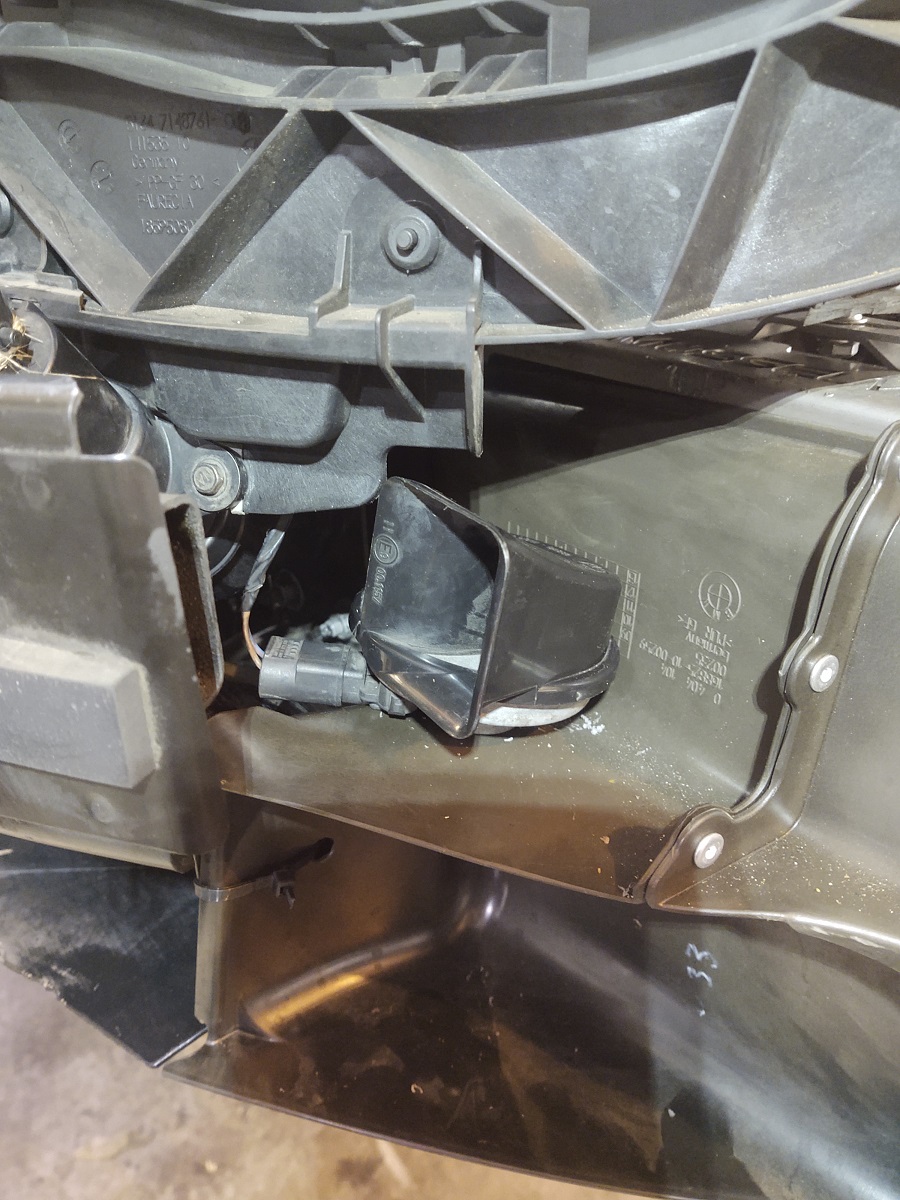 This enabled me to eliminate the 3 foot wiring extensions on both sides as well as a handful of parts - so, weight savings!  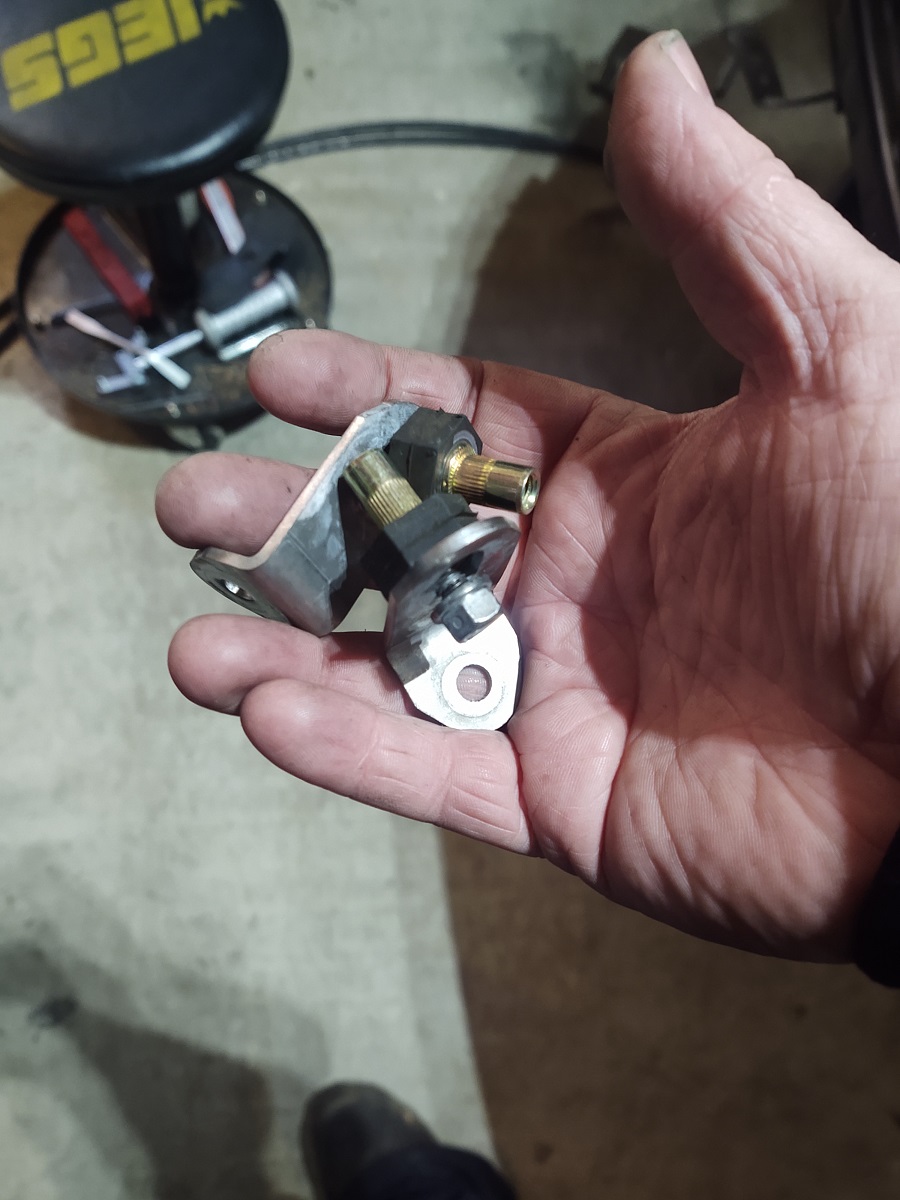 So, with the bumper finally fully fitted up, I worked on the FMIC upper bracket. The 1er pic is not helpful as the diagram on the right in the pic doesn't match up to what they are doing on the bumper, which clearly has the rubber piece not even attached. This caused me to initially mount it similar to the 335i pic and to the top of the bumper lip. 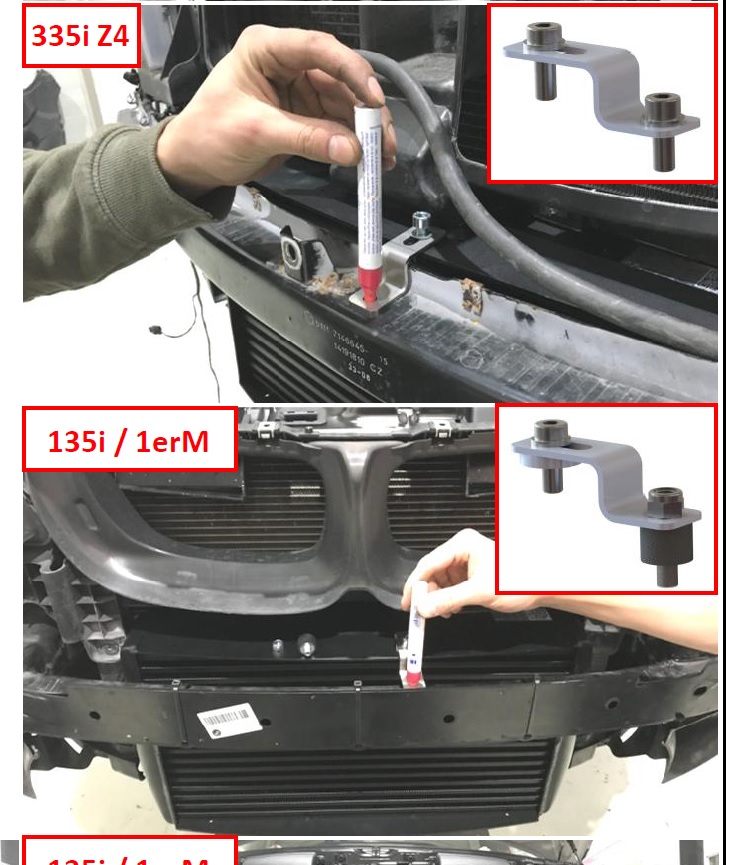 I determined there were two ways to do it, neither of which matched the pics in the instructions. Option 1. 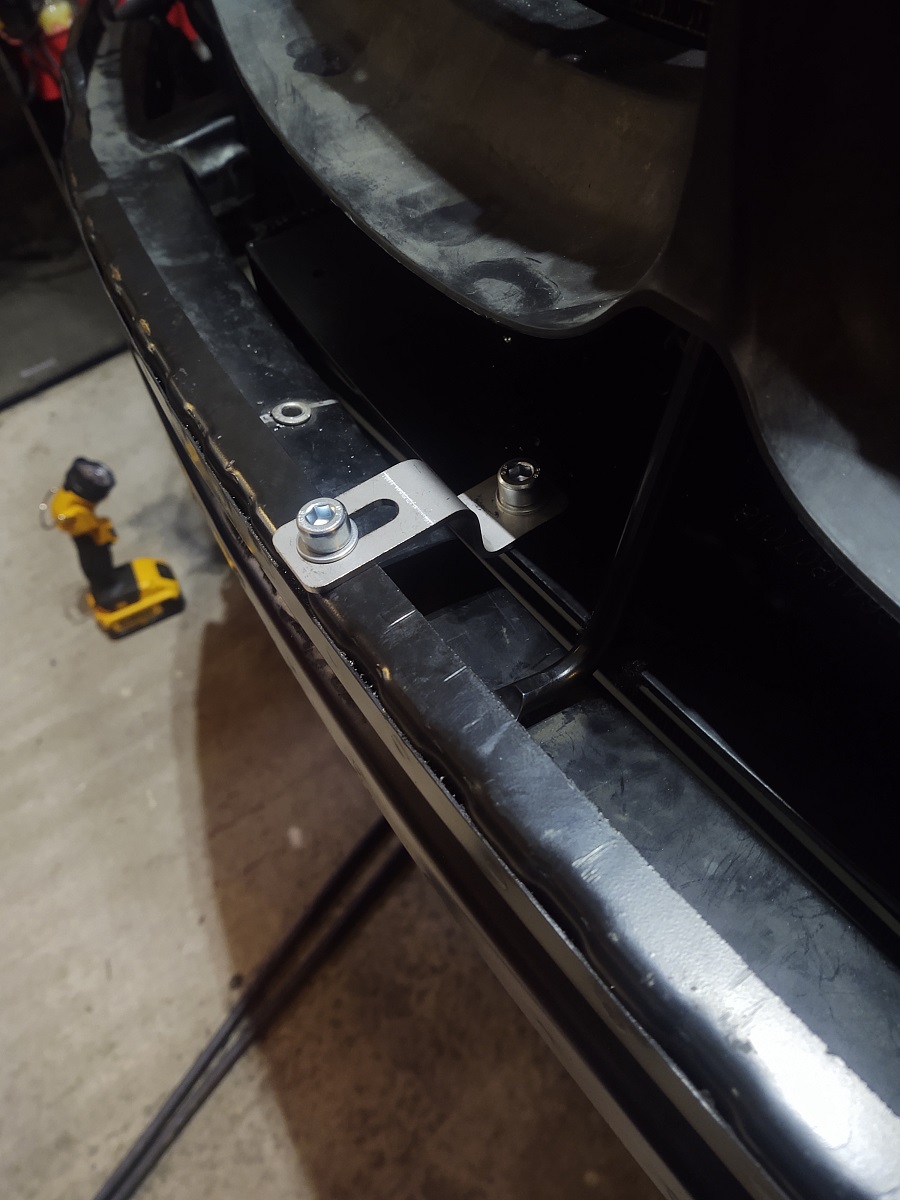 I then figured out you could reverse the parts in the 1er diagram to mount it to the bumper but under the lip. Or maybe I just suck at spatial reasoning... Option 2. I ended up sticking with this option. 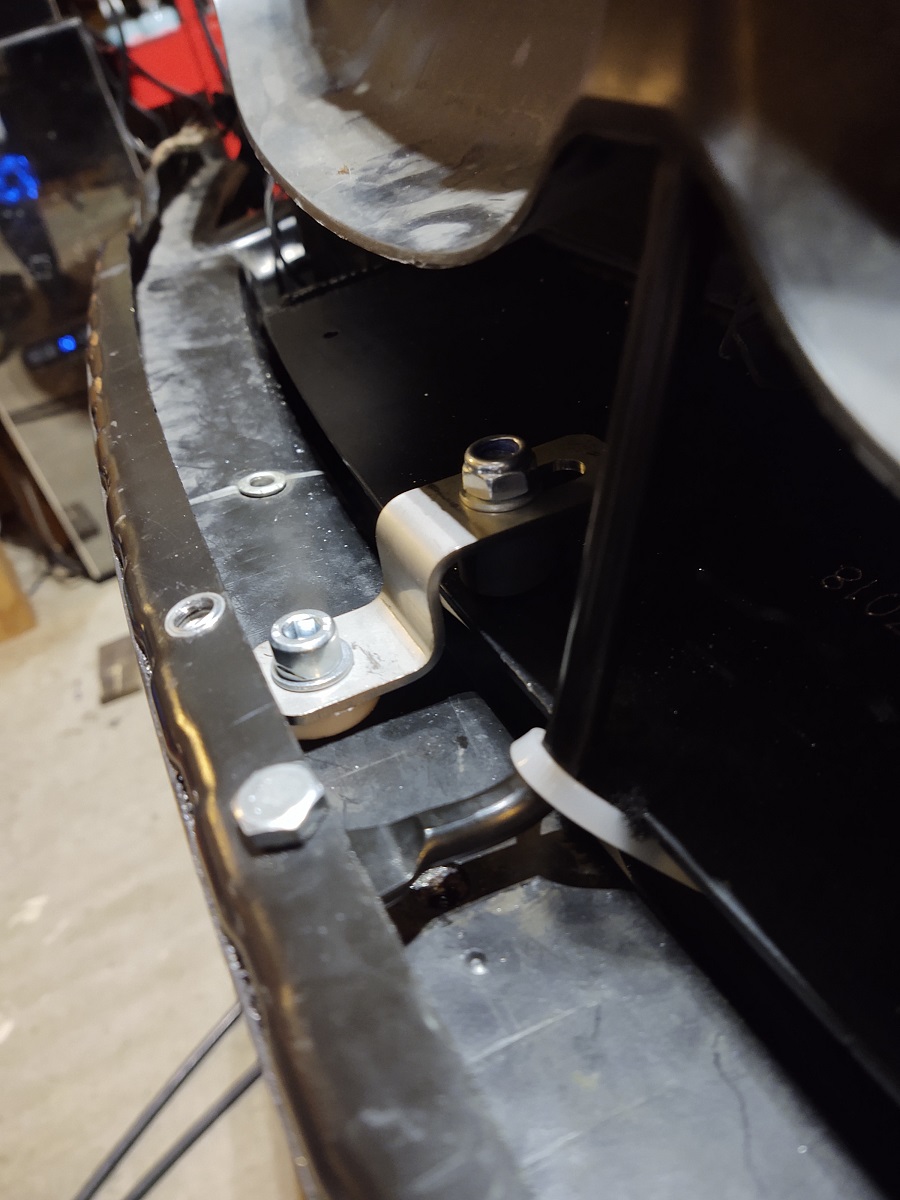 Installing the bracket it easy...just mount it to the FMIC then mark where the other end can be bolted to the bumper. Then you drill a hole and mount a rivnut. The bumper is pretty tough steel but I used a tapered bit and it worked. I also have a rivnut tool which makes it easier. I now needed to deal with my center support. I decided it wasn't for holding up the bumper...the bumper "arms" or for that, so it had to be for providing support *from* the bumper to hold up the plastic bits and radiator cross member. Given that the place where the bolt hole for the support was not convenient to put another rivnut in the bumper, I elected to go another route...bolt with a nut. Since the force it needed to support was downward and the support was under tension when pushed forward so that it didn't touch the FMIC, this should work fine. 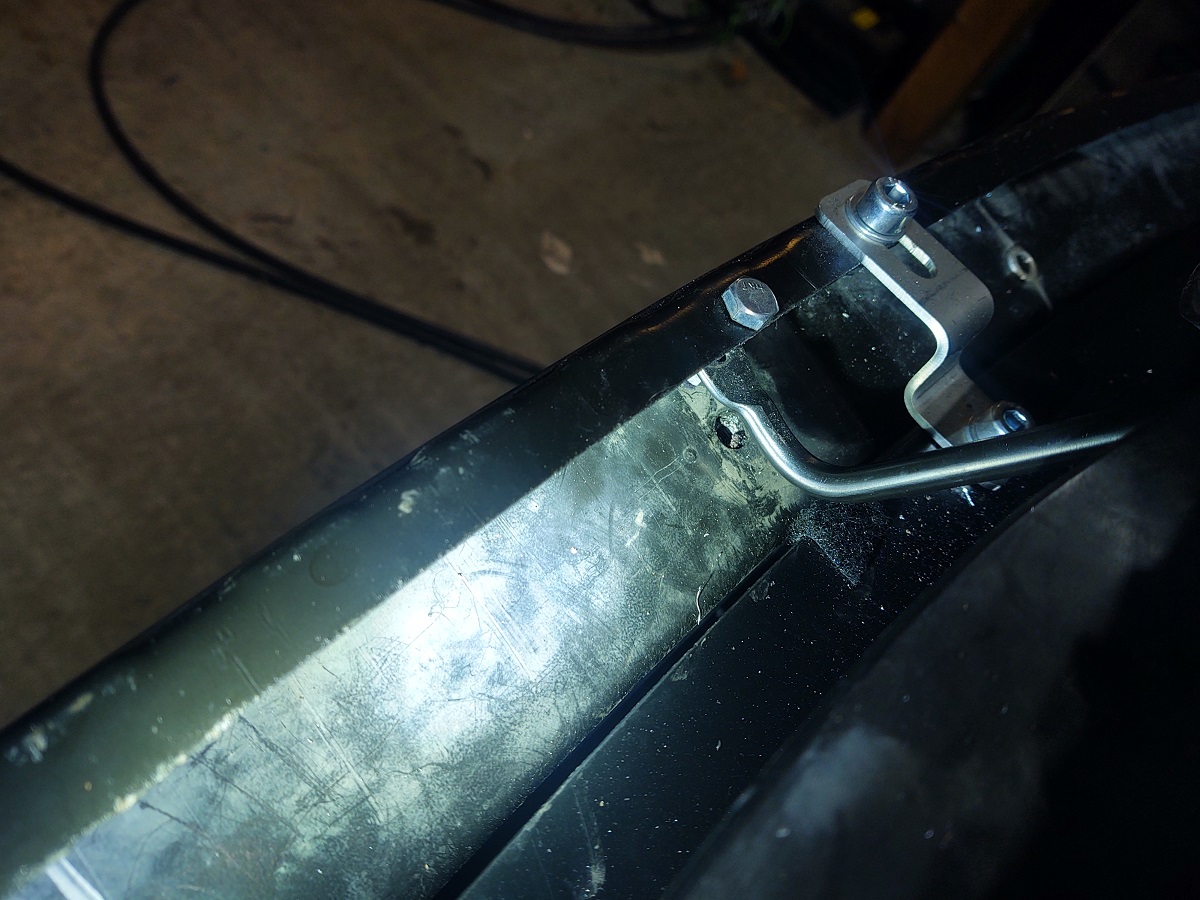 Not pretty, but it works. In hindsight, Wagner has to know about the center support...otherwise, why would they offset their FMIC bracket? Anyway, don't forget to remount your ambient temperature sensor which was installed into the center section you cutout. My splitter hanger made a convenient location. 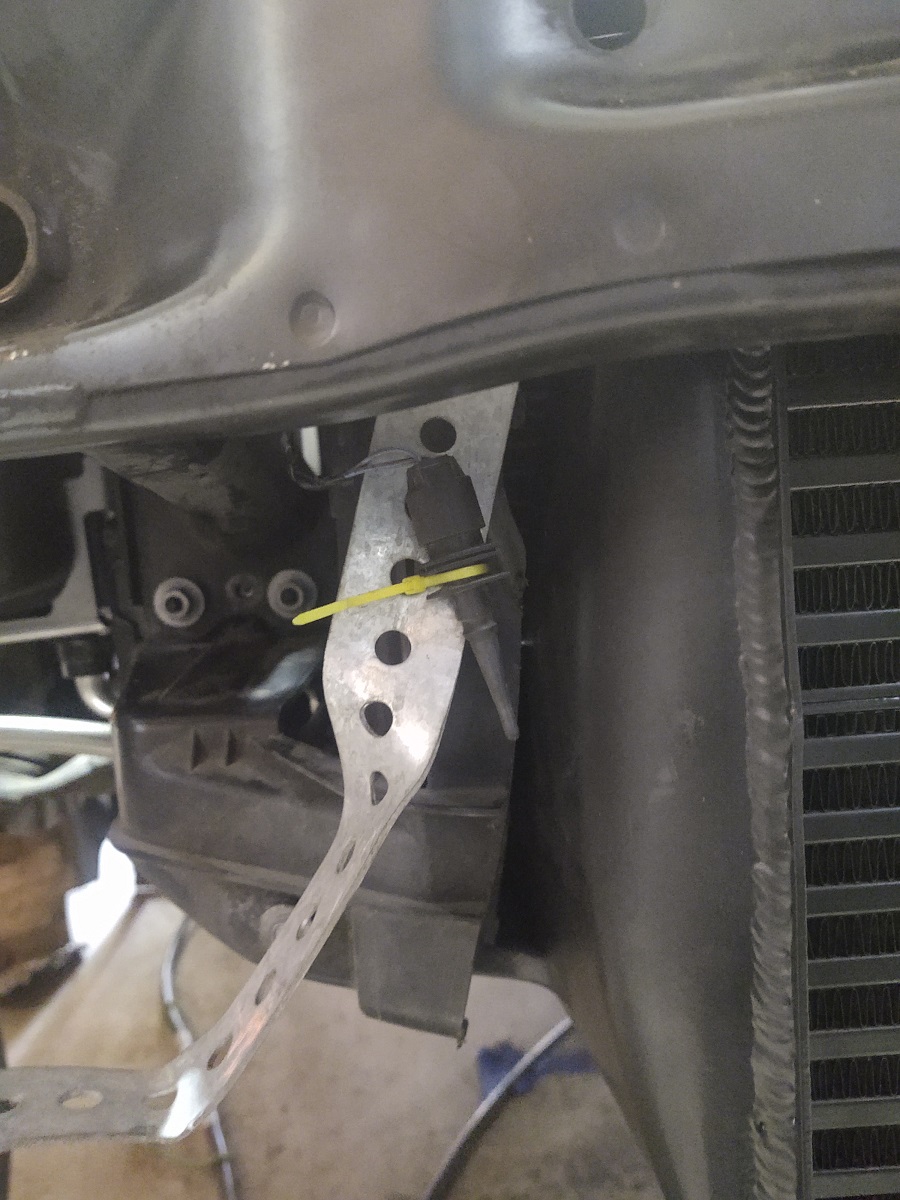 Then it was time to fitup the bumper cover. I immediately noticed the bottom was not going in and discovered another thing the manual did not mention...some "wings" in the FMIC grate that needed to get cut off. 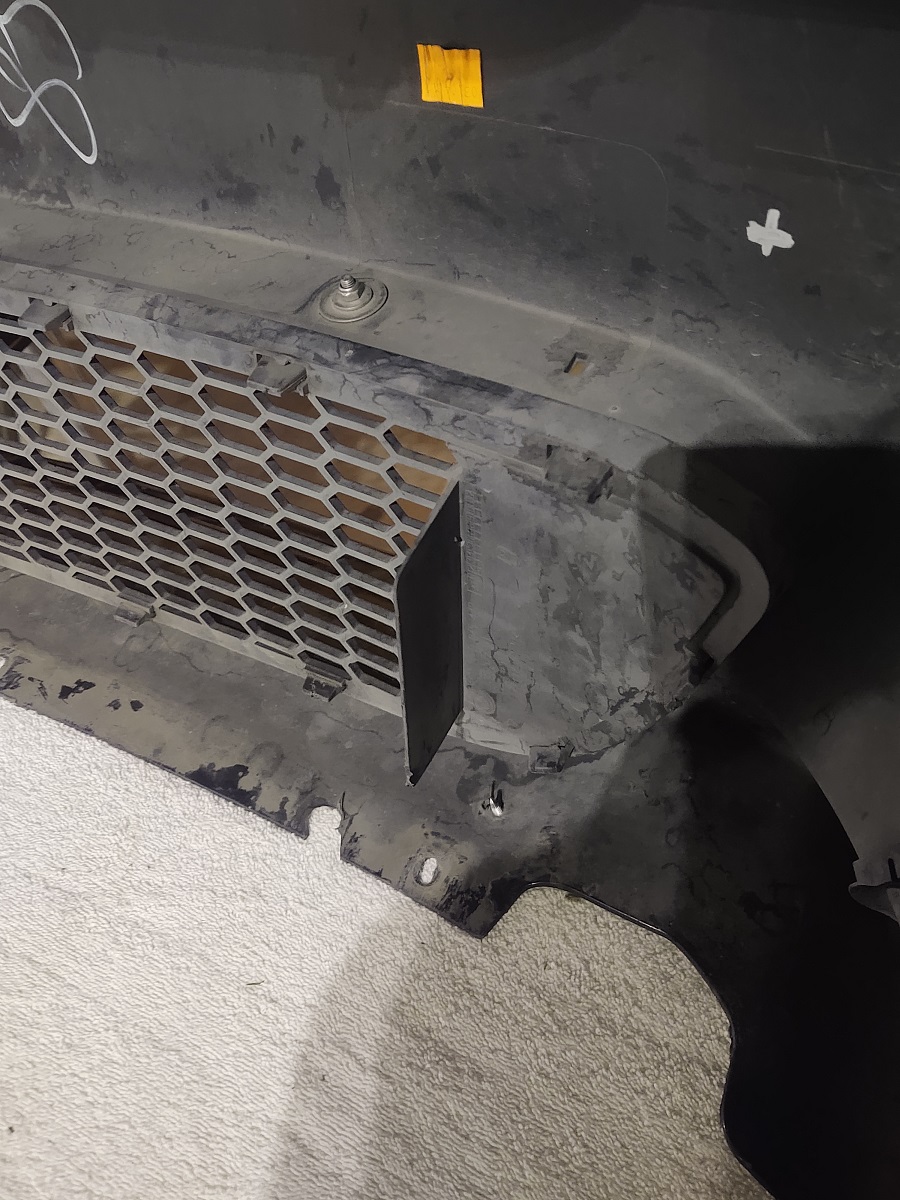 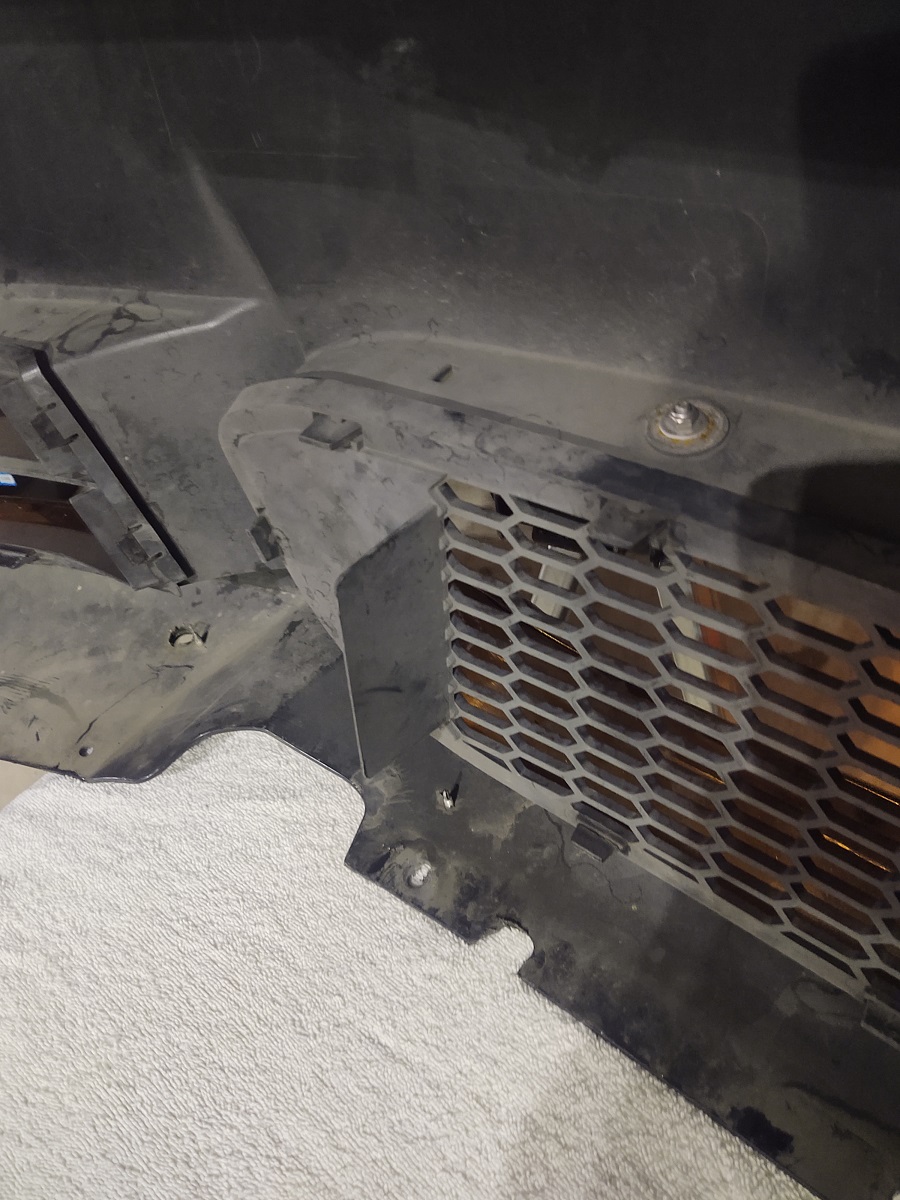 As a separate project, I have decided to mount my front splitter rods to my bumper (vice just the bumper cover) and need to complete that before I do a complete final fitup with the bumper cover, but will post that once I get the new splitter mounts done. So, all in all, pretty extensive mods required to mount this FMIC. Here's hoping the IAT reductions are worth it!
__________________
Best,
Andy '12 E82-PS2,Stoptechs,Clubsports+M3 bits,Accusump,Wagner DP+EVO III FMIC,ERCP,BMS Intake,Mason Strut Bar,Wedge Tune |
| 03-30-2021, 12:17 PM | #9 |
|
Colonel
706
Rep 2,444
Posts |
Thanks for the detailed write up. I enjoyed reading about the solutions to your challenges. It never goes as straightforward as it should and I’m sure it will help others.
It was nice to see you were able to use the Wagner s-pipe without their coupler solution. To me that’s my main dislike because it is such a clunky solution. I also have an ER CP so this would work for me as well if I go this route. WRT the stock s-pipe, I believe the easiest way to remove it is to drop it from underneath vice the top. I don’t know how you got it from the top, I remember trying and failing miserably many years ago which made me think to pull it from below. A lot of work but I’m sure it’s worth it. Great job!
__________________
|
|
Appreciate
0
|
| 04-12-2021, 09:10 AM | #10 |
|
Supreme Galactic Commander (one galaxy over...)
666
Rep 1,777
Posts |
UPDATE: I decided I didn't want to have to remove the bumper cover everytime I wanted to remove the FMIC so I designed a solution and figured I'd share.
It is basically two modified L-brackets with the one on the FMIC having a rivnut in it. The only stressful part was cutting a hole in my bumper cover but I think the end result ended up looking pretty good. Mount with rivnut bolted to spot for the Wagner bracket. 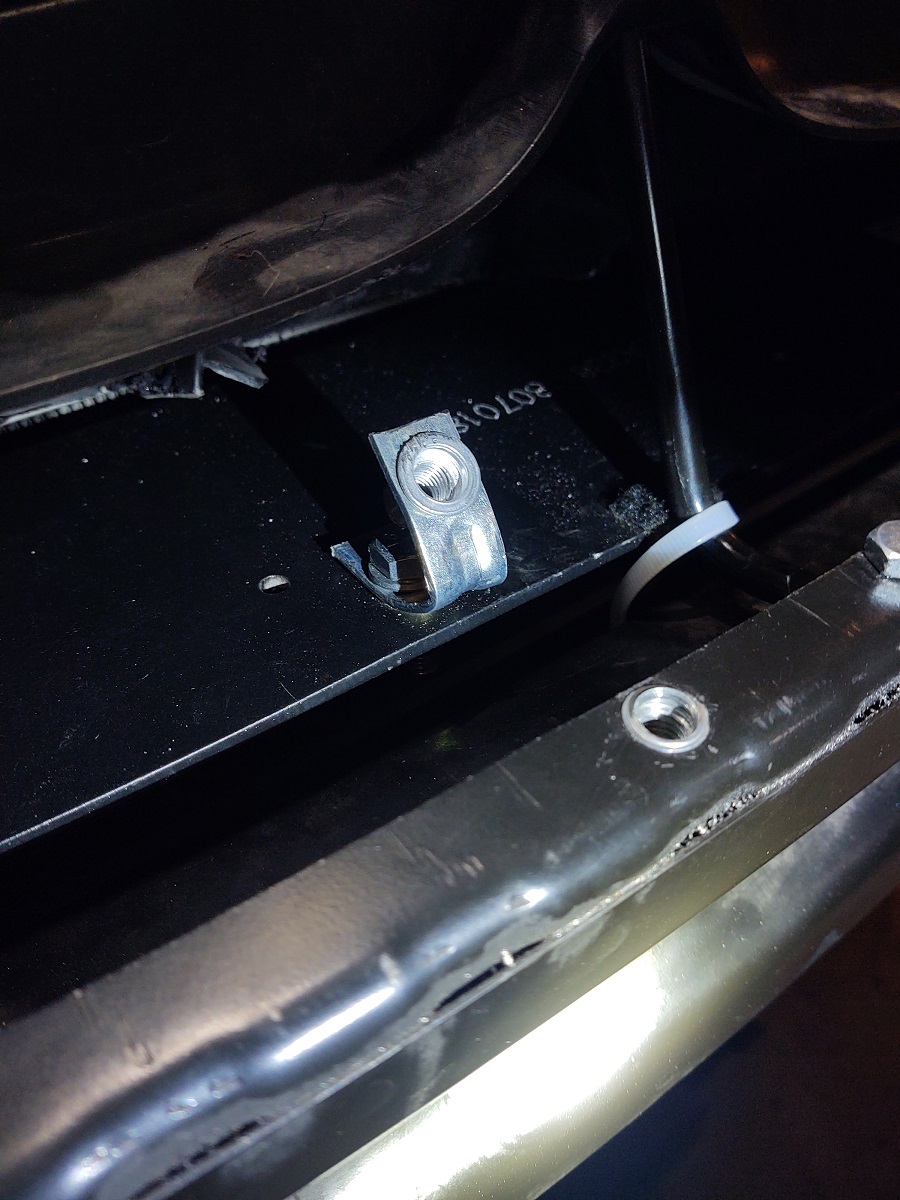 L-bracket on bumper. 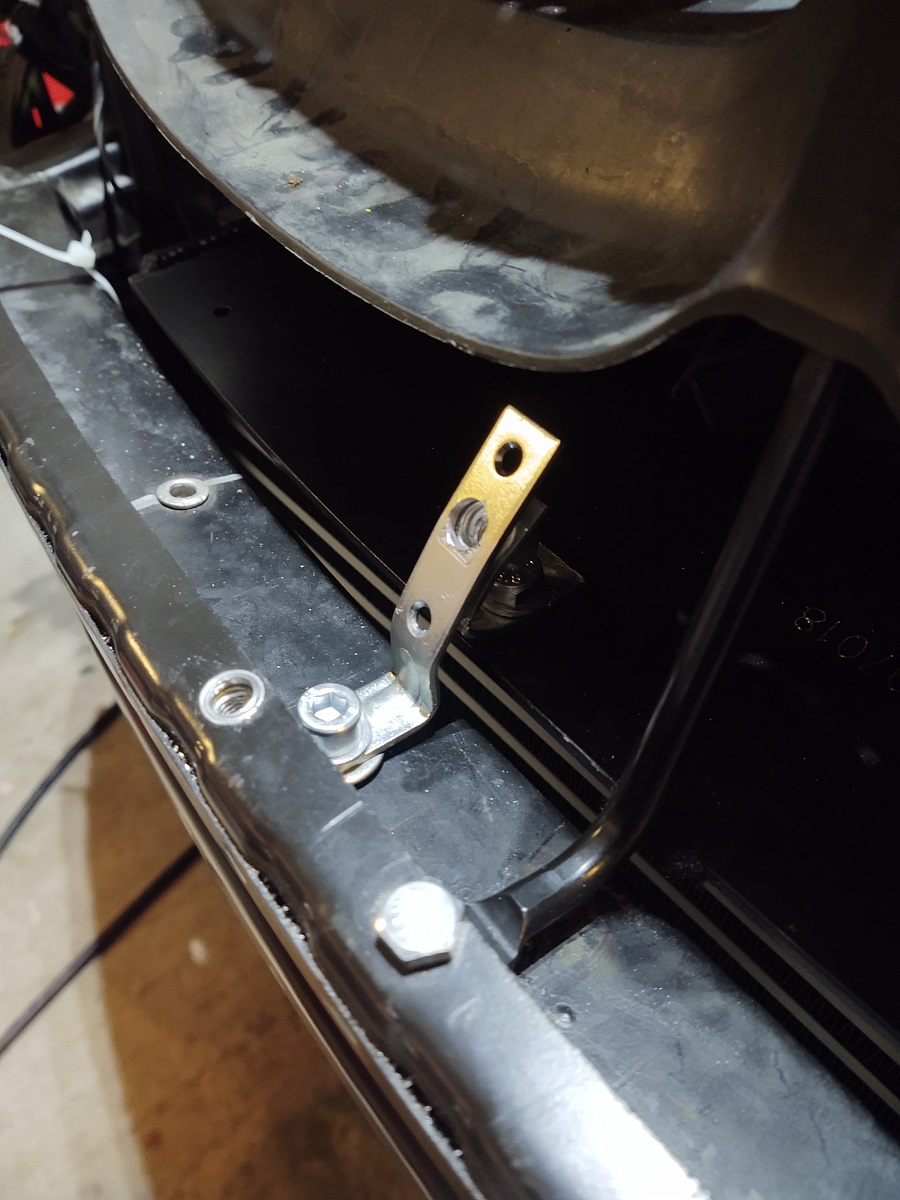 Test fit with bolt and offset. End result used a longer bolt for less chance of dropping it inside the bumper cover when removing. 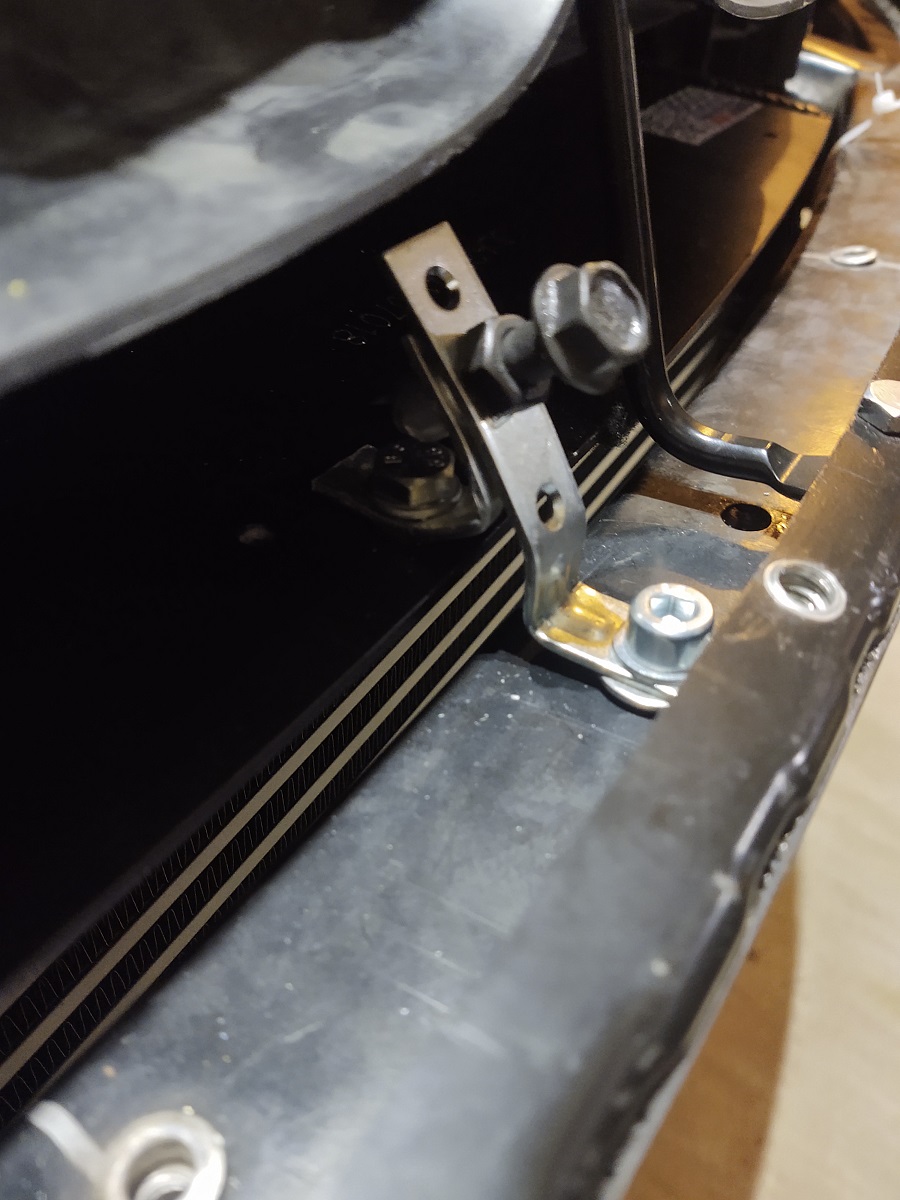 The final bolt configuration. 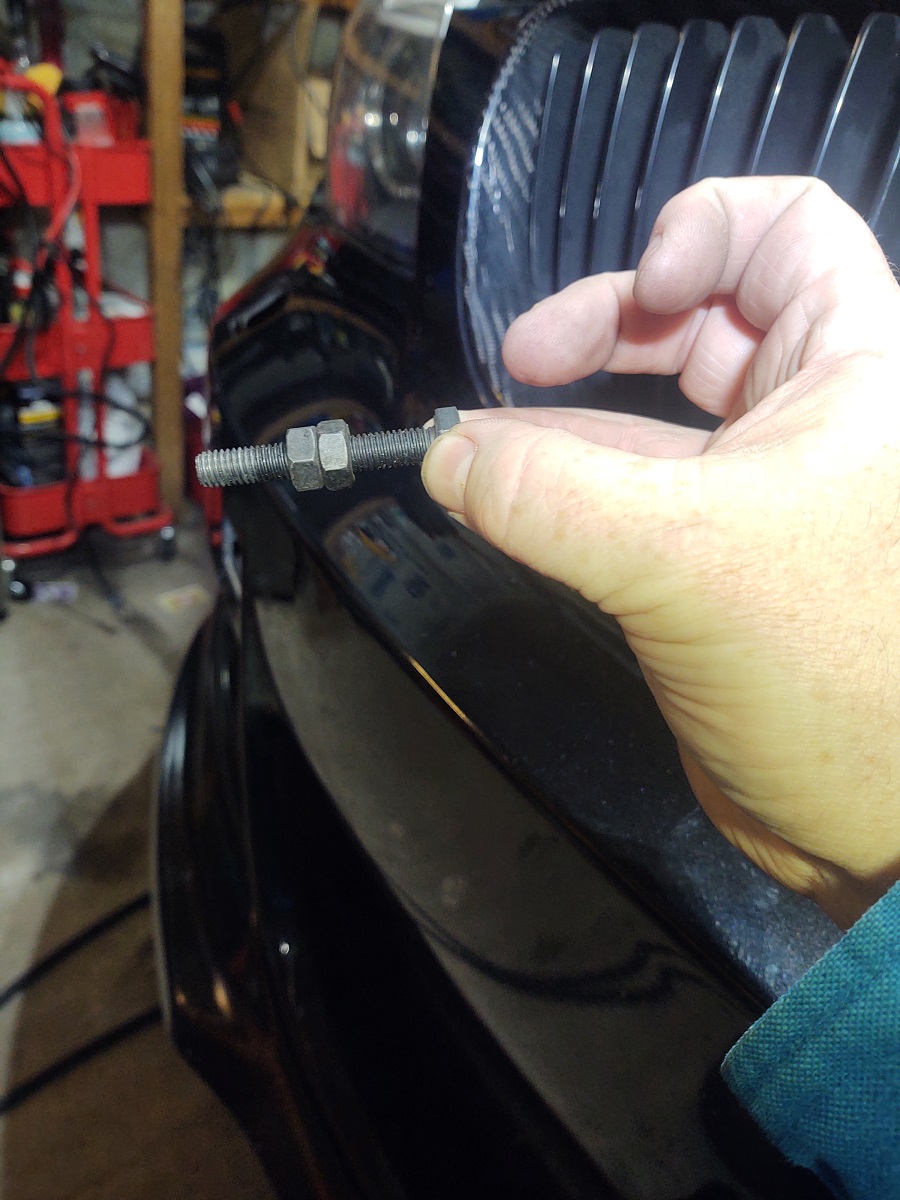 The hole in the bumper cover. This was an iterative process using progressively larger bits, with test fittings in between to ensure alignment. It is on a curved section so was a little challenging. 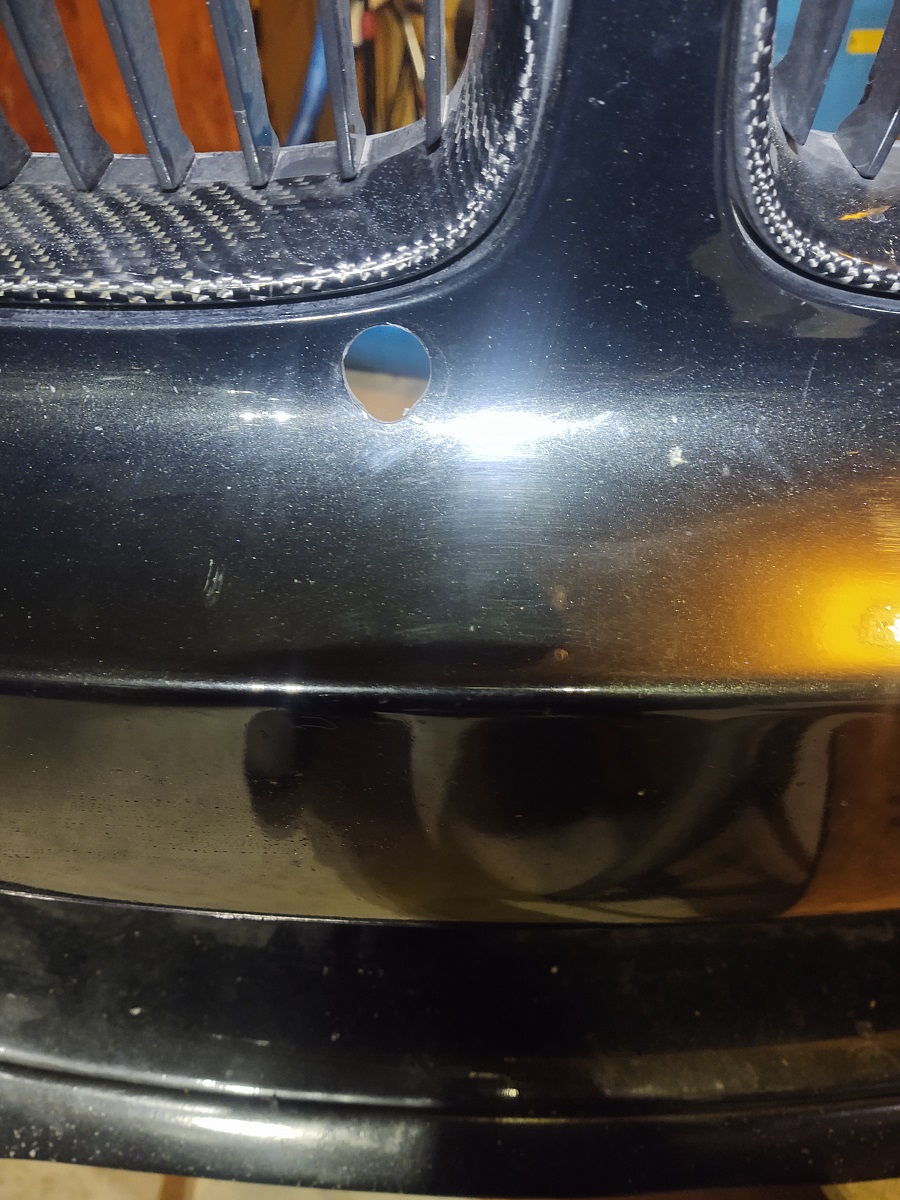 This is what the bolt head looks like fully tightened. 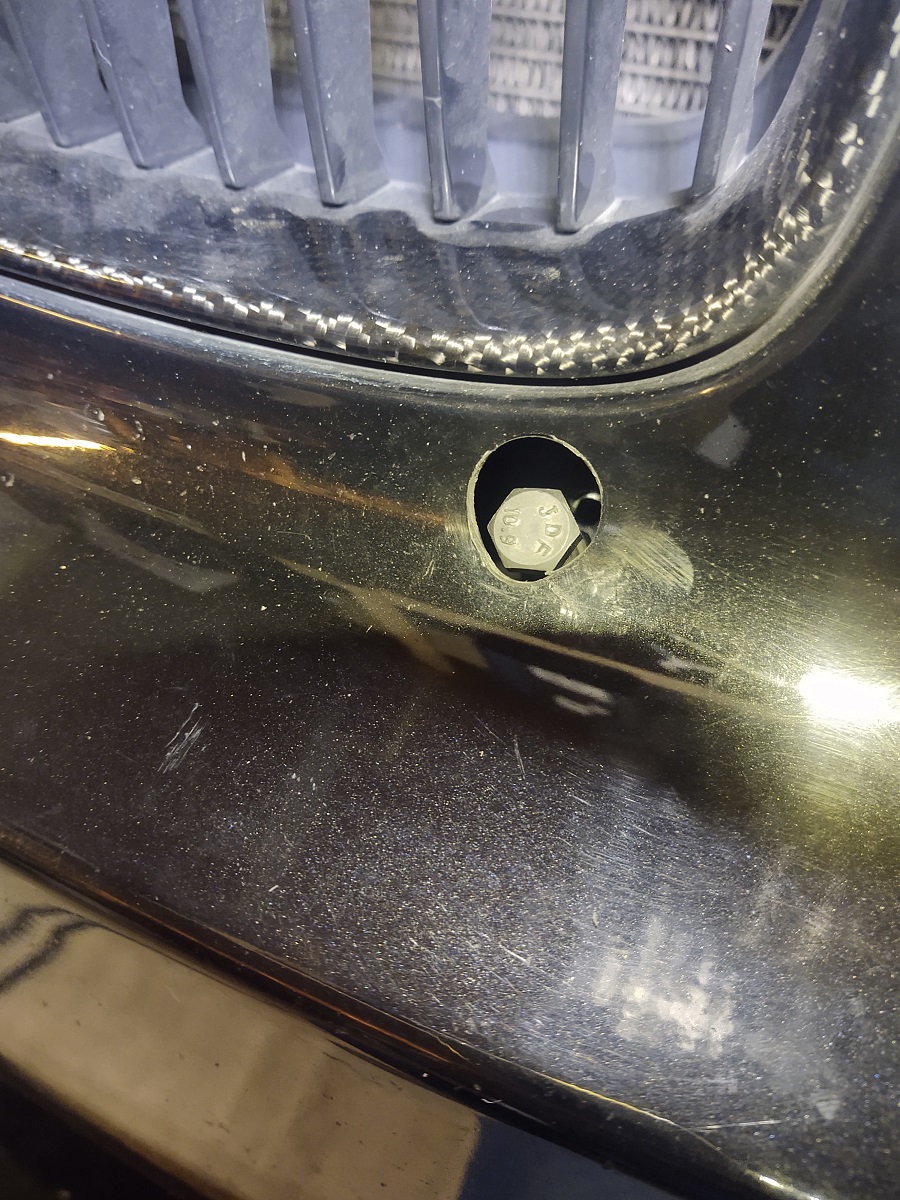 And the socket fits... 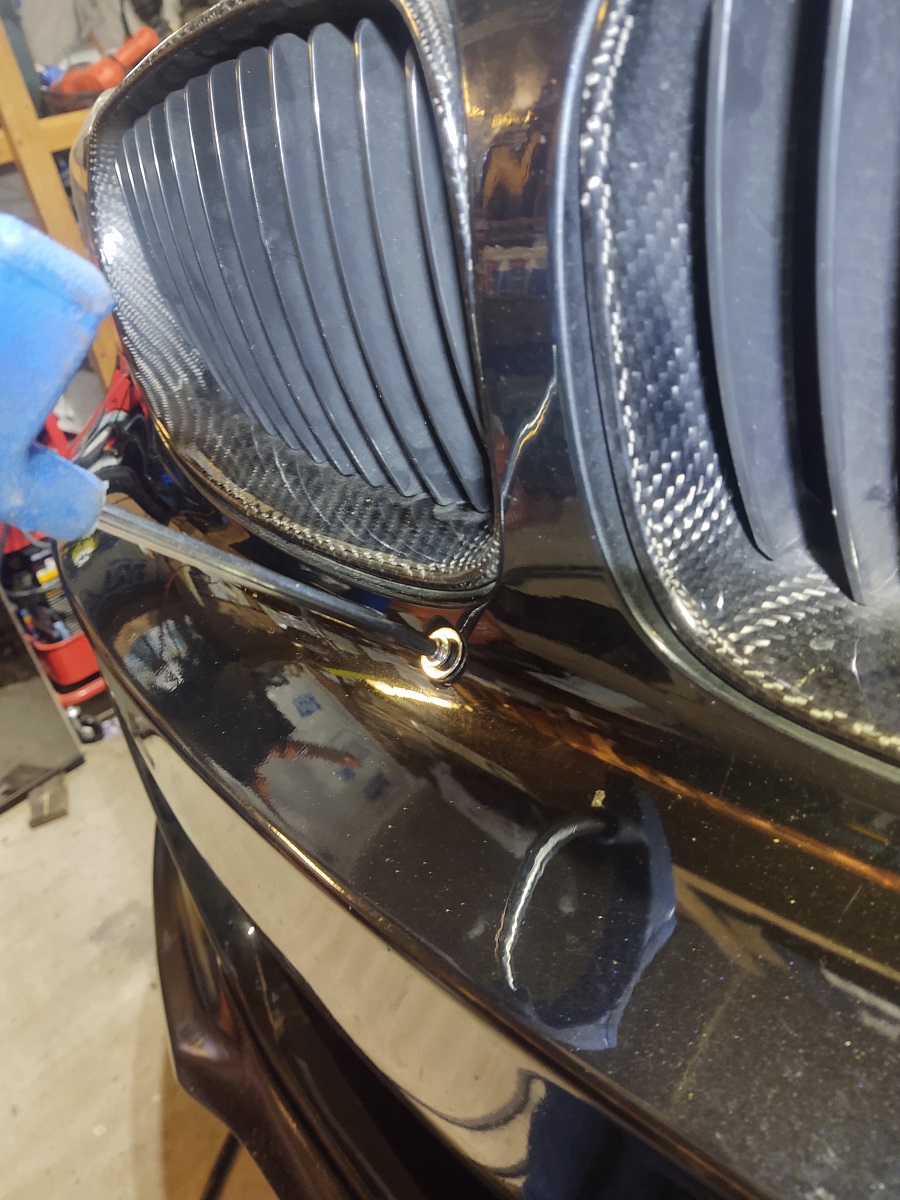 I used a 3/4" ID rubber grommet to close the hole. It is very tight - I had to use a plastic pry tool to assist installing it and removing it. 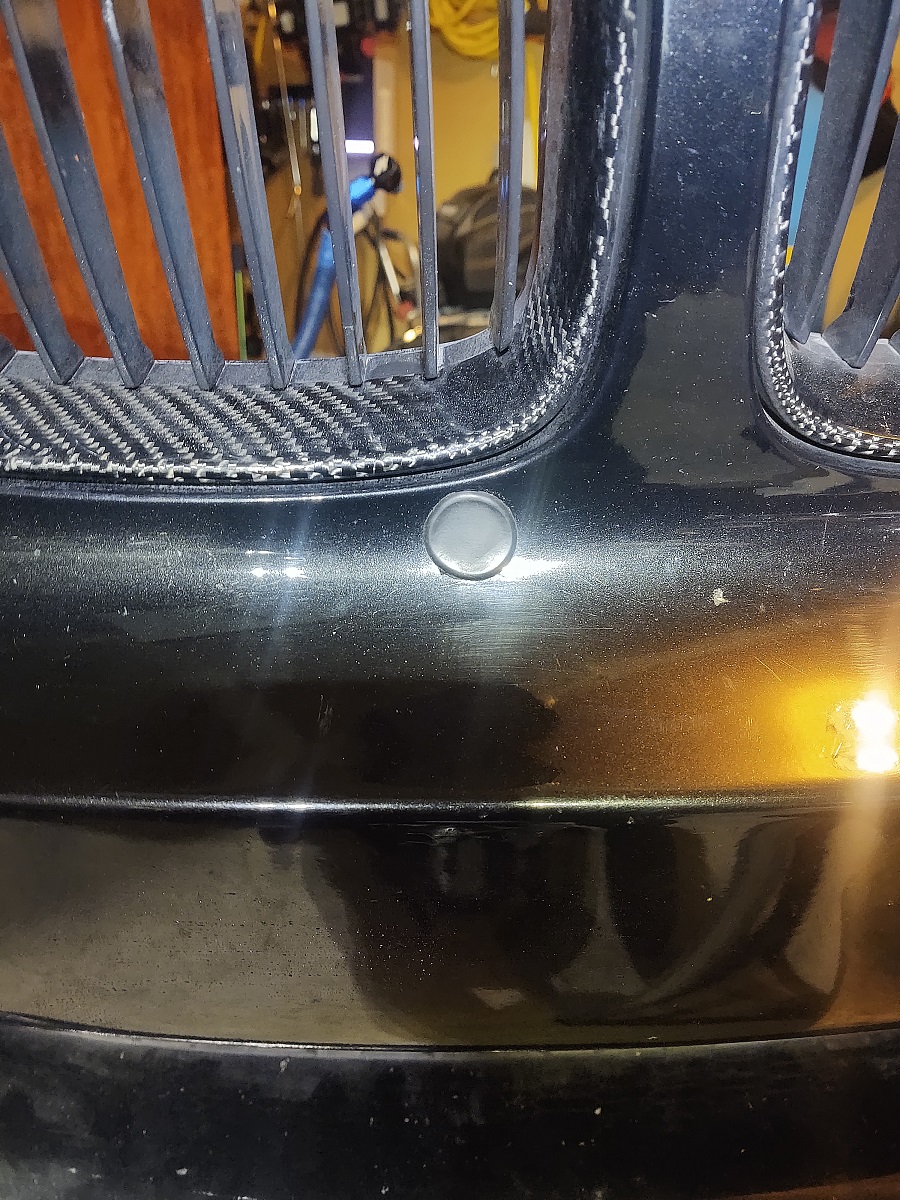 Happily, it could almost pass for one of the various sensors on modern bumpers. So , if you get the Wagner EVO III and don't like the idea of having to remove your bumper cover every time you remove your FMIC, here is one solution.
__________________
Best,
Andy '12 E82-PS2,Stoptechs,Clubsports+M3 bits,Accusump,Wagner DP+EVO III FMIC,ERCP,BMS Intake,Mason Strut Bar,Wedge Tune |
|
Appreciate
1
houtan705.50 |
| 04-12-2021, 09:27 AM | #11 |
|
Supreme Galactic Commander (one galaxy over...)
666
Rep 1,777
Posts |
I almost forgot...I promised to post the revised splitter rod mounts. It is somewhat trivial. Two pics tell the story. I used two rivnuts in the bumper and got two long bolts to replace the short ones that came with the APR mount kit.
__________________
Best,
Andy '12 E82-PS2,Stoptechs,Clubsports+M3 bits,Accusump,Wagner DP+EVO III FMIC,ERCP,BMS Intake,Mason Strut Bar,Wedge Tune |
Post Reply |
| Bookmarks |
| Thread Tools | Search this Thread |
|
|


