

|
|
|
|
|
| 08-11-2013, 03:29 PM | #1 |
|
Major
 
82
Rep 1,051
Posts |
DIY: Whiteline rear subframe inserts
edit: new imgur gallery link in case img links break or do not load:
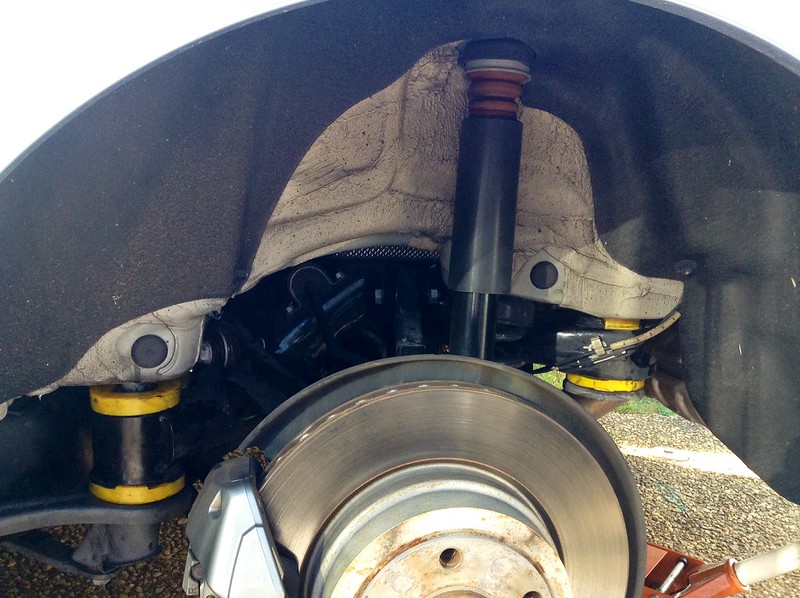
View post on imgur.comPicked up a set of Whiteline rear subframe inserts after reading the thread in suspension subforum. Decided not to go with the full M3 set due to labor involved. It looks like these should actually do a really good job anyway. This is a DIY for a home install with no lift. Shouldn't really matter, though. Special tools needed: E18 female torx. Had to hunt for one of these. 16mm ratcheting crescent wrench would be super nice, but not required. Here are the inserts before install. This is the rear pair with a subframe bolt sticking through to show approximately how they sit when installed. I think I actually got them rotated 90 degrees out, but you get the general idea. The extra single piece on the top left is the other side rear bottom insert turned bottom up.  To get started, chock your front tires, lift the rear of the car with your jack on the differential. Put your jackstands in place. If you don't have any I suggest getting some BMW jackstand adapters. Take off the rear tires, it will make life a LOT easier especially if you have no lift. Leave the jack in place under the differential as it will keep load off the subframe bolts. Take out the two rear subframe bolts with an E18 bit (18mm female torx). They should come out by hand after you get them started.  Back to the front, you'll have to take two 16mm bolts out of a extra diagonal bracket that connects the front of the subframe to the chassis.  The bolts are hidden and a pain in the ass to get to. You can use a 16mm crescent wrench or take some of the plastic off. This is immediately in front of the rear tire.  I think you really need to full remove them to get enough droop to fit the inserts in. Once those two bolts are out on each side, loosen the front subframe bolts. You'll need an extension to fit up into the mount bracket. Same E18 bolt head as the rear subframe bolts. I'd loosen them all the way then put them back about 3-4 full turns. With a jack under the rear you might be able to just remove them, but I left them in place to help keep the subframe aligned. Now back to the rear subframe bolts. Lower your jack until you have room to place the upper rear subframe insert in. Grease it up (I lost the grease that came with the pack, just used some general purpose grease), and insert it. The rear upper has the skirts facing inside and outside, not front to back. It really only goes in one way, but pay attention.  Once both sides are in, grease up the rear lower, push it in (there are "keys" on the bottom outside edge that match up with the subframe so you can rotate it correctly). Jack the diff back up so you can get the rear subframe bolts back in 3-4 full turns on both sides. Back to the front mounts, fully remove the subframe bolts. Lower the jack off the differential. There should be just enough room to slide in the inserts. I started with the top. This one was tricky to correctly align. I believe the skirts go front and back, and the block that hide under the rim go to the sides. Sorry, not 100% sure, forgot already, but you should put your finger in there and try to match the shapes correctly. I think this picture shows the skirts towards the sides but I ended up installing it rotated 90 degrees from this picture (this is passenger/right side). Sorry, I don't recall exactly how they have to be rotated. It's not obvious, so jam your finger in the top and see which way fits right. The front upper insert is the only one that is not obvious.  Again, grease them up, and you'll have to kind of jam them in. Be very careful that the fingers do not get bent over. Make sure then go straight into the bushing. I had to jam them in a bit due to clearance as the front of the subframe doesn't like to sag enough to make it easy. The bottom front insert is easy to align because there is a "key" that matches with the subframe as seen here, just like the rear bottom inserts (bottom front passenger side subframe insert here):  Once in, put your front subframe bolts back in, tighten, then put the two 16mm brace bolts back in, and if you removed the plastic reinstall. Go back to the rear subframe bolts and tighten those. Try to keep an eye on the outer exposed lip of the inserts so they do not fold under. I had to use a small flathead to keep the lip from folding under itself on a few spots on the top inserts, both front and back. Lower jack, re-torque all your subframe bolts, put your wheels back on, jack the car back off your jackstands, remove jackstands, lower car, and you should be good! I may go back and check torque again later to see if the subframe settles any.
__________________
2009 BMW 135i 6MT Sport, AFE intake, Cobb AP, Apex 18x8.5+9.5, 255/275 PSS
Last edited by Freon; 11-28-2018 at 09:31 PM.. Reason: fixing images Nov 2018 |
| 08-11-2013, 04:23 PM | #2 |
|
First Lieutenant
 150
Rep 373
Posts |
Perfect timing. Thanks for the DIY. Looks pretty straight forward. Can you tell us who you bought them from and how long did it take to get them once ordered?
Thanks. |
|
Appreciate
0
|
| 08-11-2013, 04:30 PM | #3 |
|
Major
82
Rep 1,051
Posts |
http://www.aftermarketsuspensionpart...sp?prod=KDT918
They were super quick with shipping. I think it only took 3 or 4 business days. It is pretty straight forward. 1/5 difficulty. Whiteline includes instructions and grease. Their instructions are pretty good and include photos (you can see them in the first pic). My DIY is pretty much their instructions but I don't think they mention using a jack on the diff or the front bracket piece (also missing from pics). The instructions are labeled E90, so the E90 must not have that extra bracket that ties the subframe to the chassis.
__________________
2009 BMW 135i 6MT Sport, AFE intake, Cobb AP, Apex 18x8.5+9.5, 255/275 PSS
Last edited by Freon; 08-11-2013 at 04:39 PM.. |
|
Appreciate
0
|
| 08-11-2013, 05:44 PM | #5 |
|
Brigadier General
 373
Rep 3,550
Posts |
Thanks for the DIY. The price is certainly reasonable. Did they improve handling?
__________________
128i Convertible, MT, Alpine White, Black Top, Taupe Leatherette, Walnut, Sport
Ordered 5/22/09, Completed 6/4/09, At Port 6/9/09, On the Georgia Highway 6/13/09, Ship Arrived Charleston 6/24/09 at 10pm, PCD 7/21/09  |
|
Appreciate
0
|
| 08-12-2013, 10:12 AM | #6 |
|
Major
82
Rep 1,051
Posts |
There is one turn I make every day on the way to work, left hand turn onto a road with a fair amount of crest. It always felt before like as I went over the crest in the road the car kind of "flopped" over before it settled. There was that sort of mushy center to the car that took a second to resolve. A lot of that is gone now. I imagine the remainder is due to the other bushings that still have slop in them, both front and rear.
There is no increase in NVH either that I can tell. Maybe a tiny bit more of a thud or thump gets transmitted to the chassis when shifting hard, but nothing while just driving around or even in corners.
__________________
2009 BMW 135i 6MT Sport, AFE intake, Cobb AP, Apex 18x8.5+9.5, 255/275 PSS
|
|
Appreciate
0
|
| 08-12-2013, 11:39 AM | #7 |
|
First Lieutenant
150
Rep 373
Posts |
Ordered yesterday, shipped today will be here by thursday and i will install on Friday. If I can get rid of half the slop/shake I will be happy with the $53.00 purchase.
|
|
Appreciate
0
|
| 08-13-2013, 09:40 AM | #8 |
|
Major
998
Rep 1,495
Posts |
Thanks for the DIY! Trying to decide between these or the stiffer (albeit more $$$) black Powerflex inserts.
__________________
Then - E53, E85, E92, E82, F15, F80, G01
Now - F97, Macan S |
|
Appreciate
0
|
| 08-13-2013, 09:54 AM | #9 | |
|
First Lieutenant
150
Rep 373
Posts |
Quote:
I am very familiar with the rear end dynamics and will be able to tell the difference quite easily once installed. I should have them installed on Friday and will report back. |
|
|
Appreciate
0
|
| 08-13-2013, 10:06 AM | #10 | |
|
Major
998
Rep 1,495
Posts |
Quote:
__________________
Then - E53, E85, E92, E82, F15, F80, G01
Now - F97, Macan S |
|
|
Appreciate
0
|
| 08-13-2013, 12:57 PM | #11 |
|
Private First Class
 30
Rep 151
Posts |
Nicely done Freon and great DIY instructions.
I have the Whiteline inserts installed about a month ago and I think it's great value/performance. Really tights the rear a lot. I do have other pieces such as M3 FSB and Dinan suspension kit that help as well. The inserts just ties everything together nicely. |
|
Appreciate
0
|
| 08-15-2013, 10:19 AM | #13 | |
|
!
742
Rep 3,267
Posts |
Quote:
__________________
____________________________ |
|
|
Appreciate
0
|
| 08-15-2013, 01:41 PM | #14 |
|
Major
82
Rep 1,051
Posts |
I got this set which covers from E4 up to E20:
http://www.amazon.com/gp/product/B0002SQEW8/ The steering rack is E12 and I imagine there are other uses of E-torx bolts, so I decided just to get an entire set. The local auto parts stores only had up to E16 so I had to order them off the internet. Also after getting some more driving time in I notice less slop when I start to accelerate hard out of turns. I am more confident when applying throttle when unrolling the steering wheel and accelerating out of turns. Also, on very tight corners there seems to be less wheel hop on the inside tire when accelerating hard. Again, it's not like it fixes all the slop in all the bushings or the soft stock suspension, but it helps a ton. For the money and effort a great mod.
__________________
2009 BMW 135i 6MT Sport, AFE intake, Cobb AP, Apex 18x8.5+9.5, 255/275 PSS
|
|
Appreciate
0
|
| 08-15-2013, 01:46 PM | #15 |
|
First Lieutenant
150
Rep 373
Posts |
Borrowed one from a friend. I'll order one now so I have it.
So I finished the install and its pretty much as Freon said. The rears are simple and the fronts are slightly hard to get the upper bushing in. And be carefull becuse the front upper looks like it can install in 2 directions but there is only one right way. That being said it took me about 1.5 hours total from pull in the garage to back on the wheels. I did a test drive of about 10 miles on some smooth and bumpy roads. I can tell you that the subframe is now more located and has considerable less movement. I did not notice the "second" set taking place as it would before. Is there a little bit of subframe movement? Yes but it is minor and is what you would feel in a car that is properly bushed. I have yet to corner over any bumps so my take on the "subframe steer" is non existent at this point. But my first impressions are these inserts are worth the price and effort. I have never been a fan of inserts but in this case they work quite well and are a good alternative price wise to the M3 bits. I have not driven a car with the M3 bushings so I can't compare them. If this is what the M3 bushings would have felt like I would have been happy with the results. After I put some more miles on them I will give an update. There is a particular corner with RR tracks that has always upset the rear of the car and should be a good indicator of how the inserts are performing. So far the dynamics of the rear end are much better and at this point I would recomend them as a sound alternative. I ordered them from the link that Freon posted and they arrived yesterday, ordered on Sunday. So quite fast and in stock. |
|
Appreciate
0
|
| 08-15-2013, 02:52 PM | #16 | |
|
!
742
Rep 3,267
Posts |
Quote:
Anyway, thanks everyone for install info, impressions, etc.
__________________
____________________________ |
|
|
Appreciate
0
|
| 08-23-2013, 12:31 AM | #18 | |
|
Private
 4
Rep 82
Posts |
Quote:
Still a bit premature for me but I'd more or less fully agree with this post. It's not an amazing transformation, but a good improvement & I'm not one to try and justify something to myself just because I paid $$$. NVH is hardly any more, slight however. The inserts are enough for me to now realise my rear wheels need a balance - didn't notice any wheel vibration before the inserts. Over bad quality roads the rear doesn't feel as mushy..I'd say it's 30% improvement.. For the price you can’t go wrong, it's completely worth it. I've been in a car with M3 bushings (and coilovers unfortunately) so I can't draw a direct comparison however I can't see the M3 bushings being a night and day difference over these (and worth the extra $500 at least?). Suspension wise I'm completely stock, and running decent street rubber (non-rft's) Simon Last edited by sliderpass; 08-23-2013 at 12:40 AM.. |
|
|
Appreciate
0
|
| 08-29-2013, 03:18 PM | #19 |
|
First Lieutenant
150
Rep 373
Posts |
So it's been about 2 weeks since I did the install and my impression of the inserts remains the same. The rear is much more stable. Better than 30%. I would say its very acceptable with slight unwanted movements but totally manageable. If this was how the car came from the factory, I doubt we would have many complaints.
I hit the corner with the RR tracks several times in both directions and the car stays pretty settled. Maybe a slight secondary movement but that could be normal due to the tracks in the middle of the corner. Overall I would do this mod again. It really is a no brainer considering the cost and effort it takes to install them. Now I just have to see how they long they last. |
|
Appreciate
0
|
| 09-03-2013, 06:01 AM | #20 |
|
Captain

62
Rep 741
Posts
Drives: E87 130i
Join Date: Jan 2012
Location: Melbourne, AU
|
Fit them. Mine were fitted with M3 arms all round and B14s, I can tell what has done what, subframe doesnt wiggle nor slop. Car feels more connected. Best VFM mod for a 1er.
M3 arms should def be considered too. |
|
Appreciate
0
|
| 10-07-2013, 06:41 AM | #22 |
|
warranty denied.

15
Rep 166
Posts |
i finally got around to installing mine this past weekend. there is definitely a noticable difference, as the car isn't as "bouncy". it only took about an hour and a half to install.
__________________
 |
|
Appreciate
0
|
Post Reply |
| Bookmarks |
|
|


