

|
|
|
|
|
| 02-19-2018, 03:13 PM | #1 |
|
BMW Cool Aide!

906
Rep 841
Posts |
Nav Screen Scratch Repair DIY Pictorial.
There are a few posts about how to repair a scratched Nav Screen. If you take info from each of them the directions can be understood. But I didn't seen any one start to finish post, so here goes.
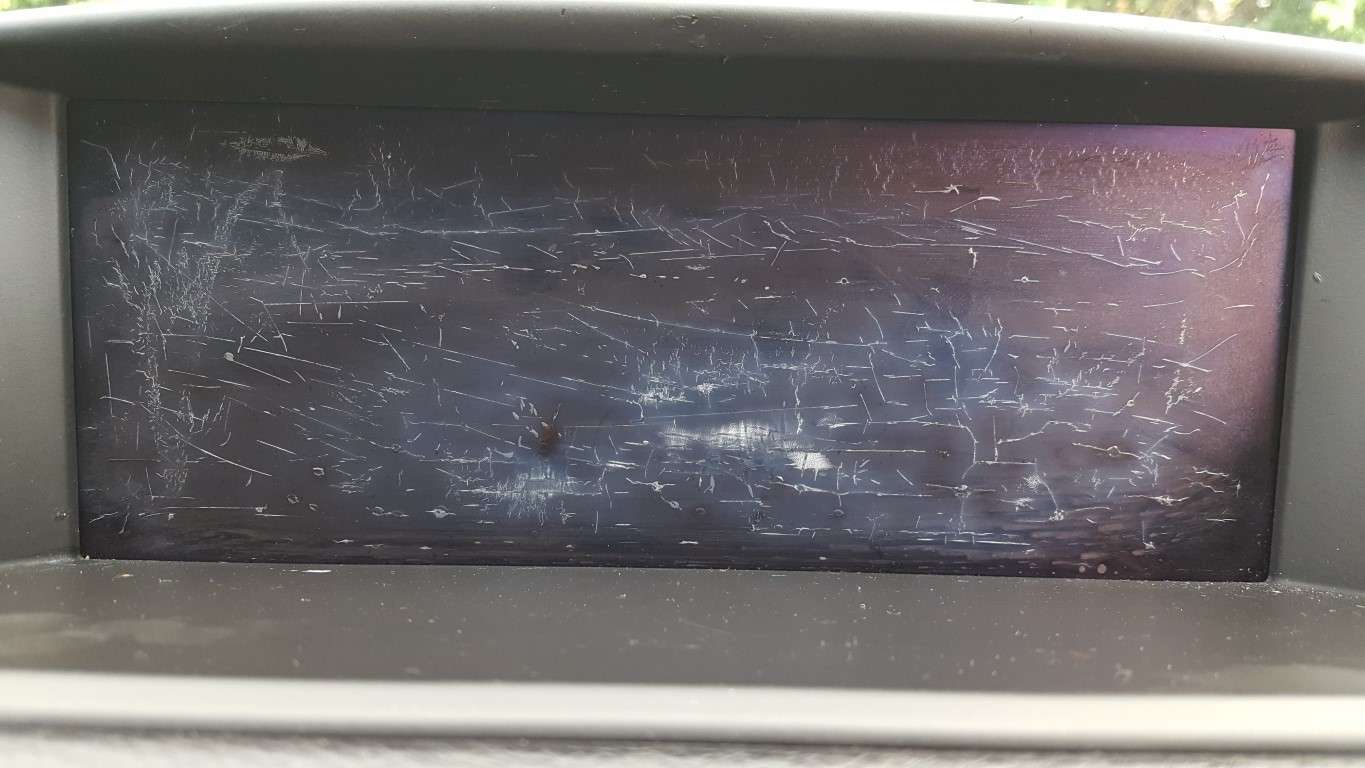
Note that these Nav screens are very easily scratched. The anti-glare coating is super delicate, and BMW is more than happy to sell you a new screen for north of $2000. Instead, it is about an hour job to fix your own, for about $20. First you need some polish. This is the best, and well recommended here and on other forums: https://www.amazon.com/gp/product/B0...?ie=UTF8&psc=1 Next, for some optional, is an anti-glare screen protector: https://www.amazon.com/gp/product/B0...?ie=UTF8&psc=1 It comes with two, you only need one. The process for removing the screen is simple and as follows: Remove the vents by gently prying on the top edge: 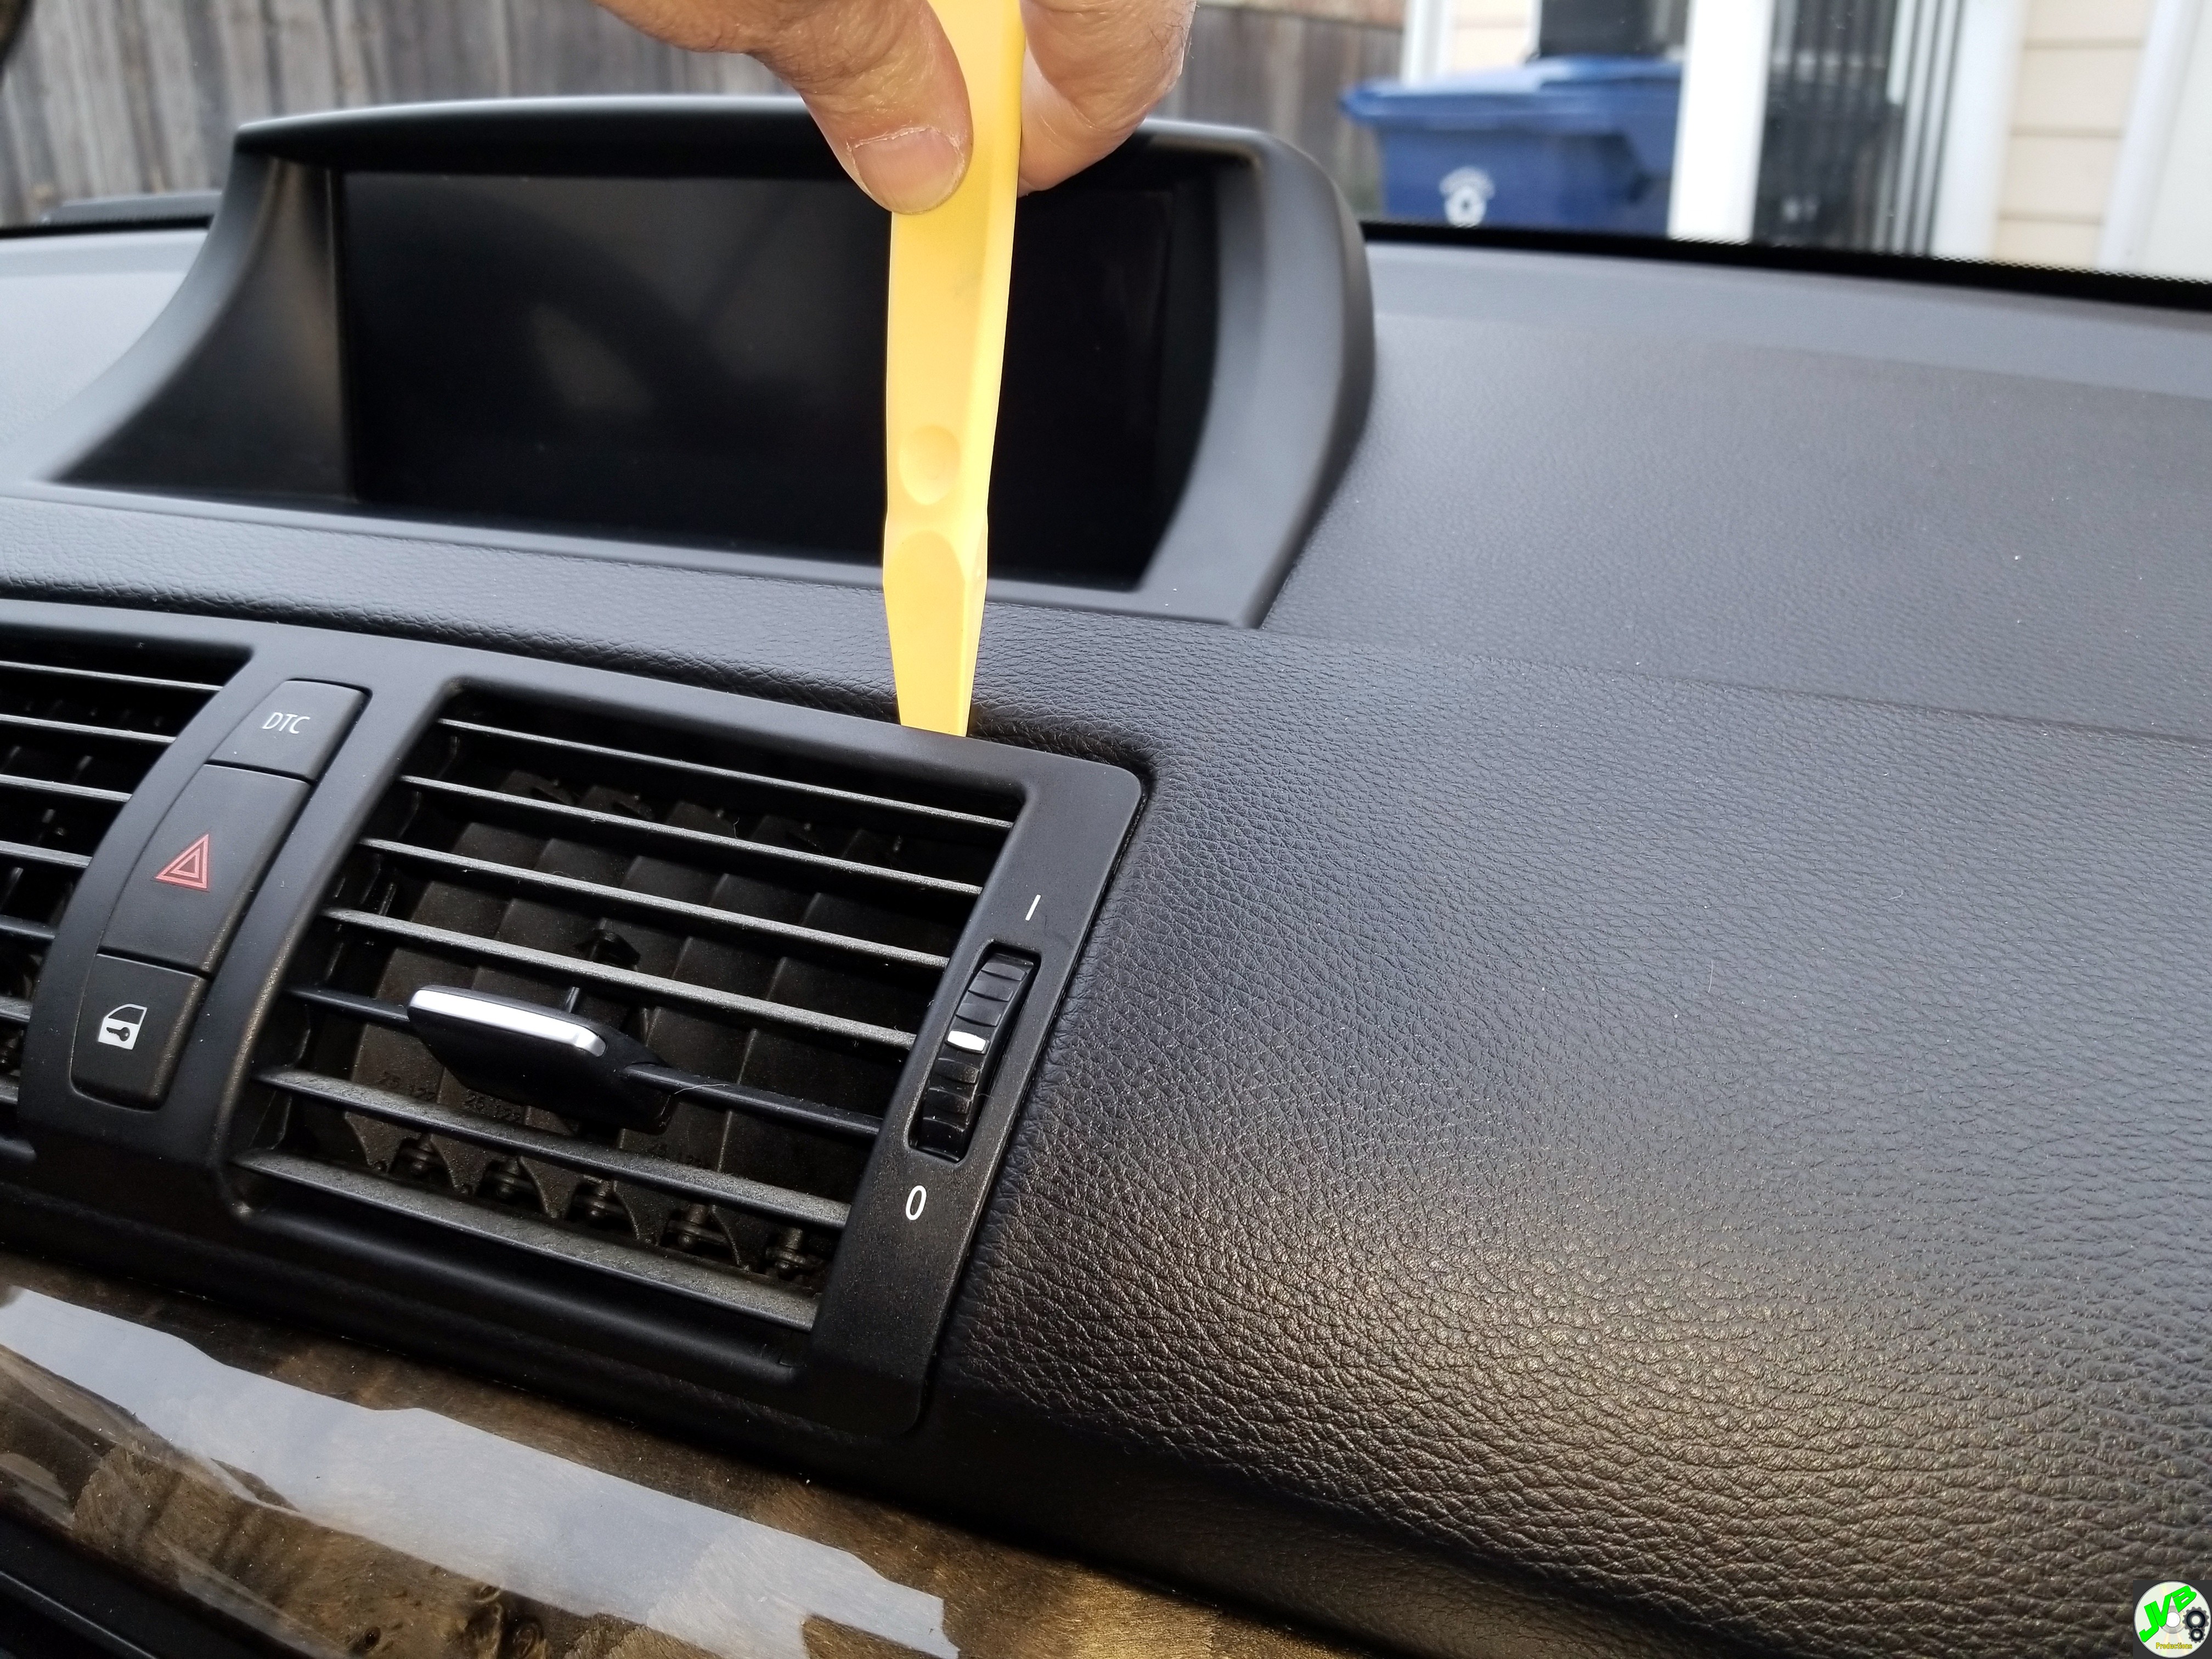 Then pull on top with your fingers. It doesn't take a lot of force:  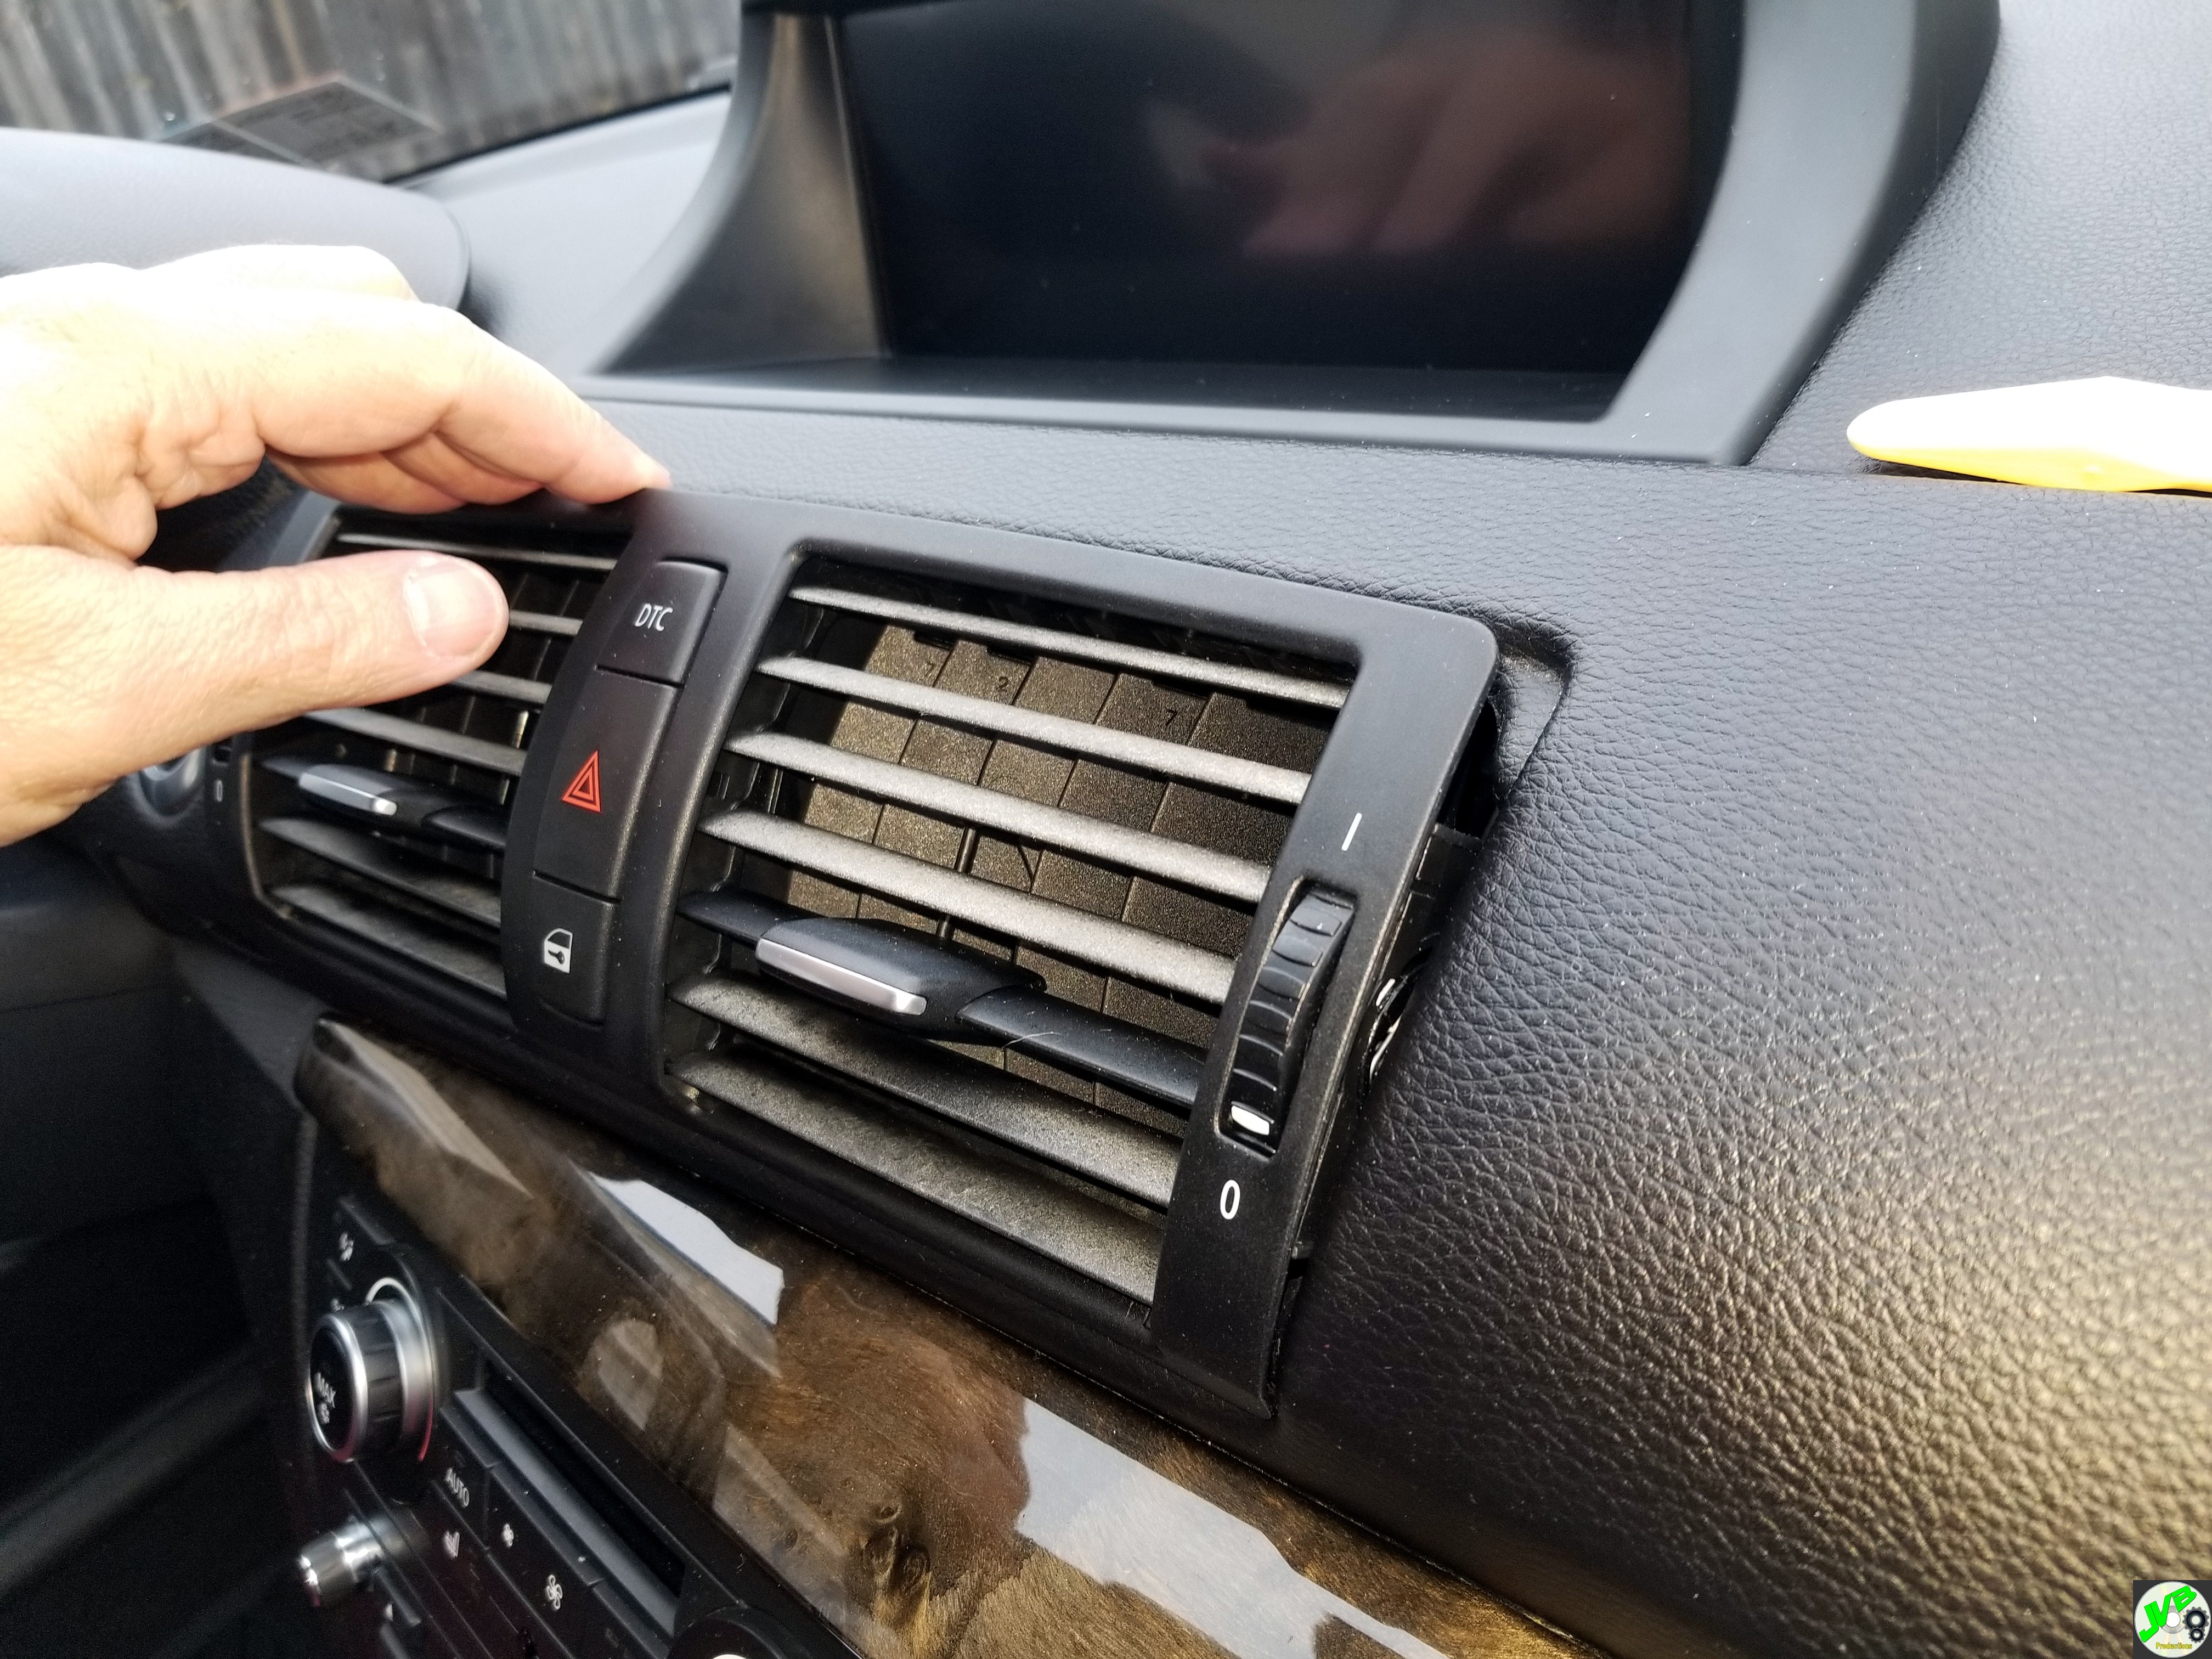 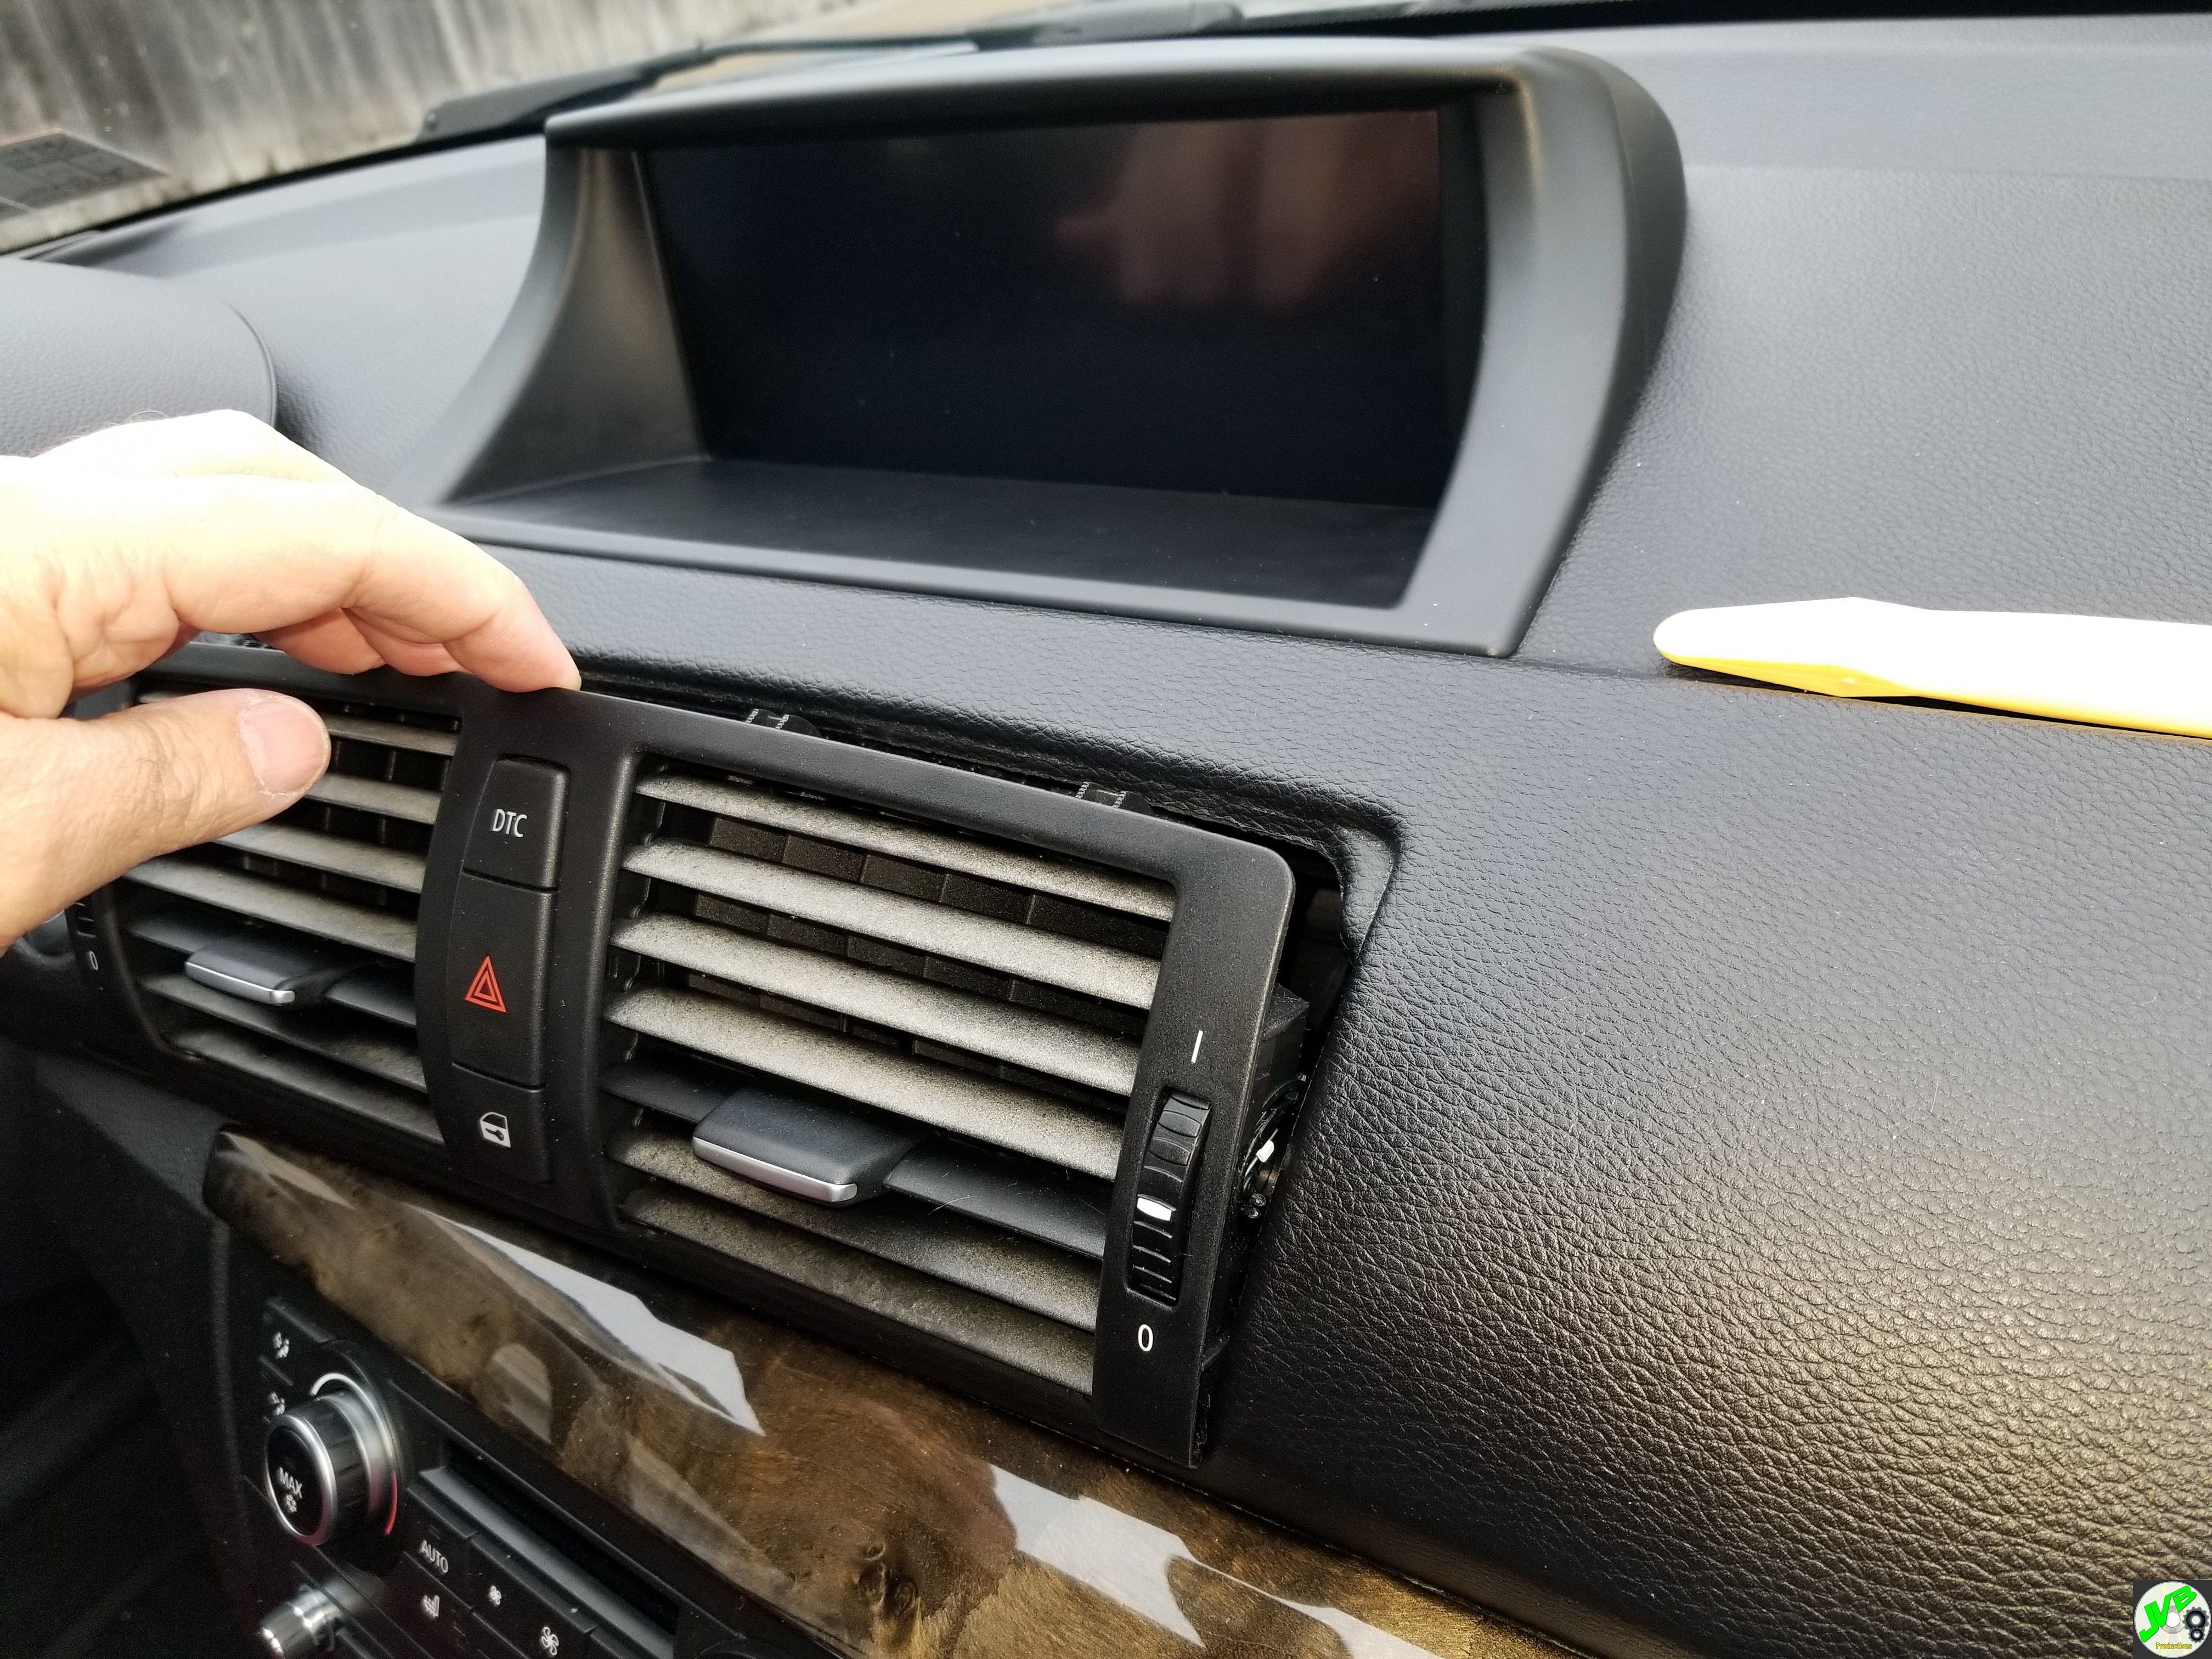 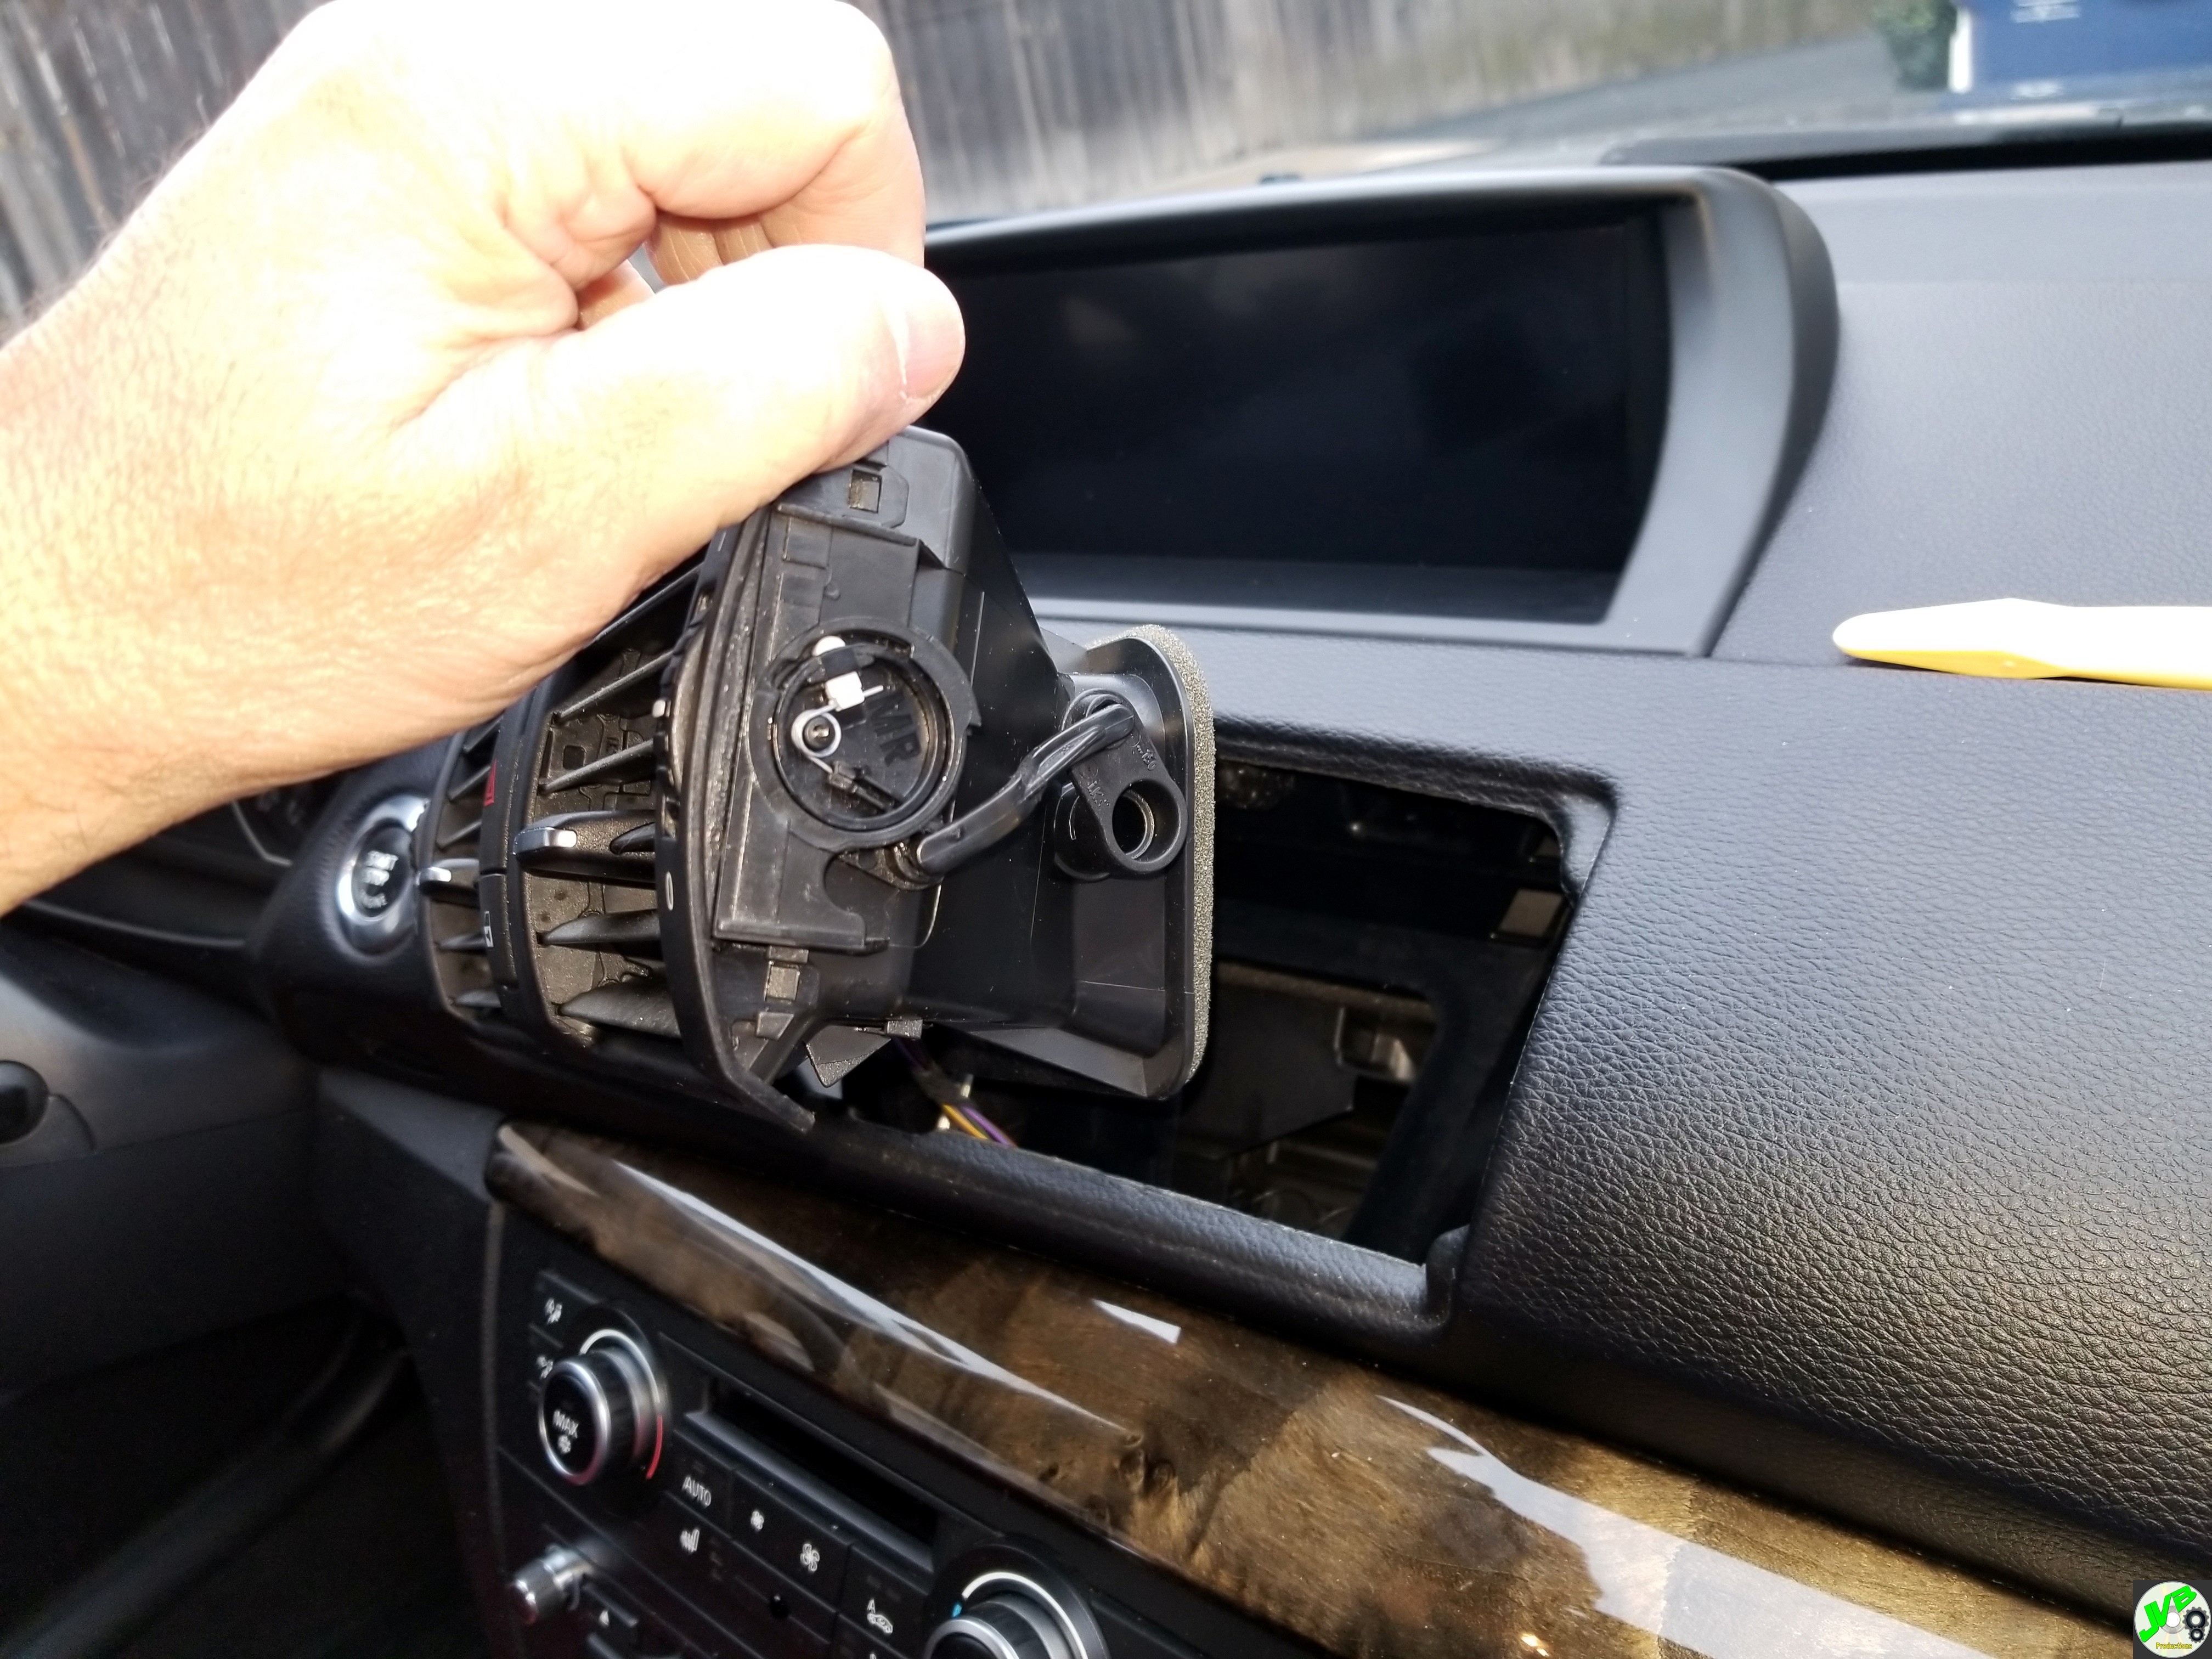 You can unplug it and fully remove it, or just rest it vertically to access the screws that hold the GPS Screen mount in place. You only take out the two screws, green arrows, not the center one with the red X. These are T-20 screws. 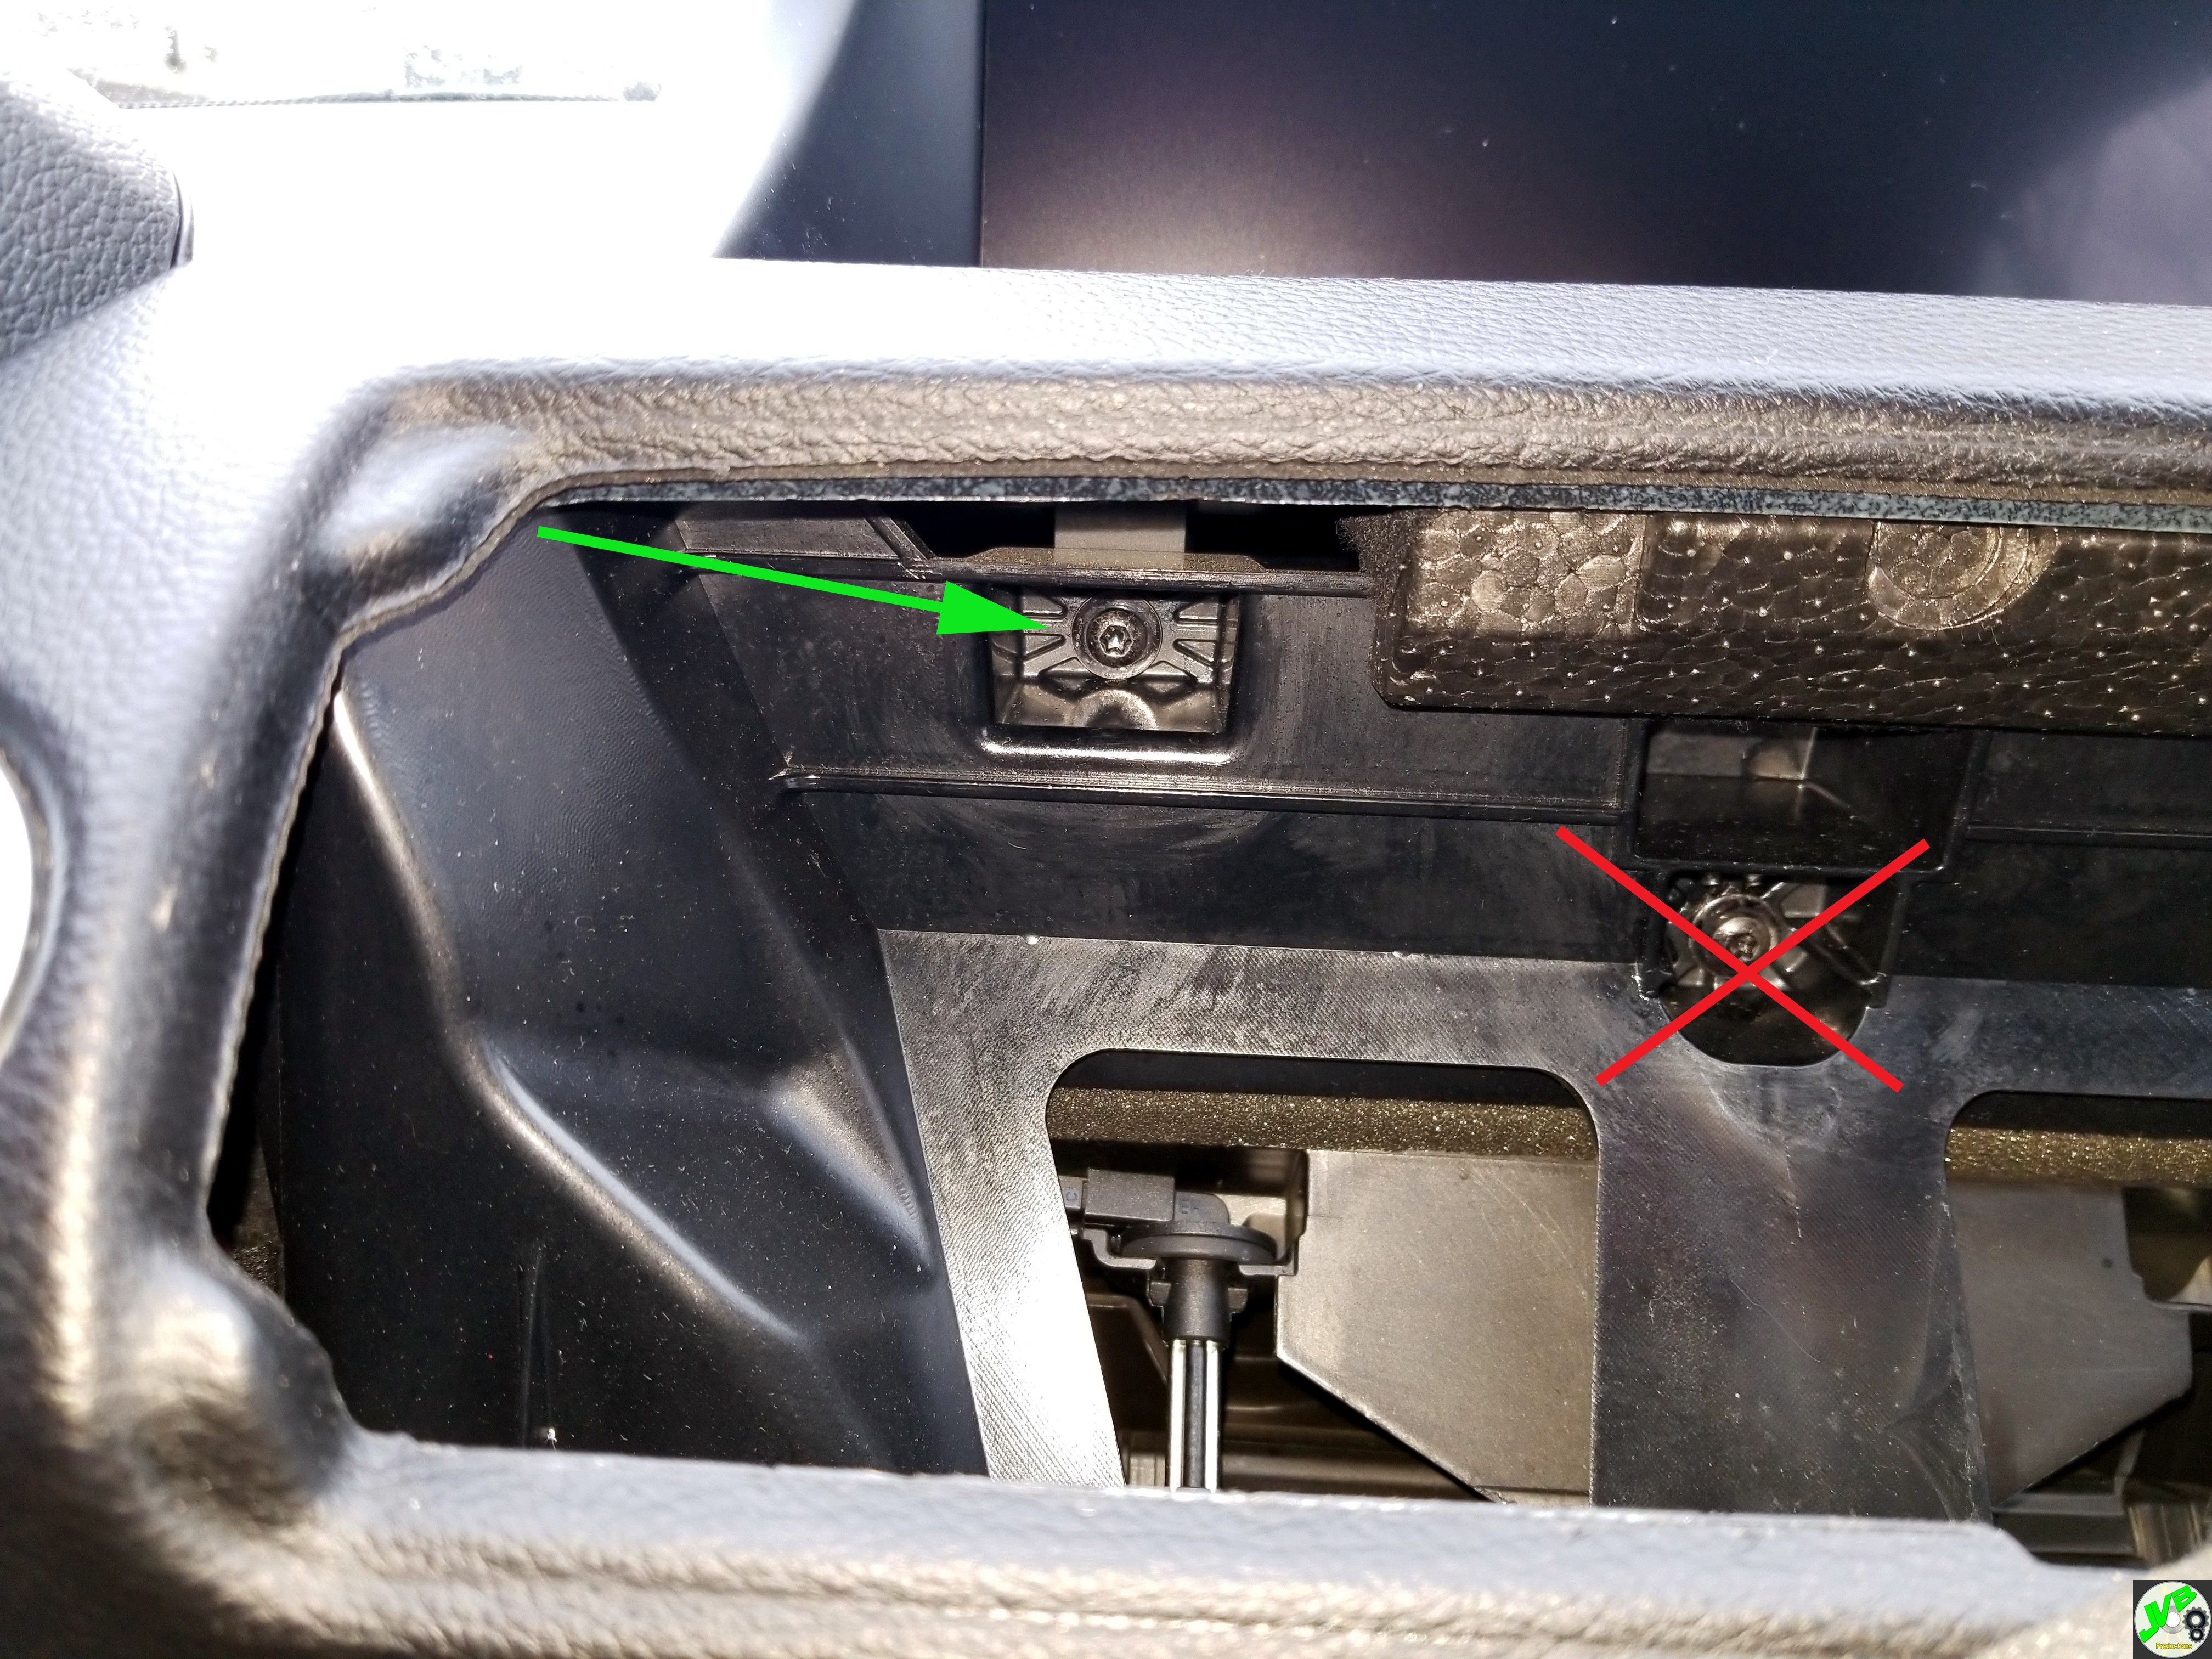 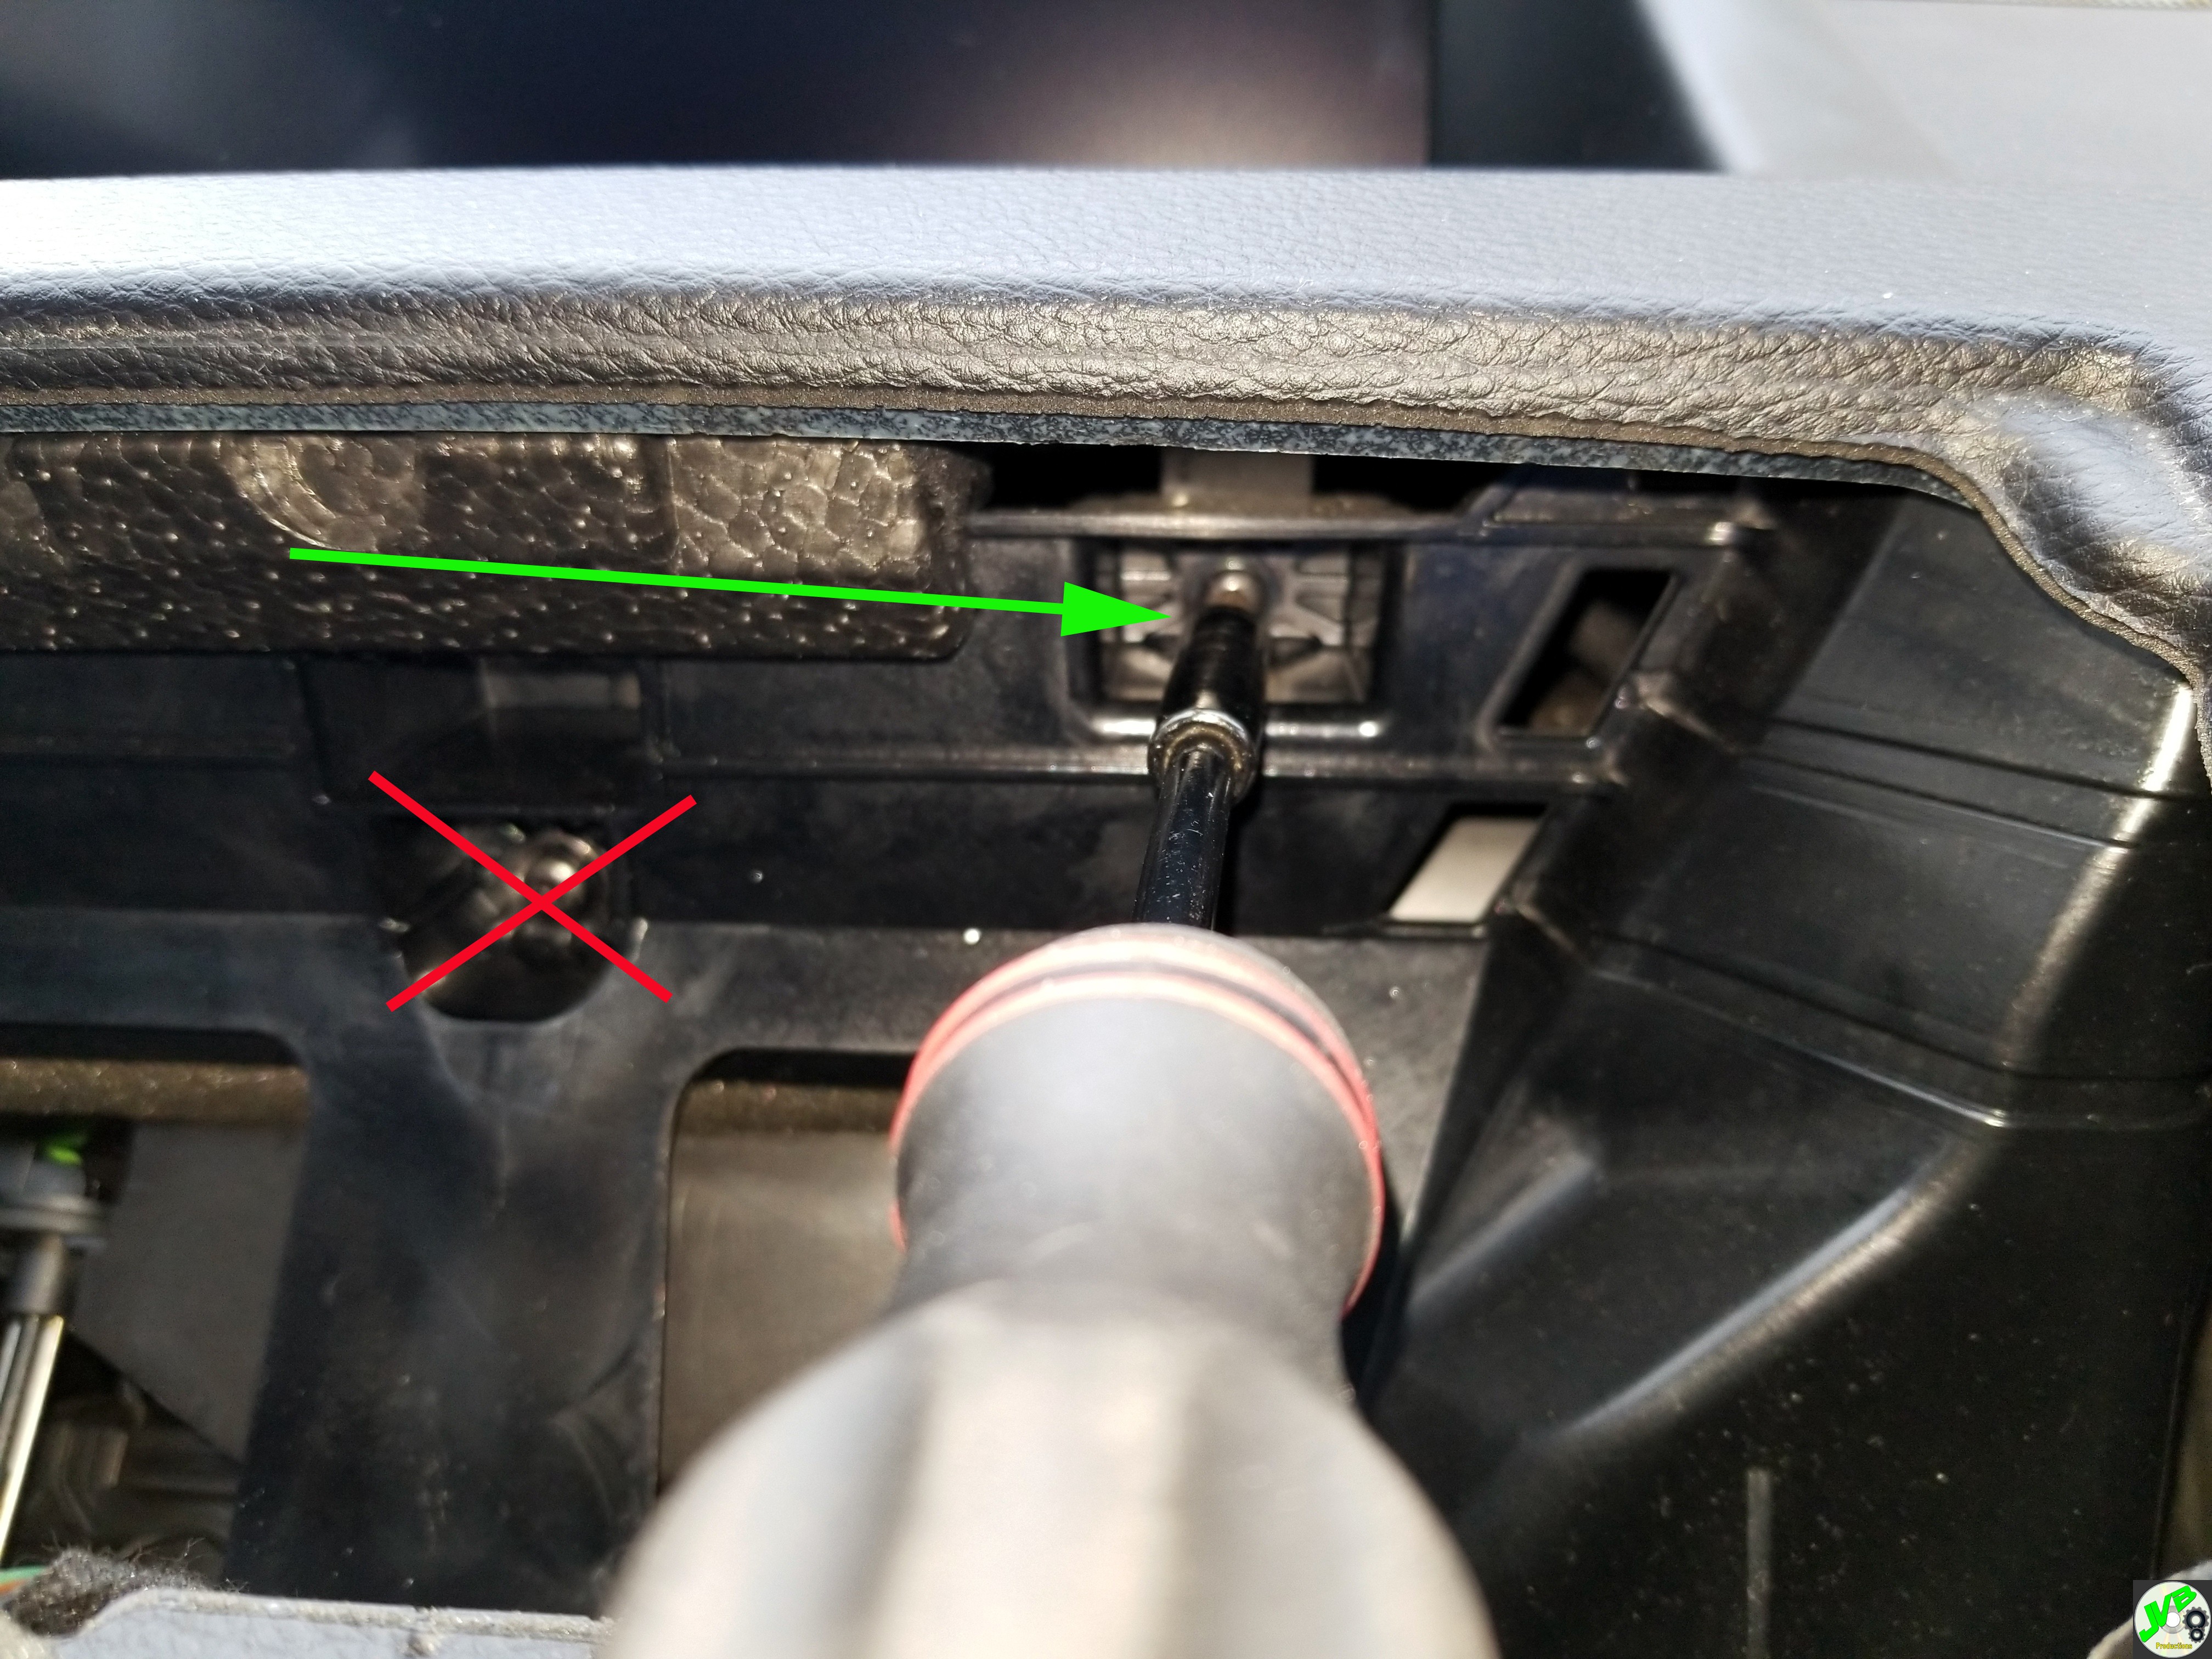 This allows you to lift it out by pulling directly up. Unplug both plugs. The white one has a secondary plug away from the unit. The purple one has to be unplugged at the unit. Lush in on the little tab, then pry it gently out. 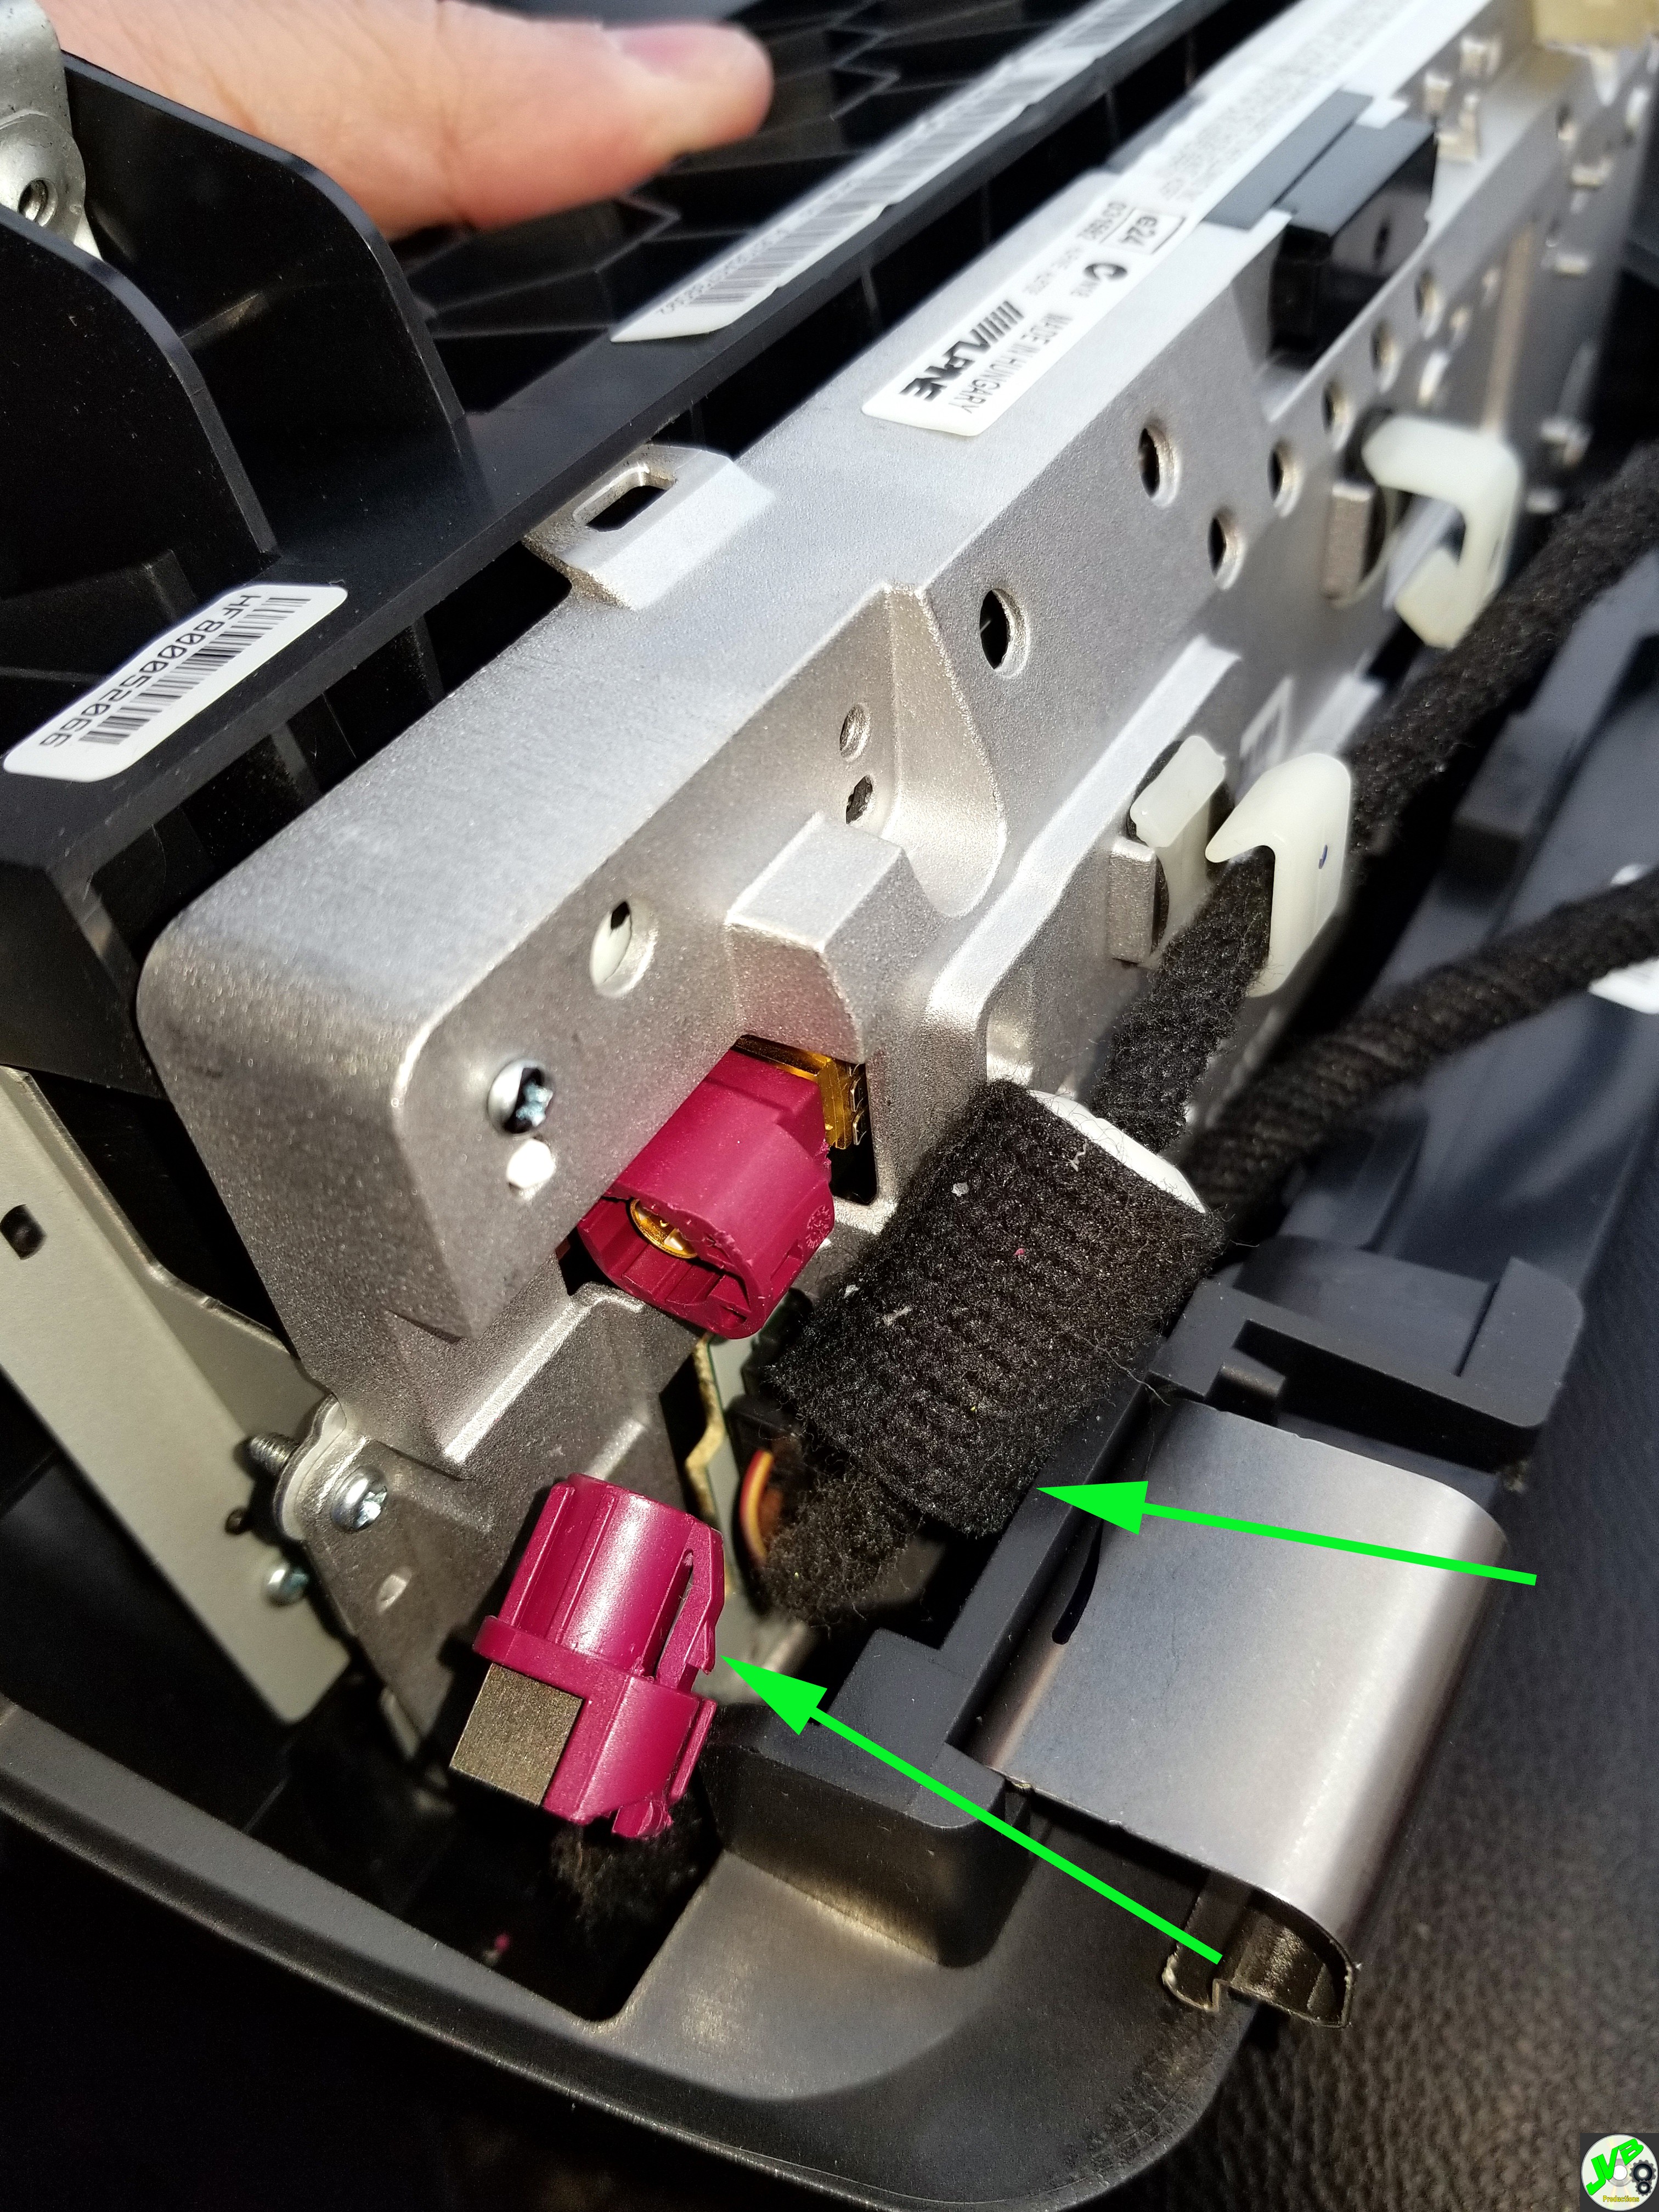 Once out, remove the other plug in the unit, then remove the sun shade by gently prying on the two clips, one on each side, with a pick: 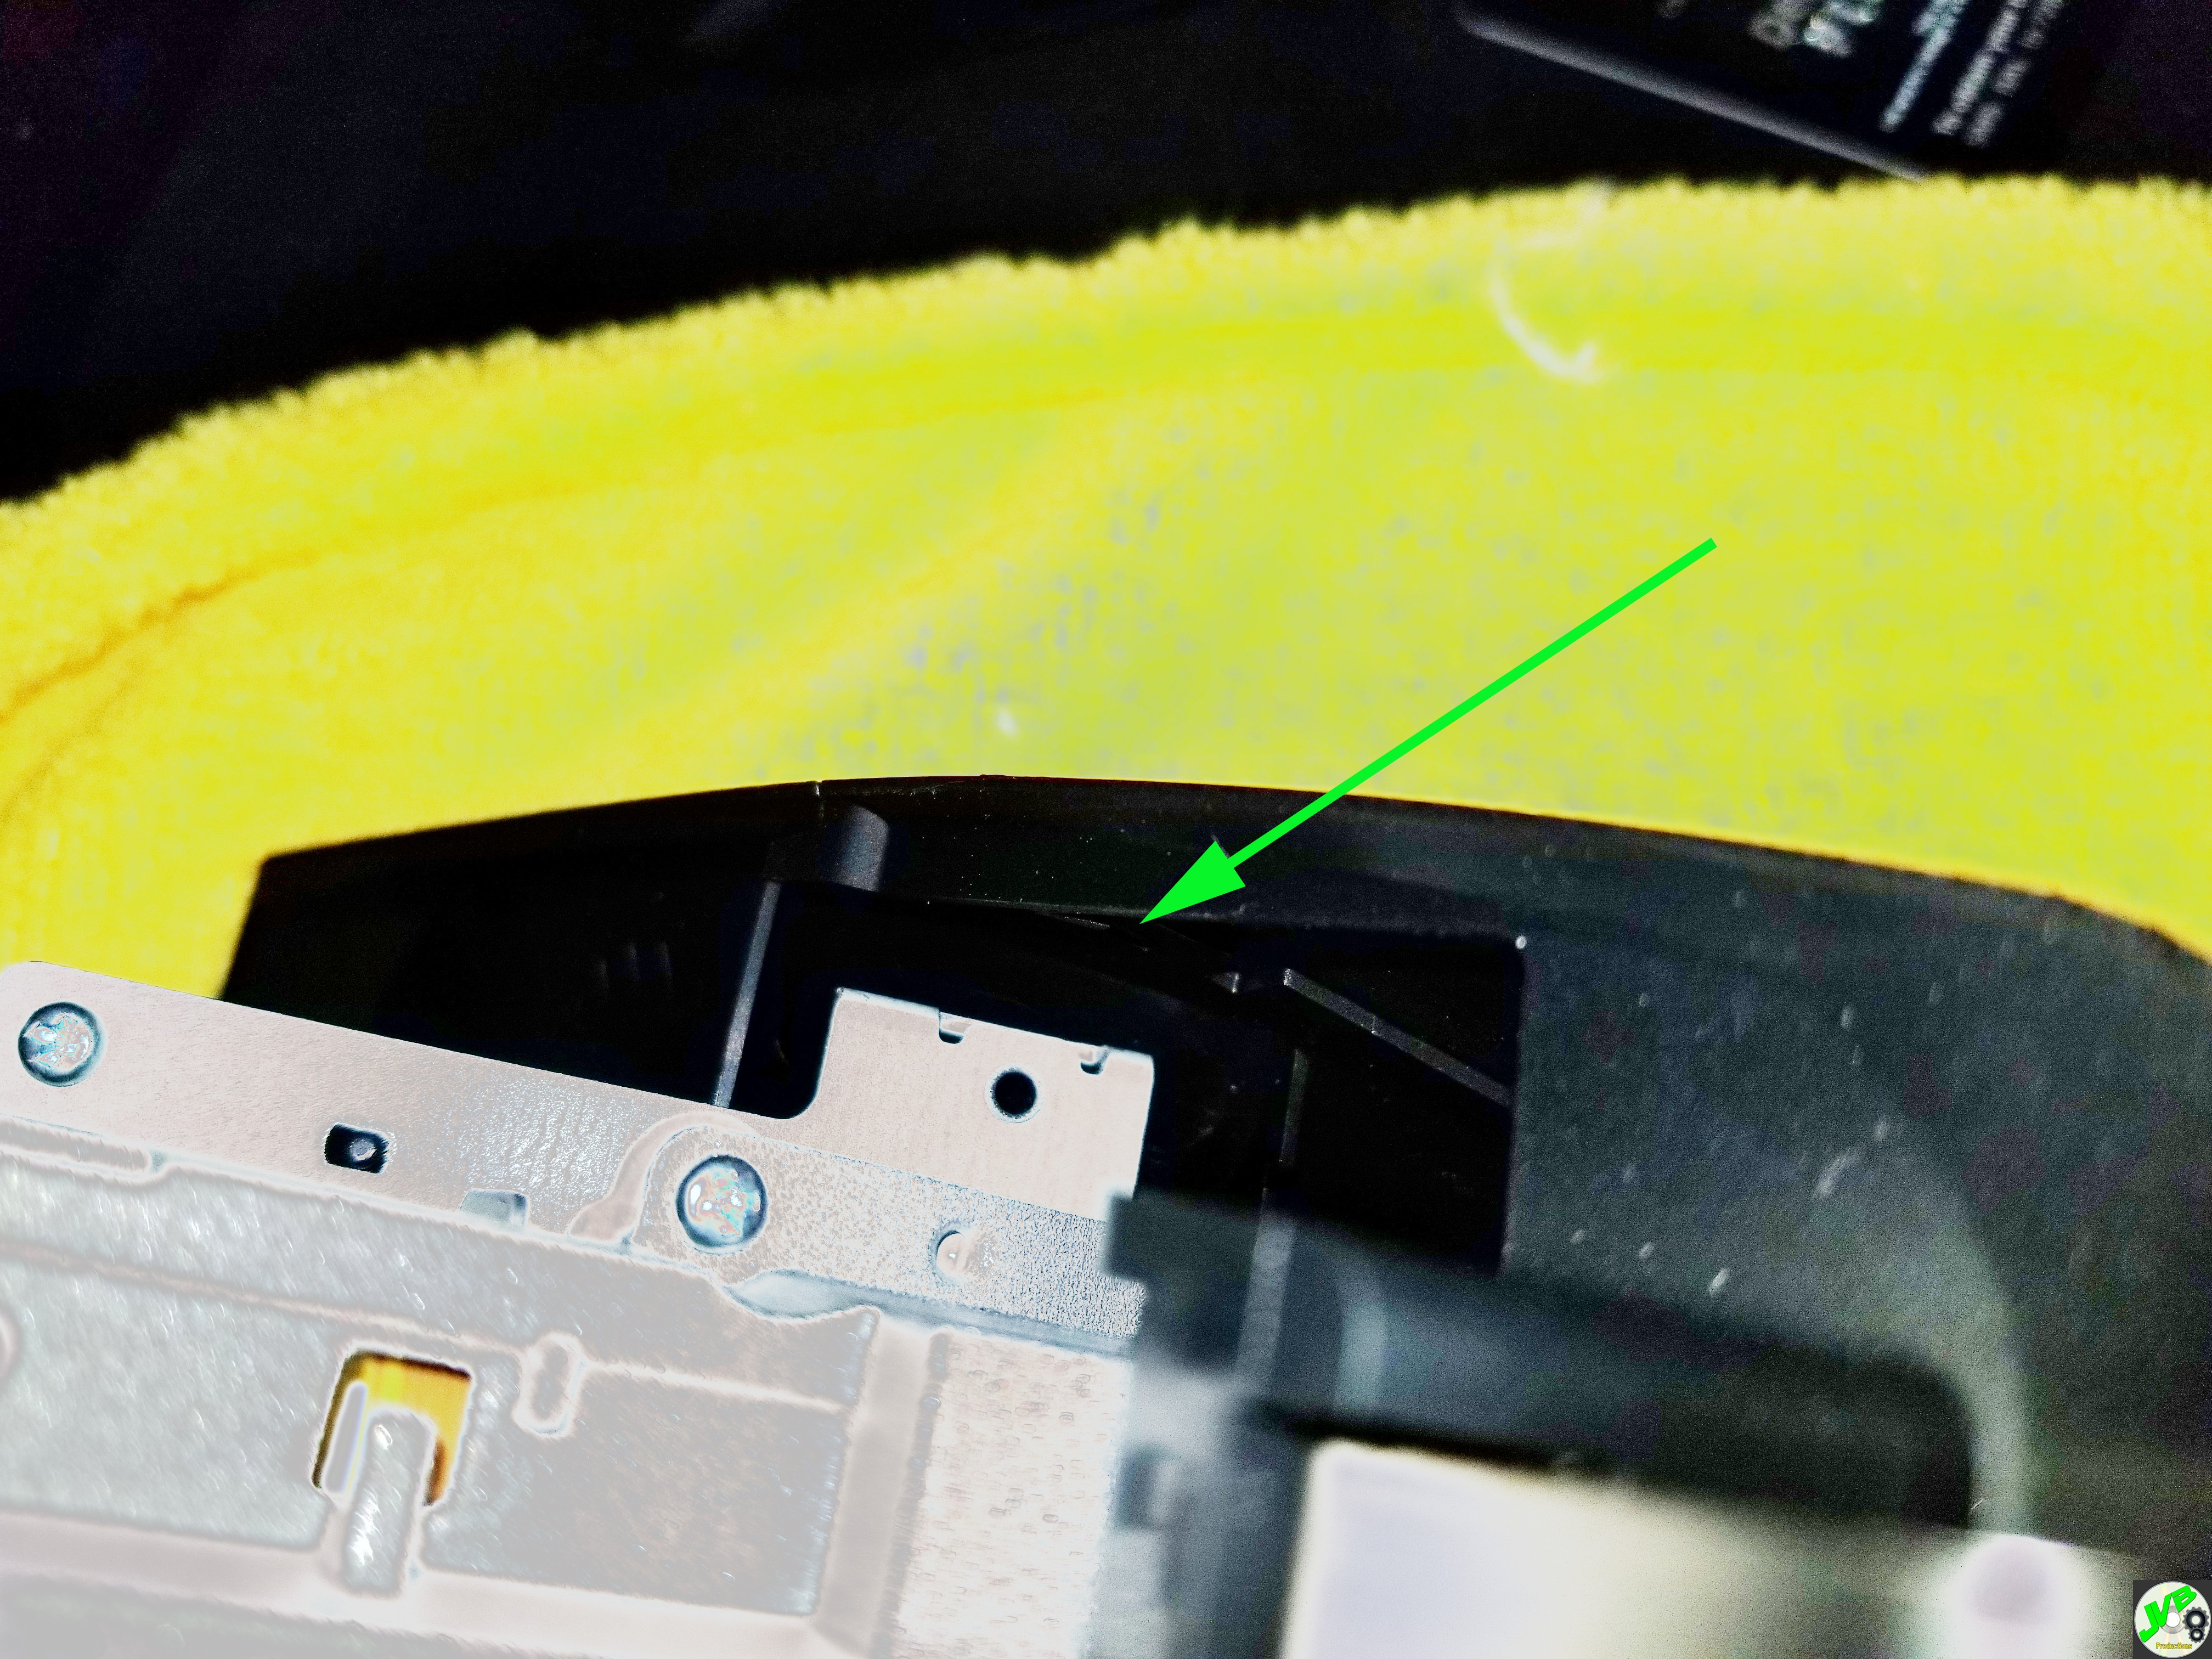 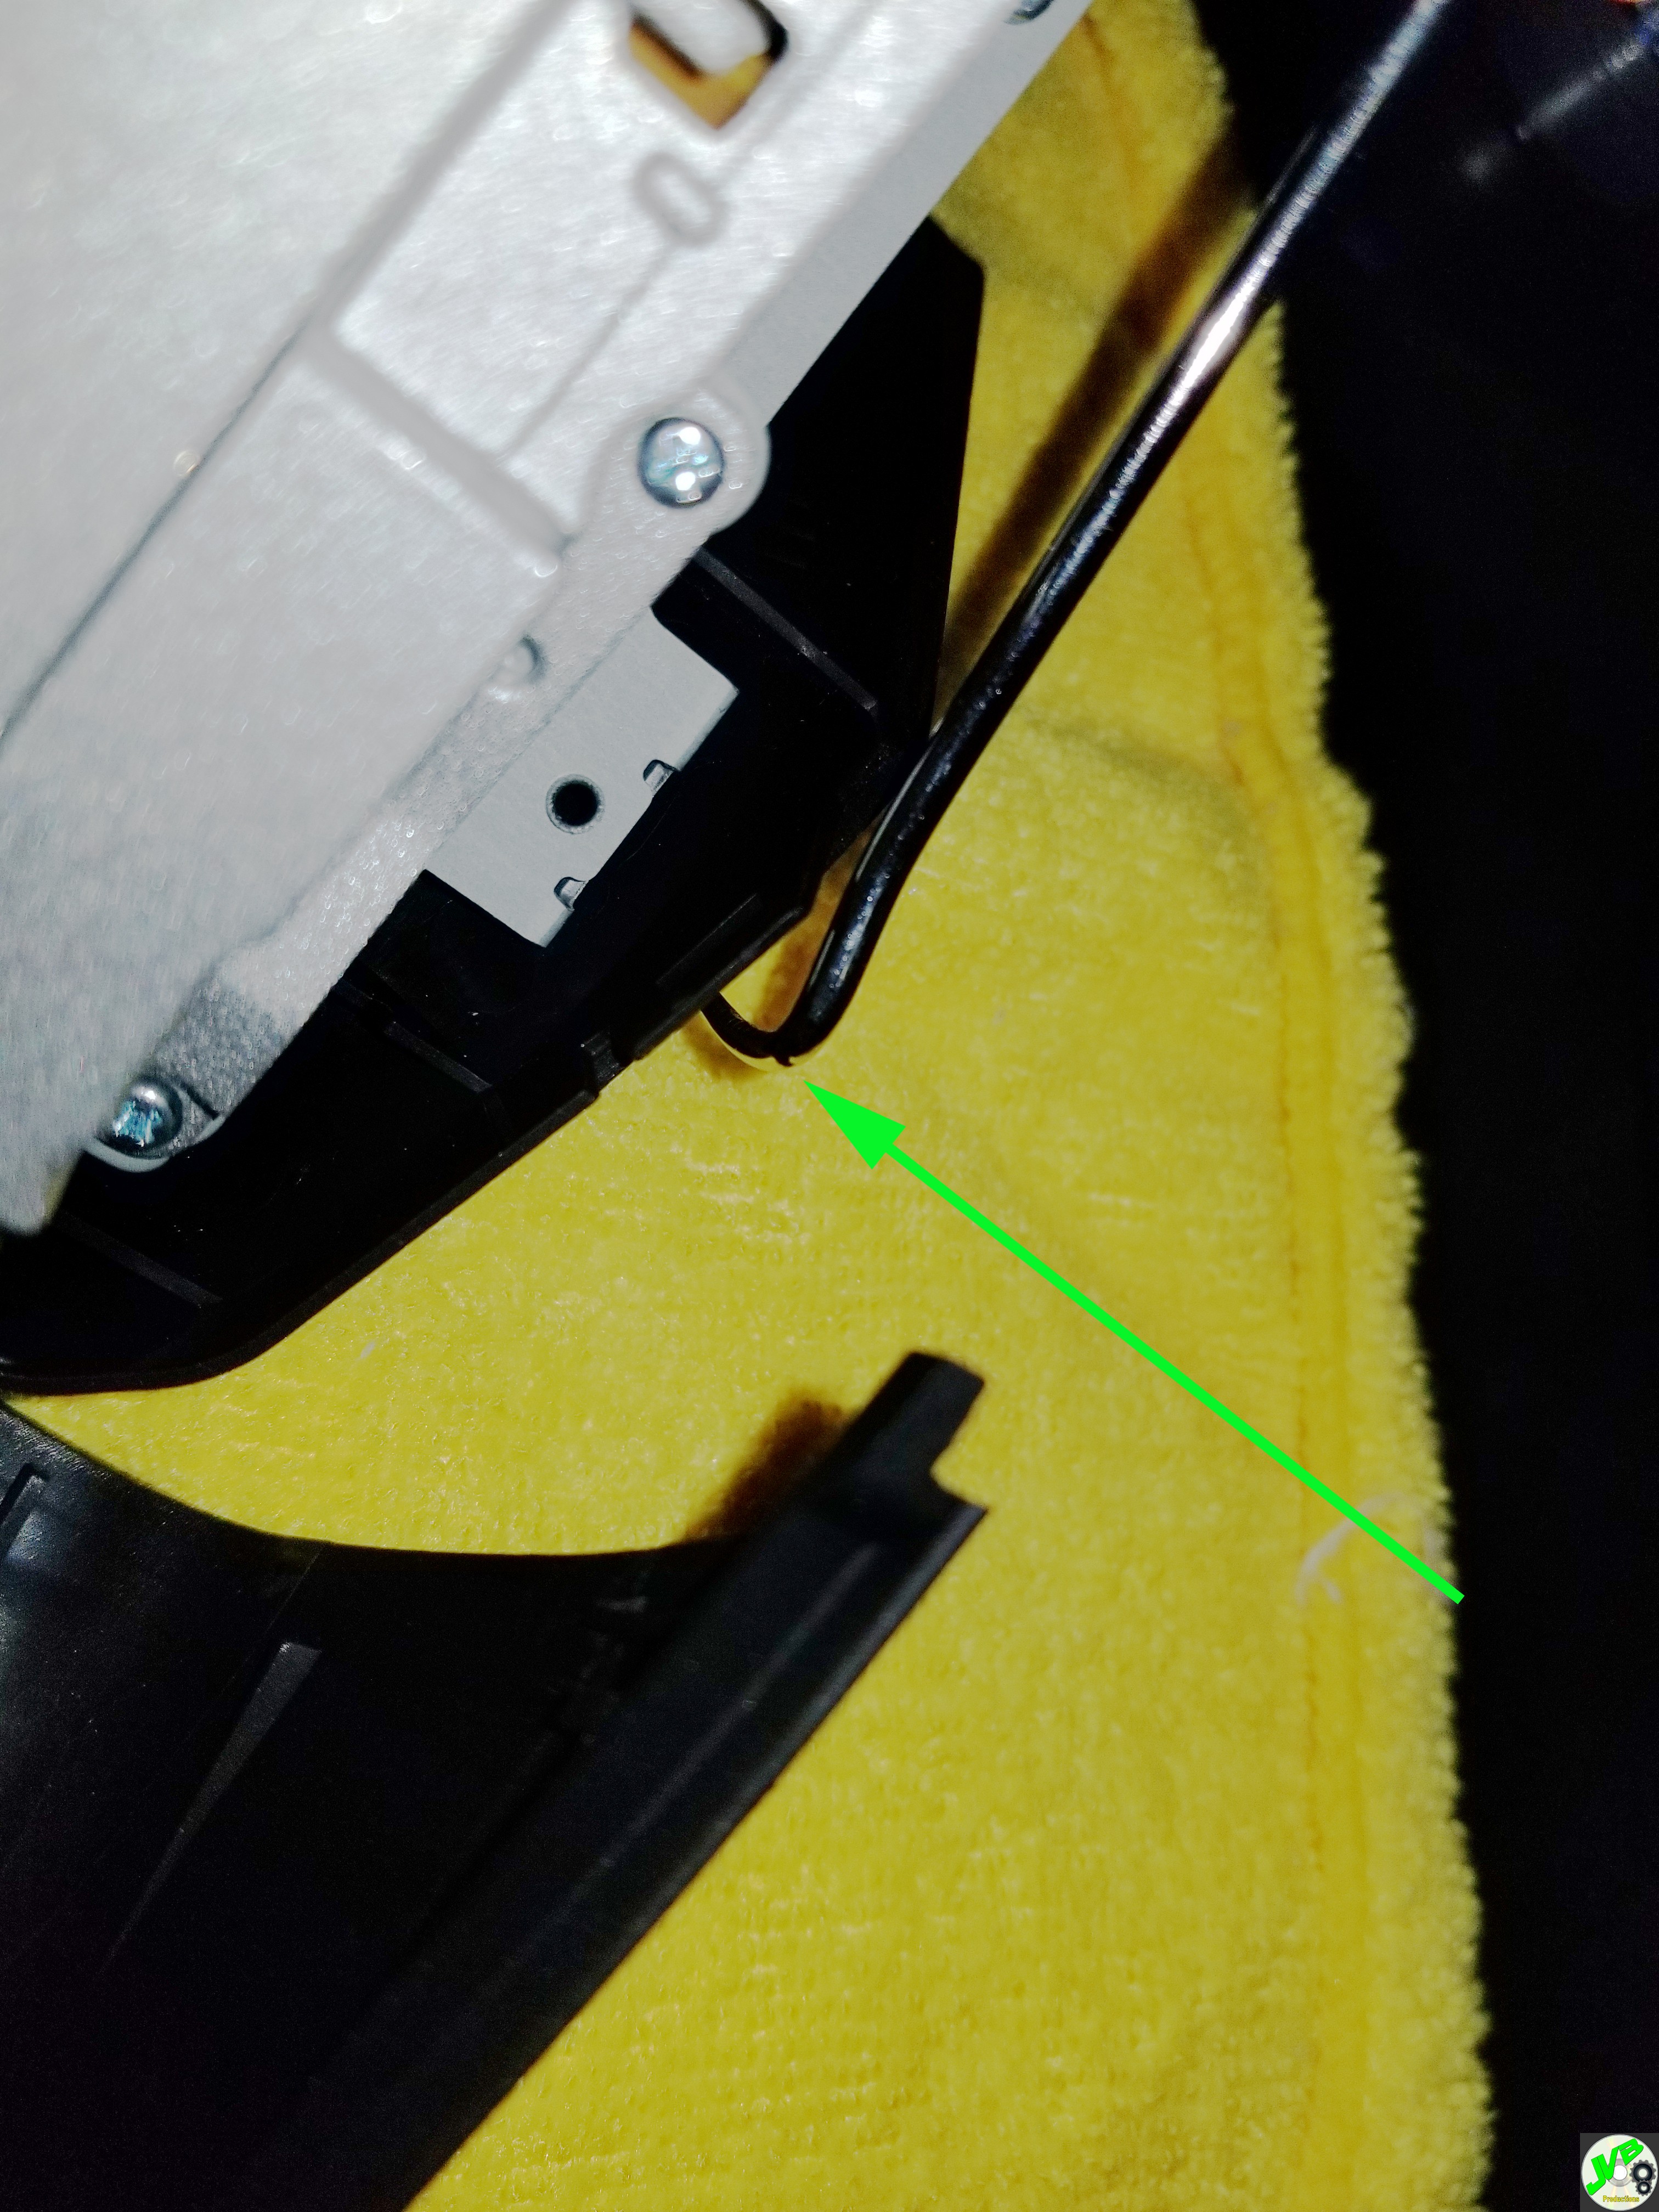 The shade will pop off. Next remove the four screws that hold the screen to the mount: 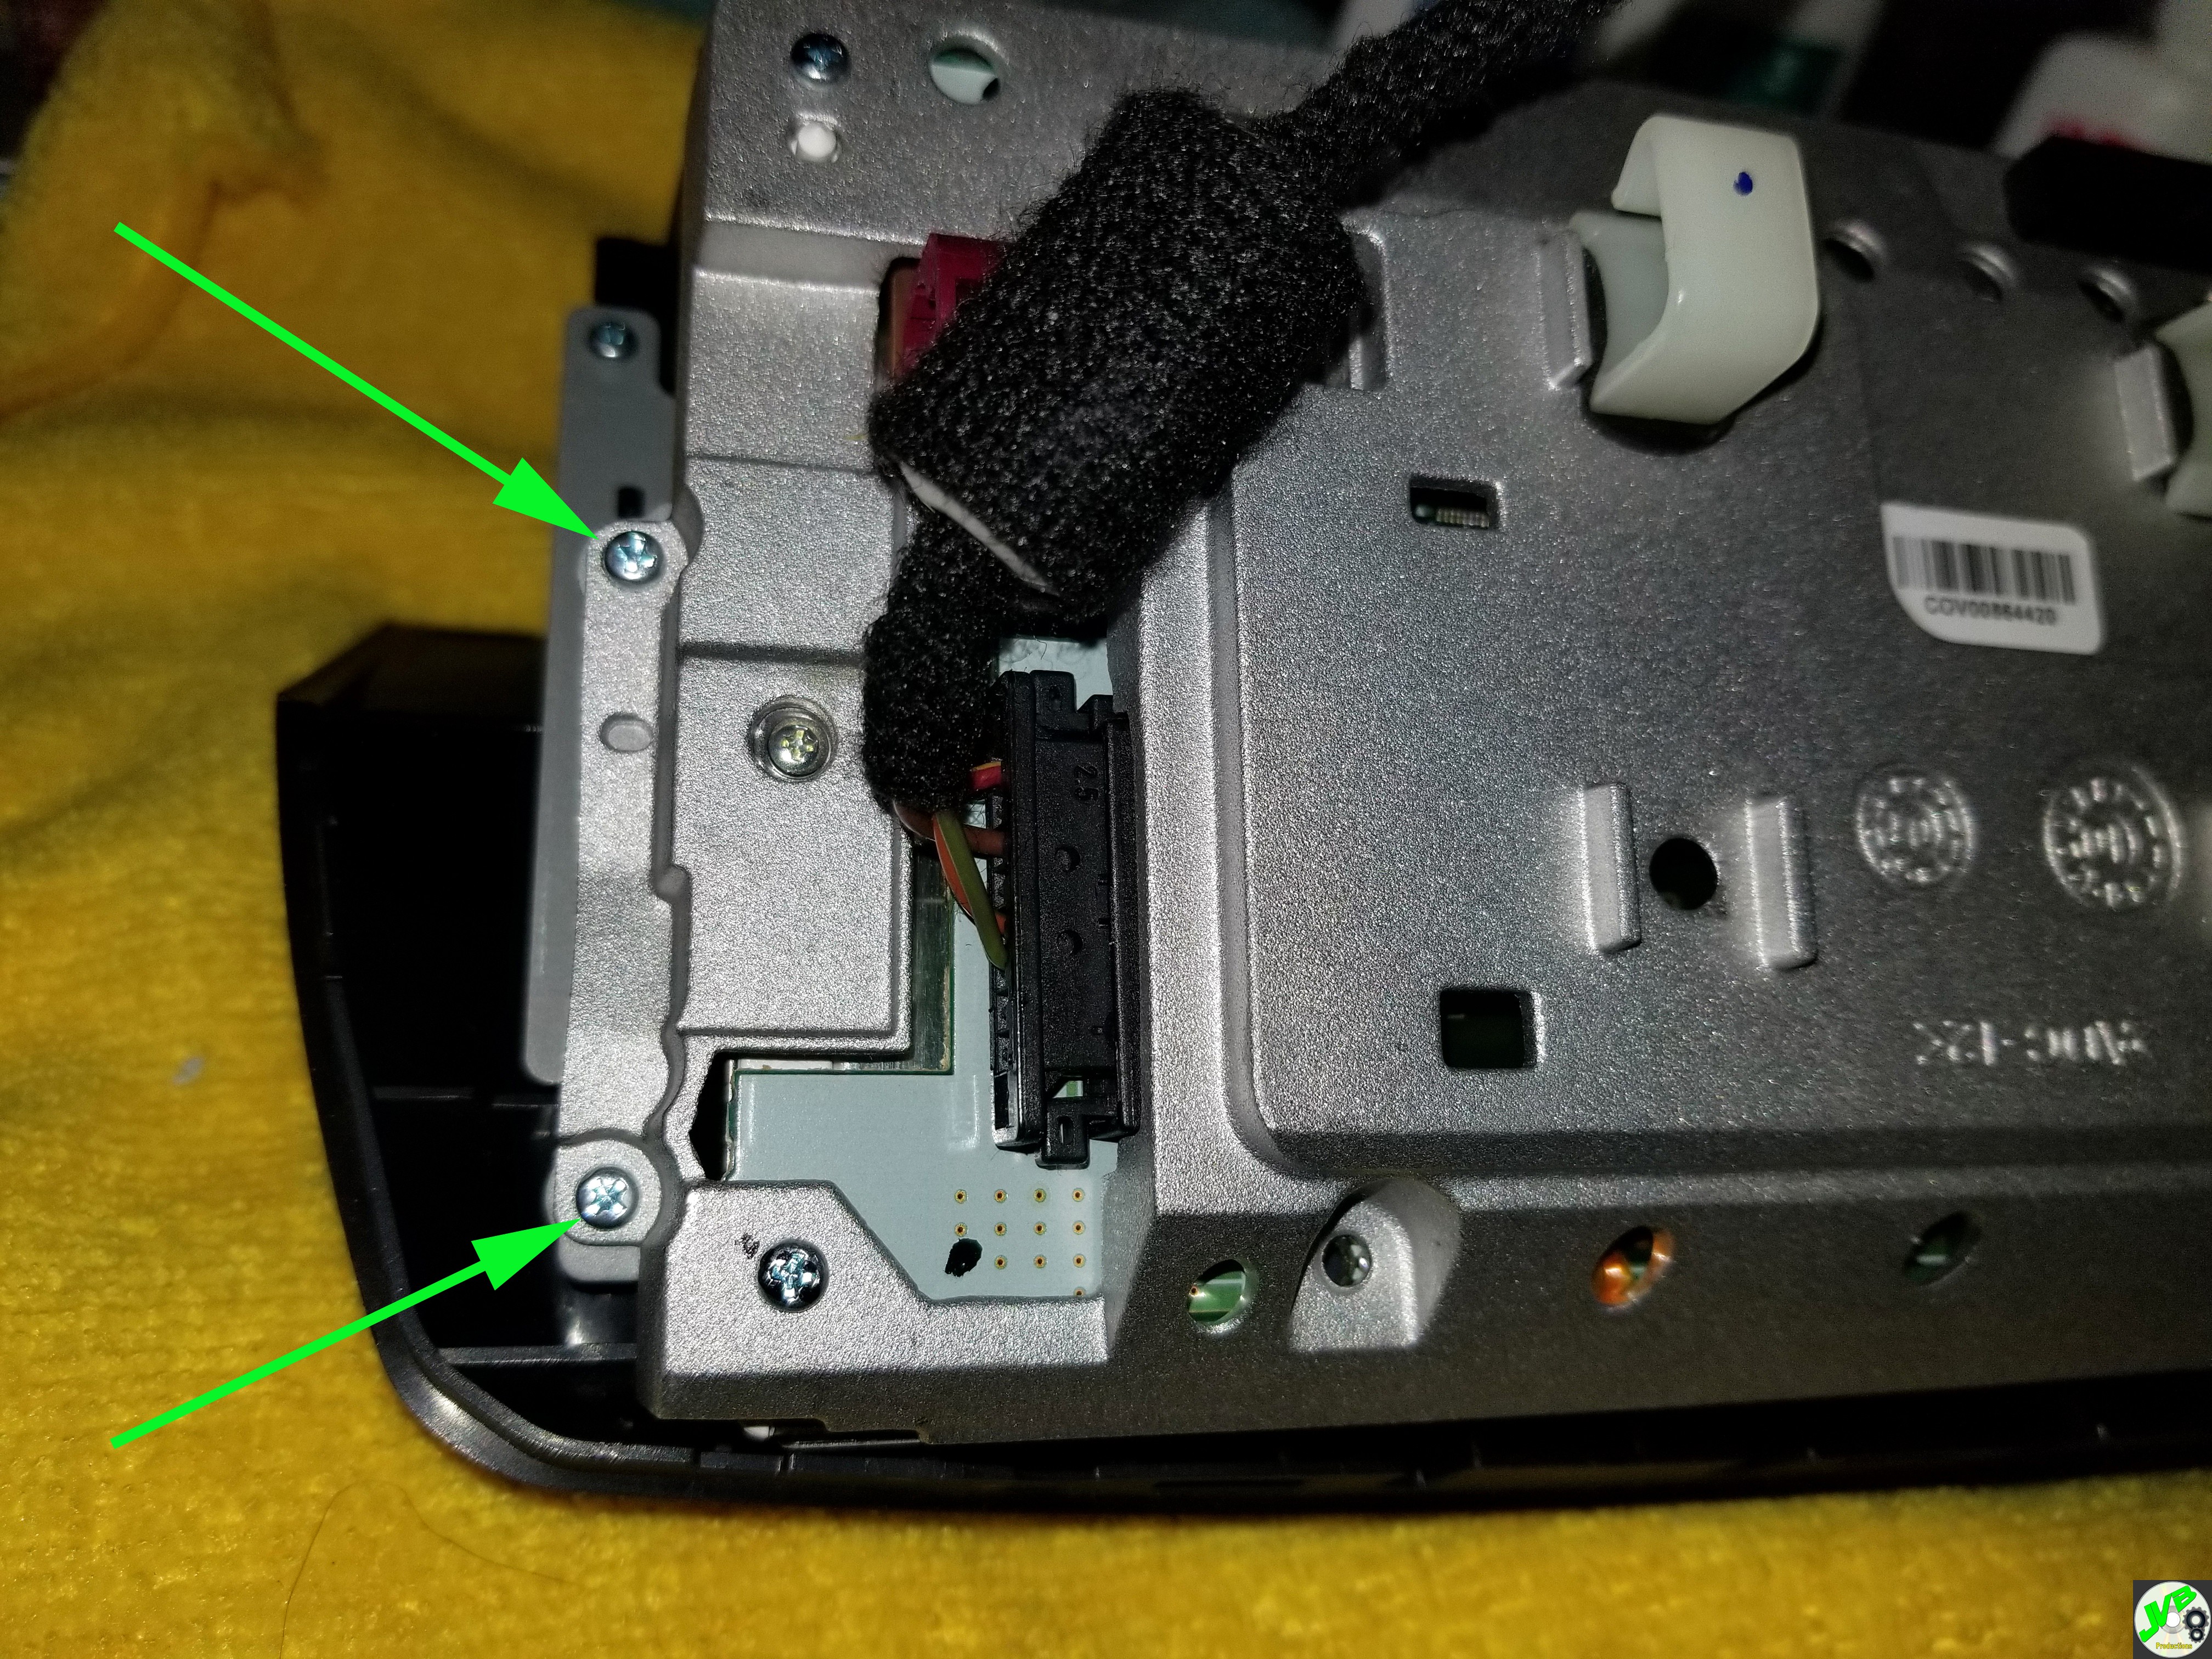 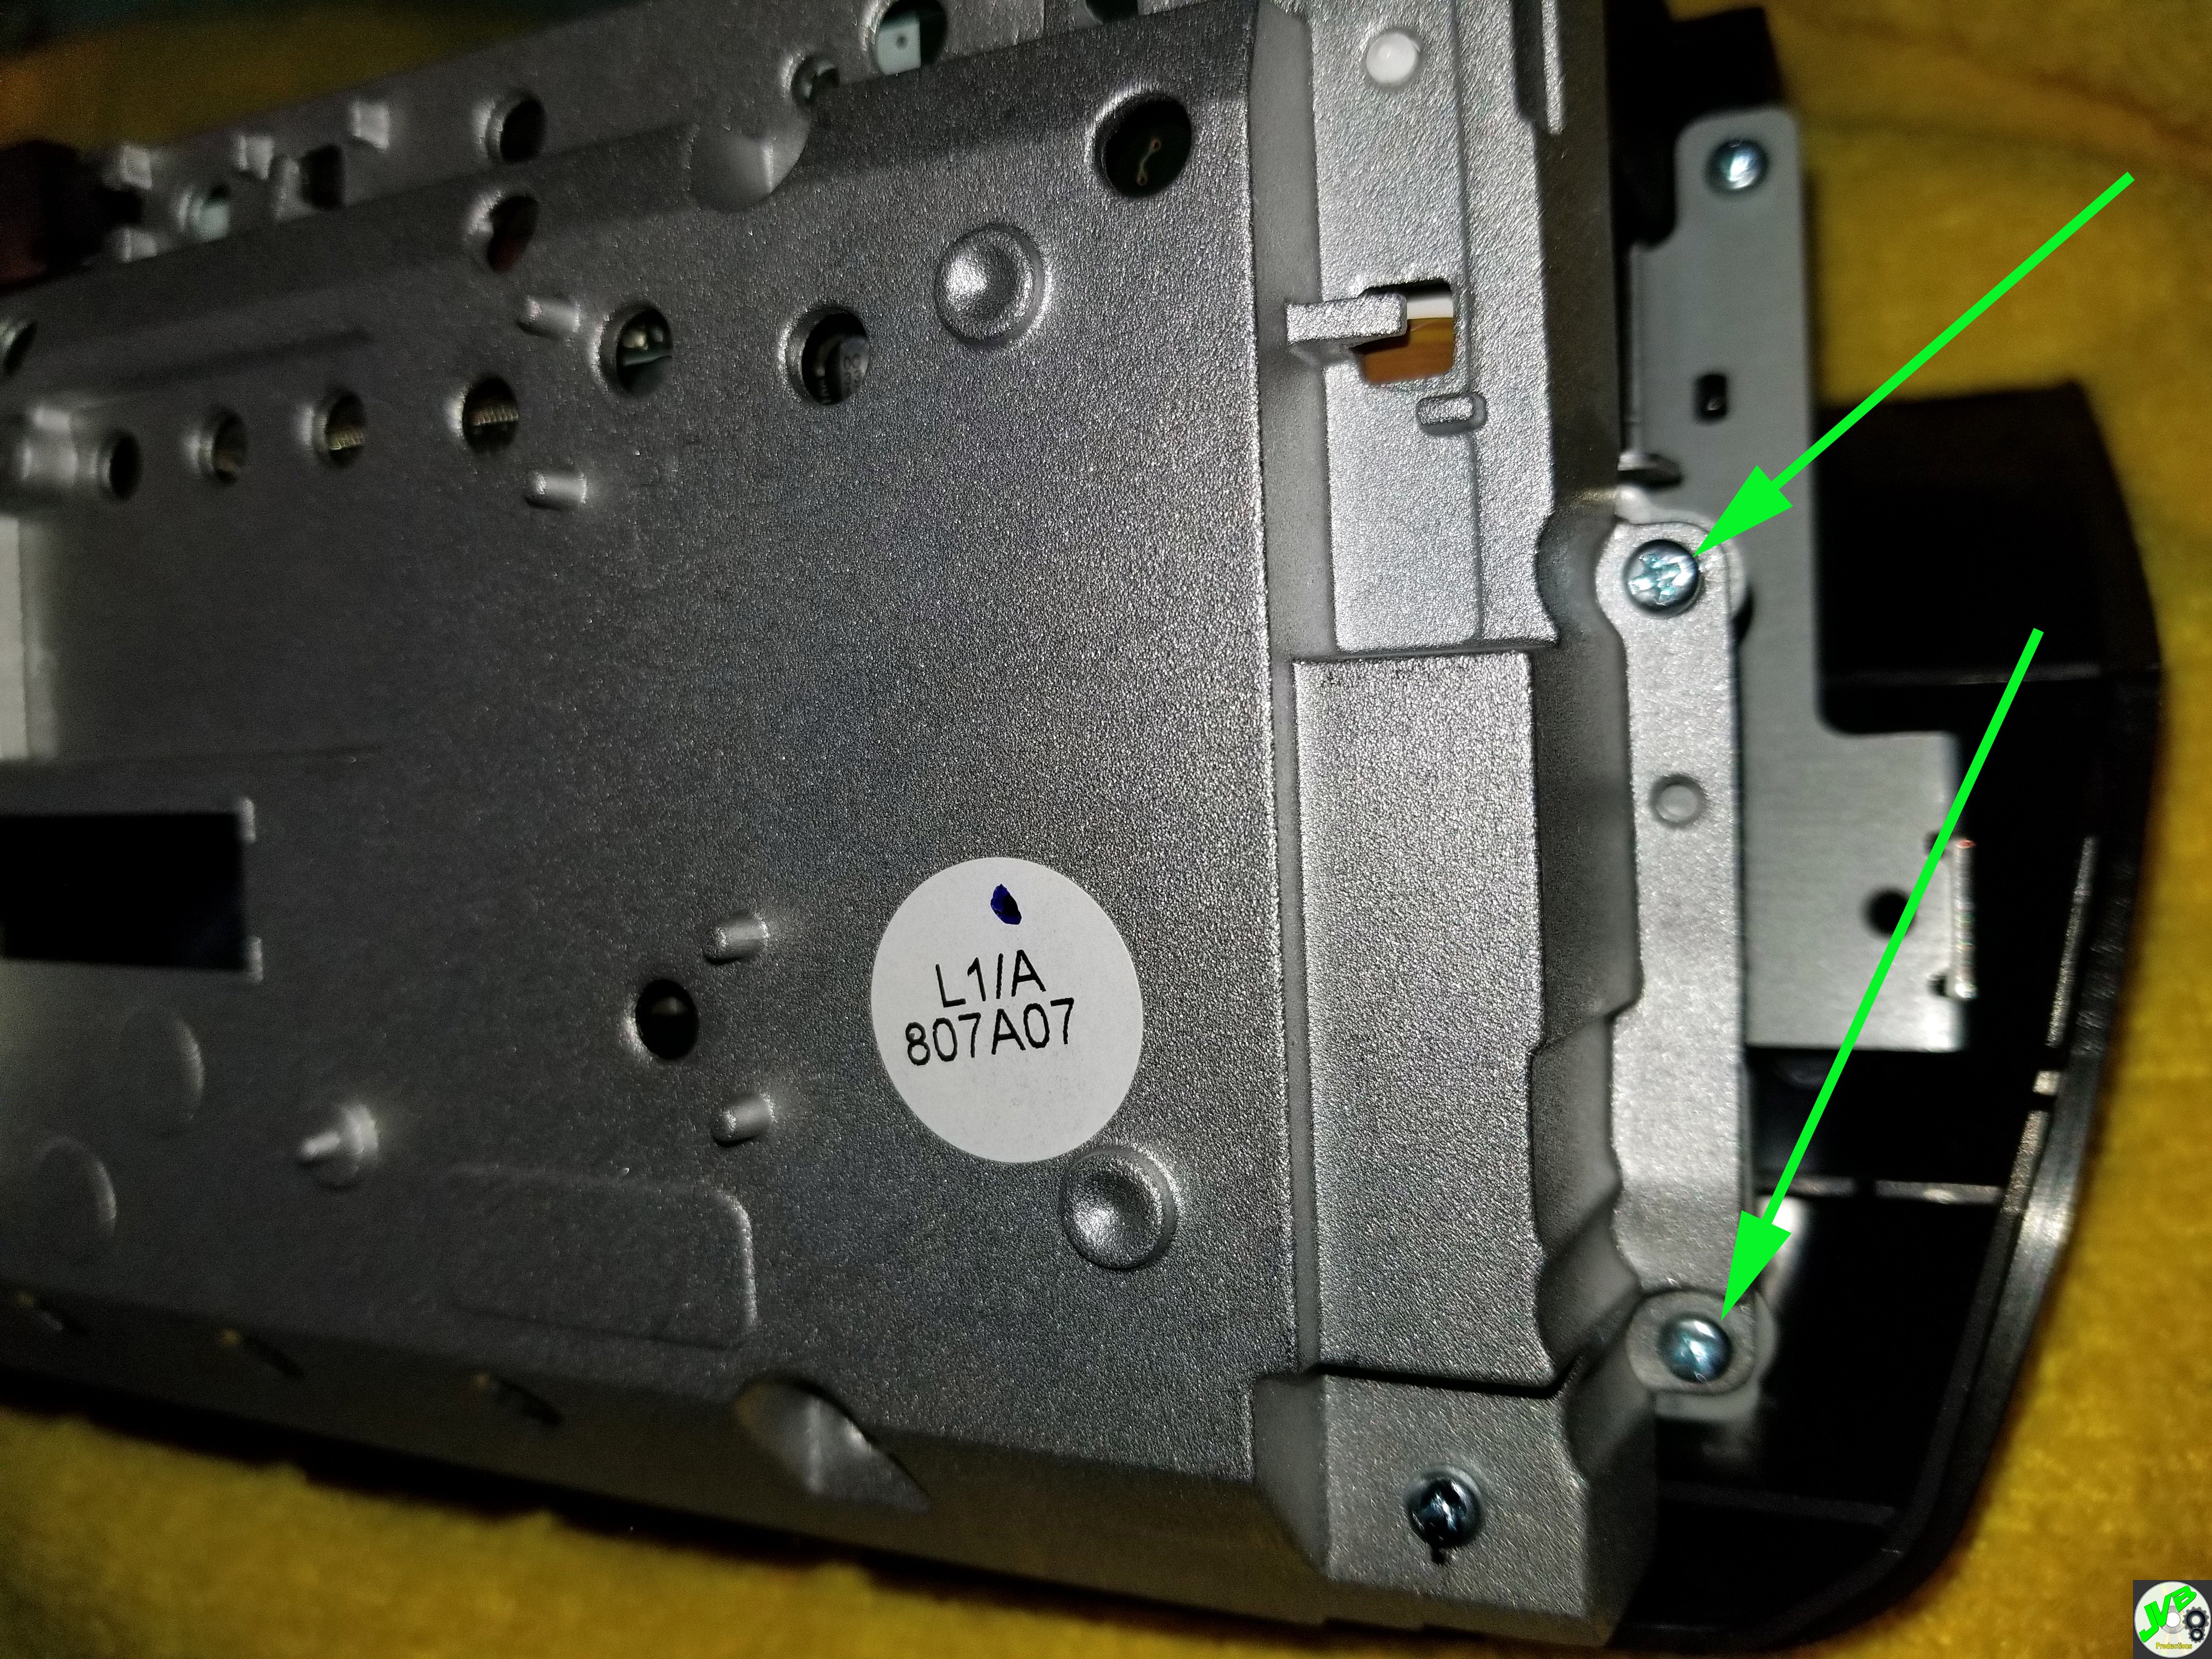 Now you can start polishing the screen. With a microfiber towel use the Novus #3 and scrub fairly vigorously. I only did half at a time for demonstration purposes. Polish with #3, wiping clean occasionally, until all of the glare coating is removed: 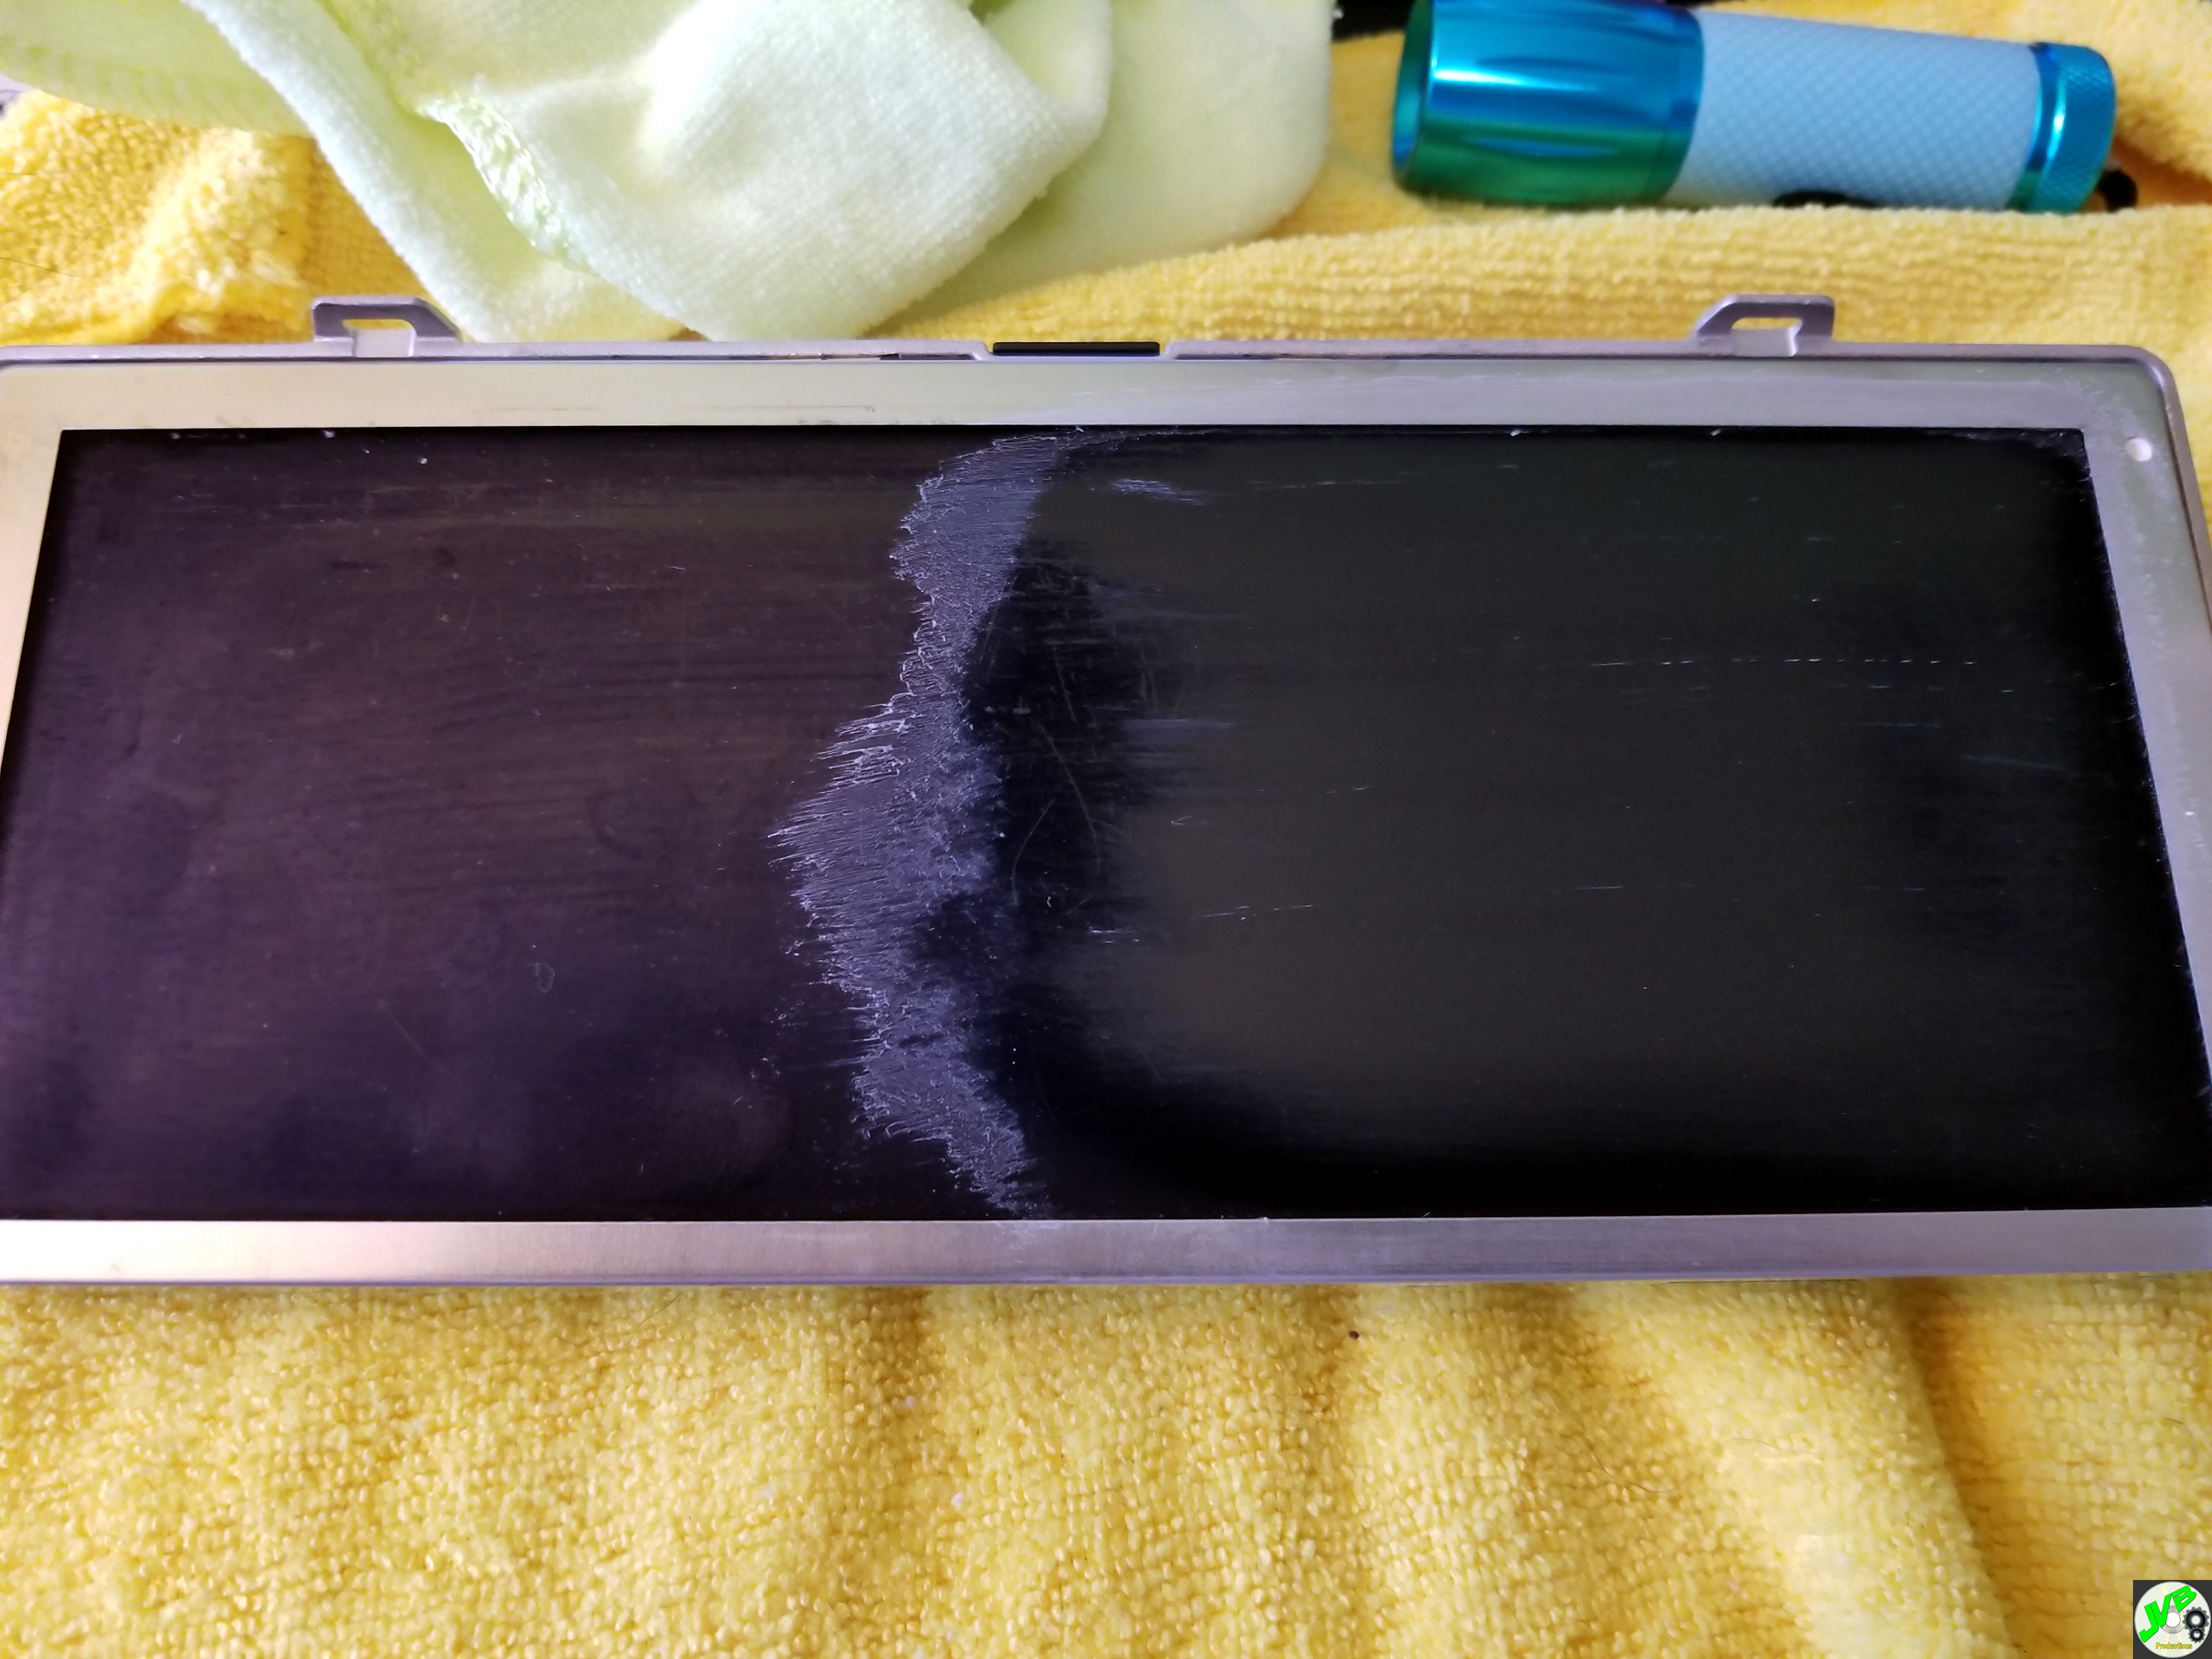 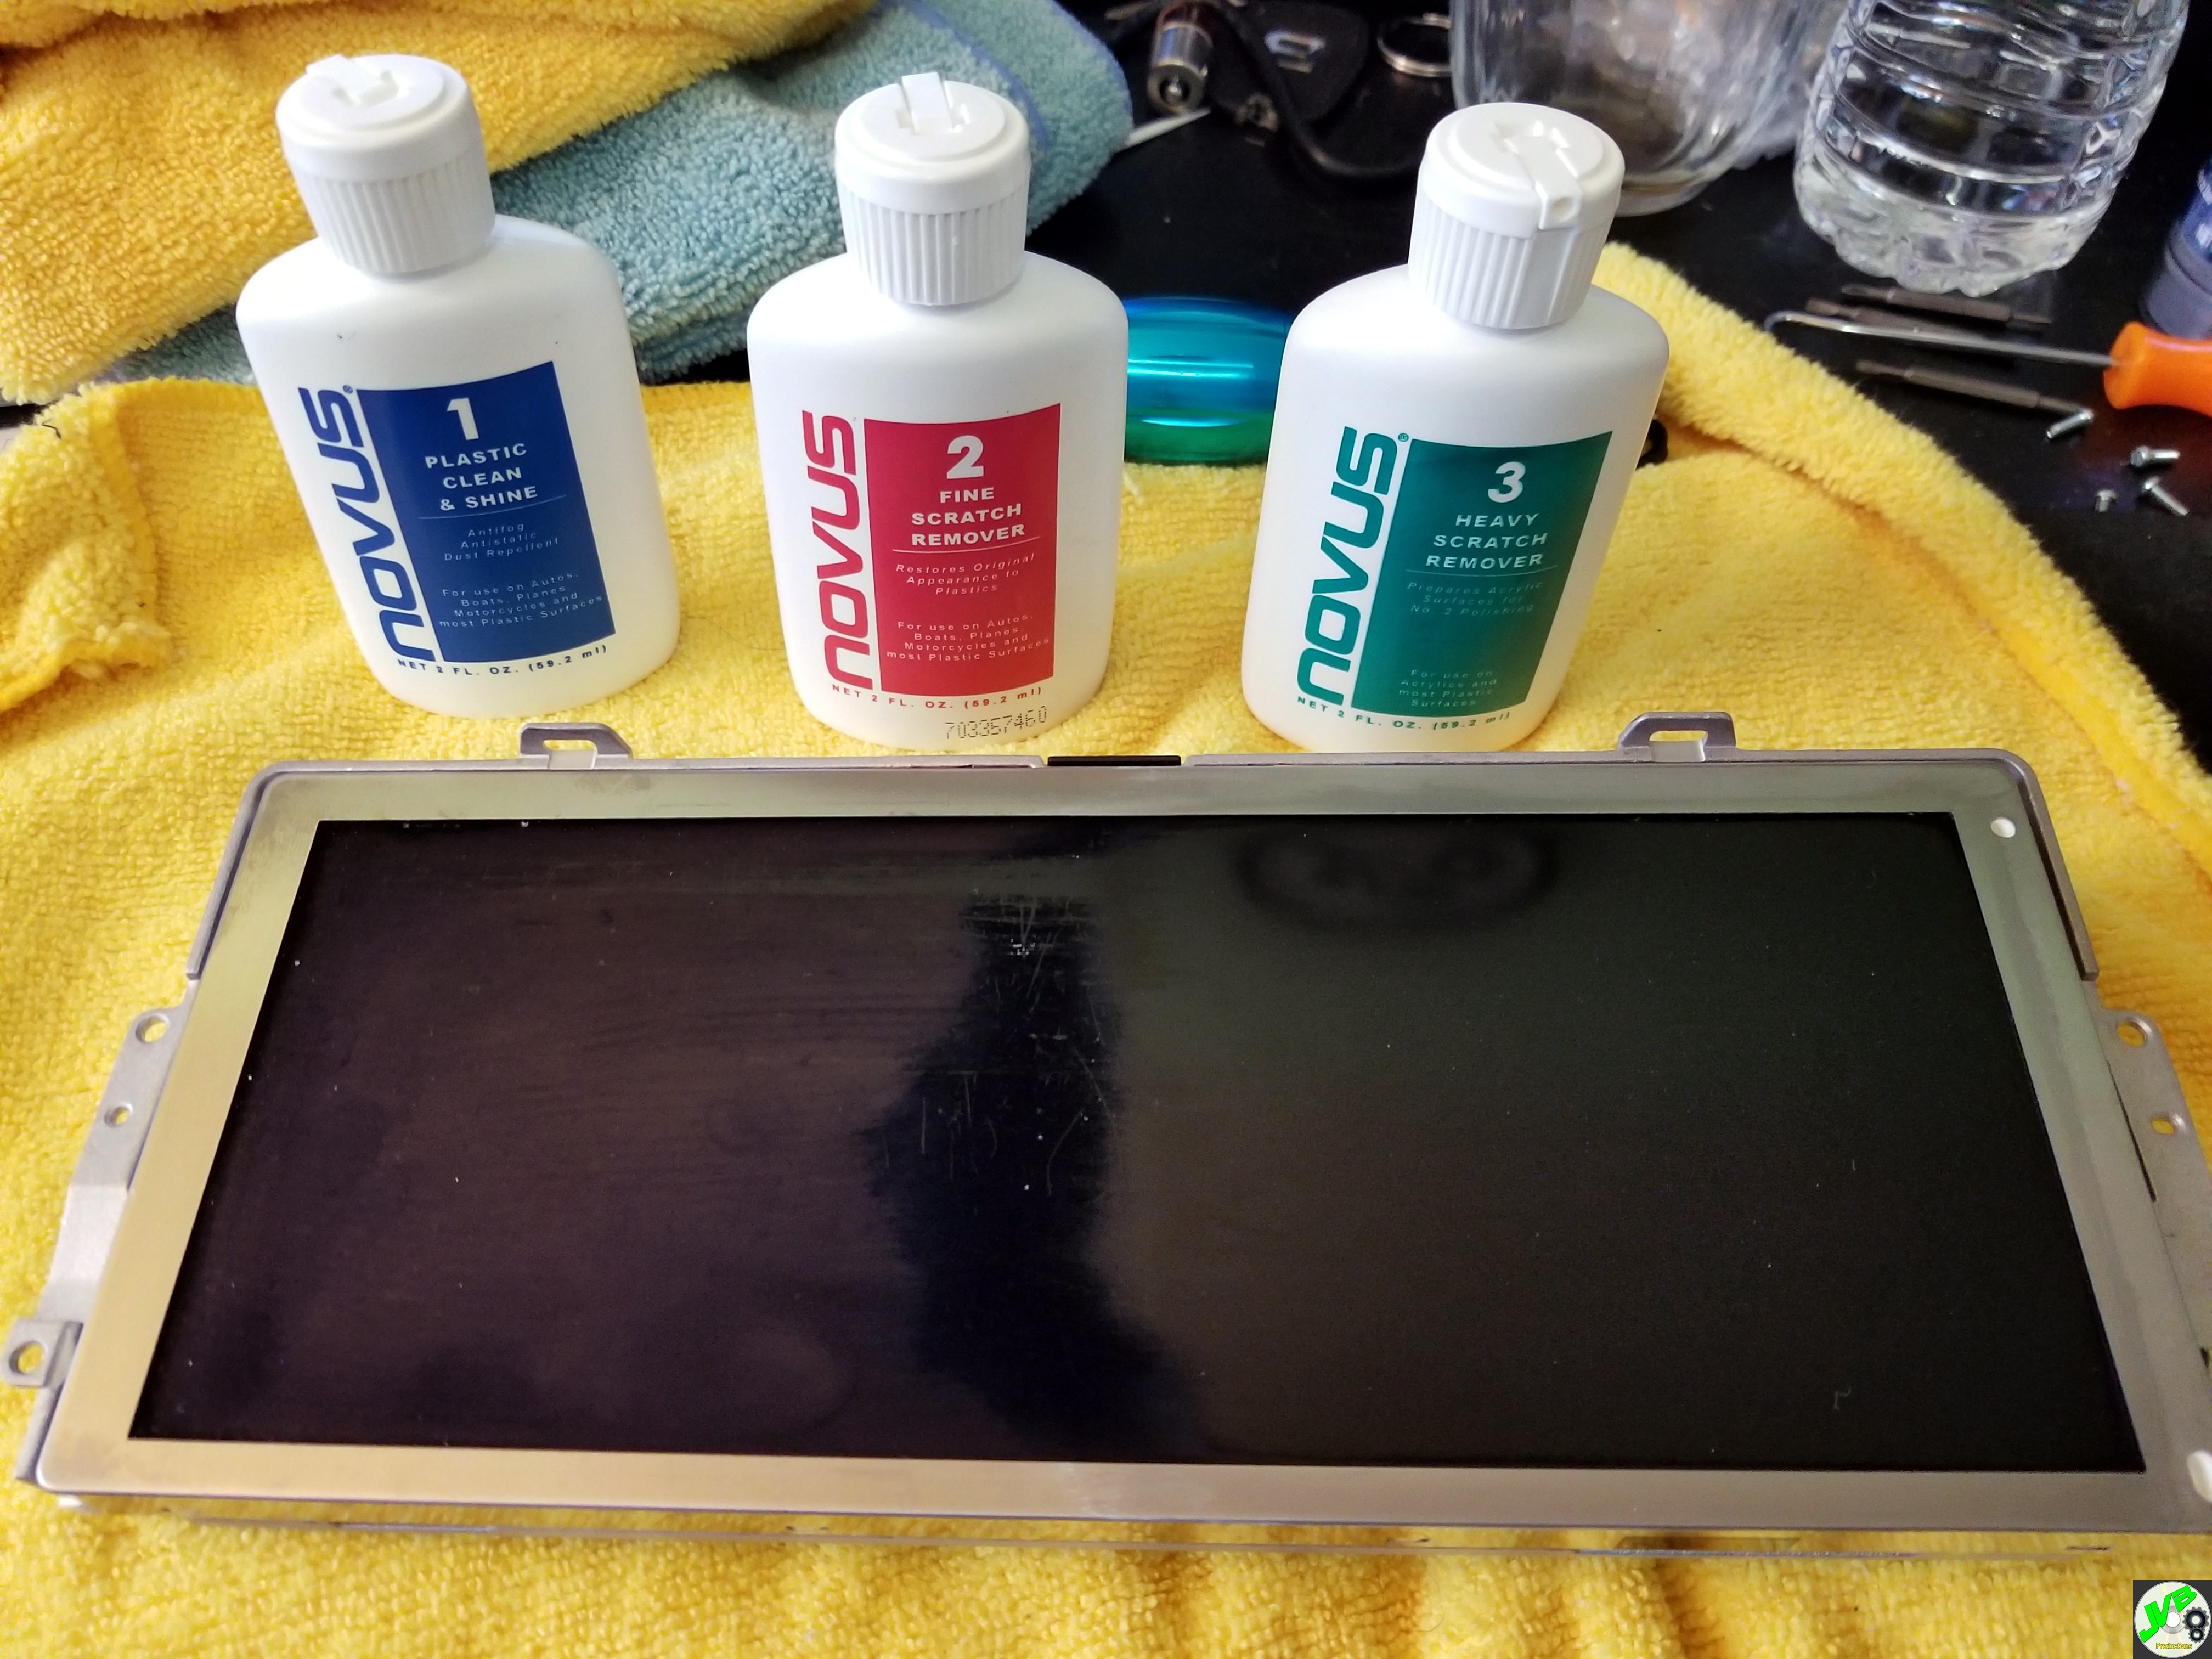 You can see the difference. This is just #3. Here is untouched: 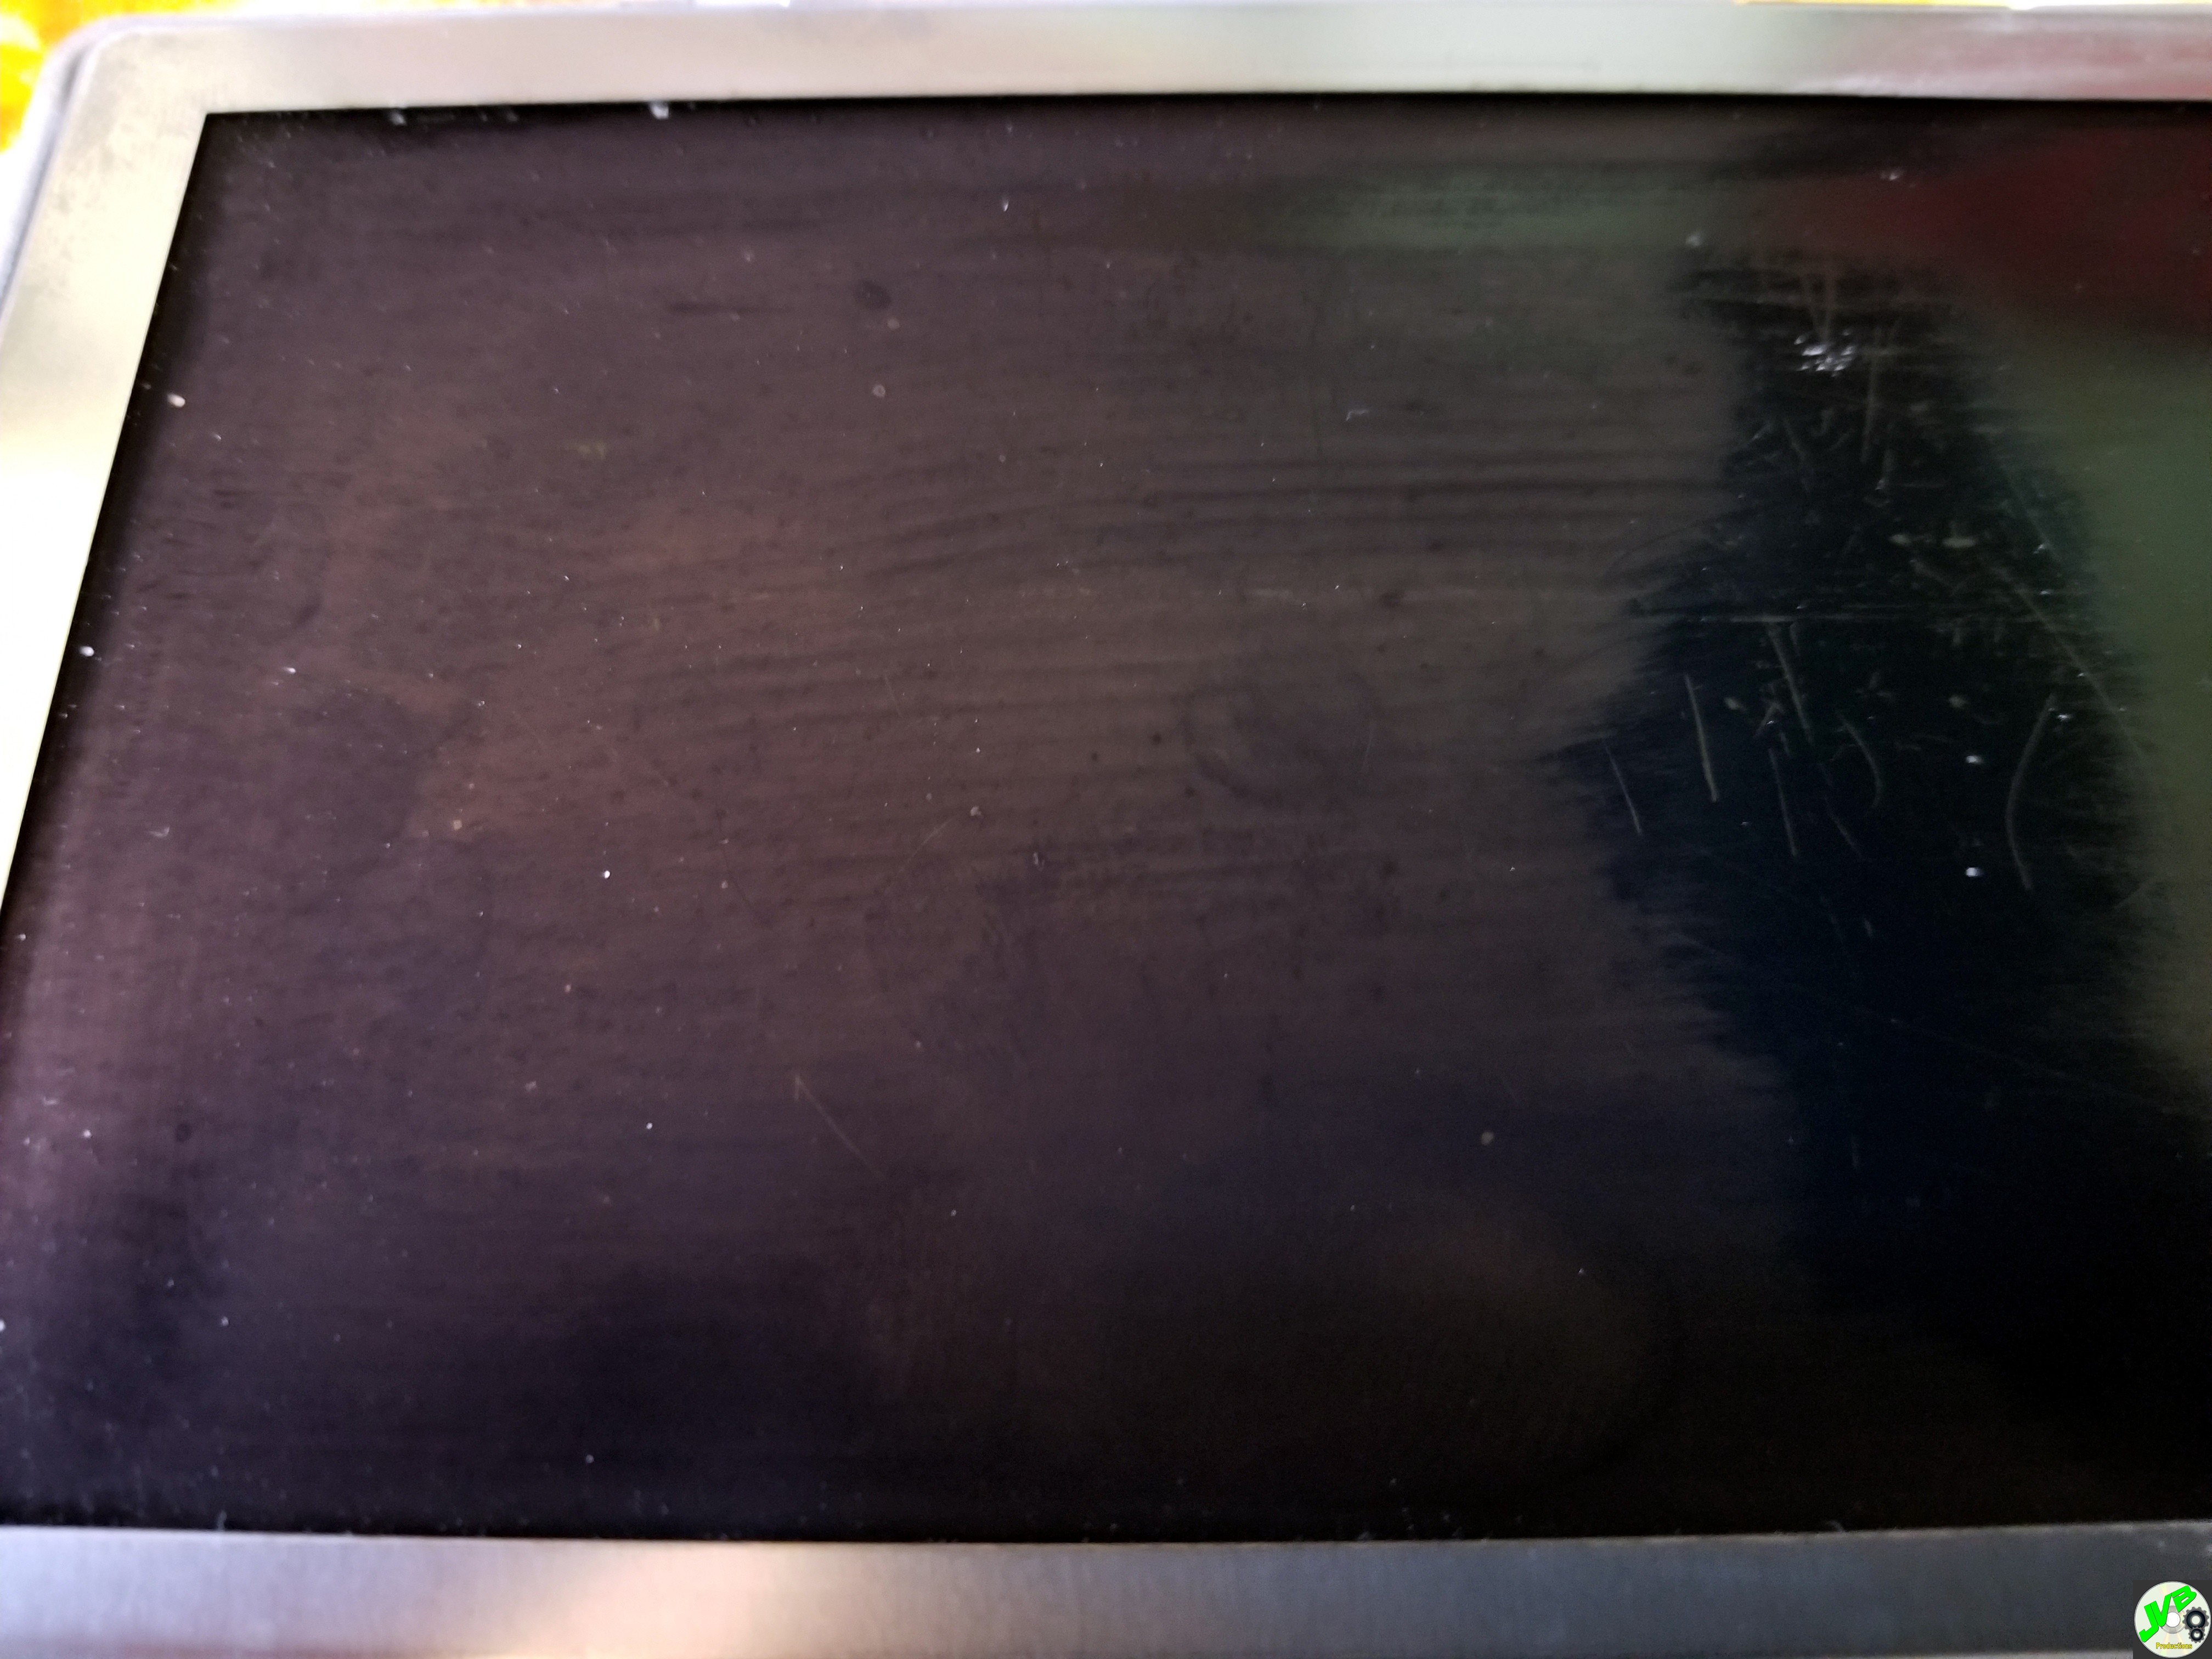 I then polished with #2, then #1.  Then I completed the rest with #3: 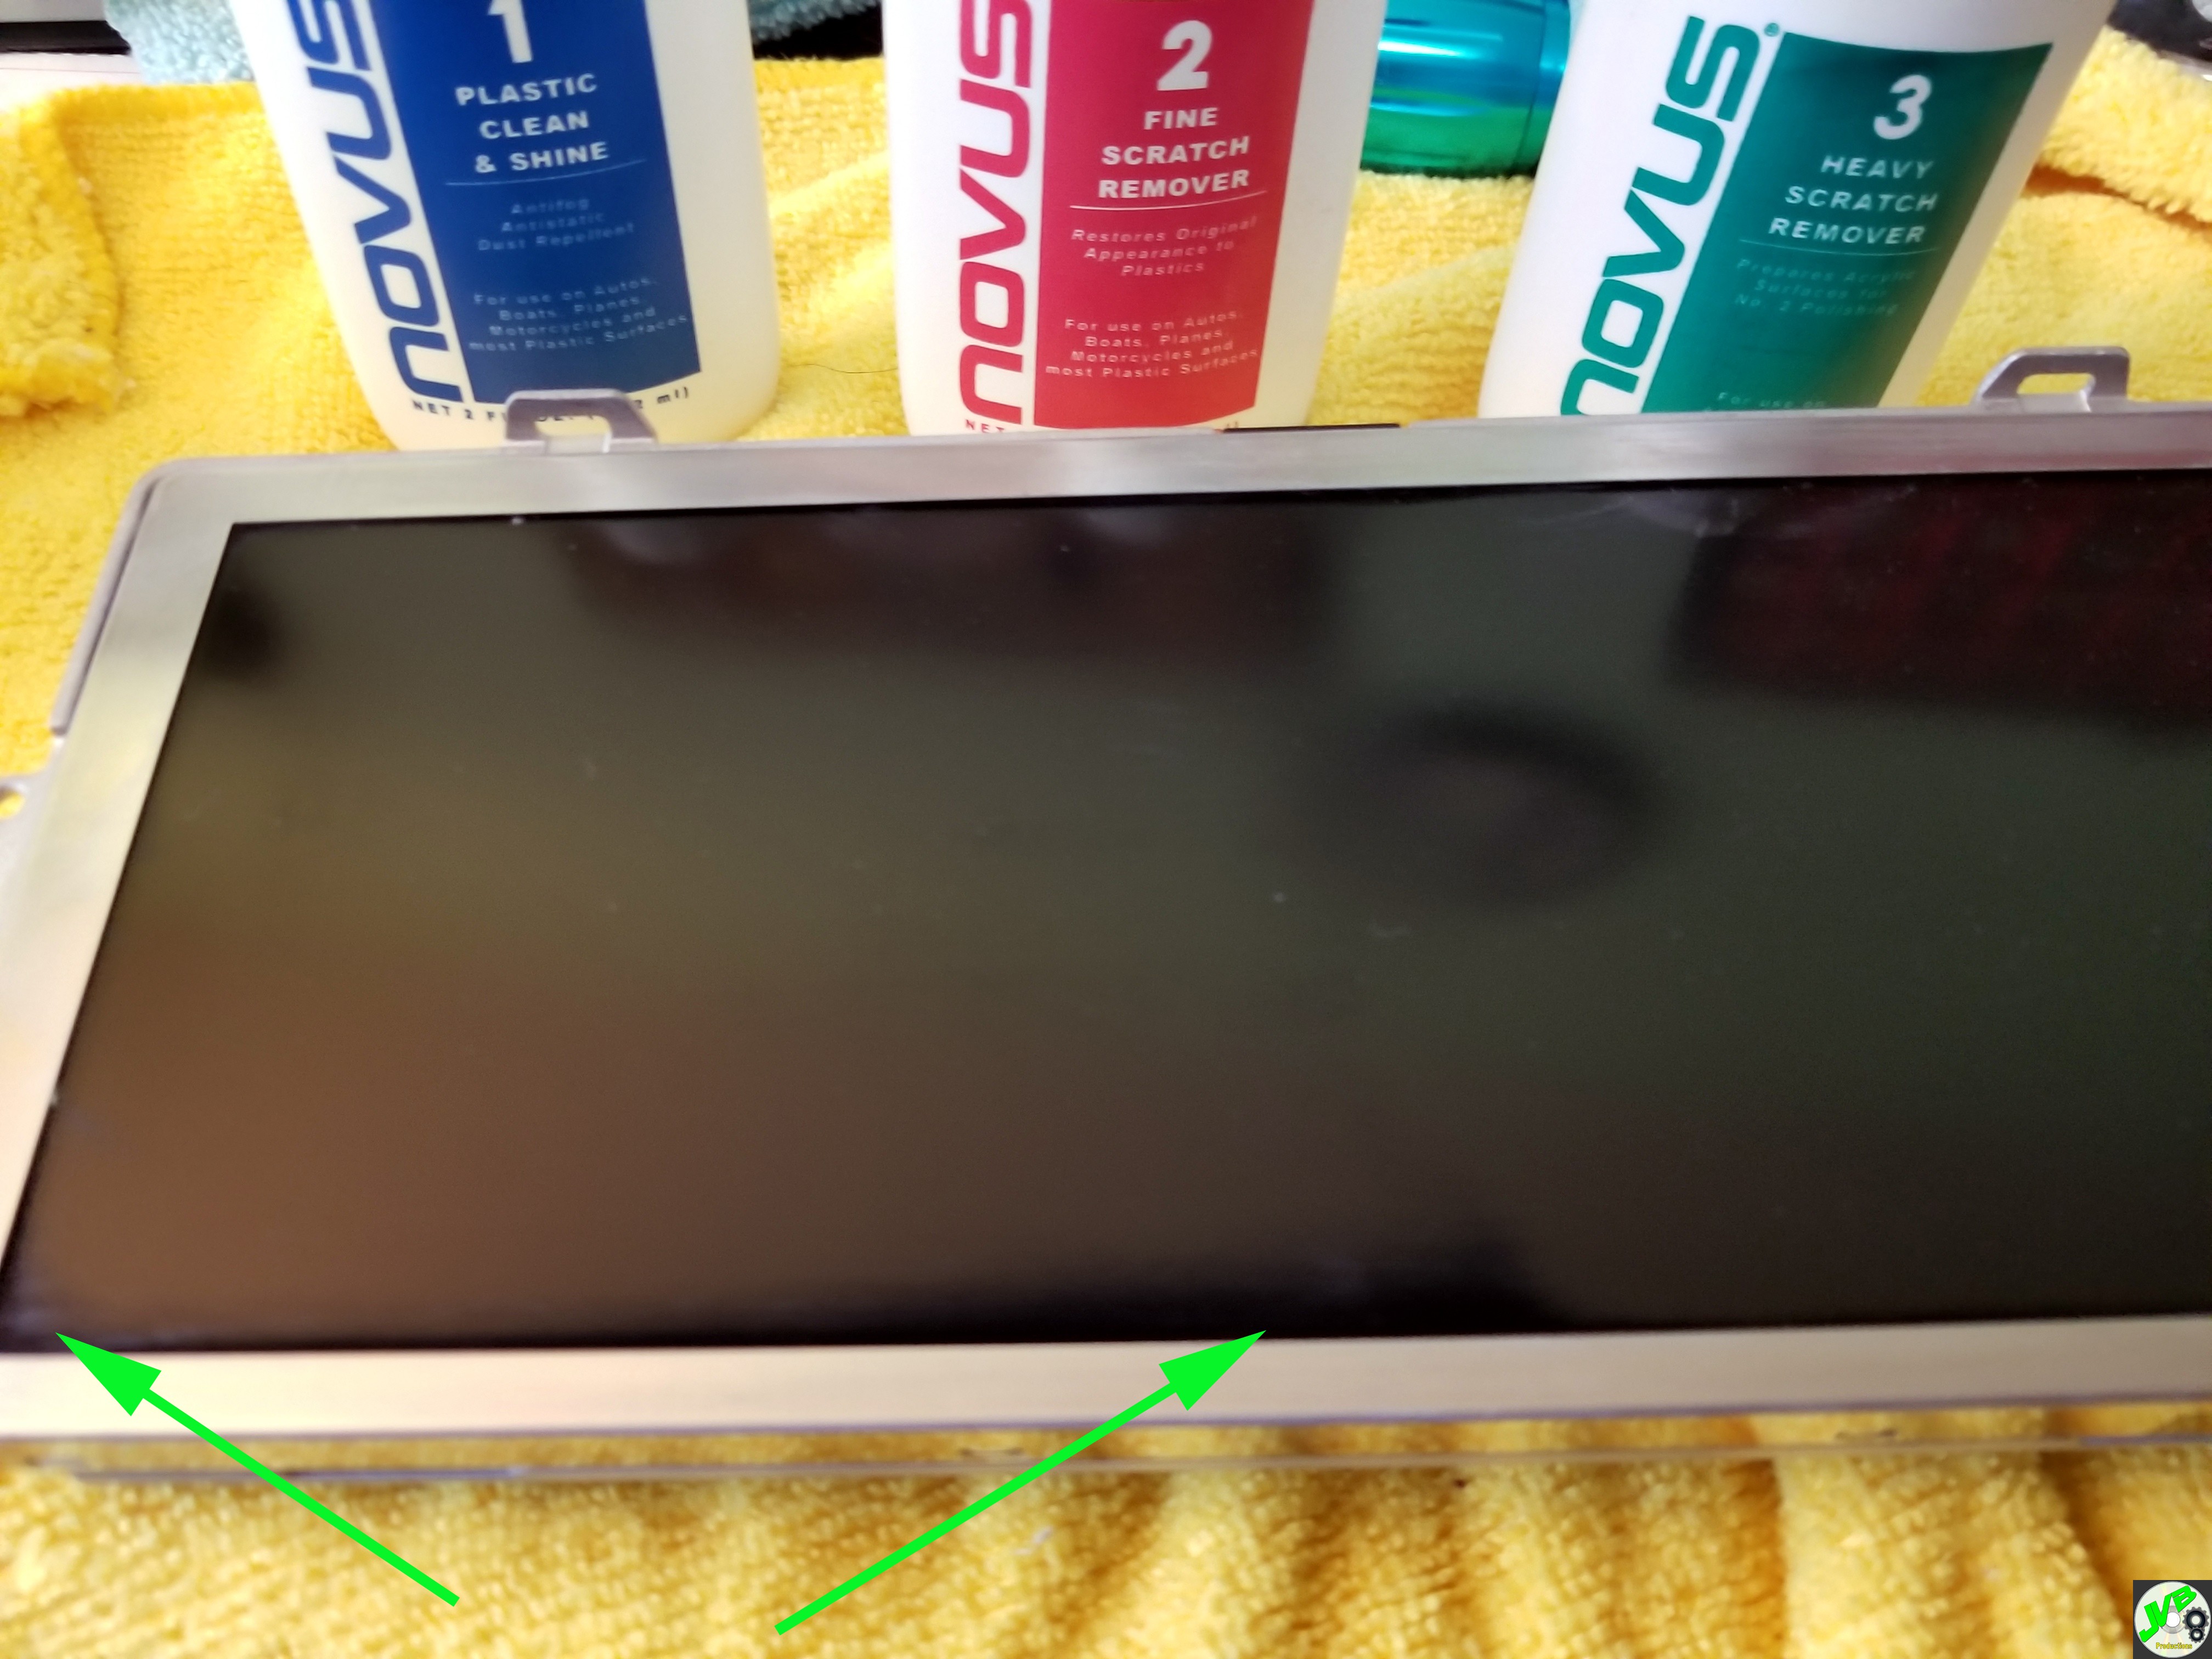 You can see the spots I missed. More #3, then #2, then #1.  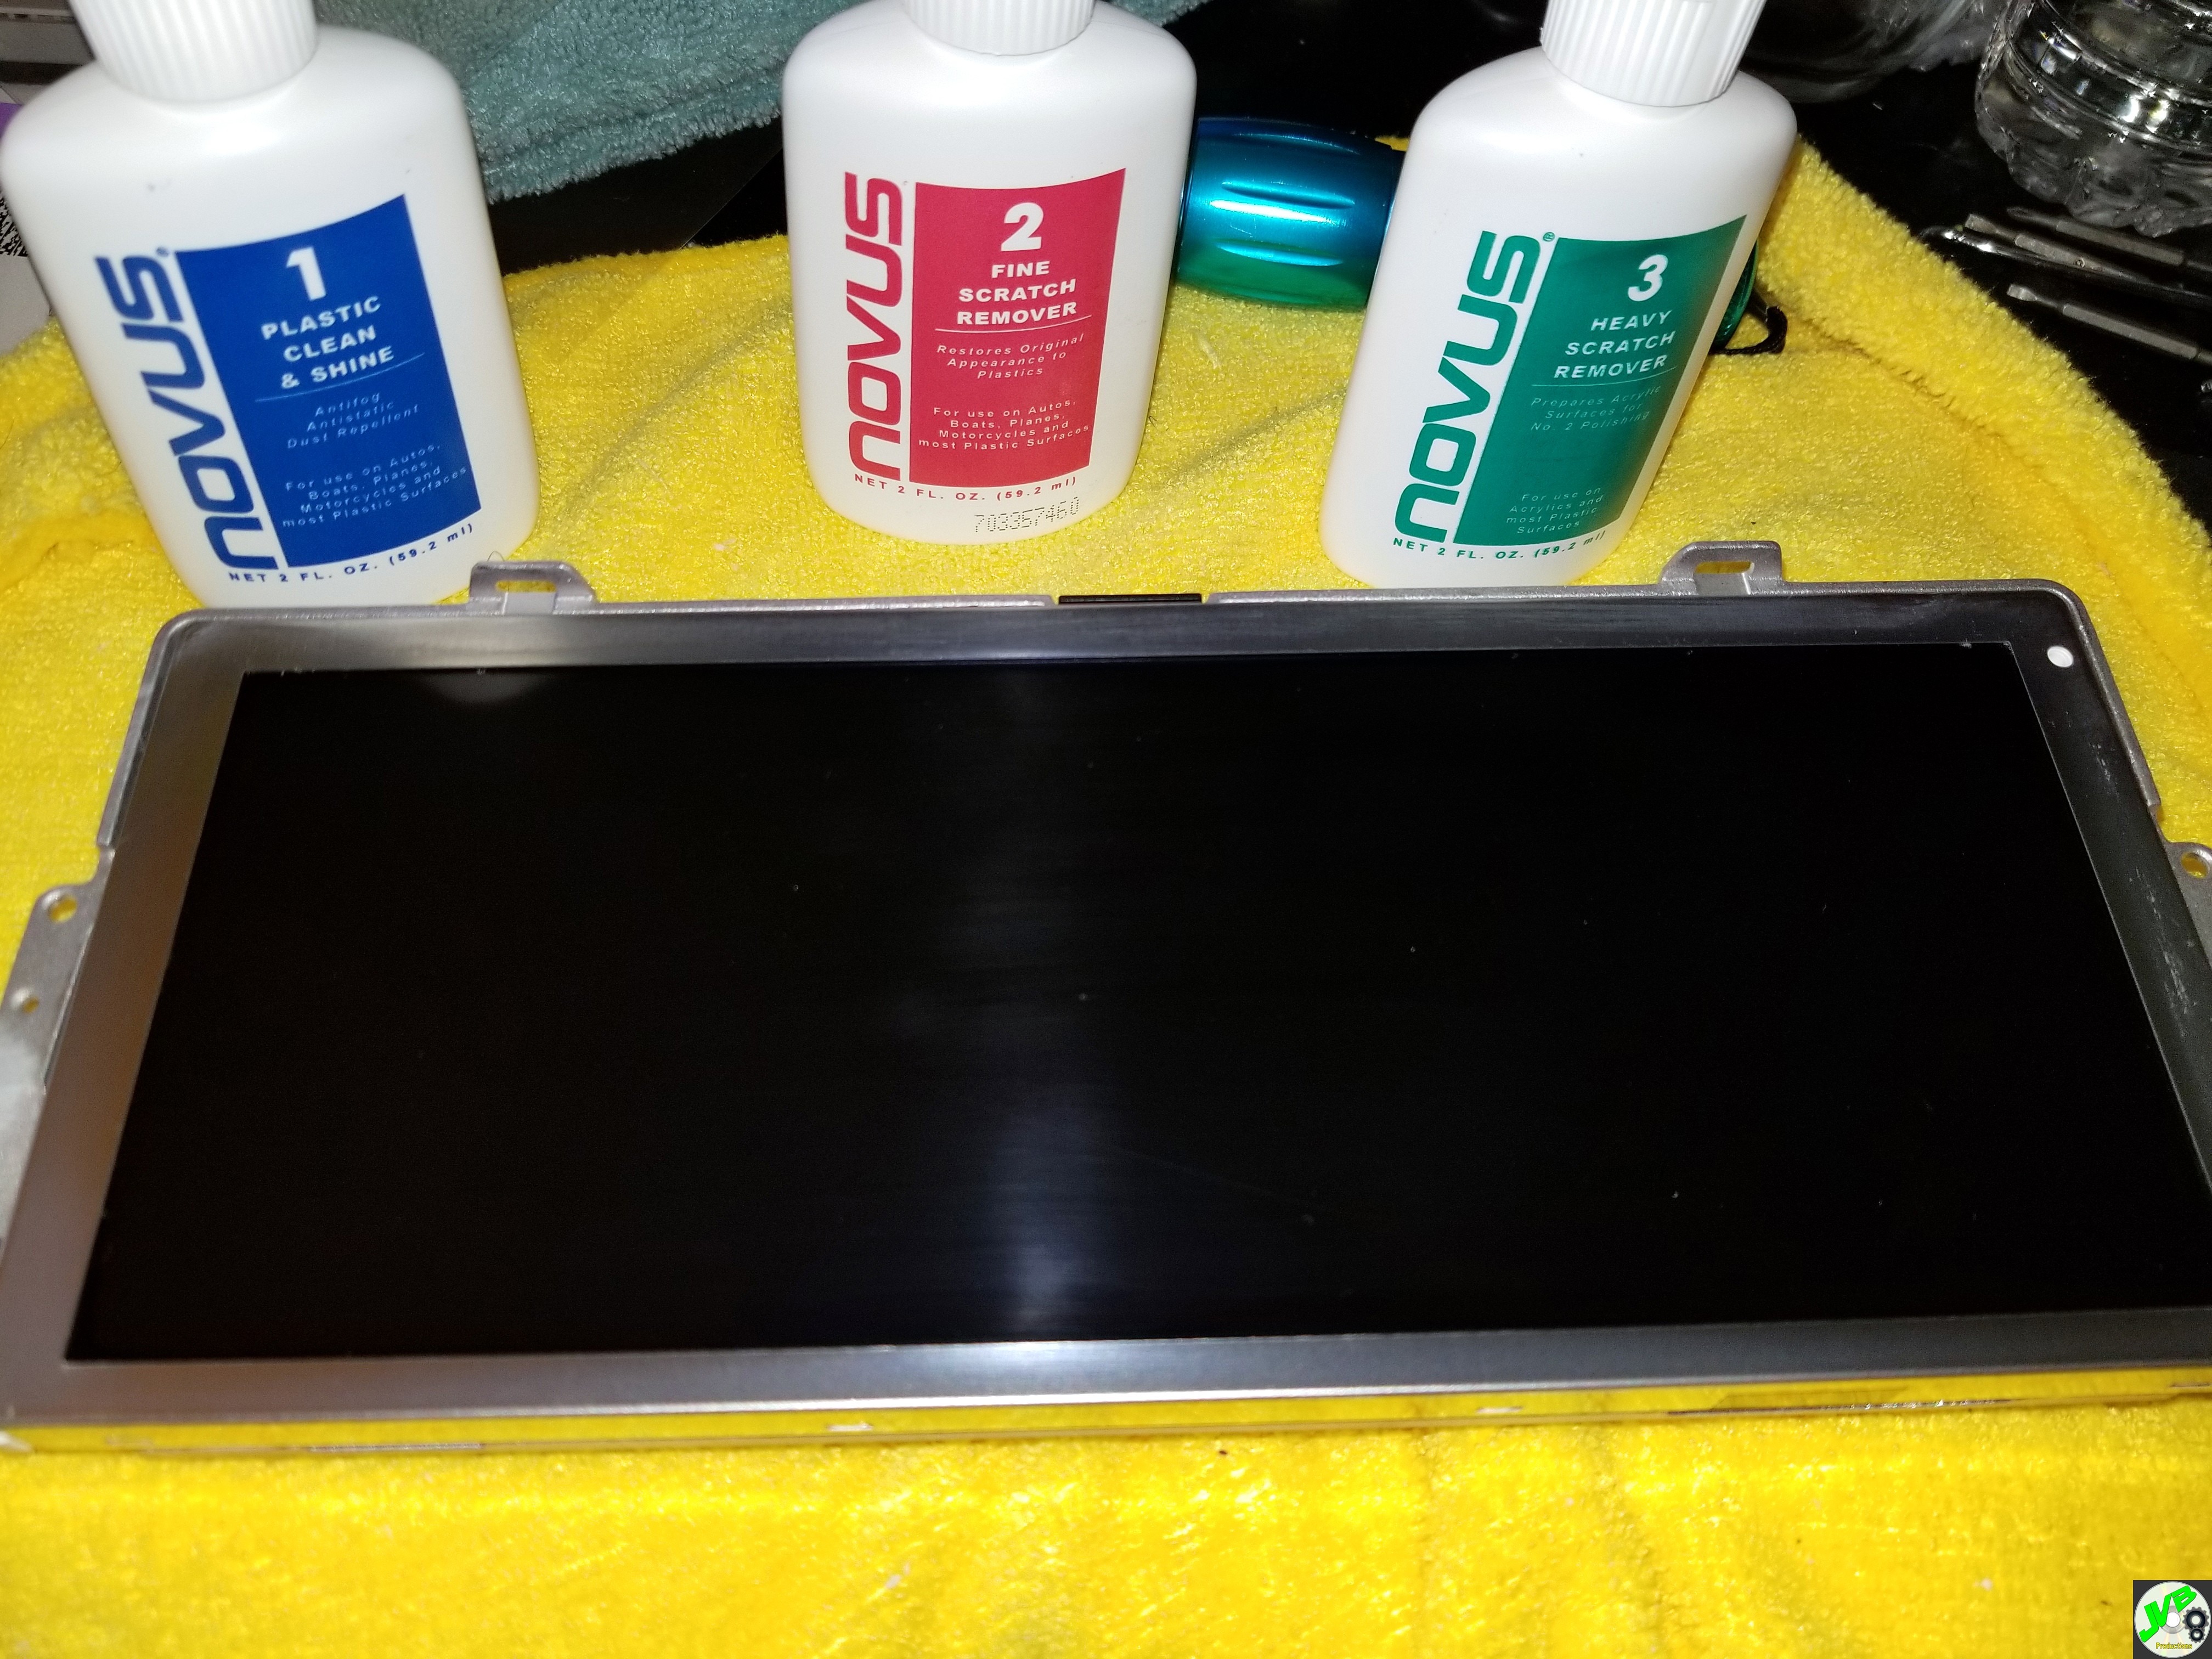 With the added screen anti-glare protector. Now, reassemble the screen to the mount, then add the sun shield, plug in the white cord and prepare to install it back in the car. Place the unit close and re-plug in the two plugs, making certain they are secure. Then slide the unit down into the slot so the unit goes in behind the metal retaining bar in the dash, see arrows. It should slide right in and the screws (T-20) line up. Install the screws. Test the nav to ensure it turns on, then reinstall the vent. The bottom of the vent has hooks, see arrows, that catch on the edge of the dash cover. Gently angle them in. When they are properly placed the bottom of the vent will slide in. Then just snap the top in place. 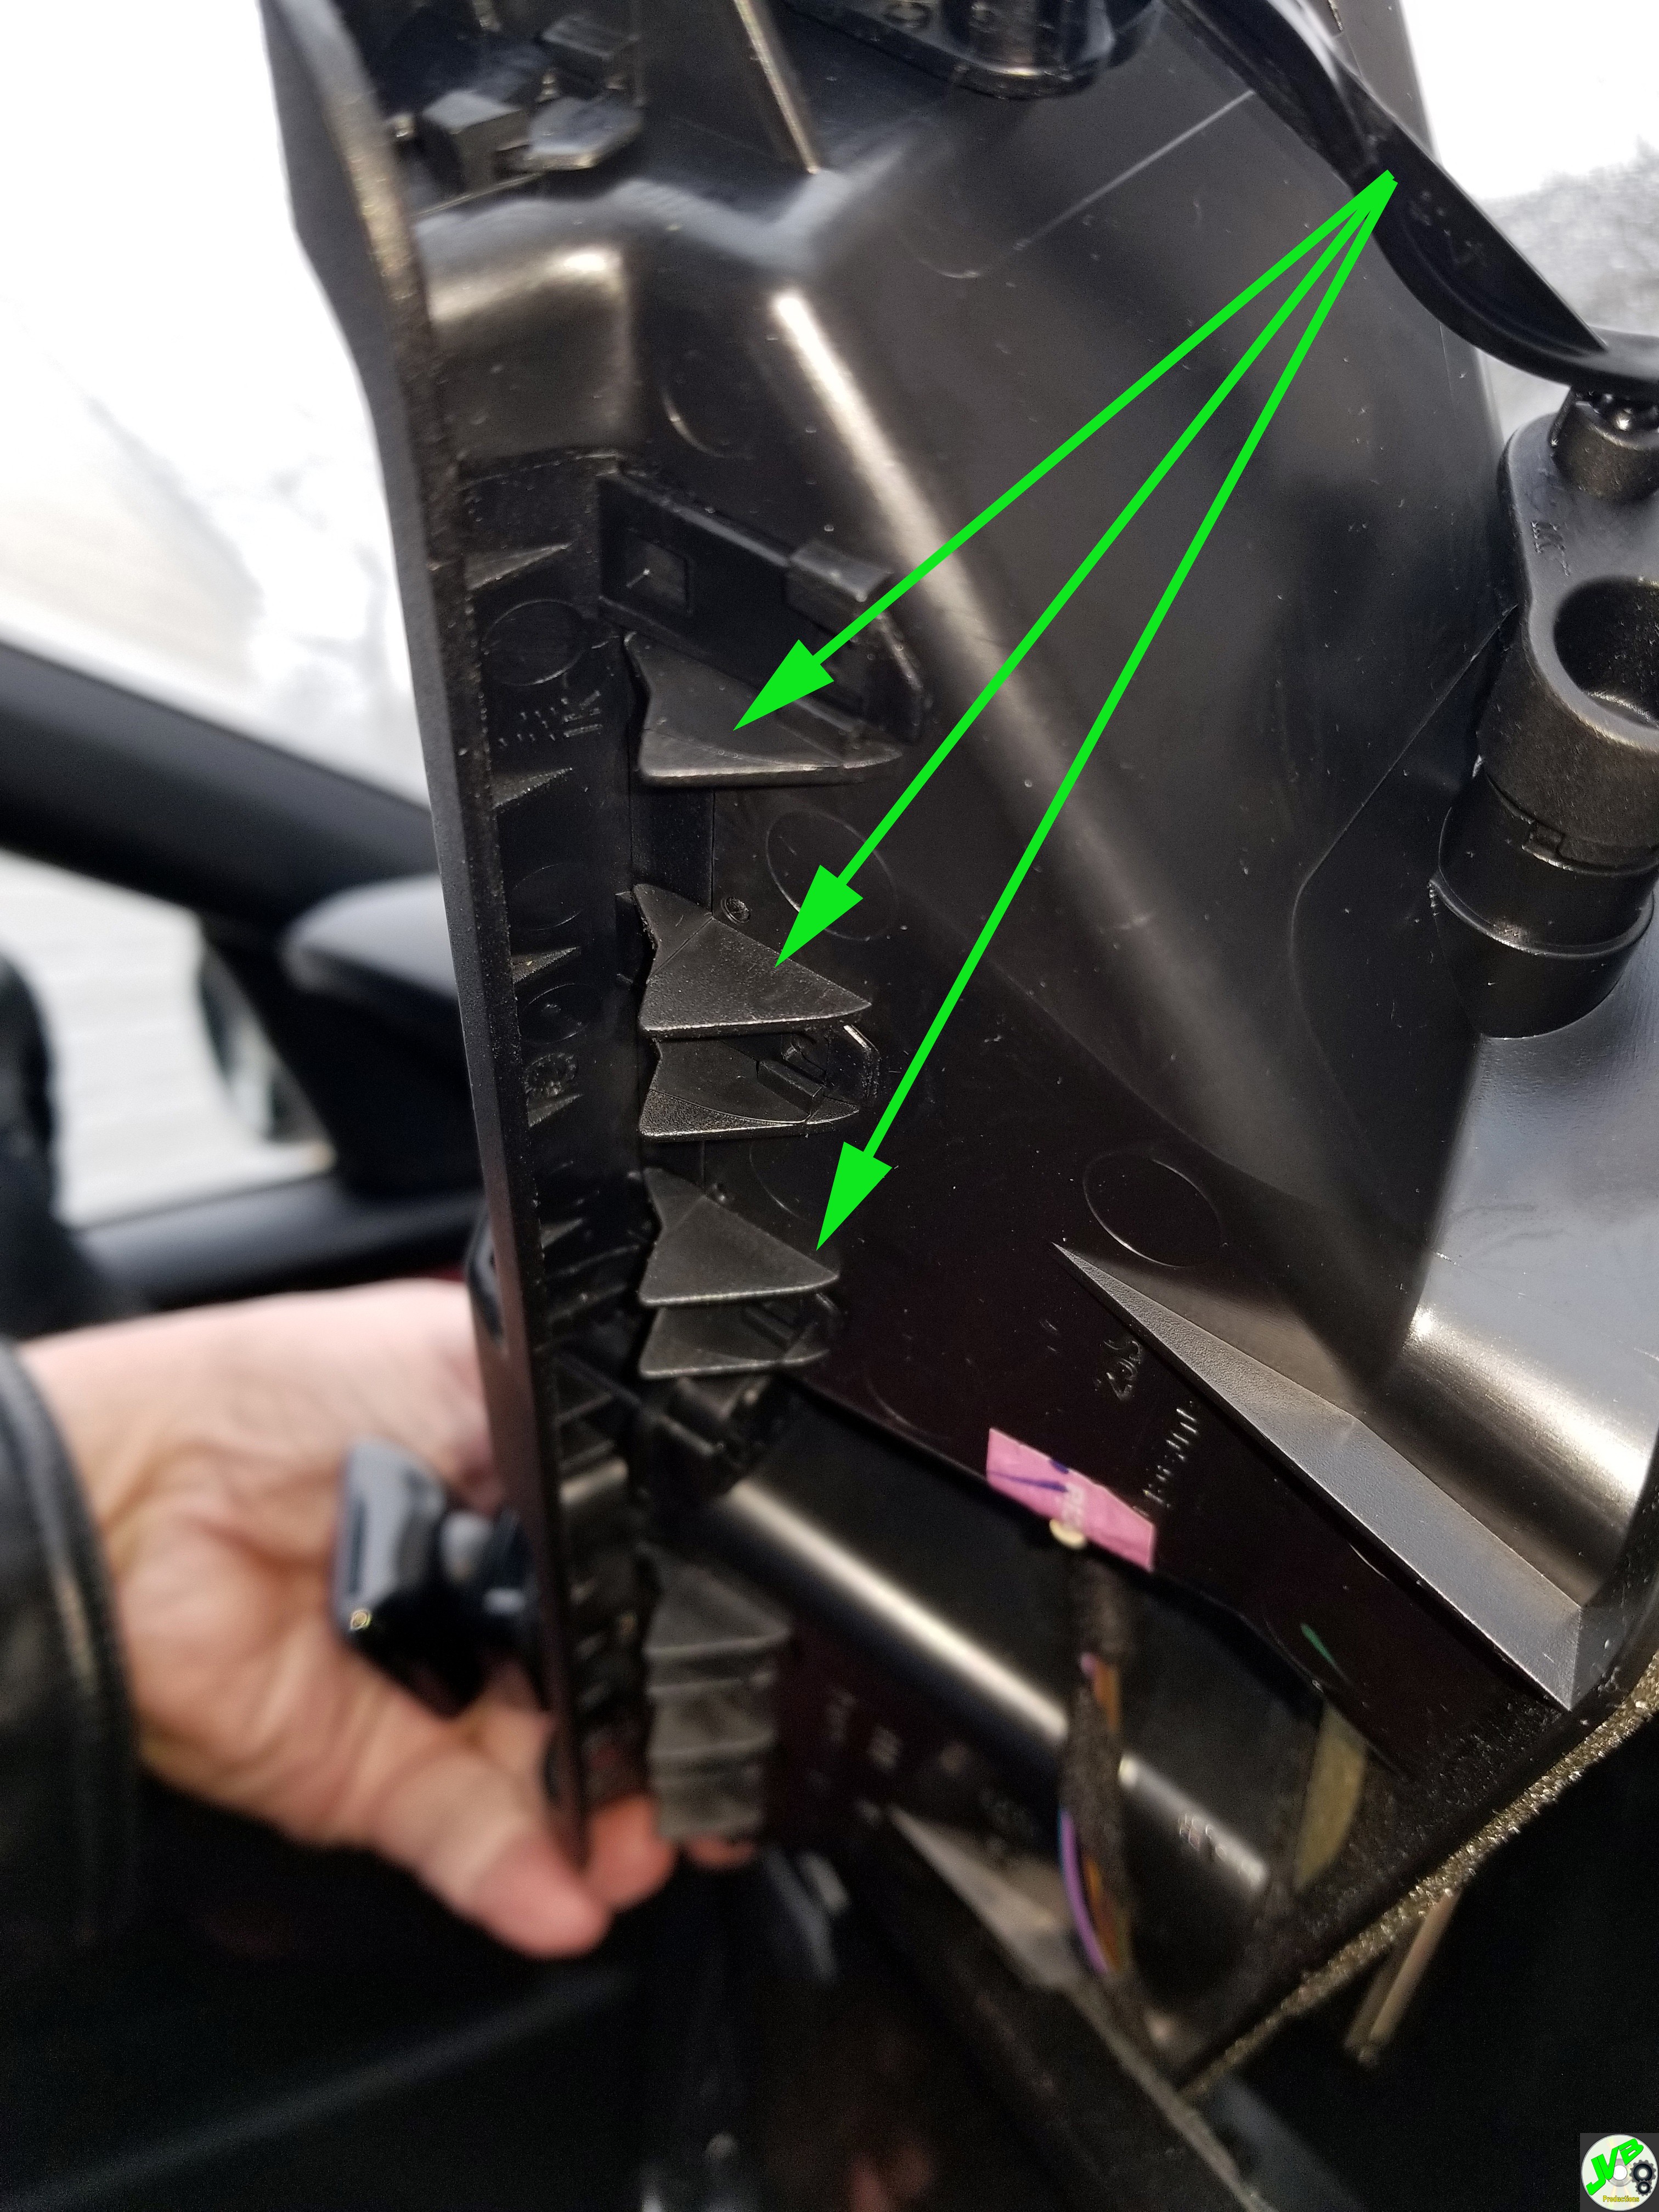 Here are a few shots installed. Note that the screen protector is slightly small, but it is nearly undetectable. 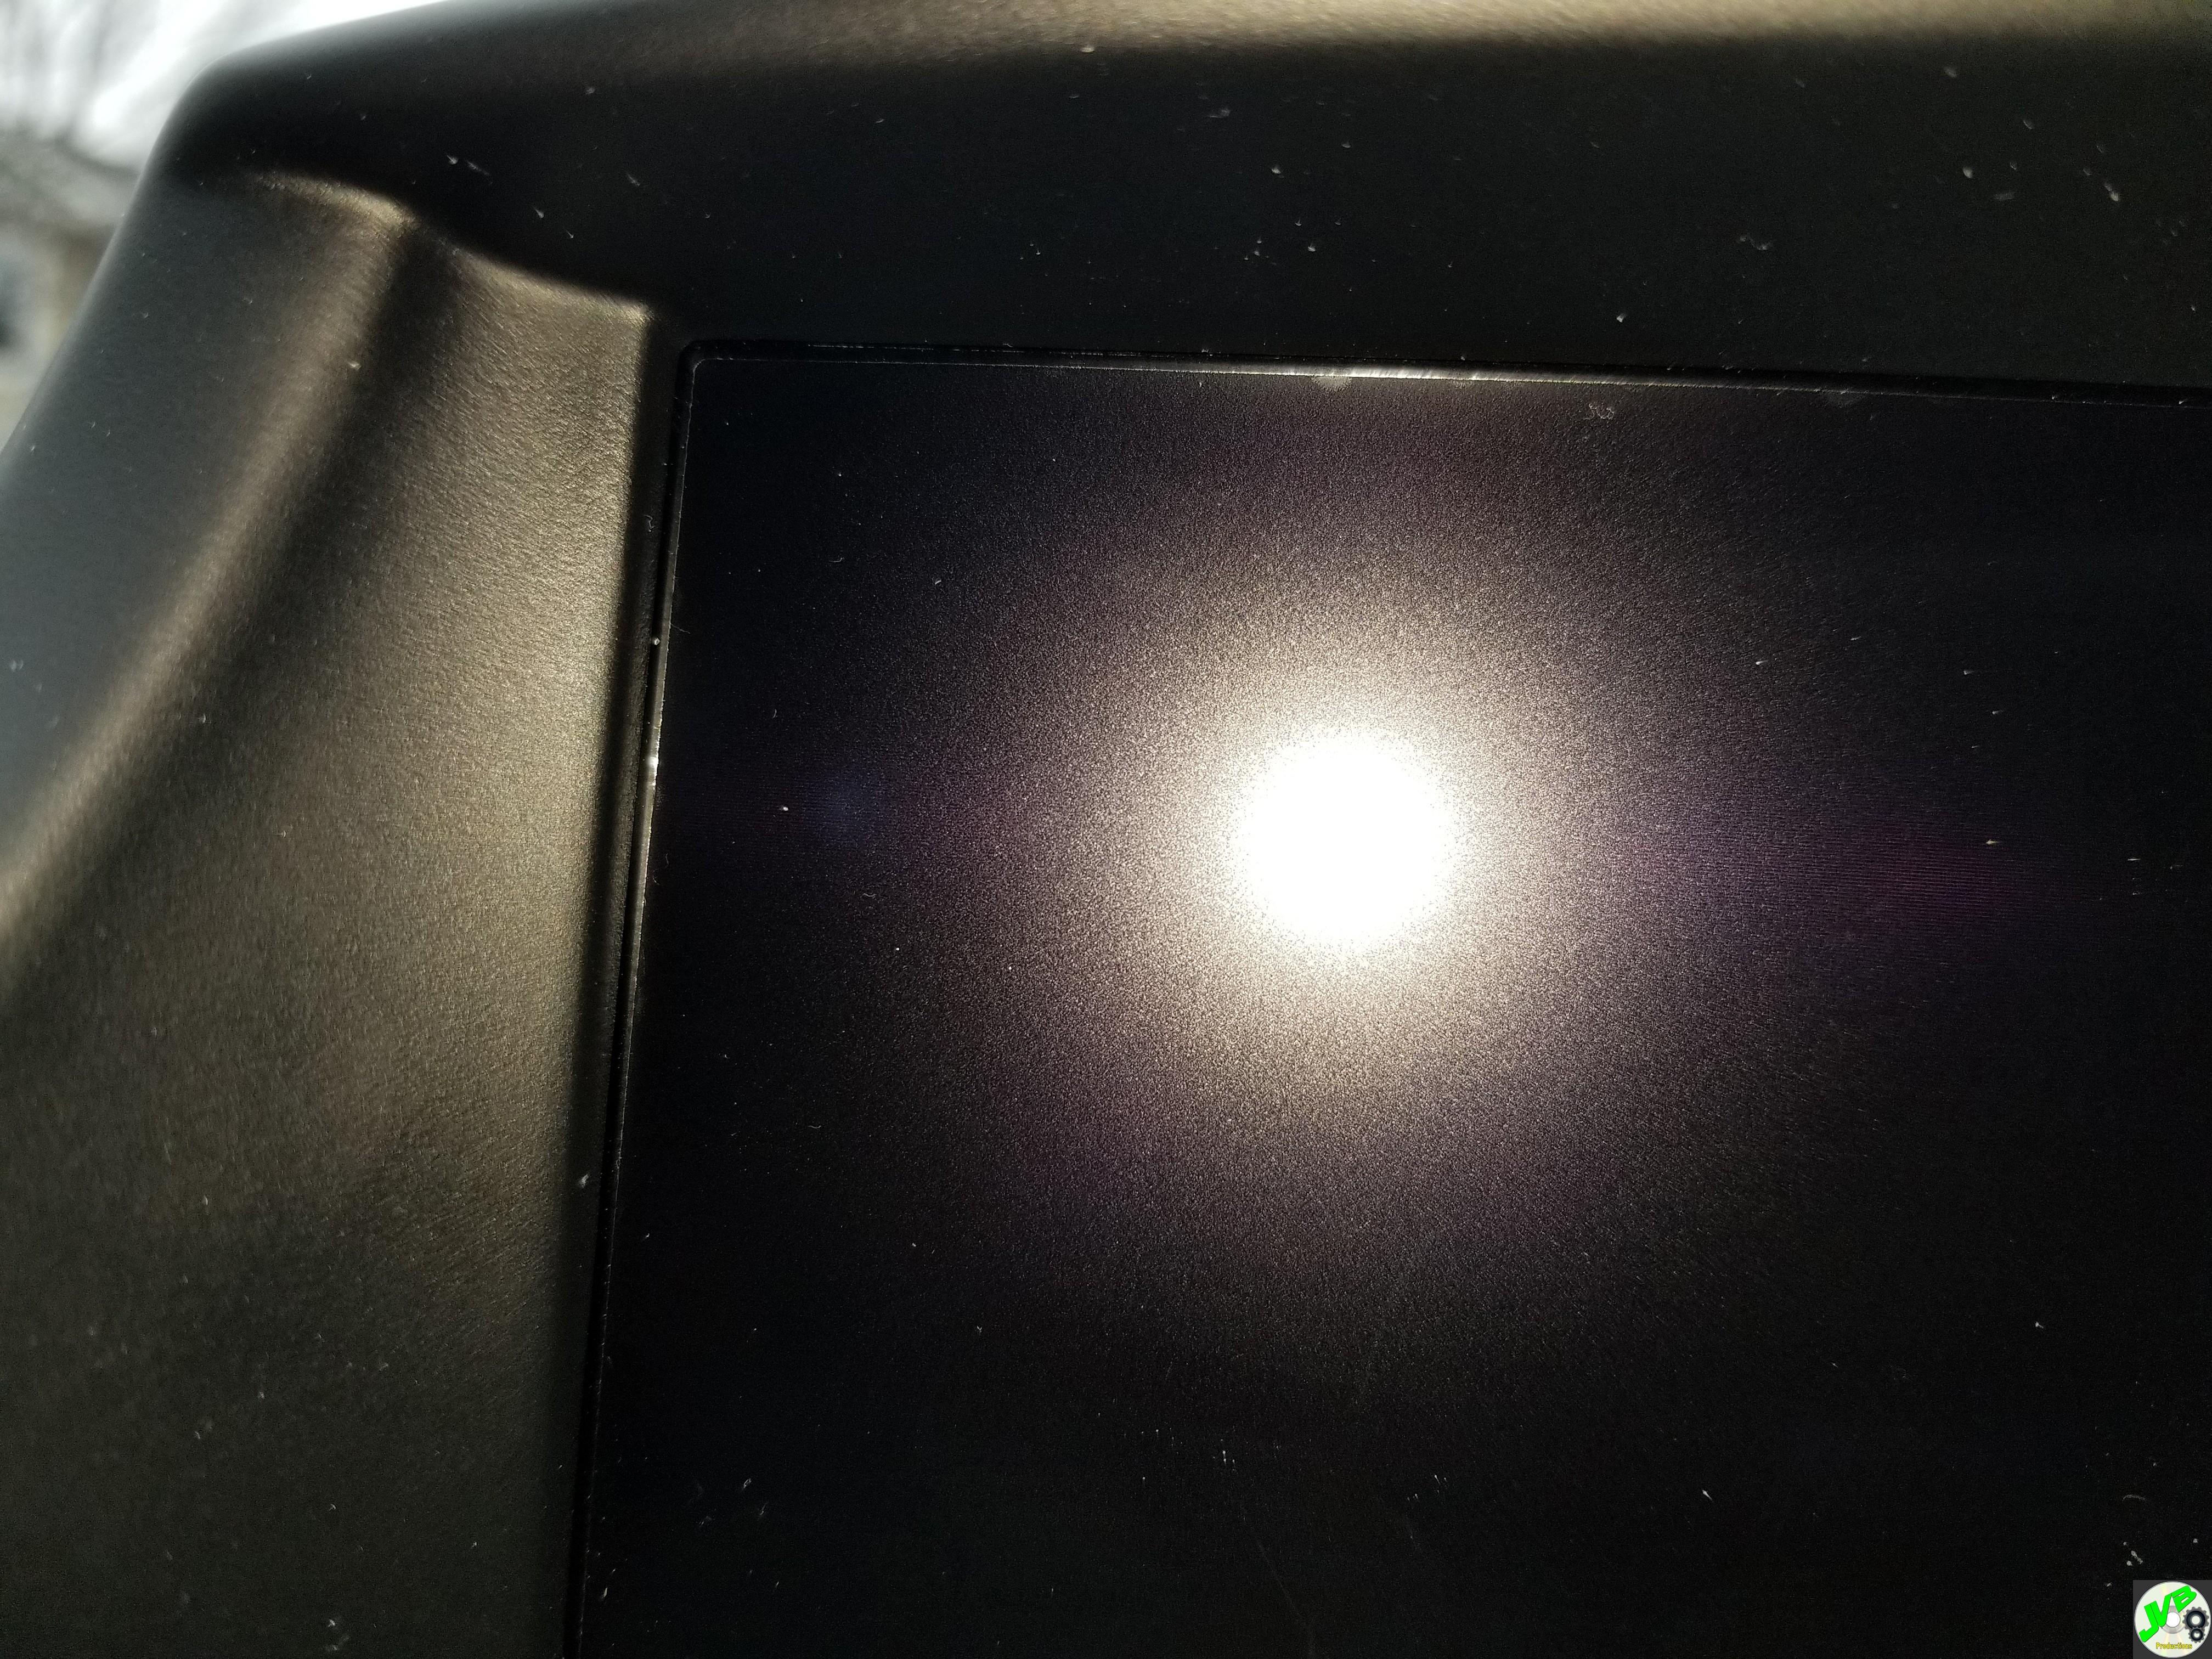 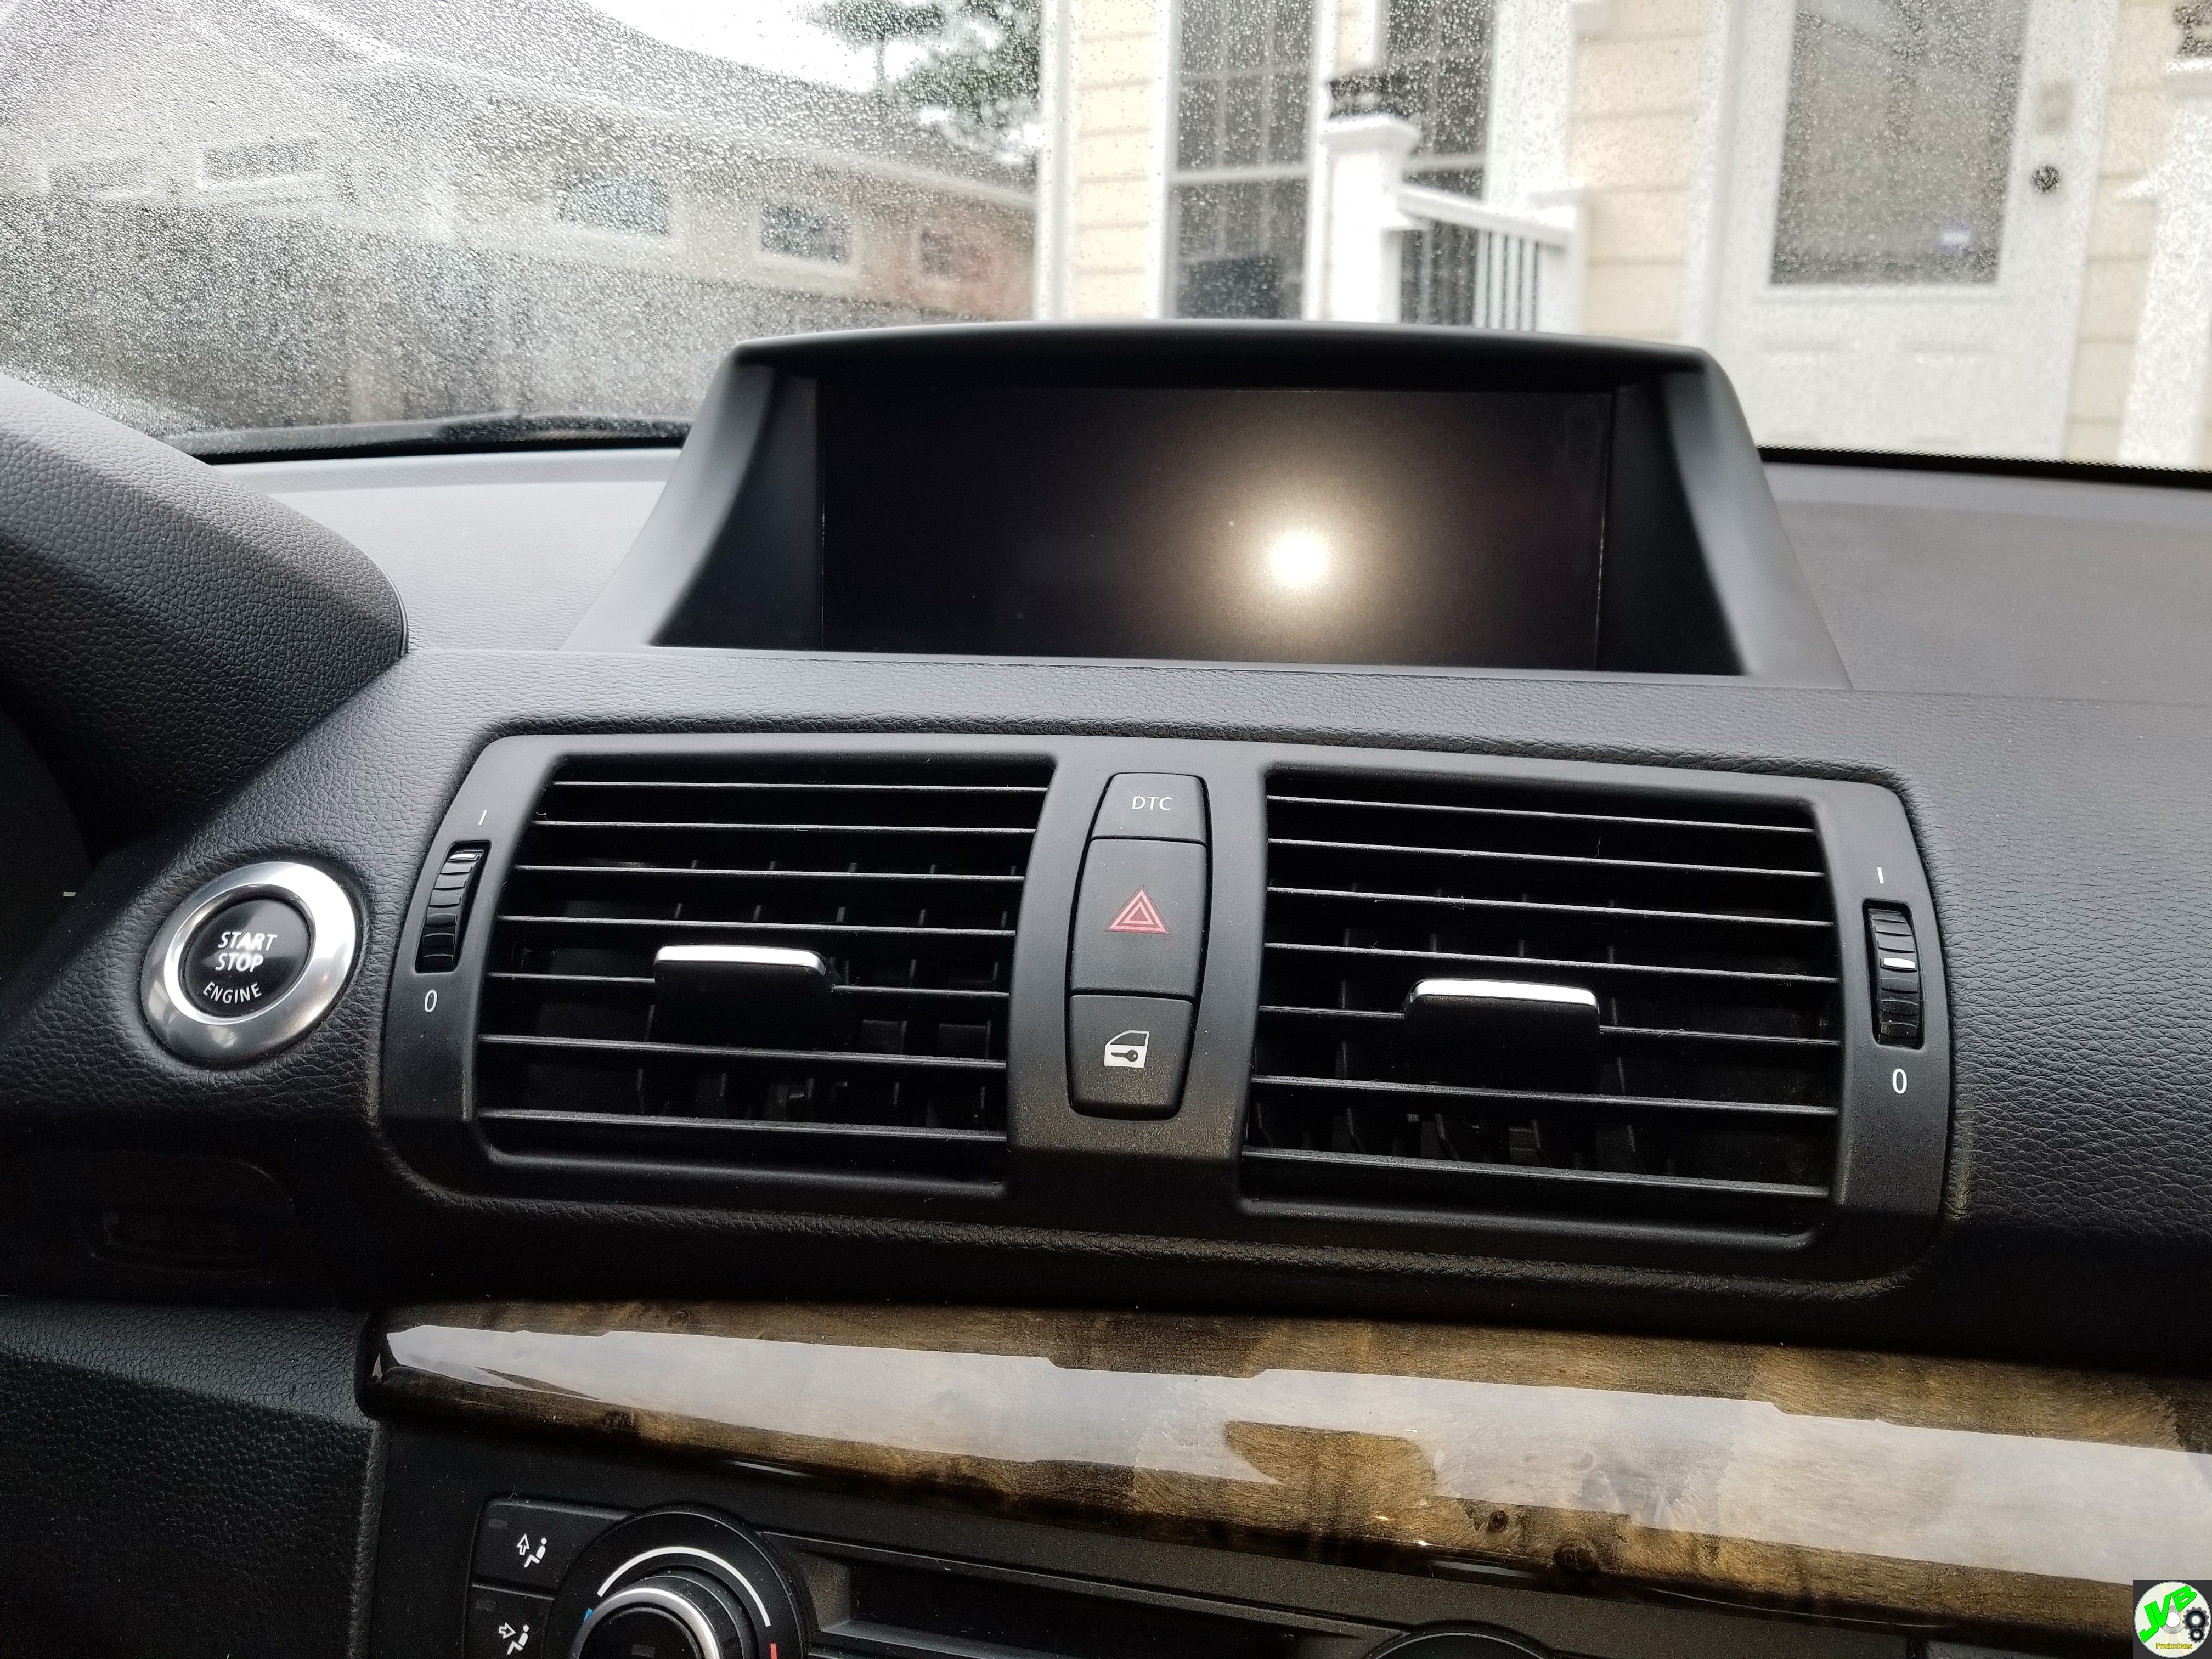  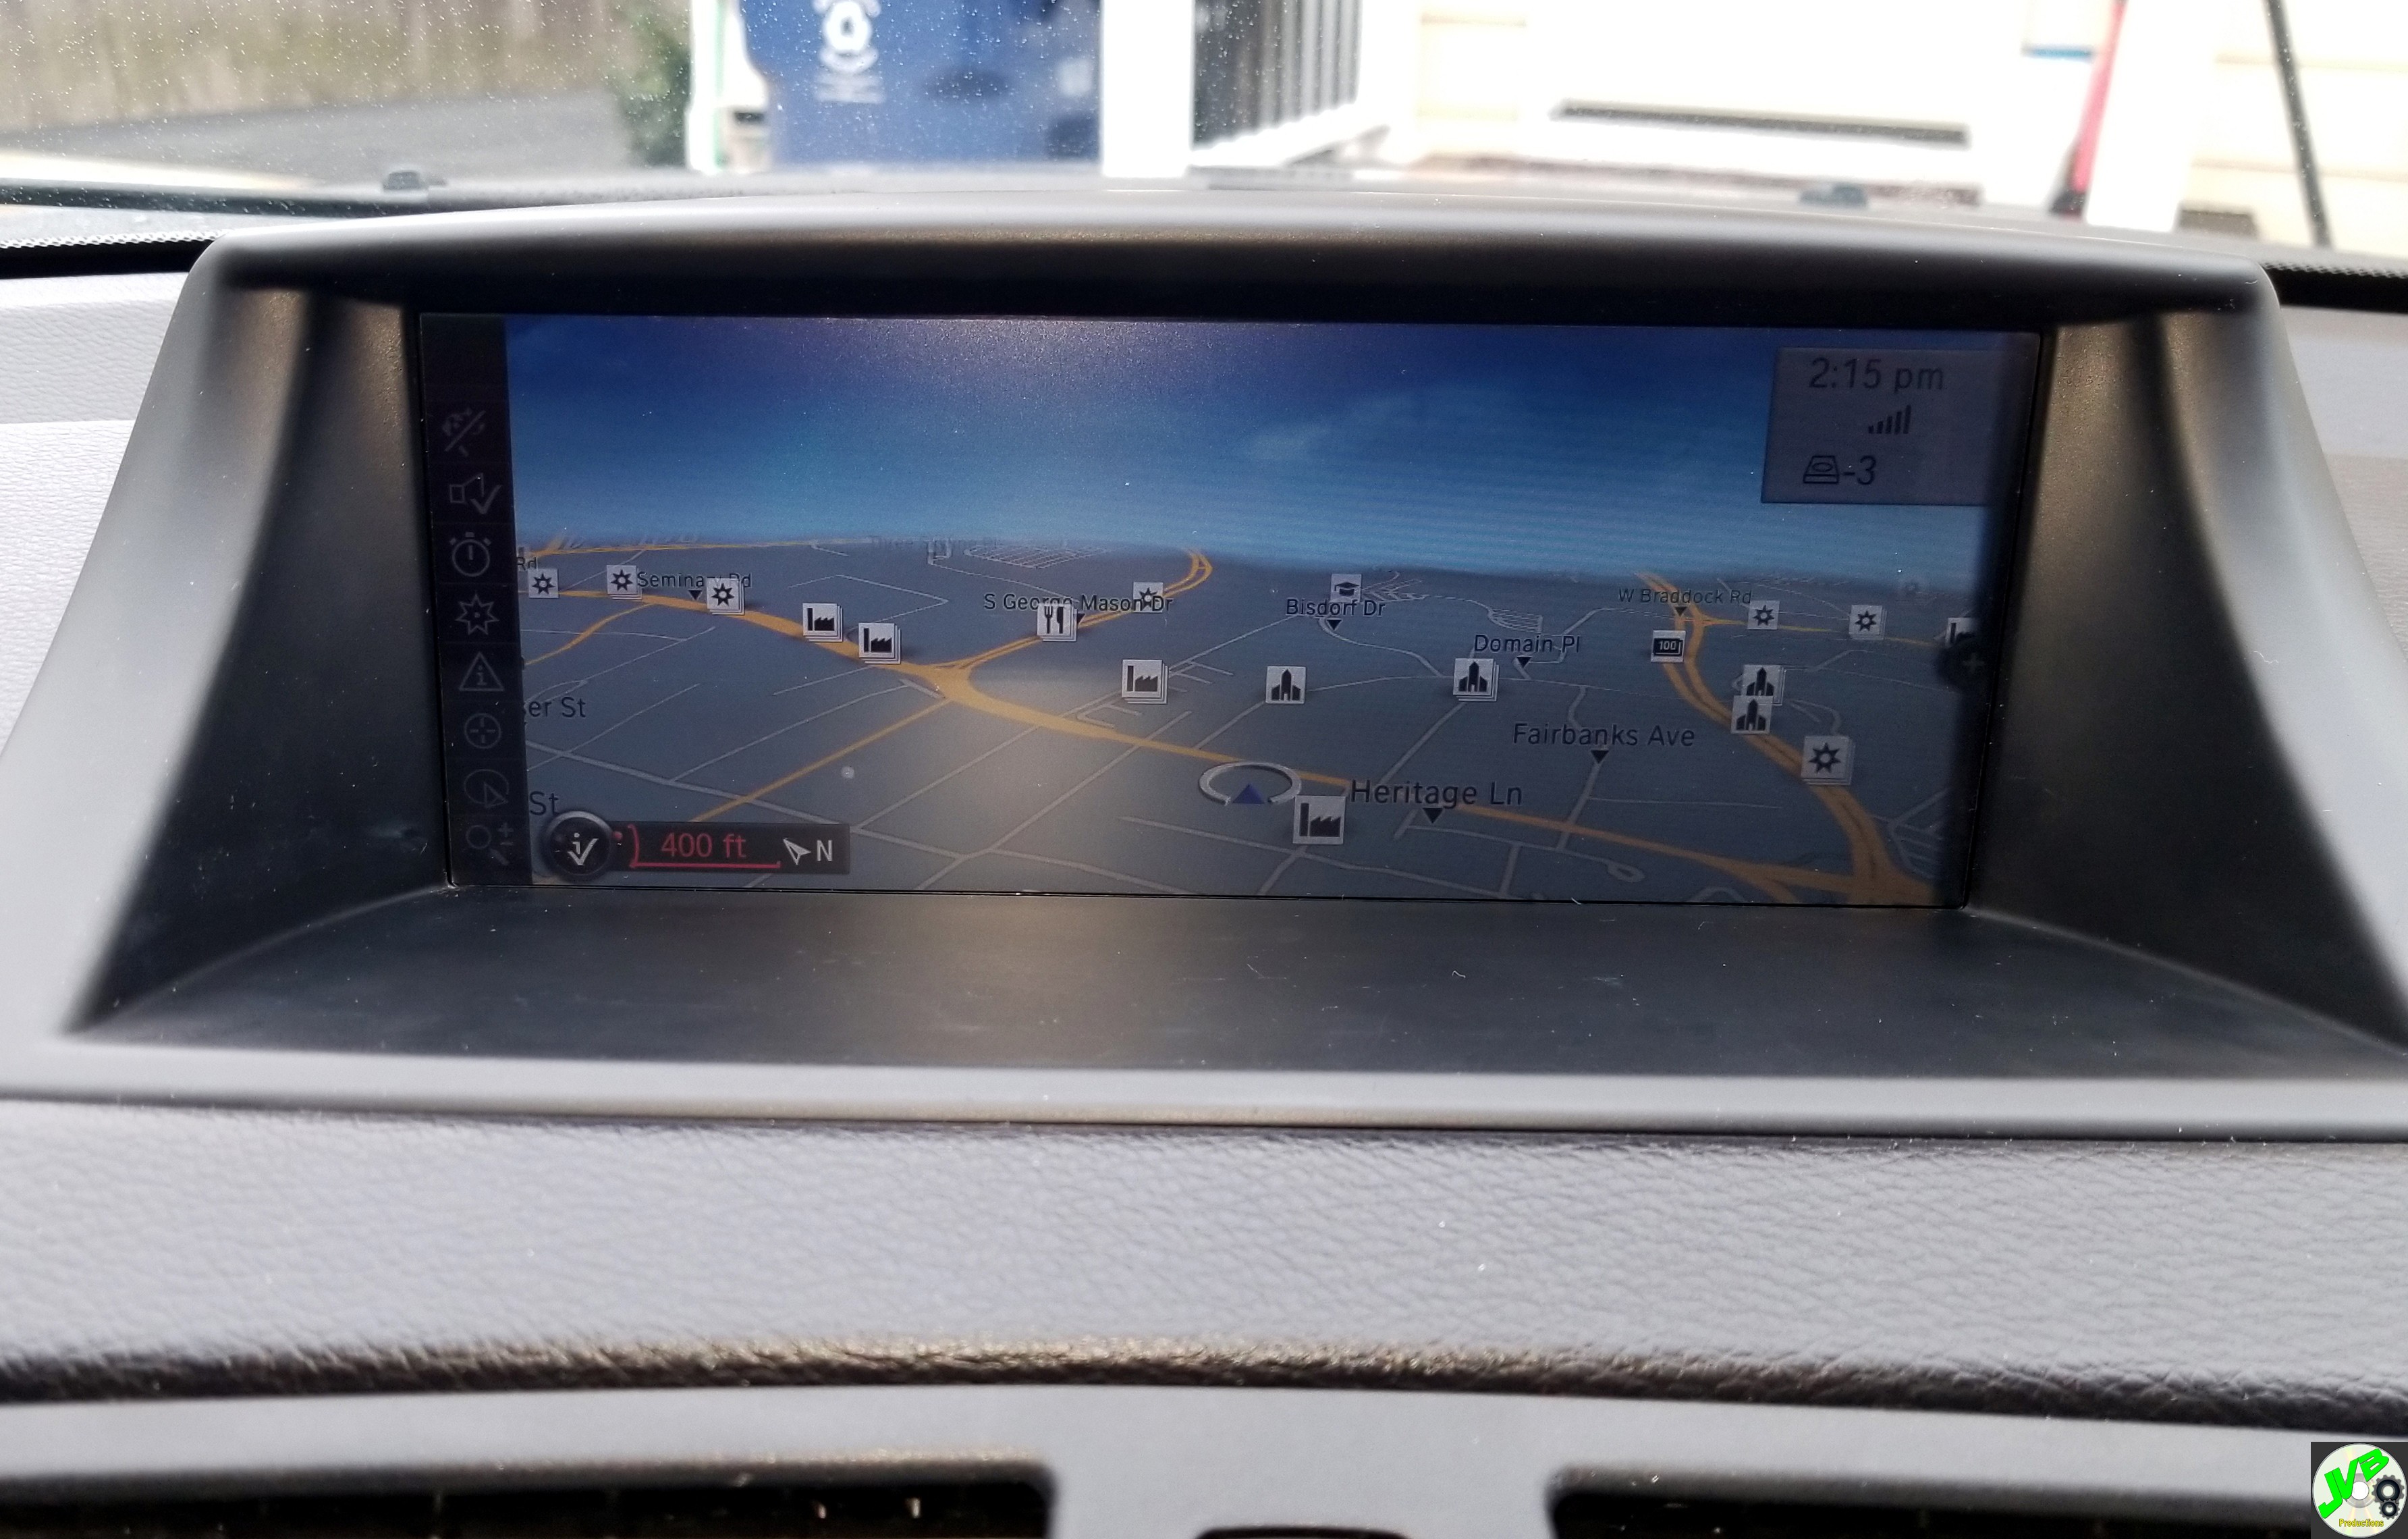 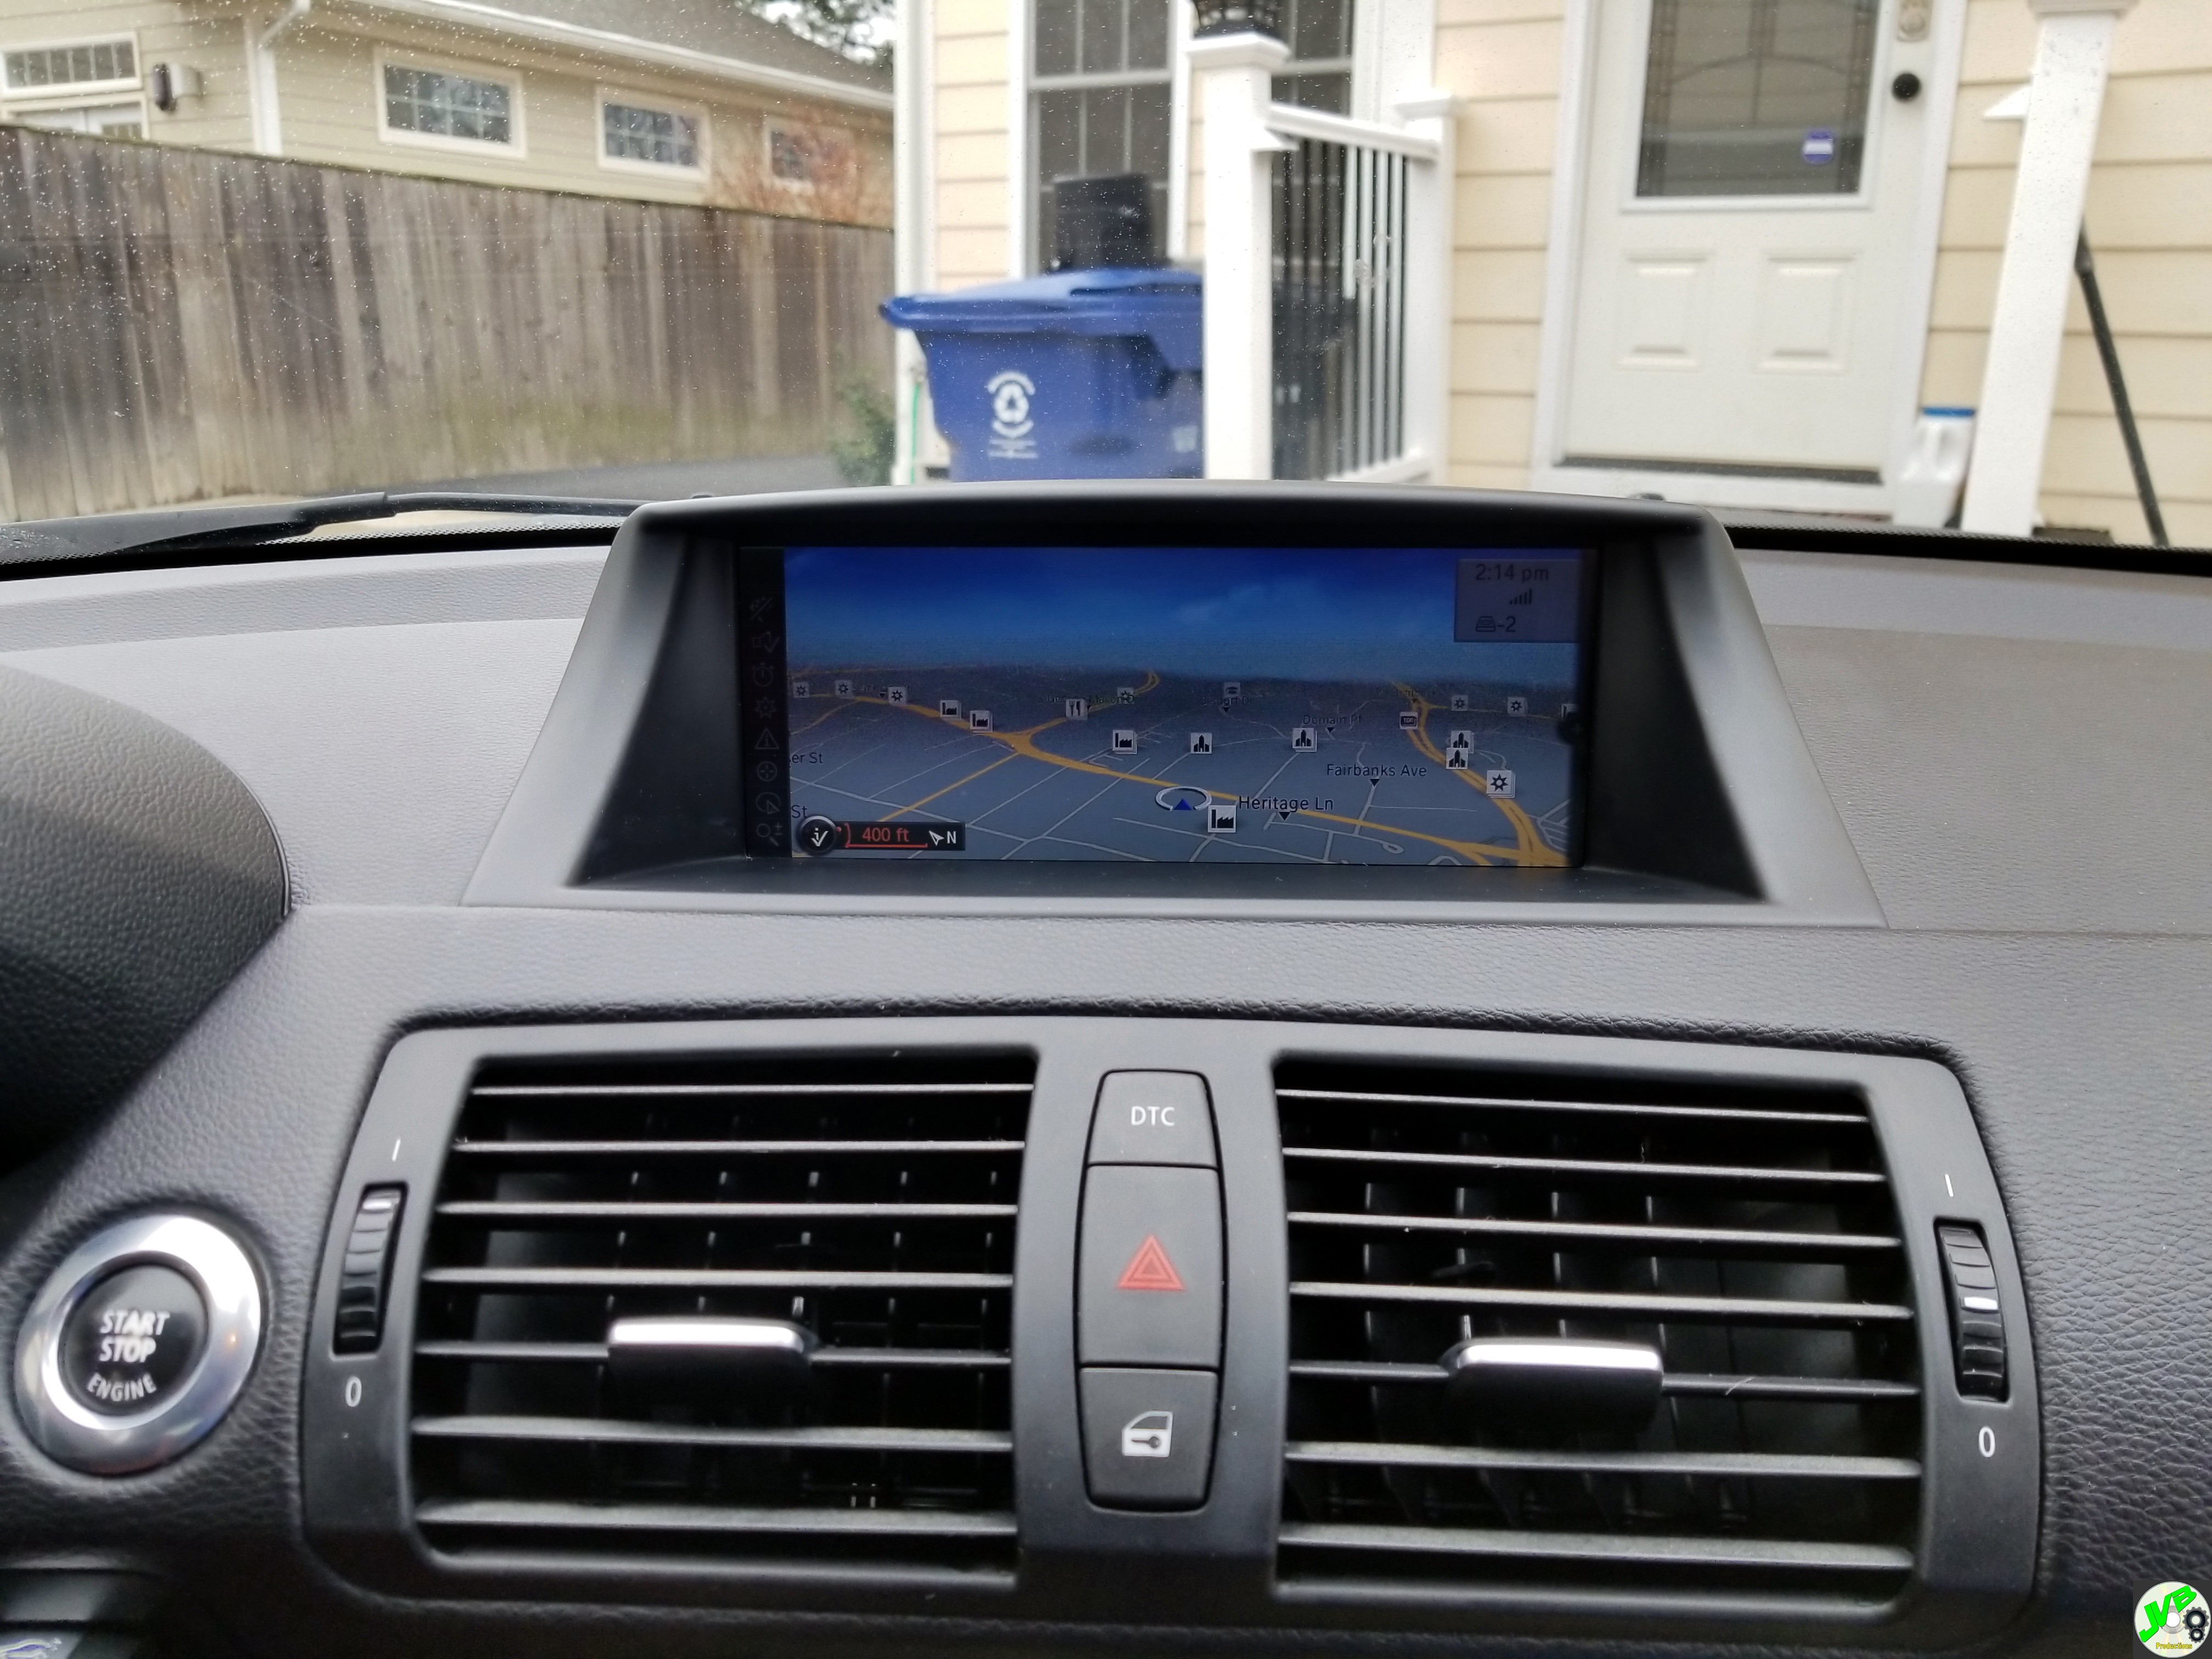 The screen is very clear, no loss of brightness, and actually looks a bit brighter and clearer. Thanks for all those that posted their experience, and I hope this helped others with the same issue.
__________________
Last edited by JimVonBaden; 02-19-2018 at 03:19 PM.. |
|
Appreciate
8
Esteban51318.50 zx10guy5476.50 atr_hugo327.00 tock172584.50 MightyMouseTech4341.50 h.specter4.50 ResinThirteen190.50 lab_rat395.50 |
| 02-19-2018, 03:17 PM | #2 |
|
Sideways and Smiling
3035
Rep 2,860
Posts
Drives: In Exuberance
Join Date: Mar 2017
Location: Rosamond, CA USA
|
Nice write-up! The pictures are great and your instructions are clean and direct.
This is irrelevant to me though, as I have no iDrive 
__________________
2012 BMW 328i 6-Speed Wagon | Deep Sea Blue with Grey Dakota Leather | Manual Swap, 330i Intake + Tune, 3.15 Helical LSD, Öhlins R&T
(SOLD) 2009 BMW 128i 6-Speed Coupé | Monaco Blue with Black Sensatec | chris_flies' 128i thread |
|
Appreciate
1
JimVonBaden905.50 |
| 02-19-2018, 03:25 PM | #3 |
|
Major General

51319
Rep 7,236
Posts |
Yeah, great job and I'm sure others will benefit from your detailed DIY.
Like chris_flies, no iDrive here either. |
|
Appreciate
1
JimVonBaden905.50 |
| 02-20-2018, 12:14 PM | #4 |
|
European Editor

10759
Rep 22,992
Posts |
Great DIY!! I moved it to the Nav section and made it a Sticky!
 Dackel
__________________
|
|
Appreciate
0
|
| 12-28-2018, 12:13 AM | #5 |
|
Registered
0
Rep 1
Posts |
Great post, getting ready to tackle this myself soon. Just picked up a used 2009 135i from coworker and the screen needs some love. Hopefully I get the same results as you...
 |
|
Appreciate
0
|
| 12-28-2018, 08:42 PM | #6 | |
|
BMW Cool Aide!
906
Rep 841
Posts |
Quote:
__________________
|
|
|
Appreciate
0
|
| 12-29-2018, 12:57 AM | #7 |
|
Beachtown Bill Collector
585
Rep 1,062
Posts
Drives: 2012 135i
Join Date: May 2011
Location: San Diego
|
Excellent DIY, not sure how I missed this for several months as I've had another similar thread saved for years. Nicely done with the repair as well. I'd love to do this myself. It looks seriously satisfying with a great end result.
My first 135i deserved this, but my second one has just a few minor scratches, none of which are visible during actual use. I actually just purchased the Lexerd cover for it to see if it will hide them when the screen is off.
__________________
 2012 BMW 135i Space Grey Metallic M-Sport DCT Dinan S2 |
|
Appreciate
1
JimVonBaden905.50 |
| 01-15-2020, 10:59 PM | #9 | |
|
BMW Cool Aide!
906
Rep 841
Posts |
Quote:
__________________
|
|
|
Appreciate
0
|
| 08-22-2021, 12:50 PM | #10 |
|
New Member
3
Rep 20
Posts |
I'm curious if cutting an anti glare cover for a laptop/iPad down to size would work adequately instead of waiting on a tuff cover in the mail. I'm tackling this job soon. Thoughts?
|
|
Appreciate
0
|
| 10-28-2021, 09:03 AM | #12 | |
|
Private First Class
 191
Rep 128
Posts
Drives: 09 135i
Join Date: Oct 2021
Location: Miami, FL
|
Quote:
Thanks so much to JimVonBaden for the walkthrough! Just ordered both the polishing kit and the protector, so I'm excited to get it fixed! |
|
|
Appreciate
0
|
| 11-10-2021, 01:07 PM | #14 |
|
Private First Class
191
Rep 128
Posts
Drives: 09 135i
Join Date: Oct 2021
Location: Miami, FL
|
So, I tried every single method in this thread and absolutely NOTHING worked to remove the caked-on coating after 12 years of being parked in the sun.
Did a little hunting for just the display panel by itself, took it apart, replaced the panel and it's brand mew again!!! Highly recommended as there was absolutely no way in hell I was gonna pay some $2,400+ for a new unit from BMW!! |
|
Appreciate
0
|
| 11-19-2021, 05:18 PM | #15 | |
|
Second Lieutenant
 
138
Rep 253
Posts
Drives: 2013 128i LE
Join Date: Feb 2015
Location: Guam
|
Quote:
__________________
// '13 BSM 128i Limited Edition //
|
|
|
Appreciate
0
|
| 11-19-2021, 11:55 PM | #16 | ||
|
Private First Class
191
Rep 128
Posts
Drives: 09 135i
Join Date: Oct 2021
Location: Miami, FL
|
Quote:
It seems like lots of sellers are selling parts that are compatible with the part number than ends in 02 and 01 but I made sure to get one that ends in 02. No coding, no fitment issues, nothing. Perfect replacement. Let me know if you have any other questions. |
||
|
Appreciate
2
1smokehouse137.50 lab_rat395.50 |
| 01-07-2022, 06:32 PM | #17 |
|
Second Lieutenant
22
Rep 277
Posts |
My daughters 09 Vert screen has been beyond terrible for some time. I polished through one too many layers apparently as upon reinstalling, all I got was a bright but otherwise blank screen
On to plan B
I purchased and installed the 02 screen part from EBay ($128). Now it works/looks just like new!
|
|
Appreciate
1
ResinThirteen190.50 |
| 02-09-2022, 05:35 PM | #18 | |
|
New Member
2
Rep 12
Posts |
2012 135i Messed up the screen
I had the de-laminating issue, and I mistakely tried to scrape off the delaminated material and I f'd up the screen totally. I'm curious if y'all know whether the LQ088K9LA02 screen would work on my 2012 car? Thanks!
Quote:
Last edited by SloMojo; 02-10-2022 at 11:15 AM.. |
|
|
Appreciate
0
|
| 04-11-2022, 03:25 PM | #19 |
|
New Member
2
Rep 12
Posts |
2012 135i - Nav Screen 100% Fix! Love it.
I ordered a replacement screen from China on eBay. I followed this write-up to disassemble the screen unit from the car, then disassembled the electronics from the screen (no biggie) plugged the FRESH new screen into the circuit board, replaced the metal protector and connected it back to the plastics, reinstalled it into the car, and voila, totally fresh new screen. Total time. 20 minutes to remove from car and check to make sure it was part number LQ088K9LA02, 2 weeks wait to receive the part from China. Then about 1 hour to remove and replace the screen. Perfect replacement, perfect fit, really pretty easy job.
BMW wanted $4200 to do this. My cost a little time and $115 including shipping. Very happy! Thanks to OP for the well detailed instructions. |
|
Appreciate
0
|
| 10-15-2022, 04:15 PM | #20 |
|
Registered

0
Rep 1
Posts
Drives: BMW E82 135is 2011 (LCI)
Join Date: Oct 2022
Location: Dubai
|
Many thanks for the tip. I also bought a chinese replacement screen from ebay and did a quick 20min swap. Looks like from factory. One little issue is that the screen has a blue-ish hue when its on, does not transmit true colors. But ir could my specific example that I bought. Not an issue but a minor point for others.
|
|
Appreciate
0
|
| 01-02-2023, 12:49 AM | #21 |
|
Private
 20
Rep 94
Posts |
Nice write up!, All im finding when i serch ebay are the 01 versions, can you share the seller that you got the 02 ( LQ088K9LA02) version from?
Thanks! |
|
Appreciate
0
|
| 01-02-2023, 05:26 PM | #22 |
|
Private
20
Rep 94
Posts |
so I lucked upon a CIC display from a 328i for a realy good price. Mount is obvioulsy different but the screen is exactly the same and once removed from the 328 mount, fits and works flawlesly in the 135. It is the LQ088K9LA01 model number but the circuit board and screen are the same. I suspect that the 5 series and maybe even the 7 series of the same years all use the same screen.
My point being, i dont think you need to get a Chinese copy. I think you can get a good e90 or e60 CIC display and you would be set. They are also chaeaper, especialy when you consider the big money folks want for a e82/88 version. :-) |
|
Appreciate
1
tracer bullet3453.00 |
Post Reply |
| Bookmarks |
|
|


