

|
|
|
|
|
| 07-12-2017, 05:54 PM | #155 |
|
Brigadier General
 
1493
Rep 3,148
Posts |
Heres a tip if you are buying most of your parts from places like FCP euro who only stock LHD parts.
I have tried many non genuine wipers off ebay and just can't seem to get anything that works properly. Decided to buy genuine ones and since I was already doing a big order from FCP I thought i'd gamble on getting the LHD variant of the E82 wipers and seeing if they can be flipped over. Luckily, it is an easy process and all you have to do is knock out the pin, and flip over the bracket. But from the pics you can see LHD brackets have a triangle that sticks out. You can either file down that triangle or you can simply knock out the pins of your RHD wipers and use the brackets from that.
__________________
|
|
Appreciate
0
|
| 07-12-2017, 10:35 PM | #156 |
|
Brigadier General
1493
Rep 3,148
Posts |
Took off my intake manifold and found a nasty suprise, at some point a boneheaded mechanic had broken the nipple on the manifold, and replaced it with a crappy plastic nipple.
Luckily I was already in the process of upgrading the nipple for the DVs, to help them actuate better. I bought an aluminium 1/4" barb with 1/8NPT thread. I drilled and tapped the manifold and sealed it up with JB weld. Upgraded the 3.5mm lines to 6mm lines and replaced the plastic Y piece with a 6mm brass Y piece. If I was to do this mod again i would just plug up the old nipple and drill and tap the manifold in the flat rectangular area, would be much easier and less messy This mod usually helps people with the Tial BOV the most, but in this case I didn't notice much of a difference with the BOV response. Ah well at least its a nice metal one instead.
__________________
|
|
Appreciate
0
|
| 07-12-2017, 10:52 PM | #157 |
|
Brigadier General
1493
Rep 3,148
Posts |
Have picked up a set of second hand KW V2s for a very good price, were a bit dirty but cleaned up well.
The V2s offer height and rebound adjustment. I will be installing a 1M strut brace and making some custom adjustment knobs for the V2s, plus remote adjustment extenders for the rears. The V2s should be a better match for the car than the B12s, which are too soft and do not suit the rest of the mods to the car. Have ordered some new top mounts and suspension refresh bits and will also see if I can install a proper dust boot on the front shocks too (instead of the crappy hard plastic one)
__________________
|
|
Appreciate
0
|
| 07-12-2017, 11:09 PM | #158 |
|
Brigadier General
1493
Rep 3,148
Posts |
Ordered a 1M strut brace which includes 2 rings and bars which are not that expensive. However the nuts for the strut rings are very expensive and cost around $100 for all 6, which is a bit of a ripoff.
Having the 1M strut brace will have the benefit of better supported strut tops (in theory) and access to the strut's rebound adjustment knobs for coilovers. For me the main reason I got these was in preparation for the KW V2's with rebound adjustment. I decided to buy some stainless M8 coupling nuts off ebay and machine them up to replicate the stock nuts. The strut top mounts have an M8 stud which isnt long enough to stick out enough for proper thread engagement with the 1M strut brace. To work around this, special nuts are used which fit into the hole of the strut brace ring. 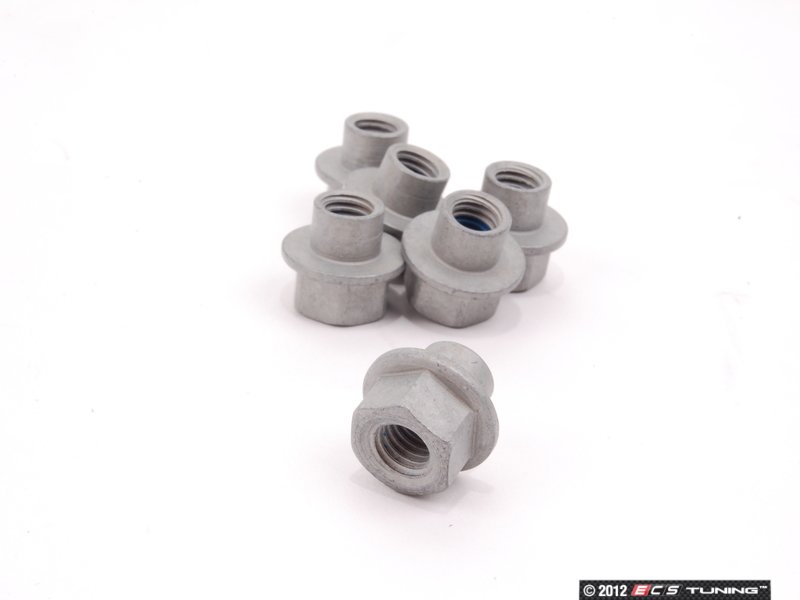 I measured one of these nuts and machined up my own. On my Mini lathe this was a slow process and I wish I simply bought the nuts. On the other hand having these shiny custom made parts is quite nice. Starting off with the hexagonal coupling nuts I machined one end to be round (first pic) then shortened the other end to the correct length, and repeated the process 6 times. Also used a stainless washer to distribute the load better too. It is probably a good idea to loctite the threads too, although I will be taking this off again when i install the KWs so I didn't. Plastic caps for the strut brace have not arrived yet so will be installing them when they arrive. I installed the strut brace and haven't really noticed much improvement in handling, seems like it feels a tad more stable up front but probably just a placebo effect. If you buy these things, buy them for cosmetics or for access to rebound adjustment knobs and not for the performance.
__________________
|
|
Appreciate
1
woosh212.00 |
| 07-13-2017, 07:39 AM | #160 |
|
New Member
6
Rep 20
Posts |
I made the mistake of buying genuine wipers from US and got the LHD, of which on initial investigation I declared they wouldn't fit, gave up and put them away. Ended up buying Bosch aerotwin from Bosch Au website which are really good.
I installed the 1m strut brace on my otherwise stock suspension and did feel it tightened up the front end, made it feel more connected (only slightly, but I did notice it). Didn't expect that, only put it on to prepare for the incoming coilovers. Keep the build thread going, lots of quality stuff in here! |
|
Appreciate
1
vtl1493.00 |
| 08-06-2017, 11:35 PM | #161 |
|
Brigadier General
1493
Rep 3,148
Posts |
A while back I had removed one of the indicators to replace the bulb with an LED unit. The crappy plastic snapped and was given an old spare indicator housing to keep me going.
Unfortunately the spare was oxidized so I ended up getting new ones, not too expensive.
__________________
|
|
Appreciate
0
|
| 08-06-2017, 11:47 PM | #162 |
|
Brigadier General
1493
Rep 3,148
Posts |
The rear ferodo DS2500s were running out of pad thickness so I decided to do all the brakes front and rear.
Front pads were ok, front discs had significant grooving and lipped from track use Rear discs looked ok, rear pads around 3mm left. Front and rear pads I replaced them with new Ferodo DS2500 Front disc Pronto BR900724 (Also commonly known as IAP DURA BR900724) Rear disc DBA DBA2887E EN shield rotors I went with the IAP discs because they were similar to stock, where they have an alloy hat and steel ring, which reduces the unsprung weight of the disc. For the rears they are not avialable in 2 piece so I went with DBA's EN shield rotor so they won't rust up on the hubs. I did not want to go for drilled discs as they can crack from the cross drilled holes (have seen even the holes on a genuine 1M rotor crack first hand) I also went ahead and replaced the handbrake shoes with Meyle. Installation was pretty straightforward apart from the handbrake. The handbrake design on these cars are absolute junk and an absolute pain to adjust. It is even more difficult with my M3 diff, which is a clutch diff that does not allow the wheels to spin freely independently. I had adjusted the handbrake to a good tightness but after a week it needs to be readjusted again, presumably since the top surface of the handbrake shoes and galvanised brake disc has worn off. The DS2500s were slightly noisy before I did the brake job, now they are completely silent after the replacement. Previously I found the DS2500s were very quiet until I took them to the 2nd track day, which then had to be chamfered to fix the squeaking brakes. Upon removing the front calipers I noted the dust boots on both calipers were cracked, so I have ordered replacement boots from FCP euro. Luckily the piston phenolic material is still in great shape.
__________________
|
|
Appreciate
0
|
| 08-07-2017, 12:10 AM | #163 |
|
Brigadier General
1493
Rep 3,148
Posts |
Have been running the Bilstein B12 kit and pretty familiar with the setup and its pros and cons.
For most people the B12 kit is a great upgrade over stock. Once you start doing all the available suspension bolt ons, put sticky tyres on and do high speed driving over not so smooth roads/tracks it is not really suitable. The front suspension of my car was good initially but the springs kept sagging. I have attempted to run ride height spacers to improve the suspension geometry under load but it does not solve the suspension travel. Under even just light bumps on the roads the fronts are riding on the bump stops, resulting in an uncomfortable ride. I am running around 18.35mm of ride height spacers (with the suspension geometry it would be around 20mm of lift) and the wheels are STILL tucked under the gaurds. Clearly the front eibach springs have failed and will only keep getting worse. I had a few options Get new springs - This would be the cheapest solution, but having seen a lot of people running springs they normally sit way too low for my liking. Also the eibach springs are probably too soft for my use. Get coilovers - Gives adjustable height, but a lot of coilovers are still too low even at maximum height. I have noted that the KW/ST coilover range gives good adjustment and doesnt make the car sit too low. Bilstein B14s also sit well on E82 and E90, but a bit too low on E92. I ended up going with the KW V2s as I saw them 2nd hand for a good price. I figure if I don't like the spring rates I can always convert the setup to use custom springs. This will be the new setup I will be installing: KW V2 coilovers Dinan camber plates New lemforder top mounts Just a note with the lemforder top mounts, the alignment pins used to be removable with a pair of vicegrips but now it is pressed into the mount. I used an 8.5mm drill bit to drill them out on the drill press, very easy and only took a few seconds. Below is a pic of how the car sits currently, way too low. Surprisingly doesn't scrape on everything, but is still bad for maintaining good suspension geometry up front.
__________________
|
|
Appreciate
0
|
| 08-07-2017, 12:17 AM | #164 |
|
Brigadier General
1493
Rep 3,148
Posts |
Installed the KW coilovers, no pics of the rears just yet, I am working on making up some custom ride height adjusters which is about 99% complete.
fronts were relatively trouble free to install, the nut for the front control arm was stuffed so just kept spinning when trying to torque it down. I had some 2nd hand spares and went through another 2 nuts before I was able to get the torque wrench to click. Definitely worth getting new hardware if you ever need to remove the control arm bolts. Ride ehgith on the front is very easy to dial in, rear is a real pain. The rear adjuster just spins the whole adjuster, I had to unbolt the camber arm and remove the adjuster from the car to adjust the height. Took the car apart another 2 times t readjust the height! Big waste of time. Initial impressions are very positive, I am no longer riding on the bump stops up front, and the firmer spring rate/with softer compression results in a ride that is more comfortable yet better in cornering. I no longer unload the rear wheel under cornering as much, resulting in more traction  I am working on some remote damper adjustment knobs on the rear, will be leaving the boot carpet off until thats completed
__________________
|
|
Appreciate
0
|
| 08-07-2017, 12:23 AM | #165 |
|
Brigadier General
1493
Rep 3,148
Posts |
I also noted the rear diff bushing is toast, the bushing has torn. I noted my car had a sloppy driveline and just gotten worse over time. It was present before I put the heavier M3 diff in but has gotten worse since then. I have ordered the following:
2x Front E9x M3 diff bushes 1x Rear Stock E9x/E8x rubber diff bush 1x Rear F3x rubber diff bush 1x Rear E9x M3 diff bush There are 3 bushes in total, 2 front ones and 1 big rear one. From my research the M3 bush doesnt fit, but could maybe be adapted to fit. Its quite cheap so may as well get it. The diesel E9x cars came with a hydraulic rear diff bush, which I am not interested in. But that same bushing was used in the F series cars so in theory, all non M F series rear diff bushes will be compatible. The rubber diff bush found on F series cars looks like it has more rubber in it than the E9x bushes so I purchased one of them as well.
__________________
|
|
Appreciate
0
|
| 08-09-2017, 05:49 PM | #166 |
|
Brigadier General
1493
Rep 3,148
Posts |
Dropped the diff last night and removed the rear diff bushing. Came out pretty easily, just a bit tricky coming up with a combination of tools that would pull it out
I have received these bushings from FCP 2x M3 front diff bushings 33312284019 - These bushings fit the stock non M subframe no issues 1x F series rear diff bushing 33316792514 - This bushing has a metal ring around it vs the split stock bushing. Looks like there may be less voids in the rubber. Have confirmed it DOES fit. 1x Stock rear diff bushing 33176770866 - Just a stock standard Lemforder rear diff bush 1x M3 rear diff bush 33312283384 - This bushing is significantly smaller, made from polyurethane and is quite soft, but has no voids in it. This bushing could indeed be made to fit a non M subframe. An aluminium sleeve could be made so that the bushing can be pressed into the sleeve, then the assembly can be pressed into the subframe. Since the F series rear diff bushing is the same size, there is a decent chance the front ones could fit too. While we already have the M3 front bushings to choose, RealOEM has recently been updated to include the M235i racing, which has all the part numbers for the upgraded parts used. The M235i racing is basically a production racing car, and has upgraded bushings and suspension arms. http://www.realoem.com/bmw/enUS/show...diagId=33_1830 Looks like it has upgraded bushings, although they specify 2 units for the rear diff bushing, so it might be a 2 piece poly unit, which I would not be interested in. Aftermarket polyurethane bushes like Nolathane and Whiteline are great for the subframe but terrible for the diff. Will get thumps and clunks on transition on power and coast and can introduce diff whine. I wanted an oem bushing that wont introduce noise for my daily driven car. The mfactory diff bushings could be another option, but they are solid and not quite sure what to expect for NVH. I would prefer an OEM option as they will be on the more conservative side and guaranteed to fit well. The installation itself for the rear bushing wasnt too difficult, I removed the vbrace, exhaust, underbody heatshielding and differential. The bushing came out very easy but took me quite a while to assemble the correct combination of tools to pull it out. As you can see the bushing was very torn and was further damaged by the removal process. Still need to install the M3 front bushings.
__________________
Last edited by vtl; 08-09-2017 at 06:20 PM.. |
|
Appreciate
0
|
| 08-10-2017, 06:29 PM | #167 |
|
Brigadier General
1493
Rep 3,148
Posts |
Got the front M3 diff bushes in and reassembled the car
I actually had to remove the rear bushing again, the bushing had to be rotated 90 degrees as the orientation was wrong, which would mess up the mounting angle of the diff. The fronts were quite difficult to make a tool to remove with the stuff I had on hand. I had to use my subframe bushing tool and readjust it for the fronts, which was very time consuming and fiddly. Big thanks to Socket for helping me lift the diff back into the car. Removing the diff DIY is not too bad but lifting and aligning it with one person on a floor jack is a bit risky
__________________
|
|
Appreciate
0
|
| 08-14-2017, 08:54 PM | #168 |
|
Brigadier General
1493
Rep 3,148
Posts |
Just a follow up on the diff bushings. They have really transformed the shift quality. I had noticed the shifting smoothness had been progressively getting poorer. I was worried it was due to a worn transmission but it seems it was all due to the diff bushes!
I have previously done a lot of fixes to the shift mechanism but was never truly happy with it and still didn't drive like a brand new shifter. Now the gear goes in without any trouble and is a lot smoother. Very happy with it now, the car drives great. I would highly recommend anyone with over 150k kms to replace their diff bushes.
__________________
Last edited by vtl; 08-20-2017 at 11:41 PM.. |
|
Appreciate
2
Pete.J320.00 dancinsteve12.50 |
| 08-20-2017, 11:49 PM | #169 |
|
Brigadier General
1493
Rep 3,148
Posts |
Installed these engine mounts on the weekend.
I dropped the subframe while supporting the engine from the top with an engine support. Did not take too long to install them, under 2 hours. The old mounts were quite worn, the left side was a bit soft but still in tact, the right side was torn and had a hole in it! Completely blown. I went with 034 motorsport engine mounts, which are solid rubber instead of the hydraulic filled bushings. The solid rubber is still 50 durometer so is soft enough to absorb the NVH. The mounts are also the same design as the casting looks almost identical to oem. I had no issues with fitment. Surprisingly, after installing these 034 mounts, they overall did not do much. On/off throttle response seems a tiny bit more immediate, but could be a placebo effect. The diff bushes did the most improvement and the driveline felt pretty tight after that. NVH has not increased as far as I can tell. I would probably not bother upgrading your engine mounts unless your car is high mileage. If your mounts are blown then these are a good choice, solid rubber mounts should be more reliable and these are also cheaper than 335is mounts. But don't expect much of an improvement in performance. It is best to view these as a maintenance item rather than a performance mod.
__________________
|
|
Appreciate
1
DR-JEKL897.50 |
| 08-22-2017, 08:00 PM | #170 |
|
Brigadier General
1493
Rep 3,148
Posts |
The KW V2 system is a rebound adjustable setup. For the fronts, I just need to pop off the dust covers and adjust the fronts with a 2mm allen knob.
For the rears, access is blocked by the carpets. The solution to this is to apparently cut holes in the carpet to access the strut adjustments. Unacceptable to me. BC and a lot of other coilovers allow adjustment via knobs and extenders. Very practical and they dont cost much. For some reason KW does not offer this at all, and due to different design, the BC knobs are incompatible. I really wanted remote adjuster knobs so I set out to make my own custom adjusters out of aluminium on my small lathe. I purchased a full set of adjuster from BC, the extenders looked very handy, but unfortunately the knobs that bolt onto the struts are incompatible. I looked at the design of the BC knobs and came up with a similar design. The knobs screw onto the strut spindle and there is an allen head shaft that i is held captive and is spring loaded. This is a good design, unlike the KW adjustment knobs with is effectively just an allen key with a knob on the top. If you just put a adjustment extender on top, it is possible for the unit to pull out, as there is nothing keeping it captive. On my design I further improved upon the design. The KW shocks use a 2mm allen adjustment knob. I purchased some hobby screwdriver bits that were ideal for this application. 2mm allen with 3mm shaft diameter. I made some small aluminium 'keepers' that stop the shaft from being pulled out of the body. These are held in by set screws. The inside bore of the body was machined out and tapped for M10x1mm which matched the KW shock spindle. The other end of the body was drilled and reamed for 3mm, the diameter of the screwdriver shaft. I deliberately made the 3mm quite deep, so it acts like a bearing, supports the screwdriver shaft and prevents the driver bit from moving off centre. I also put a small spring inside of the body which puts tension on the assembly when screwed down. This takes out any play and also helps prevents the body from unscrewing itself off the KW shock shaft. Knobs were machined which fit inside the BC extender knobs. The BC adjuster extenders can poke through the carpet on one of the existing holes for the retaining pins. Length can be cut down so it can all be neat and tidy. I am very happy with the result, the knobs work great and you can feel all the detents in the adjustment 
__________________
|
|
Appreciate
0
|
| 08-24-2017, 02:56 AM | #172 |
|
Lieutenant

77
Rep 541
Posts
Drives: 2008 135i AT Monaco Blue
Join Date: Dec 2012
Location: Brisbane, Australia
|
That adjuster extender looks like a very similar design to my MCA's. One recommendation I would suggest is to make sure the hole in the carpet is sufficiently large to fit the extender with a fair margin. I made this mistake the first time and it rubbed and squeeked like crazy. I had to pull the carpet out again and drill the hole larger. Happy corner hunting!

__________________
|
|
Appreciate
1
vtl1493.00 |
| 09-05-2017, 12:52 AM | #173 |
|
Brigadier General
1493
Rep 3,148
Posts |
Last year, I did a Sandown track day and only did several laps before the rear turbo wastegate siezed up and stock open. The heat of the exhaust must have caused the wastegate to bind up and stop working.
Ruined the day and had no confidence in taking the car to track days after that, apart from a couple days at Haunted Hills (not very stressfull on the car) i would like to do more track days so I decided to purchase a set of brand new OEM Mitsubishi turbos. I considered aftermarket but everyone I know personally has had problems with smoking and not lasting longer than a few k kms. Single turbo would be a reliable option but very costly and require the car off the road for too long. Purchased the new turbos off eBay with the 10% discount code and ordered the install kit from FCP. Also ordered new oil drains as they tend to get kinked up or blocked on removal, the install kit ended up being around $400  . . Luckily the process of installing the turbos went quite smoothly. I decided to remove the steering rack and subframe completely from the car, which saved a lot of grief and didn't take too much longer to disassemble. I took the opportunity to clean all the parts and degrease everything from the car. I also tightened up the Mitsubishi wastegates as I have previously installed these new turbos on another car and it had rattle on acceleration. I didn't want to risk it as I have enjoyed rattle free operation of my car (even on my old turbos) and didn't want to start now. I applied vacuum on my old turbos until they closed, then did the same on the brand new OEMs. The OEMs were a tad looser so I put an extra 2 turns of preload so theyd match up. Very happy with the install, everything went smoothy and no leaks or issues. Cannot wait to get it back on track 
__________________
|
|
Appreciate
1
walkie8669.00 |
| 09-17-2017, 06:55 PM | #175 |
|
Brigadier General
1493
Rep 3,148
Posts |
While doing the turbo install I noticed one of the boots on the M3 control arms was torn and leaking grease out and attracting dirt
 Luckily I have some spare non M arms and the ball joint that goes into the knuckle is the same. Cleaned out the ball joint, regreased the internals and replaced the boot. Getting the springs back over the boot was a real pain in the ass would nto want to to that again.
__________________
|
|
Appreciate
0
|
| 09-17-2017, 07:25 PM | #176 |
|
Brigadier General
1493
Rep 3,148
Posts |
During the turbo install, i removed the subframe and 034Motorsport engine mounts. I had just installed the mounts a week earlier and had around 600km on them so far.
I had already unbolted the mounts from the bottom and top. As I tilted the subframe downwards during removal the engine mounts rolled out in pieces! One of hte mounts had failed, and the other mount lookedl ike it was close to failing. The problem is the bottom cap is pressed in and the bottom perimeter of the mount is pressed in, preventing the cap from falling out. Unfortunately they had not pressed them in enough and resulted inthe caps moving. This is bad because the plastic caps support the weight of the engine. 034 was very responsive and had good customer service regarding the failure. They sent me new mounts which arrived within a few days. The new mounts look the same except they had laser markings on the body with the 034 logo on them. But personally I just didnt trust the mount design. I had some 100mm billet aluminium stock at home so I machined up a pair of new caps to fix the old failed mounts. Took a while on the little lathe. After machining them i made up a pair of jigs to hold the bottom caps on during welding. I made the caps compress the rubber mounts slightly so the rubber wouldnt shift around so the jig was quite important. I have a cheap MIG welder at home so I could not weld these mounts myself. I used Ray from Rev Speed Auto in Clayton, cost $40 and was done very quickly. I figured these would be challenging as the mounts are filled with rubber so you really don't want to cook the mount as its being welded. Installed them in on the weekend, feels much better than the old mounts I was using (335is right mount, stock left mount). Gear changes and throttle transitions feel a bit more solid. Only thing I notice now is a slight bit of a vibration from the engine at 650rpm idle. Will see if it goes away after a few weeks otherwise will bump up the idle speed to 675rpm. After driving the car on the weekend the vibration seems to have reduced significantly so will probably work itself out over the next few weeks.
__________________
|
Post Reply |
| Bookmarks |
|
|


