

|
|
|
|
|
| 05-18-2017, 12:30 PM | #23 |
|
Lieutenant Colonel
 
1522
Rep 1,591
Posts |
I did these to my 128i this past weekend. Prior to the install my camber was set to exactly 0 on both sides.
After the install of the camber plates and the pin removed (which must be done to install the cambers plates) I was at -2 on the passenger side and -1.8 on drivers side. Ended up setting both sides to -1.8. Doing this will normally also cause slight toe out, so you might want to considering an alignment afterwards if you don't have the means or know how to do one yourself. I was at 1/16 inch toe out on both sides, ideally I'd want 0, but I'll thought I'd give this a try and see how it drives as is. Overall I'm impressed with how much negative camber I got, and the install is fairly simple. The way I did it was a bit different then above because I didn't use spring compressors (yes it's possible without any). Last edited by tsk94; 05-18-2017 at 12:43 PM.. |
|
Appreciate
0
|
| 05-19-2017, 03:33 PM | #24 | |
|
New Member
11
Rep 18
Posts |
Quote:
The 'fixed' bolts on the plates are in fact press in studs. AKA 'PEM studs'. They are size M8 x 1.25 by a measured 22mm long. Consulting the PEM catalog, page 5, http://www.pemnet.com/fastening_products/pdf/fhdata.pdf It looks like closest length is 25mm. The problem is that these are press-in studs and not meant to come out. It really isn't possible to put another one in and expect it to clinch properly to the camber plate. It seems very likely that the plates are toast. PM me if you want to discuss further. |
|
|
Appreciate
0
|
| 05-19-2017, 04:06 PM | #25 | |
|
Captain
 244
Rep 616
Posts |
Quote:
|
|
|
Appreciate
0
|
| 09-23-2017, 10:40 PM | #26 |
|
Supreme Galactic Commander (one galaxy over...)

669
Rep 1,777
Posts |
So, I just did this basically following 02rsxpilot 's (Thx, man!) directions but slightly simplified(I did not disconnect the headlight sensor rod or the sway bar links - because I am lazy/efficient). Figured I'd do some payback and contribute to this thread since it gave me the confidence to attempt this.
Key tools for this method - 19mm ratcheting wrench with rotating head and a 5mm long allen socket. 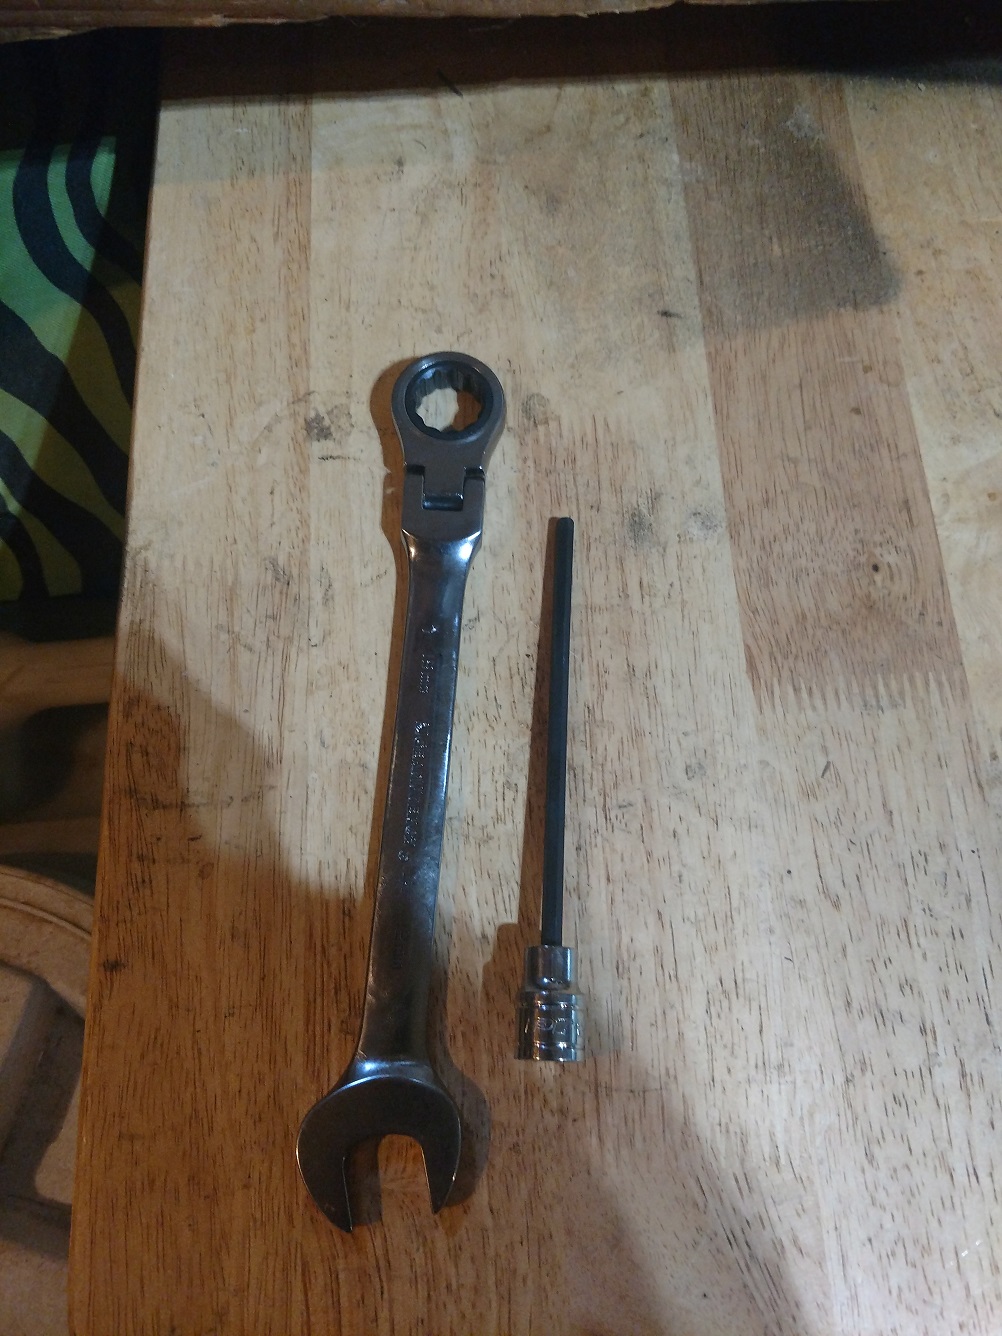 OK, lets begin! 1. Put front of car on jackstands. 2. Remove both wheels. 3. Loosen Center strut bar bolt (E18 bolt). 4. Remove both strut bar bolts at strut towers(E14 bolt). 5. Rotate strut bars inward out of the way (you don't have to remove but can if you want). 6. Drill out alignment pin/"bubble". 7. Pick a side to do first (I picked driver). Remove the three strut tower nuts (13mm - save them, these are reused). 8. Use a hammer and punch out all three strut tower studs. I also only found five - bothers my OCD. Be sure to run your hand around the "shelf" on the upper part of the strut. I had one wedge in there that was "fun" to get out. Top of strut tower should now look something like this(these are passenger side pics): 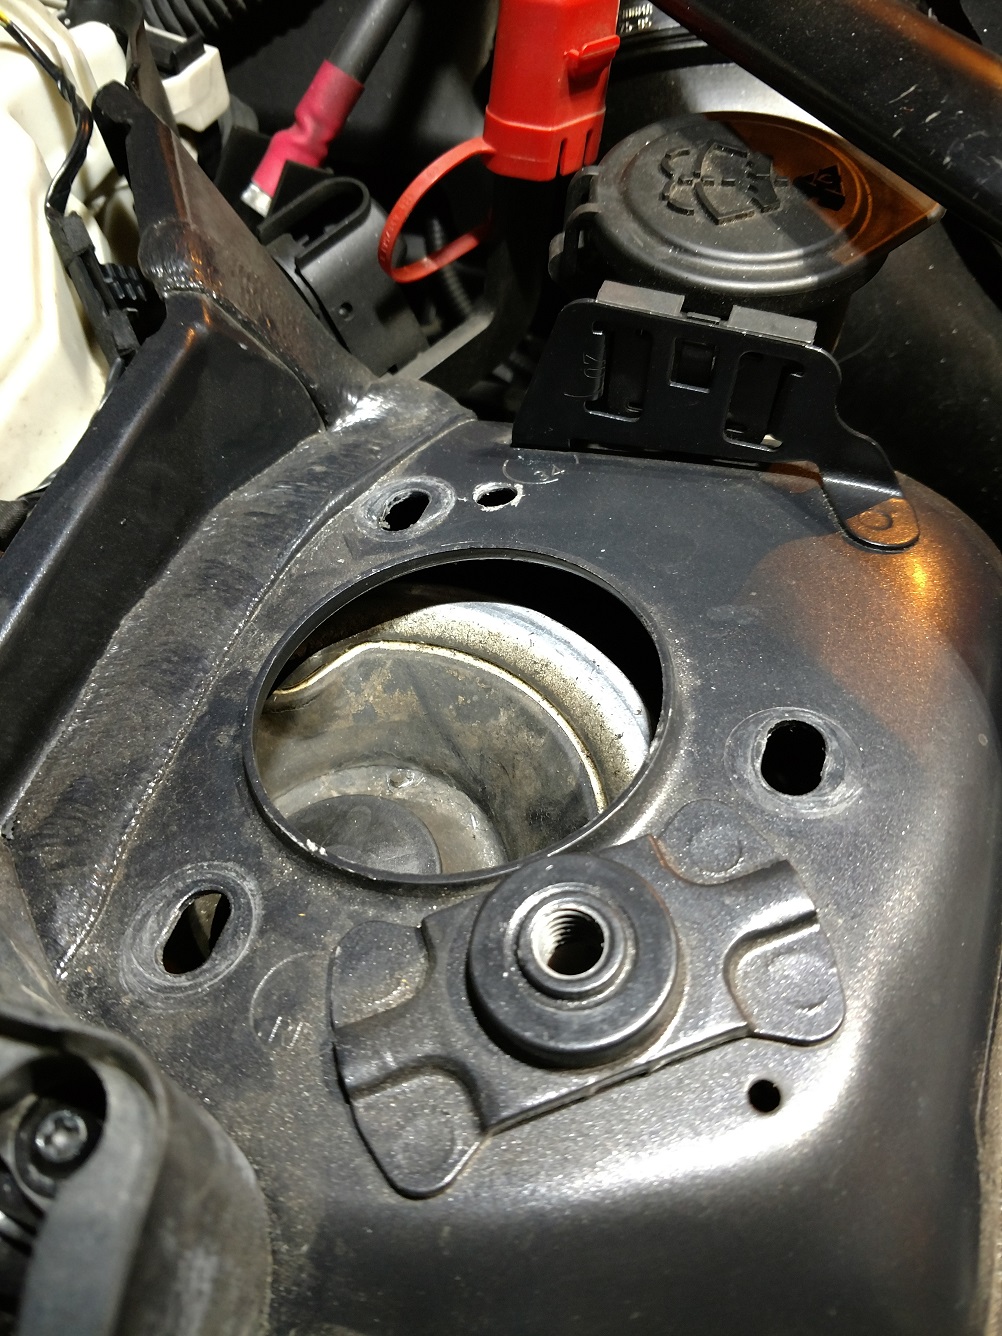 9. Use a set of spring compressors about 180 degrees apart to span 3 coils of the spring. Be sure to liberally grease the compressor threads before starting. Feel free the turn the wheel as necessary to get room for each compressor. They probably won't fit "pointing" up, so you'll have to fit in in there "pointing" down and get a wrench into the upper area to tighten the compressors. My compressors (schwaben) are 19mm - and I used a pivoting head ratcheting wrench (first key tool for this method). Alternate tightening the compressors in steps (I counted 30 ratchets then switched) on each side to keep the pressure balanced. I ended up compressing completely for maximum room between the strut top and tower top. View from bottom. 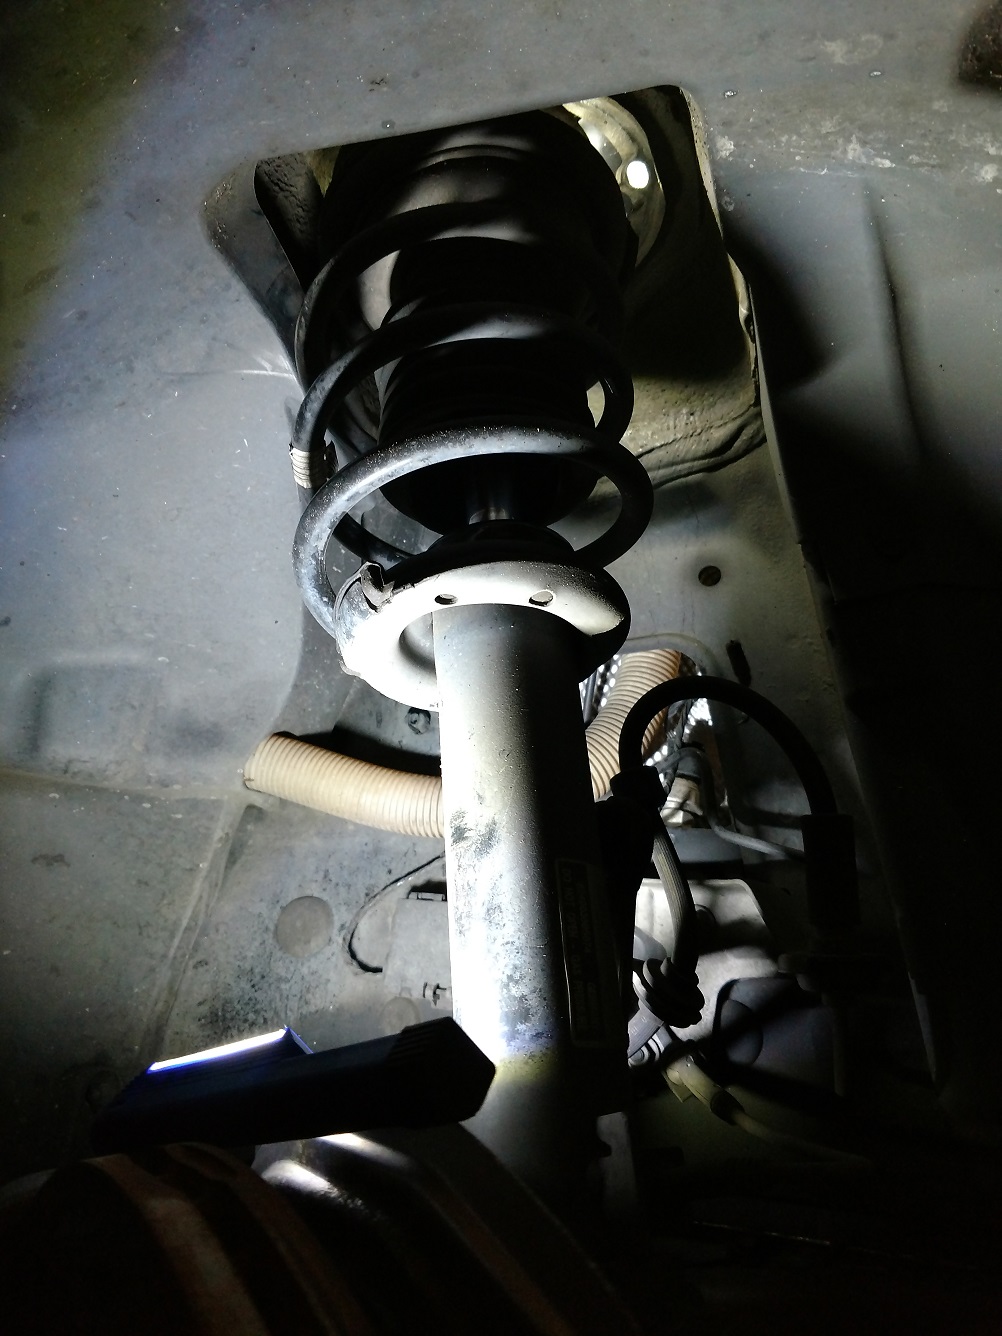 Grease and compressors. 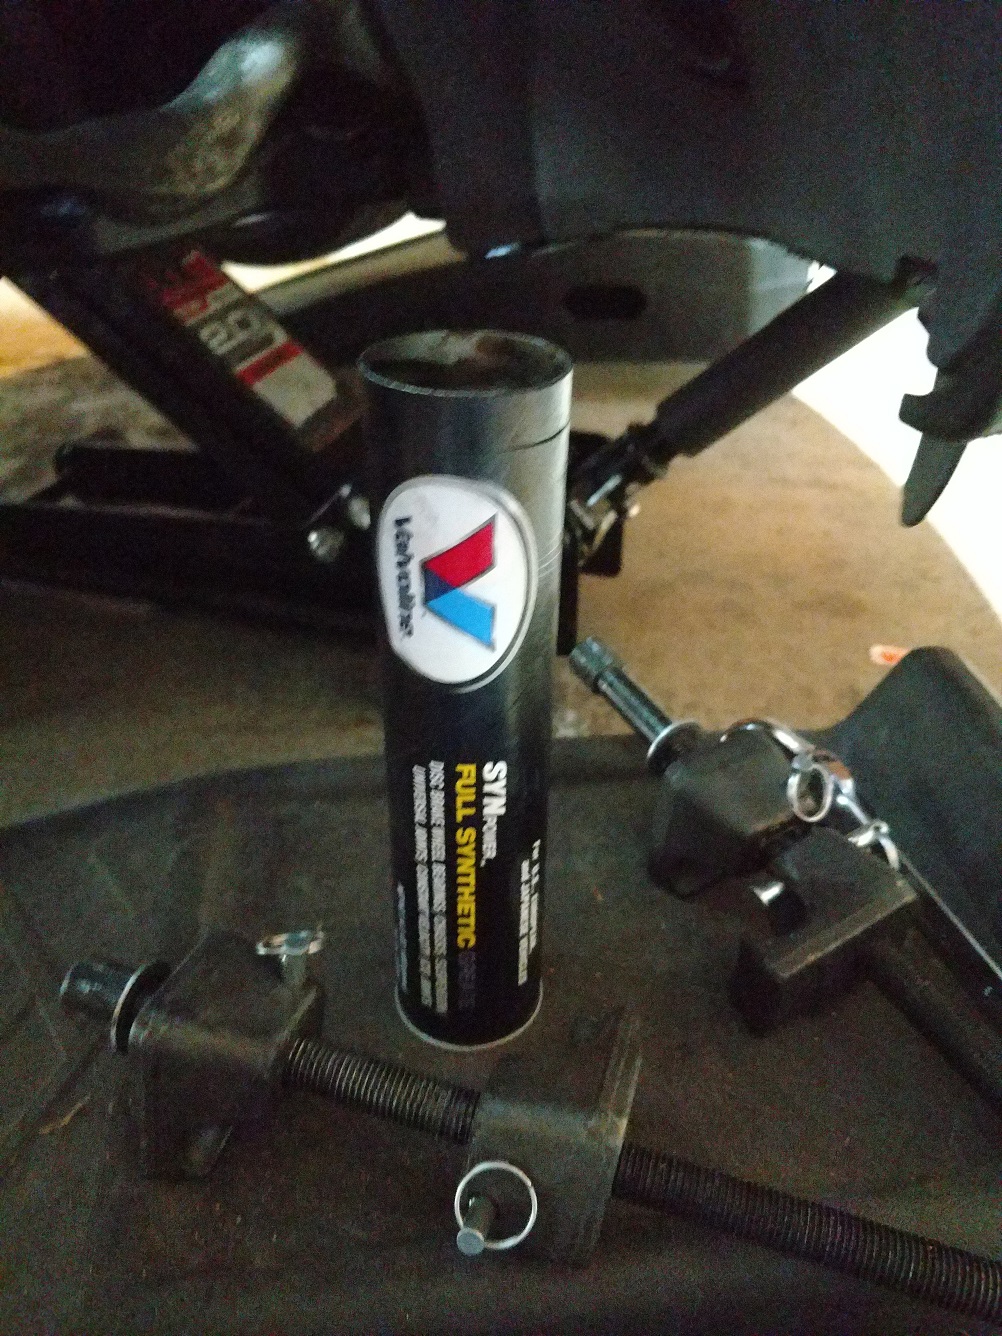 Compressors installed but not tightened. 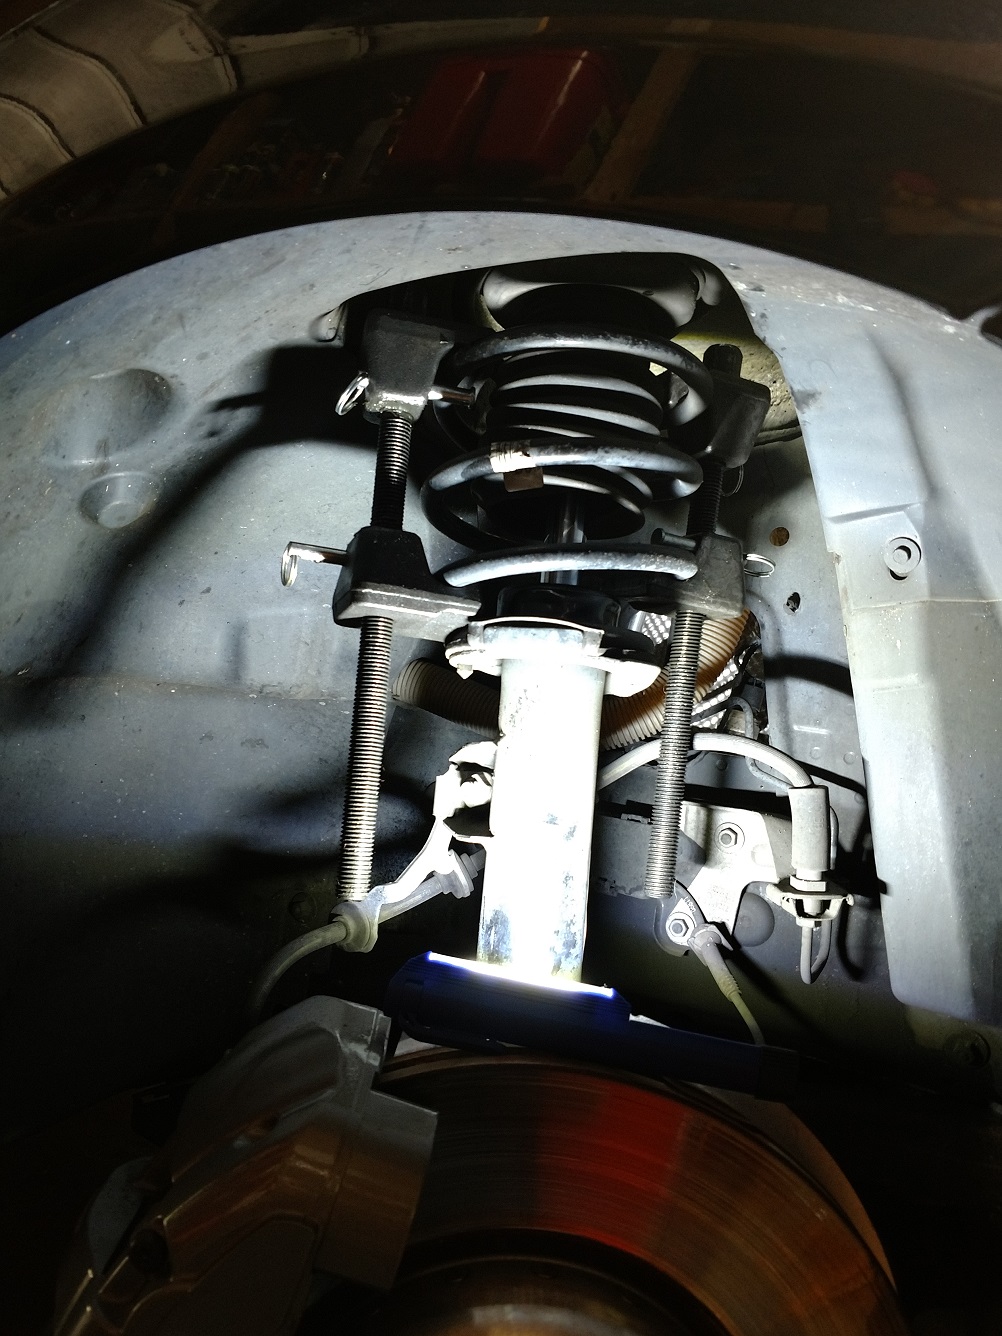 Compressors tightened. 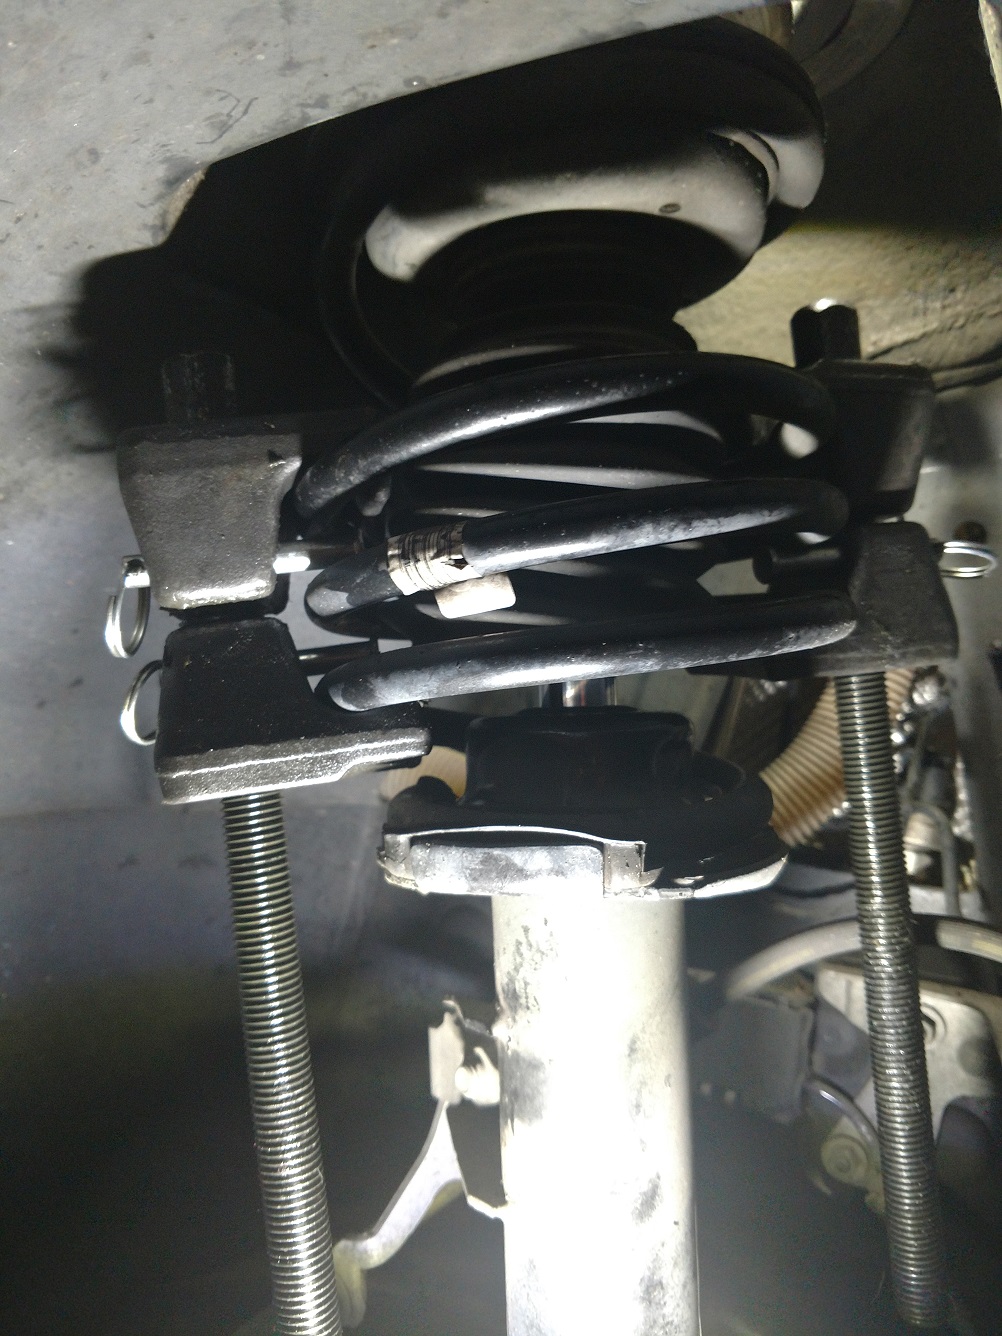 Strut tower should now have lots of room like this: 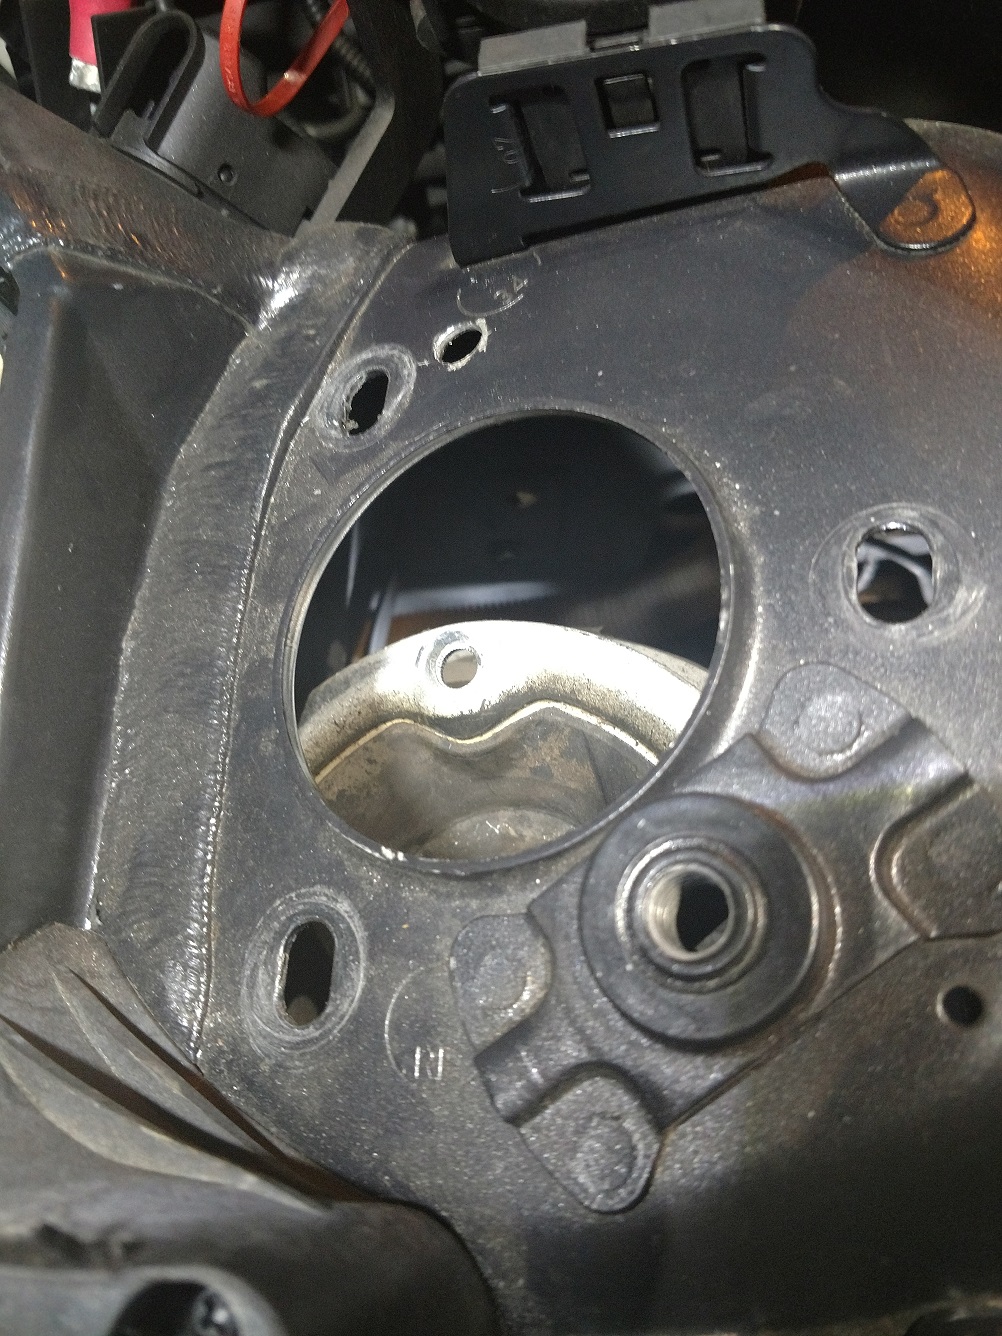 11. By moving strut around you can now slide the Dinan camber plate into the space above the strut top. Be sure to insert the correct one(L or R)! It should look something like this when you get it in (orientation doesn't matter at this point BTW): 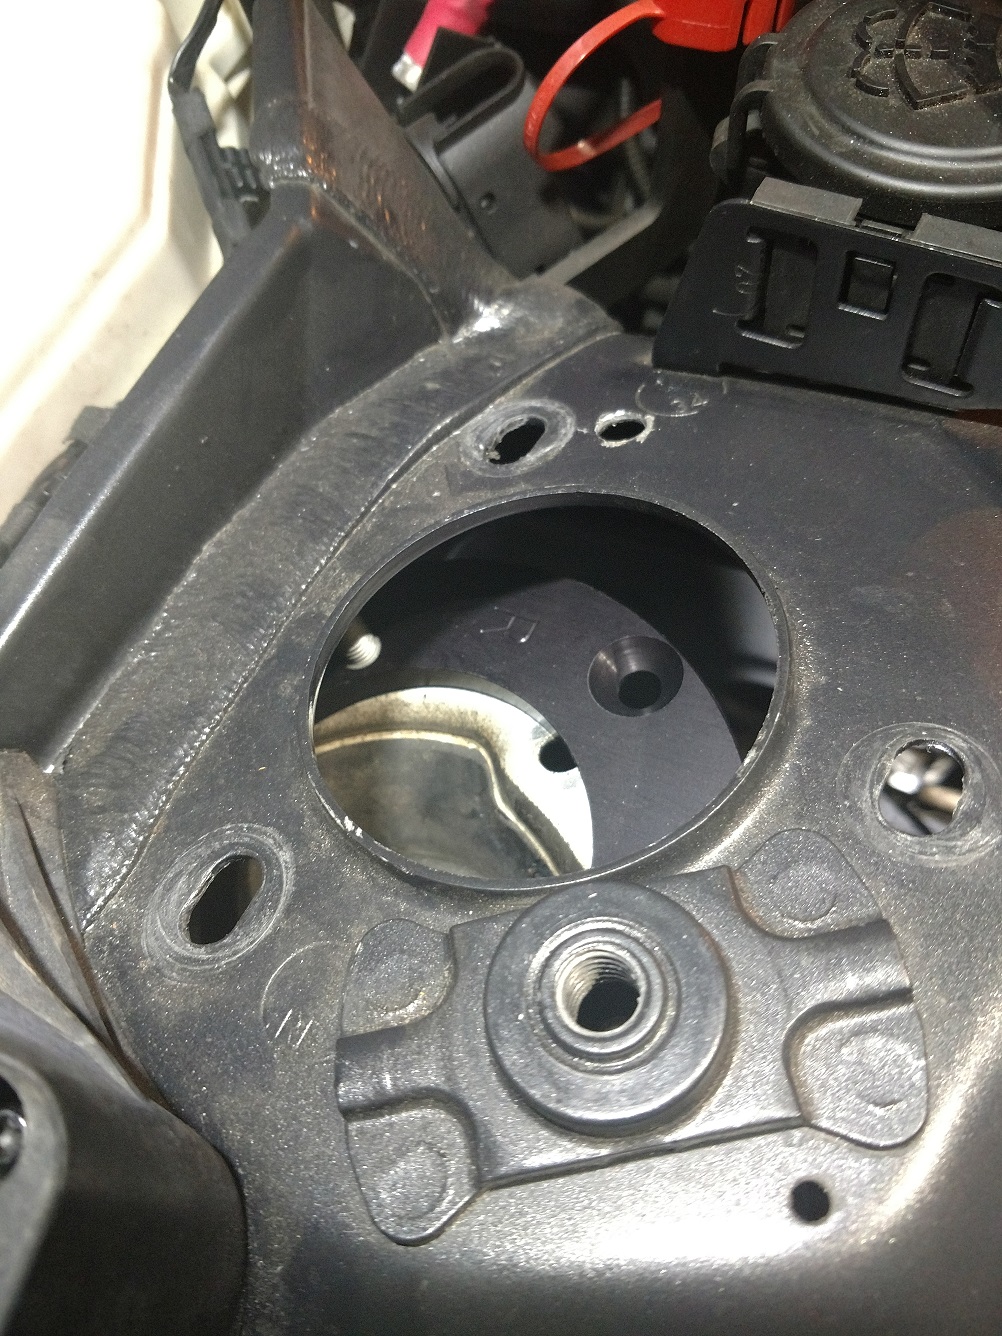 12. Loosely put the three 5mm allen head bolts provided in your Dinan kit into the Dinan plate and strut top by rotating the Dinan plate and strut top as needed to make it easier. 13. Use a 5mm long allen head socket (second key tool) and insert it in the *strut brace bolt hole* (key trick!) while rotating one of the camber plate to strut top 5mm bolts directly under it. It shoud look something like this: 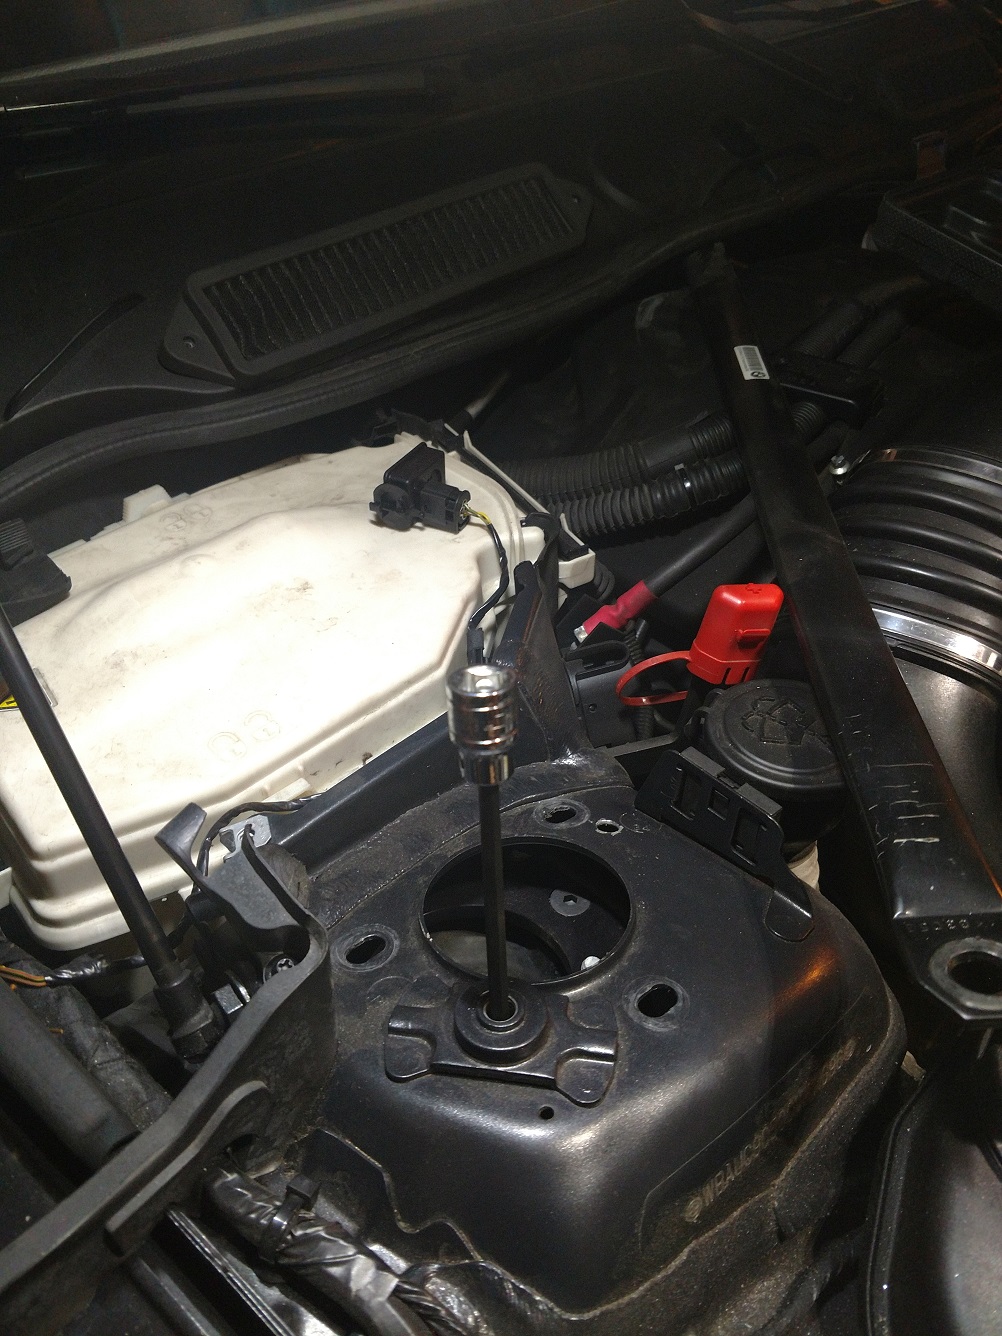 14. Loosely tighten the nut provided in the Dinan Kit onto the bolt rotated under the allen tool by hand. This can be tricky - try not to drop it. This is also easier with two people (one above, one below). Repeat for the other two bolts by rotating the strut top so the allen head lines up under the strut brace bolt hole. 15. Once all nuts are installed, use same process to rotate the strut top and torque each bolt to 18 ft-lbs(note: there will be movement of the strut while you do this so anticipate it). I had an assistant (helpful wife!) torque the bolts from the top while I used a 13mm wrench to hold the nuts below. 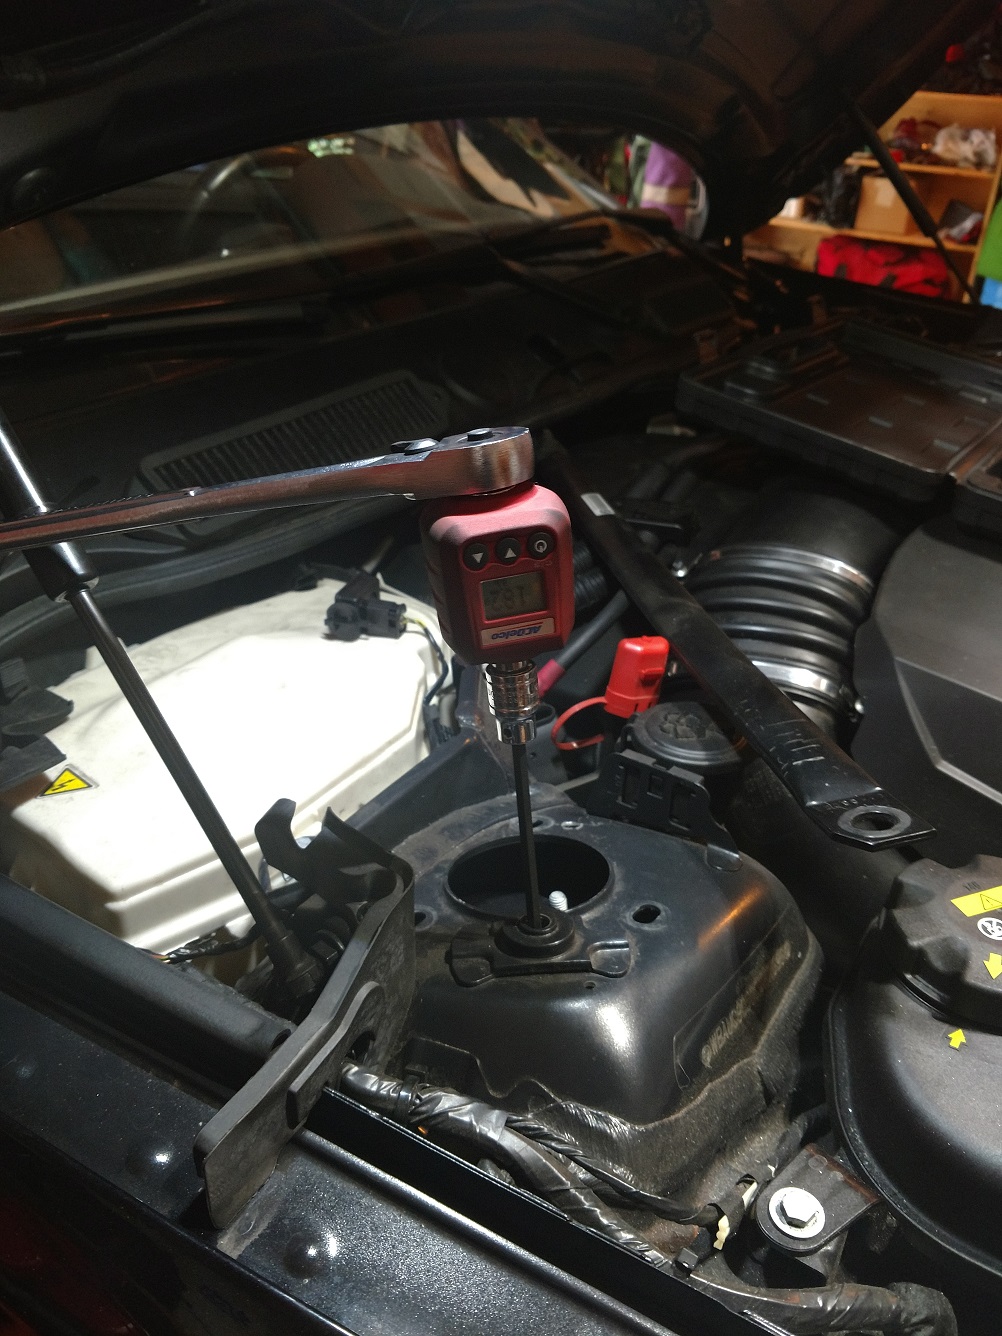 16. Now ORIENTATION OF THE TOP MATTERS. Put the arrow facing forward and the letter (L or R) facing INWARD, then start incrementally loosening the compressors while keeping the strut top aligned until the bolts are slightly into their holes, then completely remove both compressors as the three bolts rise up through the holes. Correct alignment (passenger side): 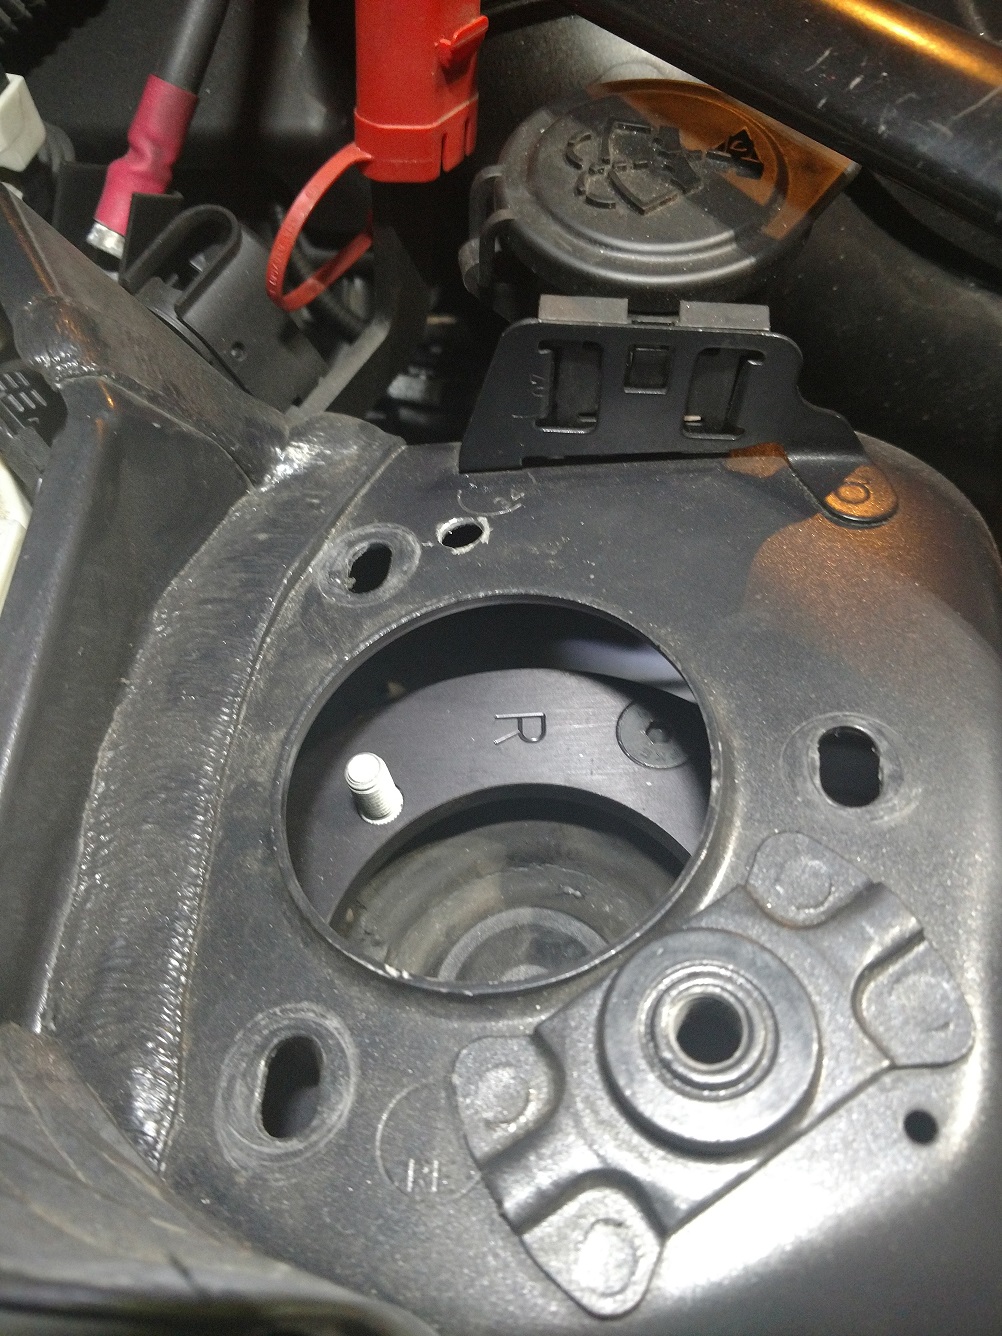 Bolts aligned: 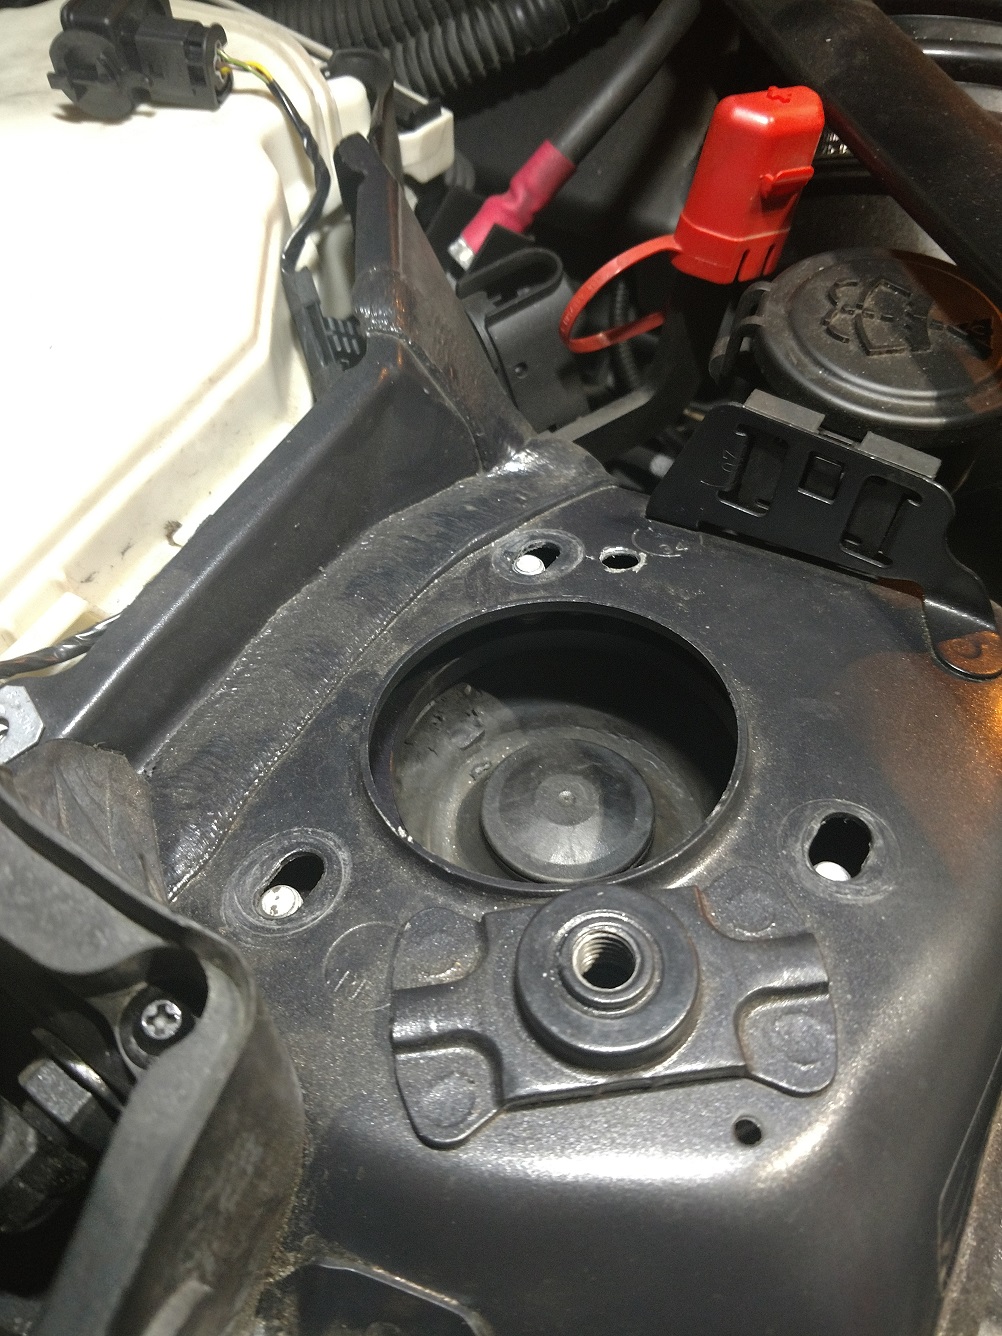 17. Put the 13mm nuts on the three bolts and tighten while pushing the strut toward the engine for maximum camber. Torque to 18 ft-lbs. 18. Reinstall strut braces, tightening E18 bolt to 100N-m plus 100 degrees and the E14's to 40N-m plus 60 degrees (Bentley manual says replace all three with new BTW - your choice). 19. Dinan instructions say get an alignment now. So to satisfy the lawyers you should probably do that. I drove the car and it drives straight and toe is probably closer to zero (total toe was 1/8" when I started). I don't care about these tires so I will see how they wear on track day next week then get an alignment as needed. 20. I don't know what my new camber is but I know my rear camber was ~-1.8 from the alignment I got last month. Looks like the front is now close to the same based on this pic: 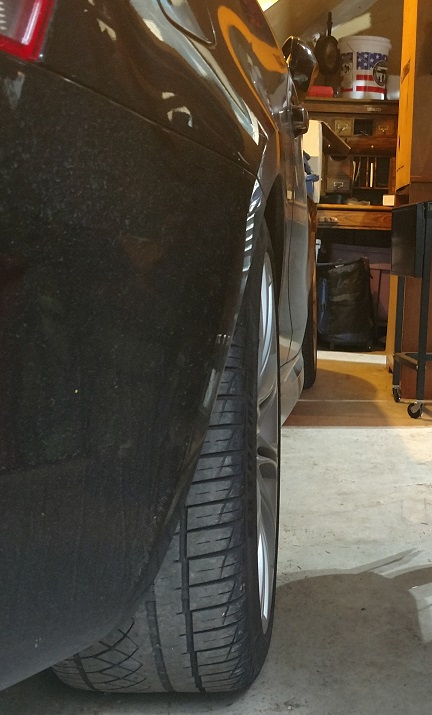 HTH and YMMV.
__________________
Best,
Andy  '12 E82-PS2,Stoptechs,Clubsports+M3 bits,Accusump,Wagner DP+EVO III FMIC,ERCP,BMS Intake,Mason Strut Bar,Wedge Tune |
|
Appreciate
1
cerealwars78.00 |
| 09-24-2017, 09:25 AM | #28 | |
|
Supreme Galactic Commander (one galaxy over...)
669
Rep 1,777
Posts |
Quote:
|
|
|
Appreciate
0
|
| 09-29-2017, 12:11 AM | #29 |
|
Supreme Galactic Commander (one galaxy over...)
669
Rep 1,777
Posts |
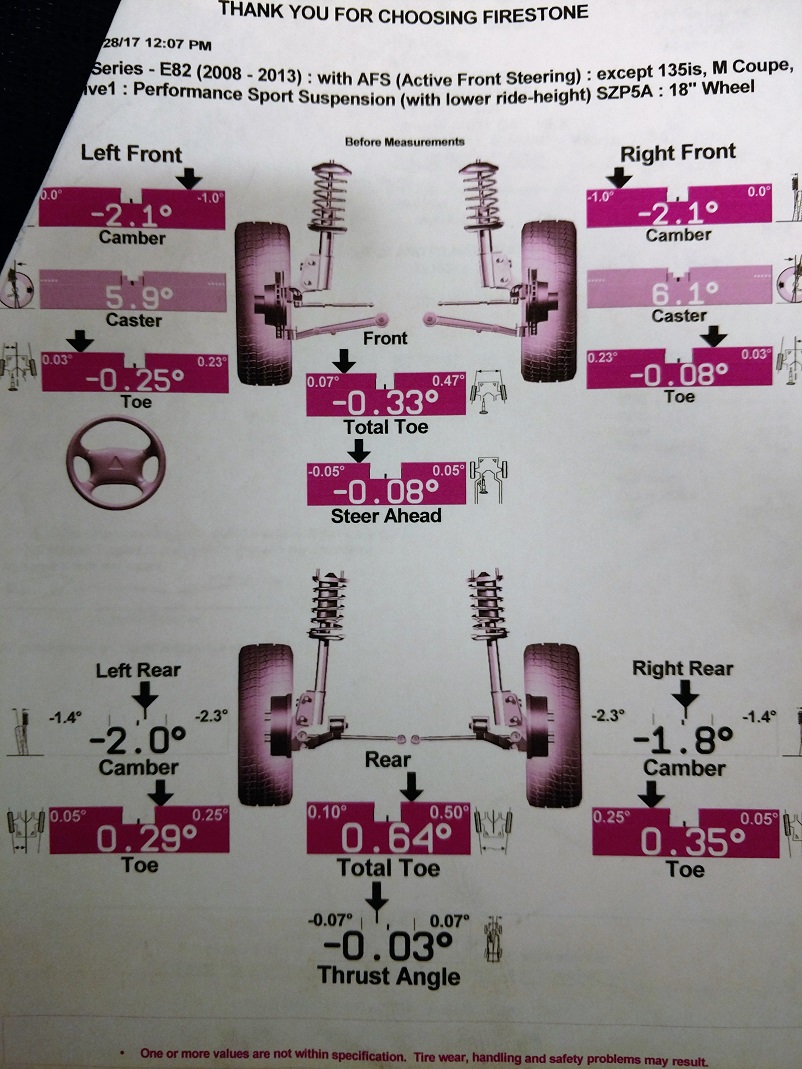
Looks like -2.0 was a pretty good guess!...did an alignment check only because the local shops won't do "custom" alignments. Toe is a bit wonky in the front but it drives fine. So, for me, the Dinan plates gave me about an additional -1.0 on each side. YMMV.
__________________
Best,
Andy '12 E82-PS2,Stoptechs,Clubsports+M3 bits,Accusump,Wagner DP+EVO III FMIC,ERCP,BMS Intake,Mason Strut Bar,Wedge Tune |
|
Appreciate
0
|
| 09-30-2017, 06:11 PM | #30 |
|
Ex '87 Carrera
246
Rep 1,259
Posts |
Looks great Andy! I picked up a set of these recently from a forum member and will be installing them soon. Seems fairly straightforward (thanks to your execellent pics!), but one thing not dealt with much in this thread is pounding the stock studs out of the top hats?
How difficult was this to do? Any pointers from your experience on their removal? I see you ended up with about -2 camber on both sides. How did you arrive at that? Just push the top studs as far inboard as they would go and tighten? Did you elongate the slots any? Also, that's a super slick little torque-measuring thingie from AC Delco in your 4th from last pic! Where'd you get that? Edit: Looks like this? https://www.amazon.com/ACDelco-ARM60...torque+adapter Thanks again for any info, ianc
__________________
"I will tell you there is a big difference between driving money and driving blood, sweat and tears." - PorscheGuy79
"I got 328 loaner and was impressed with performance. It feels much faster than my 135i." - MOCKBA Last edited by ianc; 09-30-2017 at 06:18 PM.. |
|
Appreciate
0
|
| 10-01-2017, 09:48 AM | #31 | |||
|
Supreme Galactic Commander (one galaxy over...)
669
Rep 1,777
Posts |
Quote:
They look like this:  So you are only pressing the grooved section out of the metal. Unless your aim is horrible, you don't have to worry about whacking anything in that area either (I put down painters tape just in case). Quote:
Quote:
__________________
Best,
Andy '12 E82-PS2,Stoptechs,Clubsports+M3 bits,Accusump,Wagner DP+EVO III FMIC,ERCP,BMS Intake,Mason Strut Bar,Wedge Tune |
|||
|
Appreciate
0
|
| 10-01-2017, 10:53 PM | #32 |
|
Ex '87 Carrera
246
Rep 1,259
Posts |
Thanks muchly for the info Andy!
Just trying to extrapolate where my car will be in terms of toe and camber after the install, so another couple questions if I may? It looks like you got a max of ~ -2 deg of camber on the front by pushing the struts all the way in? Are you running the M3 front arms on your car? I understand they give a bit more negative camber since they are longer, but not sure how much? I'm running them... Also, in thinking about the change in toe, it looks like you went from ~ .125" toe-in to very slightly toe-out? I'm confused about how much exactly because your alignment sheet lists toe in degrees rather than a linear measurement, but it's definitely negative. Do you know what your camber was before the plate installation? Lucky you with the 19's on your compressors; my Craftsman have stupid 24 mm. Amazon here we come. Oh well, just the excuse I needed to order that torque adapter too.. ianc |
|
Appreciate
0
|
| 10-01-2017, 11:30 PM | #33 |
|
Supreme Galactic Commander (one galaxy over...)
669
Rep 1,777
Posts |
I don't have the M3 control arms...yet.
 Front camber was ~-1.3 before. Toe is still negative(in), just unbalanced. Total toe is actually in spec. Toe spec per side is -1/32 to -3/32 with total toe max of -1/8 from a previous alignment sheet so the degree thing is ratioable. Amazon FTW! |
|
Appreciate
0
|
| 10-02-2017, 01:09 AM | #34 | |
|
Ex '87 Carrera
246
Rep 1,259
Posts |
Quote:
https://en.m.wikipedia.org/wiki/Toe_(automotive) I also note your alignment sheet lists the rear as having positive toe? Getting confused, but just trying to predict how much toe change I'm going to get in front when increasing my camber by about 1 deg. I'm currently running about 1 deg, but would like to go to 2. You increased yours by about .8, but I can't figure out how much your toe changed as a result? ianc |
|
|
Appreciate
0
|
| 10-02-2017, 07:43 AM | #35 | |
|
Supreme Galactic Commander (one galaxy over...)
669
Rep 1,777
Posts |
Quote:
__________________
Best,
Andy '12 E82-PS2,Stoptechs,Clubsports+M3 bits,Accusump,Wagner DP+EVO III FMIC,ERCP,BMS Intake,Mason Strut Bar,Wedge Tune |
|
|
Appreciate
0
|
| 11-07-2017, 06:36 PM | #36 |
|
Ex '87 Carrera
246
Rep 1,259
Posts |
Finally got the opportunity to do this on Sun. It went just as Andy suggested. A couple of thoughts:
1) I'm running Eibach springs (which it appears have sagged over the 7 years I've been running them) and Koni Sports, along with the M3 front control arms. I didn't even need the spring compressors. It was a bit tight, but there was enough room to wiggle the plates up under and get them fitted. 2) Torquing the plates to the top hat with only one person is really a PITA. I had a cut down 13 mm box end in my tool box for some reason, but I couldn't grip it hard enough with my hand to put 18 ft-lbs on it. I ended up fitting a deep well 13 socket over the end of it (regular 13 mm wrench too long to fit in there) and had just enough clearance to get it in the strut tower and enough counterorque so I could hold it while torquing the top. 3) there are a couple of paper gaskets between the top hat and the strut tower (1 per side). You'd probably be better off just buying a couple of replacements, because the likelihood of mauling them with the top studs is very high. 4) Being a good OCD'er, I ordered replacement fasteners for the strut brace bars. The ones for the strut towers are fine and probably worth it (40 NM + 60 Deg), but forget about the middle one (100 NM + 100 deg). The 100 NM is easy, but I couldn't get more than 20-30 deg movement with my half in. breaker bar after that. The position is just too awkward with the hood fitted... I of course made an appt. to get it aligned the next day, but the shop I chose used a rack with sensors that clamp to the tire rather than the rim. Since my fender would interfere with that (low in front) they claimed they couldn't set the alignment accurately, so I had to make an appt. at Wheel Works on Sat, meaning I've got to drive to work the next four days with the toe out. Their rough measurements showed -3 and -2.7 deg camber (with struts maxed + M3 control arms). Will know more on Sat. Not a terrible job, but kind of a PITA... ianc P.S. banging the OEM studs out of the top hats is really very easy as Andy suggested. Jack the strut slightly under the control arm to keep it in position in the tower, put a rag under the stud you're pounding to catch it when it drops out, then a few sharp whacks with a ball peen and punch and out they come...
__________________
"I will tell you there is a big difference between driving money and driving blood, sweat and tears." - PorscheGuy79
"I got 328 loaner and was impressed with performance. It feels much faster than my 135i." - MOCKBA Last edited by ianc; 11-08-2017 at 04:29 PM.. |
|
Appreciate
0
|
| 11-07-2017, 06:48 PM | #37 | |
|
Lieutenant


104
Rep 486
Posts |
Quote:
Disregard, I noticed the photo that AndyW shared a few posts back. Really looks like they could work, but I won't know until I have my car in the air and bearing hats mangled. Should be fun!
__________________
 |
|
|
Appreciate
0
|
| 11-08-2017, 11:18 AM | #38 |
|
Ex '87 Carrera
246
Rep 1,259
Posts |
Hi Jorgensen,
Here's a pic of the stud; it 's much as Andy pictured it above, but perhaps a little smaller. It sounds like you're wondering whether these would work in the plates? Not sure about that; I'd keep hammering on Dinan. I've tried to email them myself and had no response, but perhaps you can call them? Good luck, ianc
__________________
"I will tell you there is a big difference between driving money and driving blood, sweat and tears." - PorscheGuy79
"I got 328 loaner and was impressed with performance. It feels much faster than my 135i." - MOCKBA |
|
Appreciate
0
|
| 11-08-2017, 08:06 PM | #39 | |
|
Lieutenant
104
Rep 486
Posts |
Quote:
__________________
|
|
|
Appreciate
0
|
| 11-11-2017, 09:10 PM | #40 |
|
Ex '87 Carrera
246
Rep 1,259
Posts |
Finally got the car aligned today. The goal was to get -2 camber on the fronts, but the alignment tech was not able to get LESS than -2.3 & -2.2 with the struts pushed outboard as far as they'd go...
I have a feeling this is because the car is so ridiculously low in front. I'm measuring ~12.5" from the wheel roundel center to the fender lip. I'm suspecting my strut mounts are about gone (no clunking though), or my springs have sagged. Not sure which... ianc |
|
Appreciate
0
|
| 04-07-2020, 07:40 PM | #41 |
|
Colonel
 
152
Rep 2,757
Posts
Drives: 2017 Audi A4
Join Date: Nov 2009
Location: Arden, NC
|
I may end up attempting this soon. Will more than likely go for the "load the shock" method vs the spring compressor bit. Still a little unsure whether I'll be able to do it myself but eh
 |
|
Appreciate
0
|
| 04-07-2020, 07:56 PM | #42 |
|
Colonel
152
Rep 2,757
Posts
Drives: 2017 Audi A4
Join Date: Nov 2009
Location: Arden, NC
|
I'm also semi interested in upgrading to M3 upper and lower control arms up front, possibly even the M3 or eibach 28mm sway. I figure the install for those follow some or all of these parameters, would they all be easy to work into this install?
|
|
Appreciate
0
|
| 04-09-2020, 07:47 PM | #43 |
|
Private
 34
Rep 91
Posts |
I did everything myself over a weekend except the M3 upper and lower control arms. It wasn't an easy job but in the end it was totally worth it! Keep in mind you will need an alignment most likely. I installed Dinan camber plates, Dinan springs, Koni Shocks, Lowering spring perches, BMW strut mounts and a
Megan upper strut bar. Got a new set of tires and everything feels amazing! I recently moved to the mountains and with the upgraded suspension driving my car is a lot of fun! It's a lot quicker in the twisties than I expected... |
|
Appreciate
1
Dackelone10538.50 |
| 04-09-2020, 08:02 PM | #44 | |
|
European Editor

10539
Rep 22,992
Posts |
I'm pretty happy with my Dinan camber plates too. I was amazed on how much the front end understeer went away with these parts. I also installed Bilstein/Eibach shocks and springs at the same time. But you can clearly see how much more camber these Dinan parts give you.
 Quote:
Removing the front struts past the fender arch was a real pain. Next time I will just loosen the control arm bolts - to allow the strut to go lower in the the car - and clear the fender.
__________________
|
|
|
Appreciate
0
|
Post Reply |
| Bookmarks |
|
|


