|
|
|
|
|
| 11-29-2011, 04:05 PM | #45 |
|
Major
 
315
Rep 1,035
Posts |
I'm going to get this, not sure if I will do this DIY or Stealership...let's see how much time I have.
With respect to rubbing, yes you have to watch out! If your dealer is smart...some are some are not. All you need to do is run a line of clear silicone on all parts that touch the paint. This way the mud flap and the car will be one part and flex and fold as needed. |
|
Appreciate
0
|
| 04-10-2012, 08:22 PM | #47 |
|
Major General
 
377
Rep 5,730
Posts
Drives: BMW i3 rex
Join Date: May 2006
Location: SoCal
iTrader: (44)
Garage List 2018 I01 i3s | CURRENT [0.00]
2018 G01 X3 | CURRENT [0.00] 2017 I01 i3 | SOLD [0.00] 2017 F48 X1 | SOLD ... [0.00] 2016 I01 i3 | SOLD [0.00] 2017 F22 M240 | SOLD [8.00] 2016 F25 X3 diesel ... [0.00] 2006 E60 550 | SOLD [6.00] 2011 E90 335 | SOLD [8.66] 2012 E82 135 | SOLD [5.50] 2011 E82 1M | SOLD [7.94] 2007 E85 Z4M| SOLD [4.50] 2003 E53 X5 4.6is S ... [9.00] 2008 E92 328 | SOLD [0.00] 2008 E82 135 | SOLD [0.00] 2008 E90 335 | SOLD [0.00] 2003 E46 M3 | SOLD [7.50] 2006 E90 330 | SOLD [10.00] 2003 E46 330ZHP | SOLD [0.00] |
rancho leipzig i know you're reading this thread
those mud guards will look awsome on your cali130!!! see below installed on a black 1er http://www.1addicts.com/forums/showt...ight=mud+flaps |
|
Appreciate
0
|
| 04-11-2012, 07:33 PM | #49 |
|
General
2038
Rep 25,989
Posts |
Mudflaps are pretty sweet!

__________________
VMR|Wheels | 714.442.7916 |
sales@velocitymotoring.com | www.velocitymotoring.com | facebook | flickr | Instagram |
|
Appreciate
0
|
| 08-15-2012, 02:22 PM | #50 |
|
Enlisted Member
 3
Rep 39
Posts |
Damn the car looks beautiful, ahhhh love it
 i logged in today to look if any member had done this bec i'm sick of that hard dirt & rocks hitting the paint and i was undecided about the look. Do me a favor and can you please take some pictures of the front mud flaps, but this time just a bit more parallel to the car thank you i logged in today to look if any member had done this bec i'm sick of that hard dirt & rocks hitting the paint and i was undecided about the look. Do me a favor and can you please take some pictures of the front mud flaps, but this time just a bit more parallel to the car thank you |
|
Appreciate
0
|
| 12-07-2012, 07:58 PM | #51 |
|
Private

6
Rep 58
Posts
Drives: Alpine White 128i 2011
Join Date: Nov 2012
Location: Estero, Florida
|
Great write up! I ordered mine from the website you posted and just installed them today!
The front ones were definitely more difficult than the back but the work was worth the result http://www.1addicts.com/forums/showthread.php?t=779058 |
|
Appreciate
0
|
| 12-07-2012, 08:00 PM | #52 | |
|
Private
6
Rep 58
Posts
Drives: Alpine White 128i 2011
Join Date: Nov 2012
Location: Estero, Florida
|
Quote:
|
|
|
Appreciate
0
|
| 12-08-2012, 10:37 PM | #54 |
|
First Lieutenant
 
43
Rep 331
Posts
Drives: M140i F20 LCI-2
Join Date: Jun 2012
Location: Melbourne, Australia
|
Mudflaps with part numbers
The mud flaps were easy to install. As everyone has stated, clean the area well where the mud flaps are to stick. The part numbers are shown on the attached photos. I imported them from BMW Silver City to Australia.
Some don't like the look ... but I do ... and once you see the muck thrown up by 225/255 Non-RFT tyres, it's a no-brainer.
__________________
Current: Alpine White M140i F20 LCI-2, 250kW/335hp, 2018.
Sold: Melbourne Red 340i F30 LCI Luxury Line MMPK - 265kW/355hp, 2016. Sold: Alpine White 123d e82, 2010, 150kW/204hp. Last edited by DrGadget; 12-08-2012 at 10:47 PM.. Reason: added side-on photo |
|
Appreciate
0
|
| 12-11-2012, 06:30 PM | #55 |
|
New Member
3
Rep 14
Posts |
Ok, thanks for the great write up. This definately got me through the process. Only comment is to be very careful how you finally position the fenders before the sticky goes on. Rehearse it a few times before the red tape comes off. better yet, if you can get in place and then pull the tape off. I mis aligned at first and had to shift, so there is not as clean of a seal as I would like.
Entering the rainy season here in oregon, and the fenders work as advertised and keep the majority of gunk off the car. Have yet to try in the snow. Cheers |
|
Appreciate
0
|
| 10-23-2013, 09:07 AM | #59 | |
|
Lieutenant General
2280
Rep 12,565
Posts
Drives: Z4 M, X5, GX460
Join Date: Apr 2008
Location: CT
iTrader: (99)
Garage List F15 X5 xDrive35i [8.75]
E86 Z4 M [10.00] F10 550i (Retired) [9.17] F25 X3 xDrive35i (R ... [9.43] E82 135is (Retired) [9.50] E85 Z4 M (Retired) [9.41] E90 328i xDrive (Re ... [9.25] E86 Z4 3.0si (Retired) [9.20] |
Quote:
As precaution, I even applied some clear bra film over the rocker/fender where the mudflap would sit so that grime/debris wouldn't get in between and damage the paint.  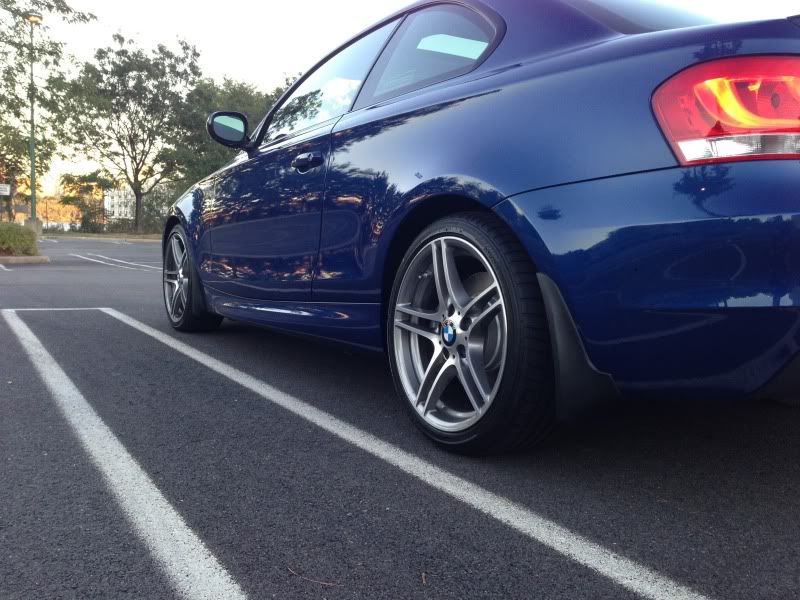 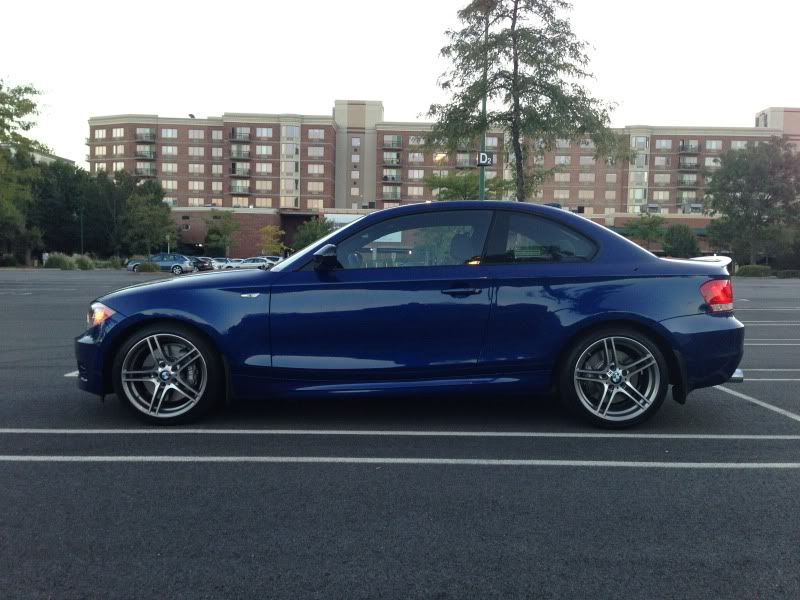
__________________
Follow
|
|
|
Appreciate
0
|
| 10-23-2013, 12:48 PM | #60 | |
|
Enlisted Member
1
Rep 43
Posts |
Hmm, there seems to be a hole on the mud guard but no hole in the wheel well. Where might on purchase this clear film?
Your car looks great btw. Quote:
|
|
|
Appreciate
0
|
| 10-23-2013, 12:56 PM | #61 | |
|
Lieutenant General
2280
Rep 12,565
Posts
Drives: Z4 M, X5, GX460
Join Date: Apr 2008
Location: CT
iTrader: (99)
Garage List F15 X5 xDrive35i [8.75]
E86 Z4 M [10.00] F10 550i (Retired) [9.17] F25 X3 xDrive35i (R ... [9.43] E82 135is (Retired) [9.50] E85 Z4 M (Retired) [9.41] E90 328i xDrive (Re ... [9.25] E86 Z4 3.0si (Retired) [9.20] |
Quote:
Read some of the write-ups, but for the 135i you don't use all the mounting holes. I honestly did it on the fly without looking at the DIY, but it was apparent what would and wouldn't work. And whenever possible, I tried to reuse the existing screws. You can find on eBay, look up 3m clear film and you can buy the size you want. Just make sure you properly clean/prep the area. I used to think mud guards were fugly and had no purpose on a performance car but after years of wasting money on resprays, I decided it was worth taking a small hit on aesthetics to preserve the paint. And honestly I don't think it looks bad at all...
__________________
Follow
|
|
|
Appreciate
0
|
| 10-23-2013, 12:59 PM | #62 | |
|
Enlisted Member
1
Rep 43
Posts |
This seems to be the only diy I can find for e82 but I guess I'll look harder. Haha I think the mud guards make the car look more aggressive, and protecting your paint is a plus.
Thanks for the info. Quote:
|
|
|
Appreciate
0
|
| 10-23-2013, 01:21 PM | #63 | |
|
Lieutenant General
2280
Rep 12,565
Posts
Drives: Z4 M, X5, GX460
Join Date: Apr 2008
Location: CT
iTrader: (99)
Garage List F15 X5 xDrive35i [8.75]
E86 Z4 M [10.00] F10 550i (Retired) [9.17] F25 X3 xDrive35i (R ... [9.43] E82 135is (Retired) [9.50] E85 Z4 M (Retired) [9.41] E90 328i xDrive (Re ... [9.25] E86 Z4 3.0si (Retired) [9.20] |
Quote:
http://www.1addicts.com/forums/showp...46&postcount=4 http://www.1addicts.com/forums/showp...5&postcount=46 Not DIY but helpful posts here: http://www.1addicts.com/forums/showthread.php?t=269720
__________________
Follow
|
|
|
Appreciate
0
|
| 10-23-2013, 01:49 PM | #64 | |
|
Enlisted Member
1
Rep 43
Posts |
Nice! This should help a lot. Thanks for the links, hopefully I don't run into any issues haha.
Quote:
|
|
|
Appreciate
0
|
| 11-24-2013, 07:17 AM | #65 |
|
New Member
2
Rep 6
Posts |
So i feel a bit stupid replying to an old thread, but I found the info posted here helpful in installing the mudguards on my 2011 128i. The links by 3002 Tii were especially helpful. If someone is hunting today for info it's still helpful. btw, it was pretty chilly outside when I did the install, so the guards had stiffened up a bit. This made it hard to flex them to get the tape to press against the car. I borrowed my wife's hand-held hairdryer to provide heat to soften them up, being careful not to get overzealous and damage the car (paint, etc) in the process. The neighbors probably think I'm a nut. Oh, well.
|
|
Appreciate
0
|
| 11-25-2013, 09:15 PM | #66 |
|
Private First Class

23
Rep 110
Posts |
I found the installation a lot easier by spraying the clean body surface and exposed adhesive with window cleaner to keep them wet. This allows you to adjust mud flap position while you get the fasteners installed. Once it dries you're set. Same principle applies to installing headlight 3M protective film.
Here's how they look on Space Grey. Last edited by Horigan; 01-11-2014 at 03:13 PM.. |
|
Appreciate
0
|
Post Reply |
| Bookmarks |
|
|