

|
|
|
|
|
| 08-29-2016, 10:20 PM | #1 |
|
Private
 26
Rep 62
Posts |
DIY: Replacing Pre-Cat Oxygen Sensors on an N54
Hey all, first DIY. This stems from me hoping to find a concise, 1-series specific how-to for replacing the front oxygen sensors. I figured I'd taken enough pictures throughout the process that I could do a reasonable job at getting people headed in the right direction.
Some quick notes: You'll need to be able to get the car jacked up safely in order to remove the power steering rack. This does not affect alignment at all. If you don't have them yet, a good set of jackstands is required (nobody wants to get crushed by their car). This should take around 4-5 hours if this is your fist time working with the downpipes. If you've already swapped them, this shouldn't be too bad! (Always love good news) I've formatted this such that the tools needed come after the description of each step in red. Ready? Here's what you'll need: 
Here's what the E12 socket looks like:  STEP 1: REMOVE ENGINE COWL/FILTER/COVERS: 8mm socket, 5mm hex driver No need to reinvent the horse here, it's pretty straightforward. Here's Burger Motorsports' outstanding writeup as part of their install instructions for their replacement filters. In addition, you'll need to remove the actual engine cover. It's held in place by three 5mm bolts: two in the front, one in the rear. Here's where you should be at the end of this step (Note that I'm running an aftermarket intake instead of the OEM airbox on the right side of the engine bay):  If you take a peek down the left side of the engine, waaayyy down there tucked behind some silver piping you can see the object of our expedition (one of the two, at least):  STEP 2: REMOVE UNDERCARRIAGE COWLS: Floor Jack, Jackstands, Rhino Ramps, 8mm socket For this step, I used Rhino Ramps to get the front of the car up to remove the required cowls. Couldn't get good pictures at this point, but it's fairly self-explanatory. The cowl is broken into three pieces: One that covers the bottom of the engine, one that covers the bottom of the transmission and one that fills the gap in after the transmission. We are concerned with removing the one under the engine. In addition to the many bolts under the car, there are two that are on the side of the cowl (they are parallel to the plane of the doors, just behind the front wheels. All the bolts are 8mm. STEP 3: REMOVE POWER STEERING RACK: E12 socket, 16mm wrench, 8mm socket At this point, you'll want to jack the car up and put it on jackstands to relieve the suspension components. Once you peel back the cowling, you'll see the ugly end of the powerplant as well as the downpipes. Be mindful of the cats (the bulbous part of the exhaust pipe); they are already very hot! I couldn't get a good angle to photograph the power steering rack, so I had to improvise. Here's an excellent photo from ridin135i's Vk Motorwerks Downpipe DIY: 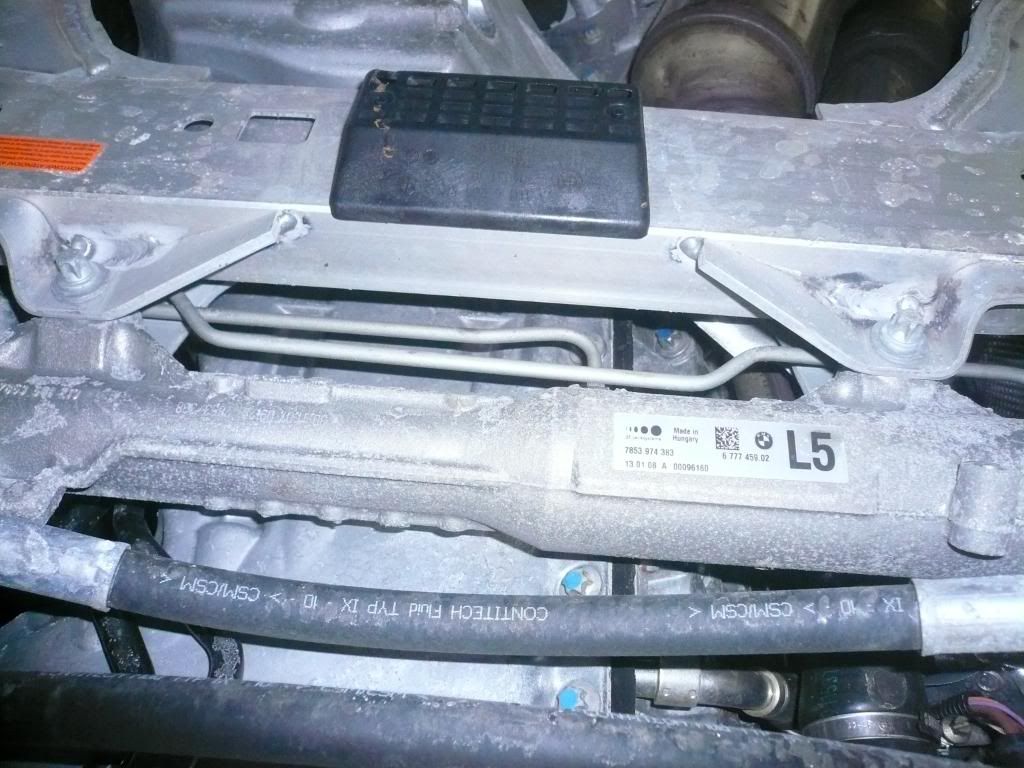 As you look at the photo, the front of the car is towards the bottom. The central jacking point is the black pad you can see center high. The downpipes can be seen in the upper right corner. The power steering rack itself is the cast piece of metal with the QR code/L5 decal on it. The two hoses you see running along the bottom from left to right are also attached. You can see the two E12 bolts holding it to the car on either side of the photo. They are secured by a 16mm nut on top; an angled box wrench is my preferred way of getting a grip on it. Once the bolts are out and the nuts are accounted for, wiggle it forward while twisting it downward. Note that there are two brackets for the undertray that must be removed in order to get the power steering rack fully out of it's slot. They are secured by 8mm bolts, and are fairly obvious as they will prevent the steering rack from moving much. It should fall out of it's groove with a bit of grunt. I use zip ties on the right side to keep it out of the way while I'm working with the downpipes/oxygen sensors - just lash it to the front sway bar. Here's the view along the right side (as you're sitting in the car):  Note that the black cable oxygen sensor goes to the FRONT downpipe! You can see in this picture how the rear oxygen sensor is pinched and twisted. This could be one of the reasons why I had issues in the first place, so don't make the same mistake I did, when installing leave the other end unplugged and periodically unkink the cable during tightening. STEP 4: LOOSEN/REMOVE OXYGEN SENSORS FROM DOWNPIPES: Oxygen Sensor tool, 22mm wrench Start with the front sensor; removing it will give you more room to remove the rear. The cramped nature of the space you just created by moving the power steering rack may not be enough to get a solid purchase on the nut. Some have gone to the extent of making their own "stubby" 22mm wrench specifically for this situation by grinding down the box end of a wrench until it fit with enough room to throw the wrench. I found the 22mm wrench I had was just small enough to allow me to loosen, flip the wrench, loosen some more, flip and loosen etc. When it's loose enough, grab that sucker and hand loosen it, because ain't nobody got time for that. STEP 5: TRACE AND REMOVE OXYGEN SENSOR CABLING: Hands The cabling comes up between those silver pipes you saw earlier and wraps its way behind the engine (thus the reason we had to remove the cowling and engine cover). Here's the first clip (back left corner of the engine):  Simply pull the cables up and out. The next step is to unclip the cables on the back of the engine. This is fairly self-explanatory, so for the sake of simplicity I didn't document the exact clip locations. Eventually, you'll run into the terminal where the sensor plugs in. There are two, one in front of the other as can be seen in this picture:  The red circle identifies the rear connection (gray cable), the yellow identifies the front (black cable). The connector itself is held in by two tabs in a slot. To remove it from the engine, twist and pull up while spreading the tabs. The connection is secured by a tab on the bottom of the connectors. Push down where the arrow is and pull them apart:  Remove the oxygen sensor from the vehicle by unraveling it from the rest of the wiring behind the engine. Repeat for the second sensor. STEP 6: REINSTALL OXYGEN SENSOR: Hands, 22mm wrench, Oxygen Sensor Tool These are the sensors I used (I ordered them from ECS):   My sensors came with pre-applied anti-seize. I cannot vouch for others though, so I'd have a tube of it ready just in case. Start with the rear sensor (gray). Leave the connector unplugged and carefully route the sensor down to the engine. Crawl back under the car and hand tighten it in the downpipe socket. Use your oxygen sensor tool or 22mm socket to tighten. I'm not sure if there's a specified torque requirement, but I found that the classic good-n-tight setting was perfect. You don't want them to leak. Trace the rear oxygen sensor cabling back the way the old one went, inserting it into the clips as you go. Plug it into the REARMOST oxygen sensor connector, and button it down in the clip. Repeat the process for the front oxygen sensor. STEP 7: REINSTALL POWER STEERING RACK: E12 socket, 16mm wrench This step was (for me, at least) the most frustrating part. Once I reinserted the power steering rack into it's groove on the chassis, I had one hell of a time getting the nut to line up so I could tighten it down. Took me a bit of fiddling, but the best way to do the left side is to hold the nut between your index and middle finger and slide it into place from the front of the car. Get the bolt started, and use your wrench and socket to tighten it down. I found that the right side was significantly easier to get going, as there is more clearance on that side. STEP 8: REINSTALL THE UNDERTRAY: 8mm socket Easy process, just reverse of uninstall. If you want to check that everything runs fine, I'd advise either reinstalling the undertray or removing all the pieces, as the aerodynamics of the car at anything over 50 MPH means that you run the risk of ripping the rest right off of the car. Yes, I mean all three pieces, I almost lost the rearmost one because I was lazy. Don't be lazy, your car deserves better. (Yes, I immediately felt guilty) STEP 9: REINSTALL THE COWL: 8mm socket Again, an easy install. THAT'S IT, FOLKS! Easy day. It's worth noting that if you complete this, you're 75% of the way to a downpipe install, so if that's been worrying you, know that you've done basically everything except removing and replacing the downpipes (and the rear oxygen sensors, but those are much easier to remove. Celebrate with a spirited lap around the neighborhood and a cool beverage when you get back! If you've got any questions, feel free to post them here or message me and I'll get back to you as soon as I can. Hope this helps! Last edited by thatoneguy...; 08-29-2016 at 10:29 PM.. |
| 08-29-2016, 10:31 PM | #2 |
|
Lieutenant Colonel
 813
Rep 1,575
Posts |
Great write up. also great point about twisting the wires. After doing the install once i'll never do it again.
__________________
2.0l ecosmackkaa
|
|
Appreciate
0
|
| 08-29-2016, 11:23 PM | #4 | |
|
Lieutenant Colonel
813
Rep 1,575
Posts |
Quote:
__________________
2.0l ecosmackkaa
|
|
|
Appreciate
0
|
| 08-30-2016, 09:14 AM | #5 | |
|
Private
26
Rep 62
Posts |
Quote:
|
|
|
Appreciate
0
|
| 03-02-2024, 08:57 PM | #6 |
|
New Member
0
Rep 18
Posts |
Hello, does anyone know part numbers of those holder for O2 sensors?
I dont have my on my car and its giving me line fault errors cuz of bad connection thx |
|
Appreciate
0
|
Post Reply |
| Bookmarks |
|
|


