

|
|
|
|
|
| 09-05-2008, 08:26 AM | #67 |
|
Captain
 
110
Rep 994
Posts
Drives: M2, 135i, Xclass
Join Date: Apr 2008
Location: Melbourne, Australia
|
I am about to install the performance pedals. It appears that the clutch and brake performance pedals cover are actual larger than the pedal. Only the top 2 holes screw into the pedal. The bottom 2 holes do not actually screw into the pedal. Can someone confirm this.
|
|
Appreciate
0
|
| 09-05-2008, 08:32 AM | #68 |
|
Lieutenant Colonel
 79
Rep 1,597
Posts |
I thought I read somewhere that someone had to drill 2 new holes in the bottom to make the pedal work. I could be wrong, or even thinking of a different set of pedals.
I'll try to find more information.
__________________
|
|
Appreciate
0
|
| 09-30-2008, 10:45 PM | #70 |
|
Proud 1er

24
Rep 699
Posts |
I just did this on my automatic. It took me about an hour and fifteen minutes, not counting the time it took to get the rubber pieces in the aluminum parts. Here are my observations:
|
|
Appreciate
0
|
| 10-01-2008, 04:46 AM | #71 | |
|
Brigadier General
 295
Rep 3,350
Posts |
Quote:
|
|
|
Appreciate
0
|
| 10-01-2008, 04:50 AM | #72 | |
|
Captain
110
Rep 994
Posts
Drives: M2, 135i, Xclass
Join Date: Apr 2008
Location: Melbourne, Australia
|
Quote:
http://www.1addicts.com/forums/showthread.php?t=15506 |
|
|
Appreciate
0
|
| 10-01-2008, 07:13 AM | #73 |
|
Colonel
 104
Rep 2,474
Posts |
ten minutes to do, HA try two hours! but well worth it! I did have a crappy drill though.
__________________
 AW 135i w/ blackette, performance short shift kit, BMW alarm, Performance rotors, APEX ARC-8 wheels, Direzza Star Spec 235/275, Dinan stage 3 suspension, M3 wishbones/tension rods/front sway/rear subframe bushings and thats all folks! |
|
Appreciate
0
|
| 02-03-2009, 12:10 PM | #74 |
|
Private First Class
 
13
Rep 152
Posts |
replacing the pedals?
I am totally sold on these pedals from these pictures. Is there any problem replacing the pedals with the stock pedals however?
The reason I ask is since mine is leased, I will not want to return it with the upgraded pedals...but I want to make sure the stock pedals can be replaced without any detriment to their functionality. Thanks. |
|
Appreciate
0
|
| 02-03-2009, 01:08 PM | #75 | |
|
Banned

55
Rep 2,013
Posts |
Quote:
|
|
|
Appreciate
0
|
| 02-03-2009, 04:22 PM | #76 |
|
Captain
49
Rep 799
Posts |
The only thing you would see is the drill holes in the accel and footrest...no big deal. The stock brake and clutch rubber pads would hide their drill holes.
__________________
 |
|
Appreciate
0
|
| 02-08-2009, 07:24 PM | #77 | |
|
Practical Idealist

9
Rep 408
Posts |
Quote:
Silly thing as well... Move your driver seat back ALL the way - gives you some added room to work in the footwell. I didn't really think of it until halfway through. I only ordered and installed the three pedals on mine. I'm not sure if I'll get the dead pedal or not.  
__________________
-f
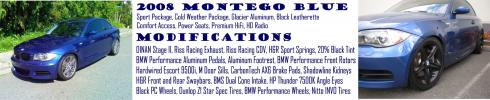
2009 135 6MT Montego Blue Coupe, Sport, Prem, Cold, Nav, CA, iPod, Smartphone | Euro Delivery on 10/25/2008  |
|
|
Appreciate
0
|
| 03-20-2009, 11:45 AM | #80 |
|
Captain
111
Rep 810
Posts |
Just finished installing clutch, brake, and gas performance pedals to match my M dead pedal. Looks GREAT. Wasn't hard, just sort of time consuming switching bits and what not. I am SO GLAD I had this as a reference. How they could provide templates that are wrong is beyond me. I'm glad my pedals aren't swiss cheese!
|
|
Appreciate
0
|
| 03-20-2009, 12:12 PM | #81 |
|
Colonel

378
Rep 2,067
Posts |
I purchased the pedals before I picked up my car so I had the dealer install them for me (no charge of course). Saved me the labor of doing it myself and I do not own a drill.

__________________
2020 X3MC
2009 135i: AW/CR Aluminum Trim, 6 speed, M-Sport, Premium, Heated Seats, Ipod, BMW Performance Pedals, BMW Performance SSK, BMW Performance Exhaust, BMW Performance Grills E93 M3 FSB |
|
Appreciate
0
|
| 03-20-2009, 12:19 PM | #82 | |
|
Captain
111
Rep 810
Posts |
Quote:
 |
|
|
Appreciate
0
|
| 03-21-2009, 03:48 AM | #83 |
|
aiming for 450.....
303
Rep 2,910
Posts |
Easiest mod to do. Thanks for the pics. Helped alot.
__________________
Quote from Ezeedee regarding car mods:
"you're only done when you sell the car  " " |
|
Appreciate
0
|
| 04-01-2009, 04:04 AM | #84 |
|
Enlisted Member
 1
Rep 48
Posts |
I just did the install for the Aus Auto RHD.
Note: Aus don't get the foot rest  The rubber inserts went in pretty easy, just worked in the corners and pushed them on. The sticker outlines were pretty accurate to the size, although the accelerator sticker didn't stay on very well for the drilling. The bottom holes were slightly off compared to the sticker. I used the 4 locking nuts for the brake and the 4 self tapers for the accelerator as many people above did. The hardest bit was working out the drill sizes to use. I used a larger drill size for the brake 3/8 i believe it was in the end and a smaller drill bit for the accelerator, 9/64. It was a matter of drilling the top left hole into the sticker outline, positioning the pedal on top, then drilling in the screw using a T15 (torque) drill bit, with pliers holding the nut on the back of the brake. Once screwed, then simply alternating drilling and screwing the other four corners while holding the pedal in position and voila. The accelerator drills much easier than the brake being plastic. I did find the curved contours on the accelerator meant the drill hole was slightly more to the left than I really wanted but it was close enough to not worry me. All up it took me around 20 minutes to get everything setup and sized. Around 45 minutes to do and simply pulled out the floor mat to get rid of the mess at the end.  |
|
Appreciate
0
|
| 04-05-2009, 08:53 AM | #86 |
|
Private First Class
13
Rep 152
Posts |
Did my installation yesterday. One thing I did which made the drilling very easy was to use some small wood clamps to hold the pedal in place. I could sit back, make small adjustments, then hold it tighter with my hand and drill through the hole. No need for pilot holes and no errors. After one hole was drilled, I would place a screw in to ensure there would be no shifting.
I have to say the interior looks soooo much nicer with these! |
|
Appreciate
0
|
| 08-14-2009, 09:58 AM | #88 |
|
Colonel

381
Rep 2,926
Posts
Drives: Cayman GT4, 135i
Join Date: Apr 2008
Location: NJ
|
great install
__________________
Current: M2CS
Gone but not forgotten: Cayman GT4, M2C, 2011 135i, E83 X3 6MT, 2016 SO M3, 2012 335iS, 2010 135i and 2006 e90 325xi |
|
Appreciate
0
|
Post Reply |
| Bookmarks |
|
|


 Auto 135i with M-Sport:


