

|
|
|
|
|
| 11-04-2010, 10:42 PM | #1 |
|
Lieutenant
 
48
Rep 567
Posts |
DIY: BMW Performance Exhaust on 128i cabrio
Greetings.
I am posting the steps to install the BMW Performance Exhaust, along with some photos. It took me a little over two hours to do the job, but that would have gone faster with a Sawzall (instead of a Dremel Tool and a hack saw!) and if I had realized the diffuser needs to be removed! Tools needed: 13mm socket and ratchet 8mm socket or wrench (unless the odd little inverse torx socket is available) Sawzall, or hack saw and much patience A way to jack up the rear of the car. I used ramps. Raise the rear of the car. A lift is good, jack stands ok, I used ramps, which work fine. Remove the diffuser first. It's easy, a few 8 mm screws and some tabs hold it in place. Be sure not to break any tabs.  Next, measure and cut the exhaust pipe. I used the included clamp as a guide. I was missing one of the nuts, but found the right sized one in my tool box! Here is the stock exhaust before removing the diffuser...  Here is the new exhaust, carefully unpacked. I left the bubble wrap on the exit pipes to keep them from getting scratched up. 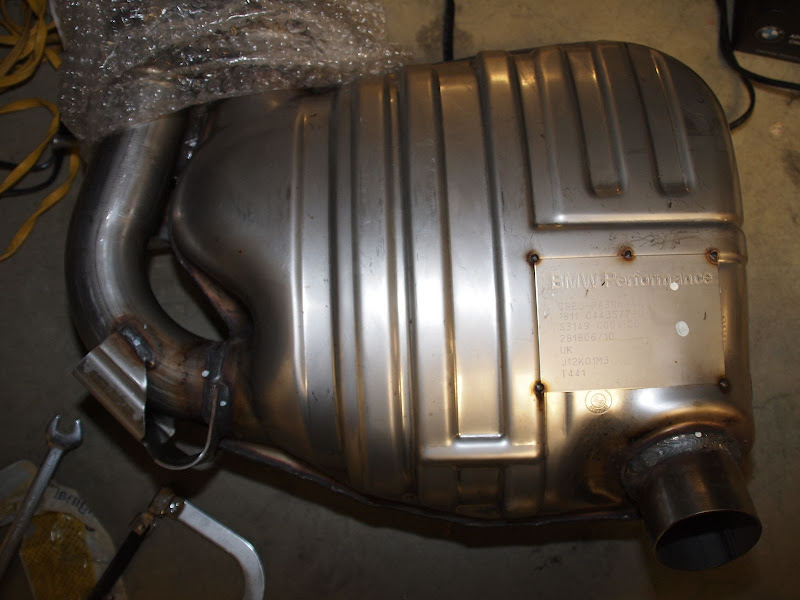 Here is the clamp... 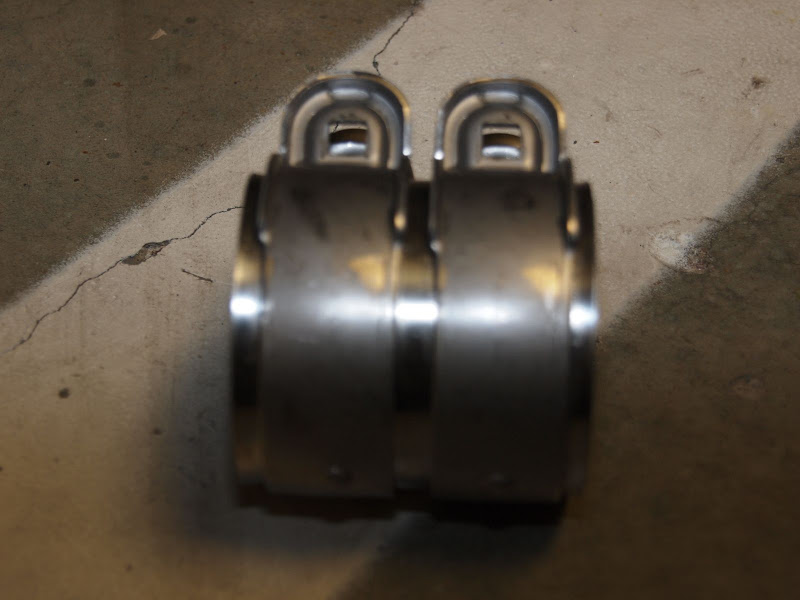 The exhaust pipe itself took about 40 minutes to cut through. I made initial cuts with the Dremel Tool and finished with a hack saw. Here is the pipe with a small cut as I got started.  And the pipe cut off. 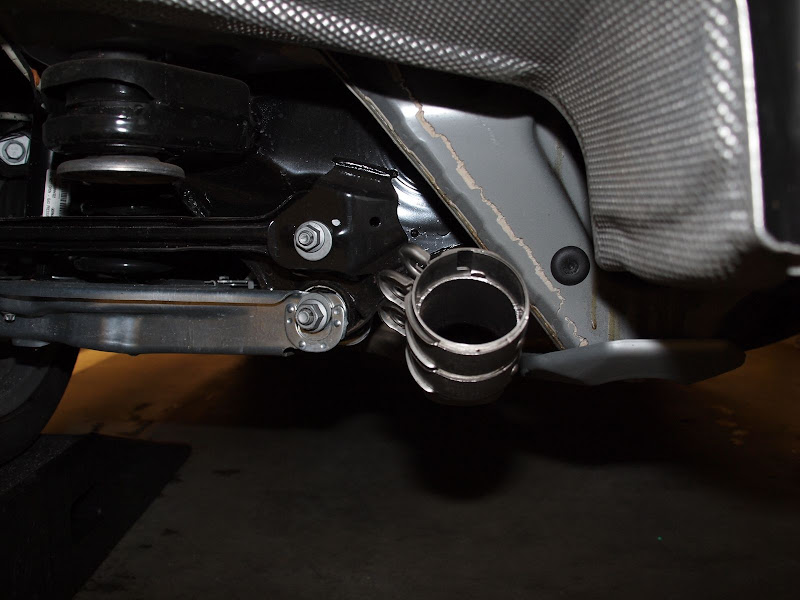 Next, pop the flapper valve hose off from the left side of the exhaust. The new exhaust has a post for this to attach to. 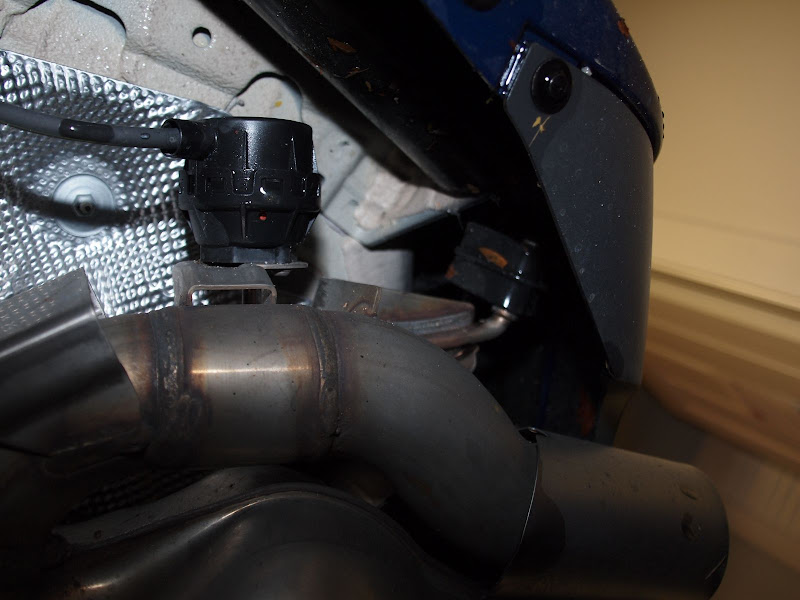 Locate the screw holding the right hand exhaust hanger and remove it. I used an 8mm wrench. It is a little torx bolt, not sure why a normal fastener wasn't used here. Ensure the muffler portion of the exhaust is supported as you remove this, as it is quite heavy and will drop right on top of you. Once free, pry the left hand hanger off the mounting post. The old exhaust will finally be free! Set it down, and the proceed to remove the right side hanger bushing along with the right side hanger that you just unbolted from the car. It is not necessary to separate the bushing from the hanger, just from the exhaust. Install the bushing on the new exhaust. 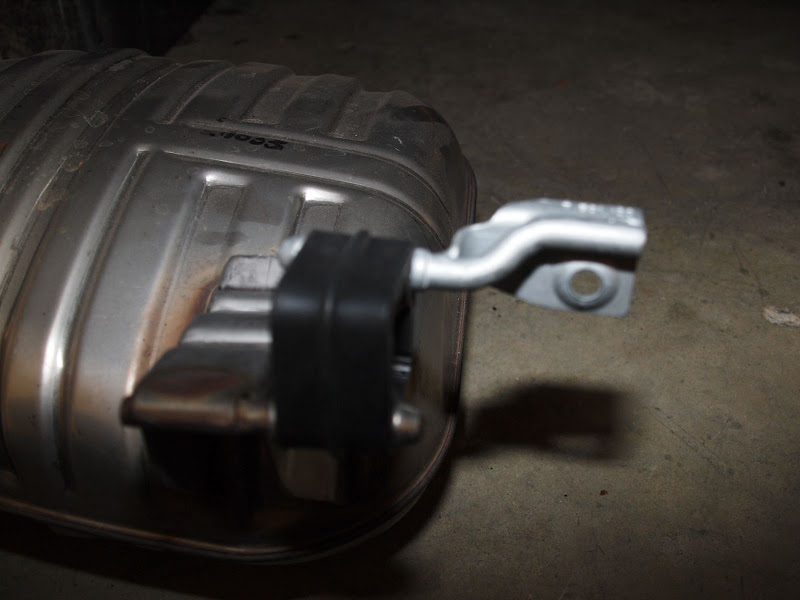 If your car is older, it is a good idea to order two rubber bushings and just replace the installed ones, as they get quite hard. Mine were essentially brand new and were not that tricky to free. Here is the left hand rubber bushing. 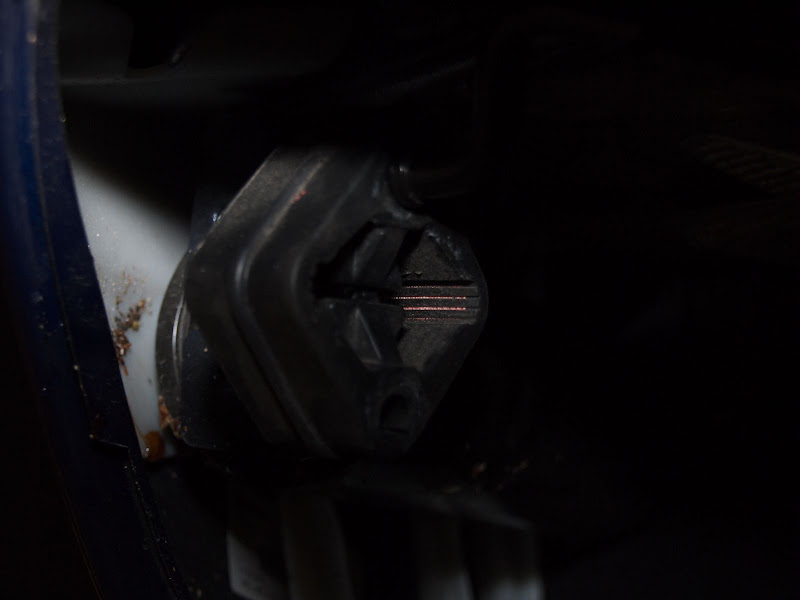 Now postion the new exhaust and press the left side hanger post into the rubber bushing. I balanced the exhaust on my knees whilst doing this. Next, install the clamp on the end of the exhaust and attach it to the exhaust pipe. No need to bolt the clamp yet. Lift the exhaust up and use the 8mm torx bolt to fasten the right side bracket. Lastly, take the rubber hose and press it onto the little metal post sticking out on the left side of the exhaust. (I actually haven't done this yet, because I did not realize what this was. I plugged the hose and tucked it under the heat shield. Probably will change that and simply pop the hose onto the post.) Here is the exhaust before I tightened the clamp bolts.  Now, go under the car and position the clamp. Attach the bolts and ensure the two pipe sections are secure. Now would be a good time to take a break, step back and admire the work so far. No flapper inside this exhaust! 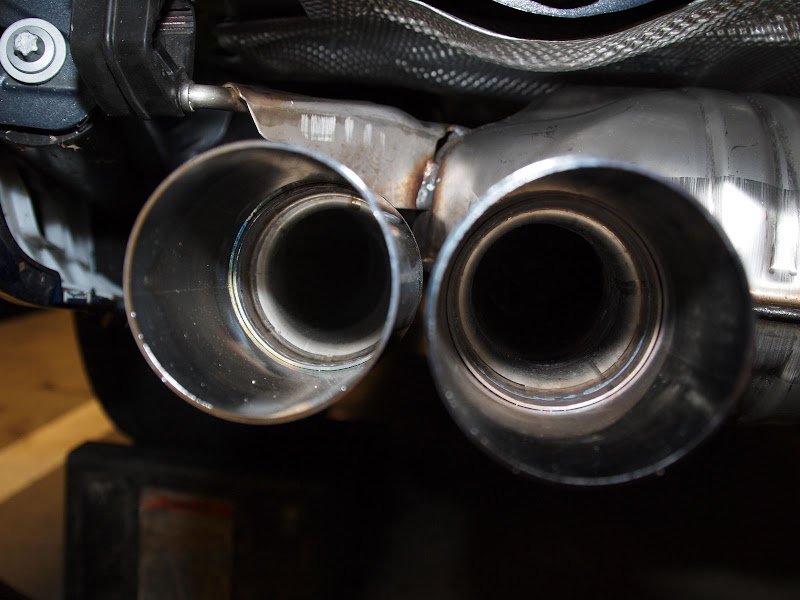 Once the new exhaust is secure, reinstall the diffuser, taking care not to strip the 8mm sheet metal screws, as they are attached to the body with little metal strips. Torque the screws gently, but enough to secure the diffuser. I installed some of the center screws first to hold the diffuser in place and then popped the tabs back into the bumper. It was easy enough to remove and reinstall the diffuser that I might get the ICarbon one at some point. Here is a nice detail of the new stainless steel tips. They are a little larger than the stock ones and look pretty cool. 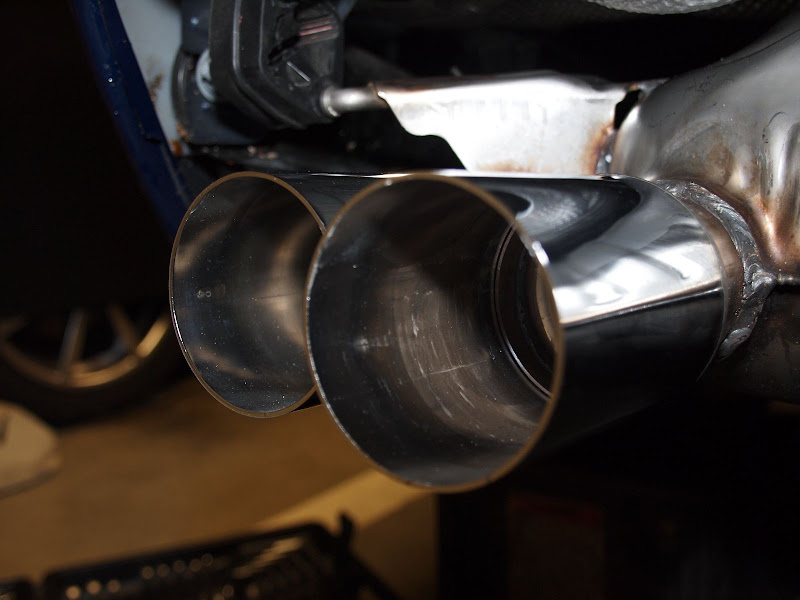 Here is the exhaust with the diffuser back in place. It looks great, and sounds even better. Not too droney or noisey. In higher gears at low rpms, it is pretty quiet. Hit the throttle and the exhaust starts with a deep growl that grows to a banshee like scream. I need to find some tunnels!  The new BMW Performance exhaust peeking out from the diffuser. Looks good! 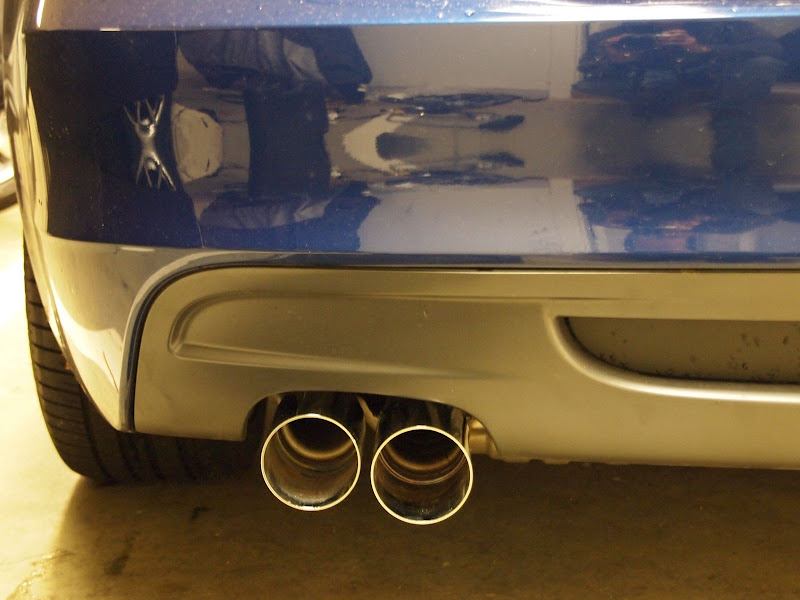 In conclusion, not a hugely difficult project, but not for the faint of heart either. Still, I felt like my time was well spent, less than half a day including putting tools away and taking a test ride to Clydes for the filet mignon special, a well earned late lunch. A BMW dealer quoted me about $250 for the install. The exhaust was on sale at Tischer (getBMWParts.com) so I got a great deal. I have not had a chance to go on a longer drive, or through some good tunnels. All in good time! |
| 11-05-2010, 08:44 AM | #6 | |
|
Lieutenant
48
Rep 567
Posts |
Quote:
|
|
|
Appreciate
1
Dackelone10758.50 |
| 11-05-2010, 03:49 PM | #8 |
|
!
742
Rep 3,267
Posts |
Awesome DIY - I've been waiting for something like this for the PE, and I have a feeling I'm not the only one. Kudos on the really great pics and write up.
I think this will be my next mod after the suspension work I'm about to do (coils and camber plates). I suspect the 128i benefits greatly from this. About the only thing I'm iffy on is the cutting. You seriously did this with a hacksaw? I mean, obviously it's not ideal, but I guess it worked. I don't mind spending a couple of hours with it, if that's what it takes. I just hate to buy some sort of exhaust cutter just for this one job... I'm pretty sure we have a jigsaw around - any idea if that might work, with the right blades? |
|
Appreciate
0
|
| 11-05-2010, 11:32 PM | #9 |
|
Lieutenant
48
Rep 567
Posts |
Yeah, I used a hack saw! Started the cut with a dermal tool, which burned through two cutter wheels in a few mintues. I have done a few exhausts on older BMWs, all this way. A jig saw might cut the pipe, with the correct blade, for cutting metal. You would have to remove the entire pipe and muffler from the car though, which I did not do.
As for black chrome tips, I like the stainless, they look great. Na friend just grabbed my Matt silver ones off the stock exhaust and stuck them on his 328 touring. They great on there. I was actually expecting a DIY for this, but did not see one, so I figured why not write it. We can always edit if there are some extra steps needed. I was glad there was no y pipe to worry about. In fact, when I opened the box, I thought something was missing! The muffler is not nearly as big as the box. So far, so good. Doing a couple hundred miles Saturday morning up to PA, son we'll see how a few hours ride with the exhaust works out. UPDATE: The exhaust note is smoothing out with mileage and time, and getting quite nice. At idle and low rpm, it sounds very stock, just a little deeper. Rev the engine, or go through a tunnel or under a viaduct and you get this cool roar, mainly heard when the roof is down. So far, pretty happy with this! Last edited by MikeinAlexandria; 11-09-2010 at 02:45 PM.. |
|
Appreciate
0
|
| 12-02-2010, 09:00 PM | #10 |
|
Colonel

219
Rep 2,233
Posts |
Pulled the trigger and ordered mine today from Dan@UnitedBMW. Can't wait to get started. I'll rent a Sawzall to cut the pipe for the job to avoid the hassle mentioned at the beginning of this post. Thanks for the tip.
|
|
Appreciate
0
|
| 12-21-2010, 12:03 PM | #12 | |
|
Colonel
219
Rep 2,233
Posts |
Quote:
|
|
|
Appreciate
0
|
| 12-21-2010, 11:25 PM | #14 |
|
Lieutenant
48
Rep 567
Posts |
Lclevert, yes, that's me! The Elise is my sporty summertime ride... How funny! I haven't really written any DIY articles for the Lotus because most have been done already. I do plan on one for the installation of the updated A/C thermostat. I love the Elise, it is a fantastic car, but it is nice to have a sporty sedan as well, in case you have a few extra passengers.
|
|
Appreciate
0
|
| 12-22-2010, 02:41 AM | #15 |
|
!
742
Rep 3,267
Posts |
Does anyone know if the non-M-Sport rear bumper needs to be removed to install this? I'm thinking about this for my next mod. I think the 128i would benefit greatly from it - just give the car a bit more presence, you know?
|
|
Appreciate
0
|
| 12-22-2010, 07:35 AM | #16 |
|
Registered
0
Rep 4
Posts |
I just got the 128i so I'm new here. Actually, its the wife's car and she doesn't really want it all mod-ed up. I'm thinking about an exhaust if that will yield a little more hp or gas mileage.
Has anyone done some before and after tests to see real world hp or fuel mileage gains? Skip |
|
Appreciate
0
|
| 12-22-2010, 10:22 AM | #17 | |
|
Colonel
219
Rep 2,233
Posts |
Quote:
|
|
|
Appreciate
0
|
| 12-22-2010, 10:24 AM | #18 | |
|
Colonel
219
Rep 2,233
Posts |
Quote:
The exhaust note is fairly aggressive which she might not like. Without also doing an intake I doubt there will be any hp gains and I expect my MPG to drop for a while since I am driving the car more aggressively to hear the sound. |
|
|
Appreciate
0
|
| 12-22-2010, 10:27 AM | #19 | |
|
!
742
Rep 3,267
Posts |
Quote:
|
|
|
Appreciate
0
|
| 12-22-2010, 10:32 AM | #20 |
|
Colonel
219
Rep 2,233
Posts |
This might be helpful. The pic shows the new exhaust with items that get transferred from the old unit (in red) and the blue arrow shows the stub for the flapper valve hose.
|
|
Appreciate
0
|
| 12-22-2010, 01:29 PM | #21 | |
|
!
742
Rep 3,267
Posts |
Quote:
Anyone seen or done an exhaust swap on a 128i with the regular bumper and know the answer to this? |
|
|
Appreciate
0
|
| 12-22-2010, 03:00 PM | #22 | |
|
Colonel
219
Rep 2,233
Posts |
Quote:
|
|
|
Appreciate
0
|
Post Reply |
| Bookmarks |
|
|


 2006 525i


