

|
|
|
|
|
| 11-14-2014, 10:40 AM | #1 |
|
Major
 193
Rep 1,181
Posts |
TUN3D 135i build (1M Conversion) - Battery & Exhaust
Thanks to ilikebmxbikes, Sk8fe, Venom, EINSER M, Mybad135, Tony135, uberschnell, and a few others for answering my questions in regards to this project. Not reinventing the wheel here, just another boring 1M conversion -- haha! Hopefully some of the pics will help the next guy in line -- so lets get to it.
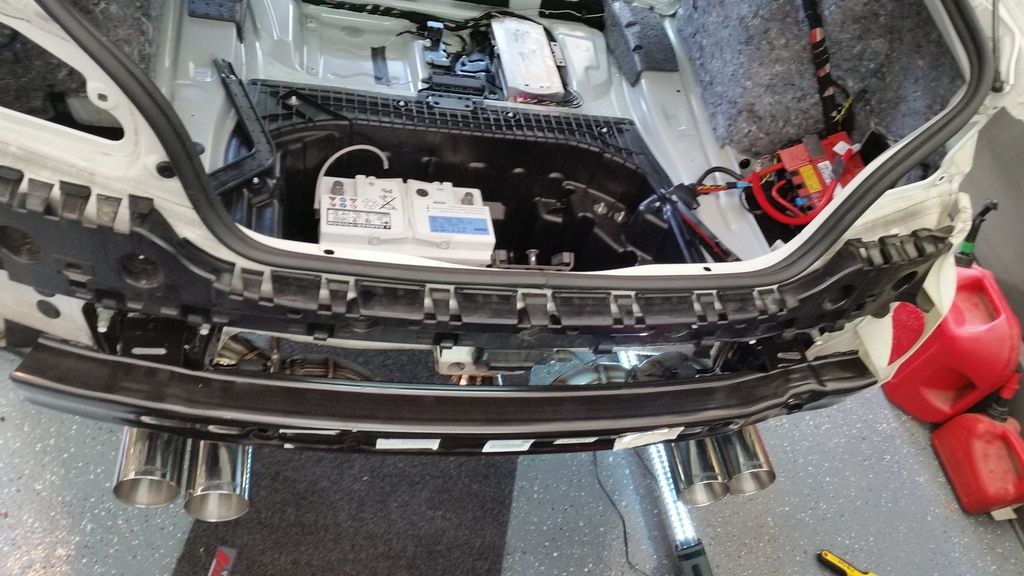
Note: I broke this build into different sections/threads. The page was getting so big that even I had trouble following or finding things at times. This conversion has many phases. I've done my best to group them in a manner which is easy to understand and navigate... Navigation: Conversion & Parts List • Home Page & Main Build Thread • Front • Rear & Quarters • Battery & Exhaust < • Ducts & PPK2 ---------------------------------------- In this post you'll find: • Battery & Exhaust Relocation • Battery Cable Options • Scavenge Air Line Mod ---------------------------------------- ////////////////////////////////////////////// Battery & Exhaust List ========================= 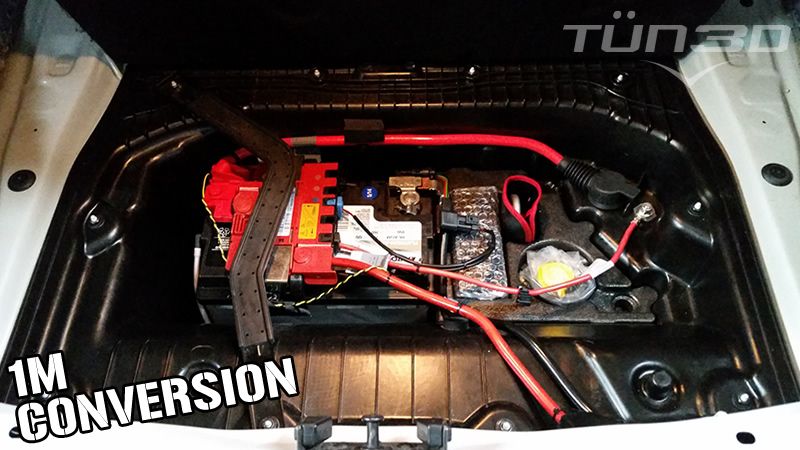 Required - Battery Relocation 51718051597 - Multi-Purpose Bucket 61217553951 - Battery AGM 70AH 760A (*1) 61126929715 - Positive Lead 61129217036 - Positive Cable 61127845120 - Negative Cable w/o IBS (Brown) (*2) 61127618679 - Negative Cable w/i IBS (Black) (*2) 12517615476 - IBS Adapter (*3) Required - Fuel Line Vent Relocation 16137845193 - Low Pressure Fuel Pump Bucket Vent Pipe 16137845194 - Exhaust Steam Pipe with Dust Filter 16137845195 - Gas Filler Vent Pipe Required - Quad Exhaust Components 18107845402 - Exhaust (*4) 51488051598 - Heat Shield 07147147513 - Heat Shield M6x12 Hex Bolt w/i washer > Qty.7 (*5) 18207798560 - Muffler Rubber Mounts > Qty.3 51128051589 - Rear Bumper Carrier Optional Parts: 51478052634 - Battery Bucket Foam Insert 71100413439 - Tyre mobility set 16137845196 - Scavenge air line (*6) ======================= Notes & Updates: (*1) Technically speaking, this "should" be the proper battery for the 1M (760-CCA). Unfortunately, when ordered, you'll most likely get the wrong part. After two weeks of back-n-forth with the dealer -- I gave up. I went to my local auto-parts store and bought an "AutoCraft Platinum AGM, Group Size H6, 760 CCA" battery. This is the direct replacement (BTW), for all 1M's. The correct length of the battery (to fit properly) needs to be 11". (*2) If your battery's IBS is connected to the negative terminal, then you'll have to get the "black" more expensive negative battery cable. If your car's IBS is not connected to the negative terminal, then you're in luck and can order the cheaper brown negative battery cable. View pics below. (*3) You ONLY need this part if you get the black "Negative Battery Cable w/i IBS". (*4) Same as the diffuser, the Exhaust is around $650+. I would look into an aftermarket upgrade (or perhaps a custom solution). (*5) You'll run out of these bolts for sure. Order a few extra. (*6) The scavenge air line is part of the fuel ventilation system. I had an issue locating this thru BMW. It's a special order part (listed in all online & dealer catalogs), however, for whatever reason -- doesn't register at the dealer. In other words, you can't order it. Oddly enough, after alot of searching -- I was able to get it thru ECS Tuning. They added this to their online catalog as a result of my conversation with them. Ultimately it's not required though. It's an easy inexpensive mod. View pics below. ---------------------------------------- ////////////////////////////////////////////// Battery Cable Options ========================= Back at the end of August, I posted a request for battery/trunk pics of real 1M owners. I did this after noticing that some of the 1M's had a "brown" negative cable while others had a "black" negative cable. I wasn't sure whether it was a European vs US spec type thing -- or -- whether it was a build date vs recall type of situation. 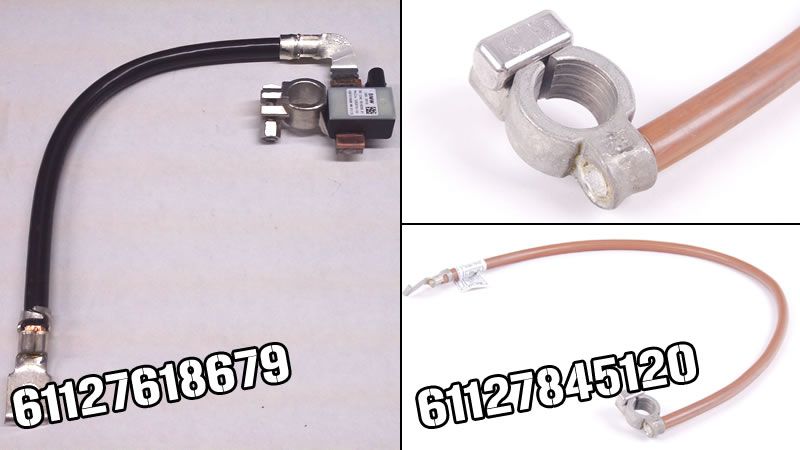 Here are the two options... 61127845120 > $22.37 (Brown Cable) 61127618679 > $156.70 (Black Cable) The price difference is significant. But which one is the proper cable? Once I got down to it, I pretty much answered my own question. In the initial post, Dackelone said they were both the "right" parts. This is TRUE, but not really. Yes, they are both negative terminal cables and WILL work. However, there is a reason WHY they are different so you must order the correct part for your car. The deciding factor is where/how the IBS (Intelligent Battery Sensor) is installed. 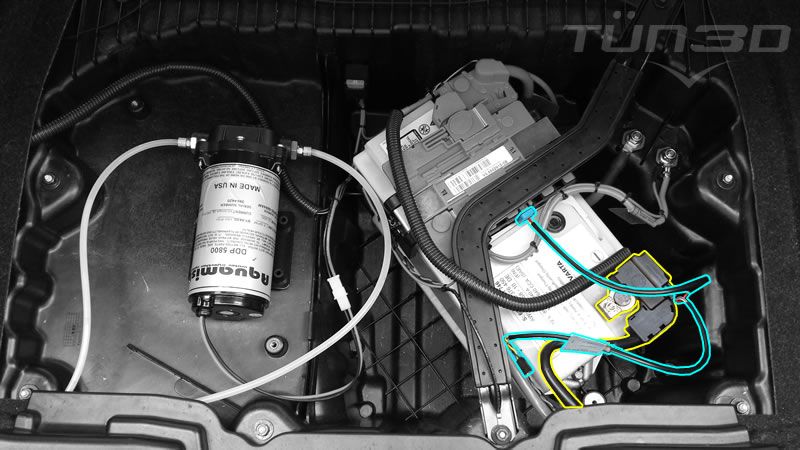 In this diagram, you see how the 135i battery is wired. In blue, you'll notice how the IBS sensor is connected to the negative terminal. If your 135i's negative battery terminal/cable looks like this -- then you need to order the more expensive replacement > 61127618679. If it doesn't, and you're negative terminal has no other components, then order the less expensive replacement > 61127845120... ////////////////////////////////////////////// Battery Cable Options - About IBS ========================= What the hell is the IBS anyways? From what I've gathered, it charges the battery "intelligently" increasing voltage just after start-up and decreasing as time goes on. It cuts supply to certain modules if the battery is low, charges it a little bit more if it's winter, helps conserve battery if its running low, and increases battery life (amongst other things). Can you drive without it? -- YES. At least I've been able to. I ordered the brown wire initially and haven't had any issues starting up the car and driving -- albeit -- a few miles. Don't know what the long term implications are of not using the IBS, but don't want to find out. I put my order in for the new cable. 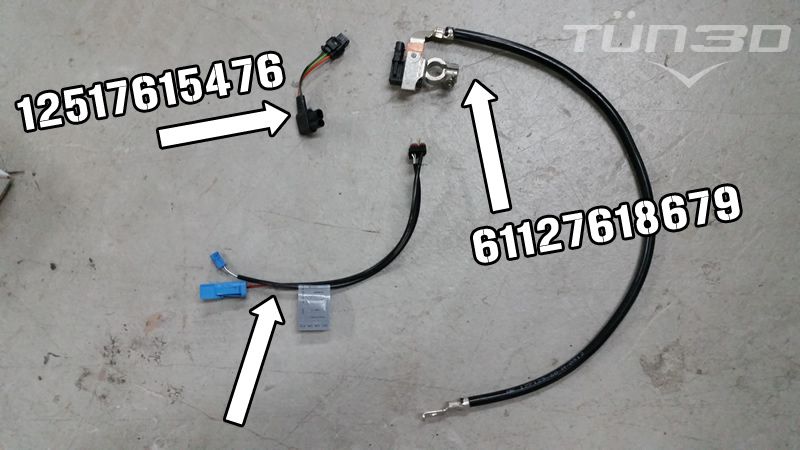 Here's another view of the Negative Battery Cable & Adapter For IBS. The adapter is needed if you order this cable... 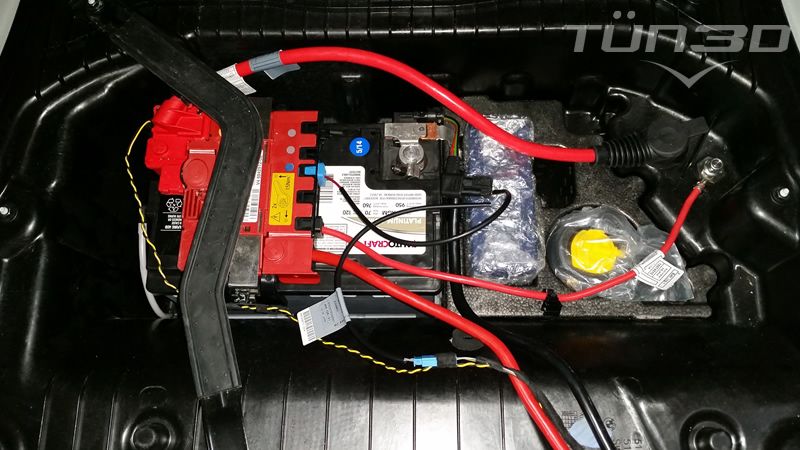 Here's a view of my battery setup with the "wrong" battery cable for my car. The tire repair kit in this image is from a different car. Cost me $15 on eBay. After buying it, I found a guy in Germany that had a brand new 1M OEM repair kit (with the yellow cap). Once I get that in the next week or two...the battery project will be complete... 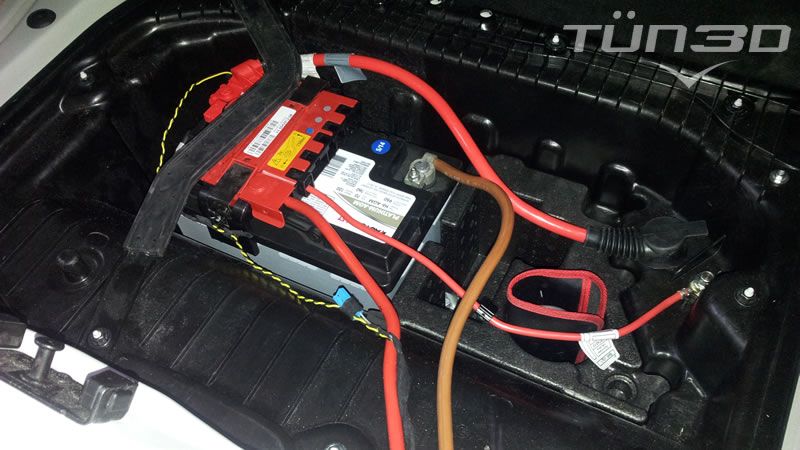 Here was my install prior to getting the correct cable... 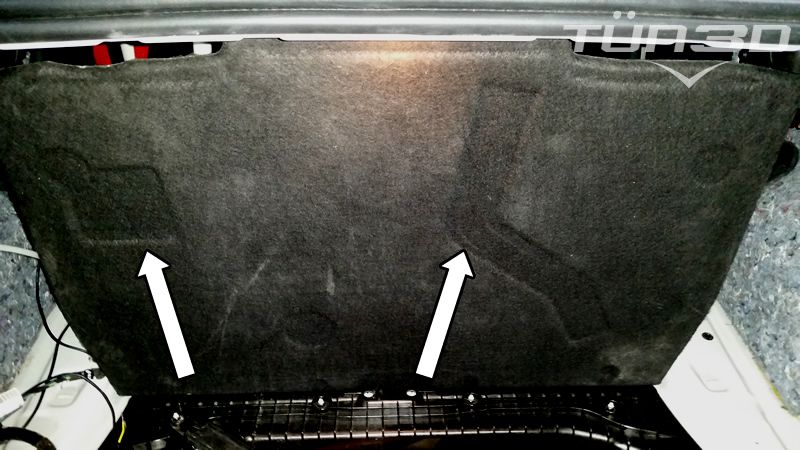 The devil is in the details. So I was laying back enjoying my work and had the trunk flap up when I noticed that it has specific indentations for the 135i battery and tray position. Would love to change it but, there is no option. I had a 1M owner confirm that they have the same lid. Looks like BMW missed it there... ////////////////////////////////////////////// Battery Relocation View ========================= 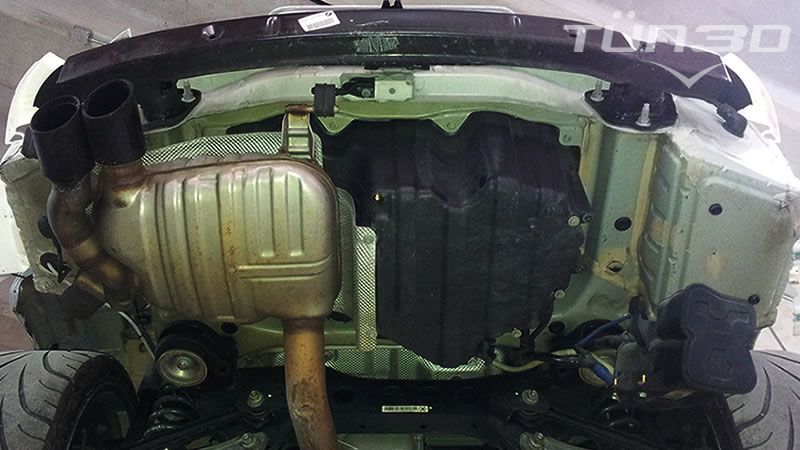 Before Battery Relocation... 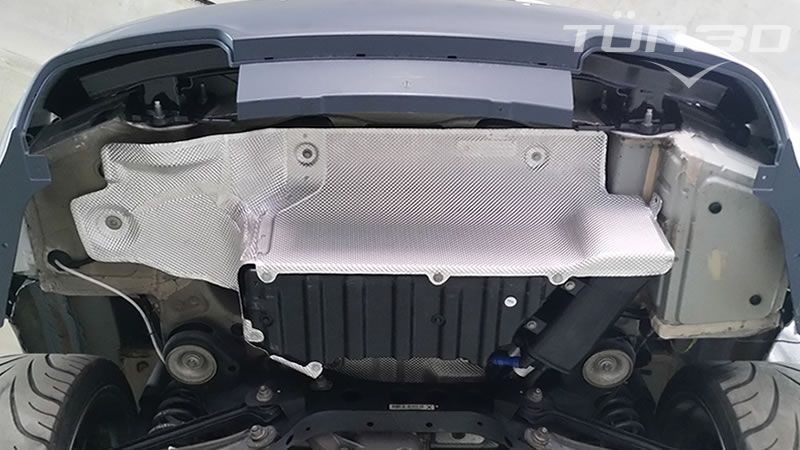 After Battery Relocation... 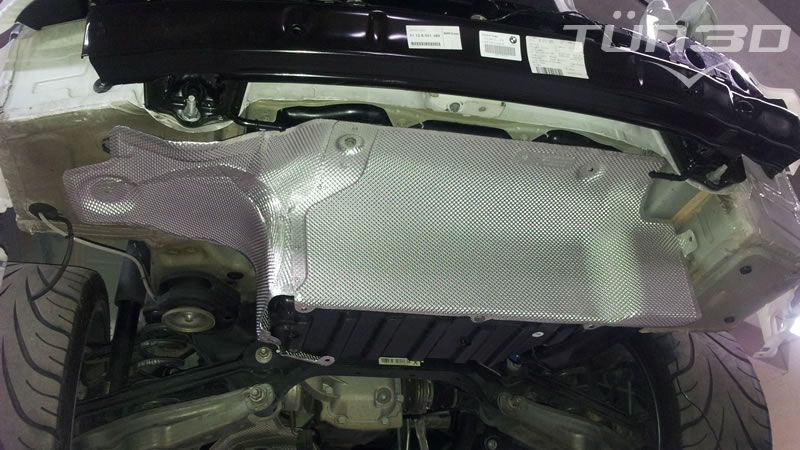 1M heat shield... 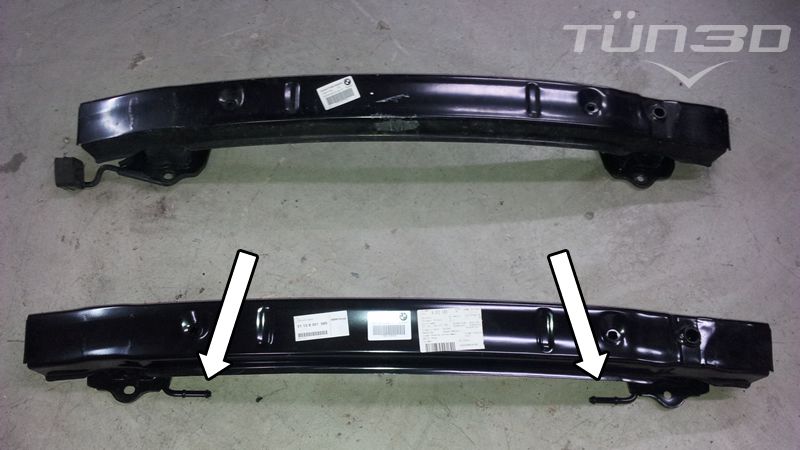 Here is a side-by-side of the bumper carrier. Notice how the 1M part has the dual hooks... ////////////////////////////////////////////// Scavenge Air Line Mod ========================= The "Scavenge air line" needs to be modified in the event that you can't order the part. All other lines that lead to the canister, once replaced, are a perfect fit. There are two large clips that secure the line to the chassis. I cut the line at the second fitting (closest to the canister), added a 3/8 x 3/8 barbed brass coupling, and attached a section of non-kink flexible line. It's a really curvy weave coming down from the fitting, so you need something really flexible that won't kink. The fitting that goes into the canister can be removed and adapted to the flex-line without any problems... 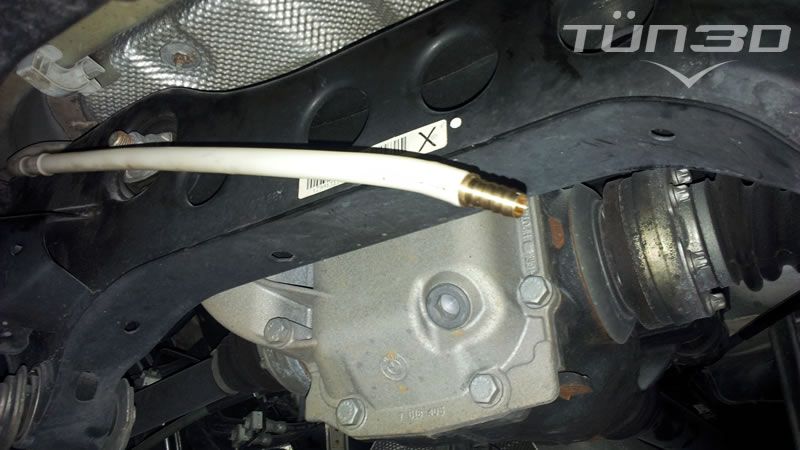 Here's a good shot of the line... 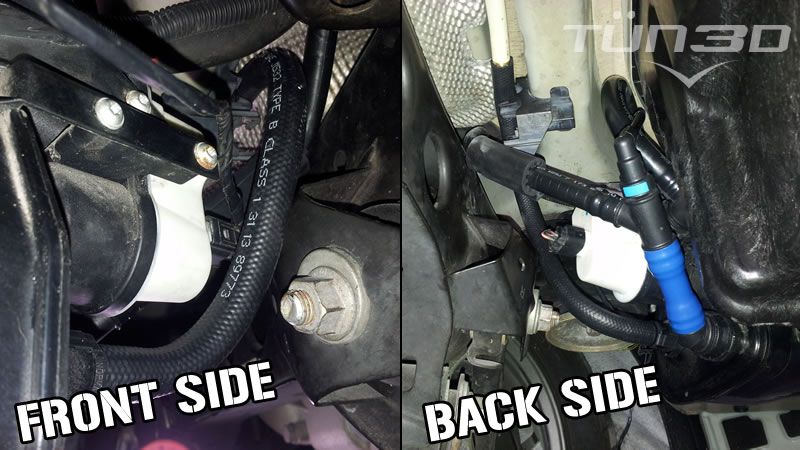 Here's a good shot of where I modified the line... ////////////////////////////////////////////// Random Pics ========================= 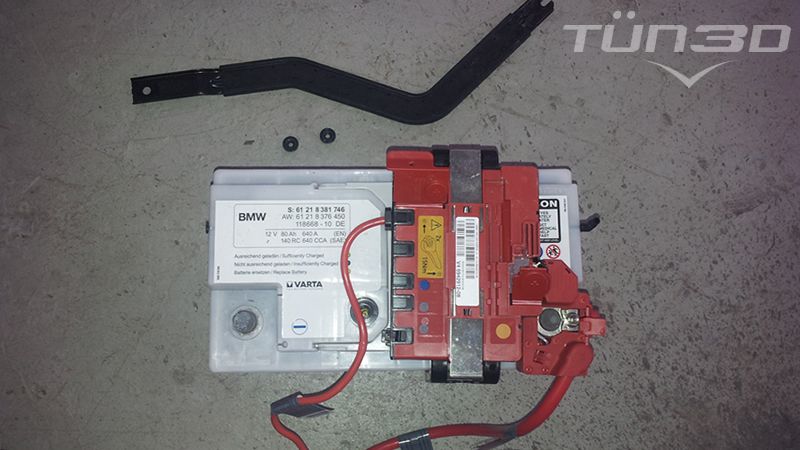 Battery out...  Tray on... 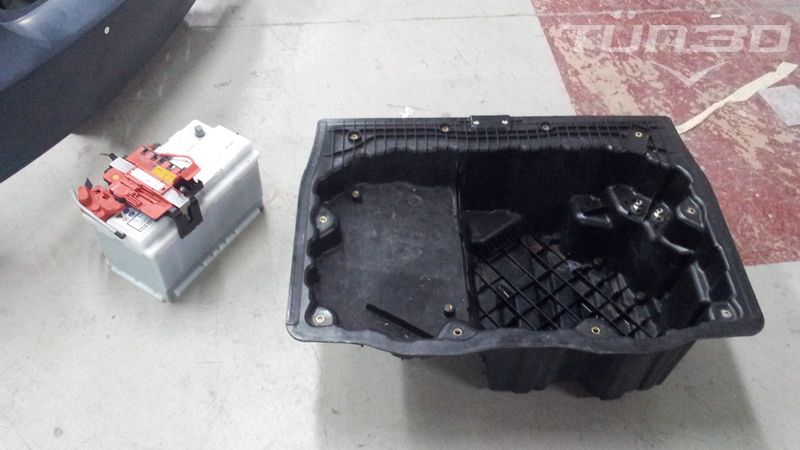 Tray out... 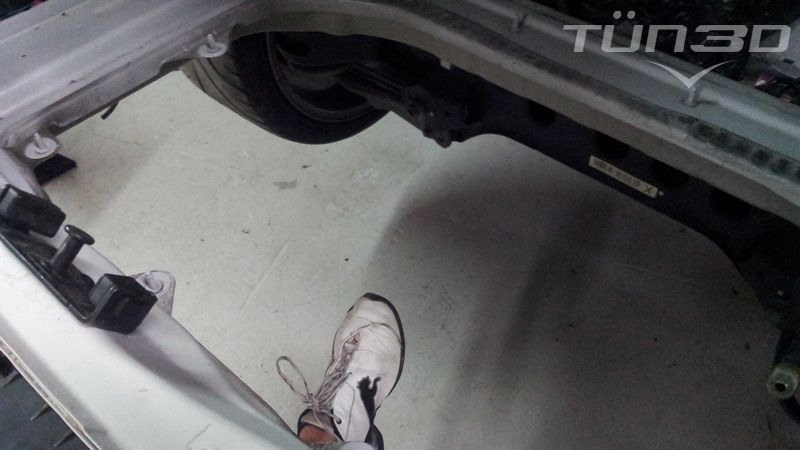 Funny how simple the trunk really is to take apart... 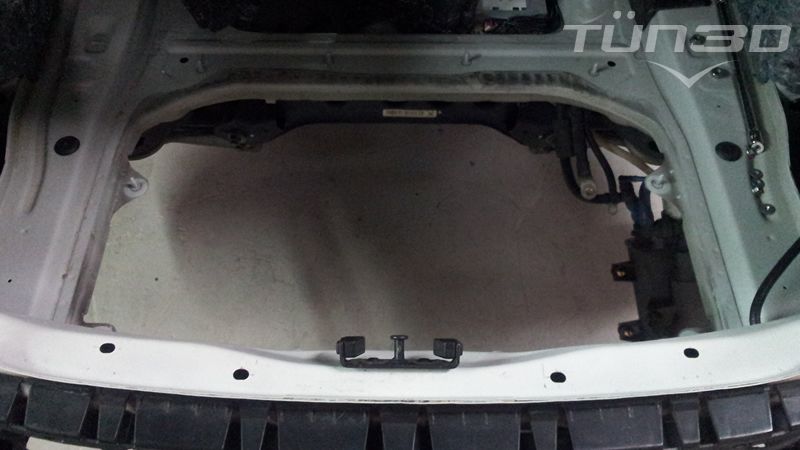 Another view of the tray out... 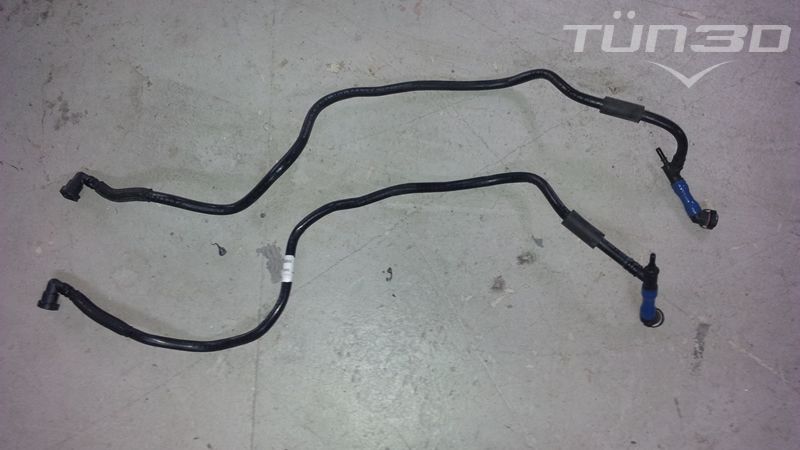 Here is a side-by-side of the LPFP vent-line that needs to be changed. The 1M line is shorter... 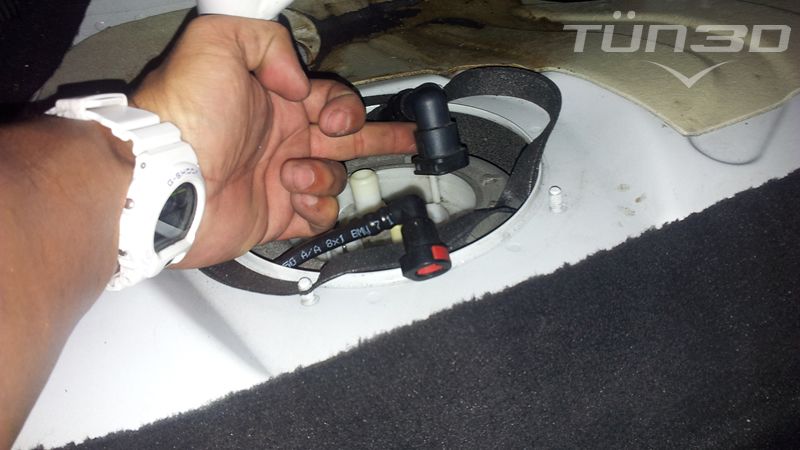 Here is an inside view of the LPFP vent-line. In order to take change it, you must first disconnect it from the LPFP bucket located underneath the passenger back seat... 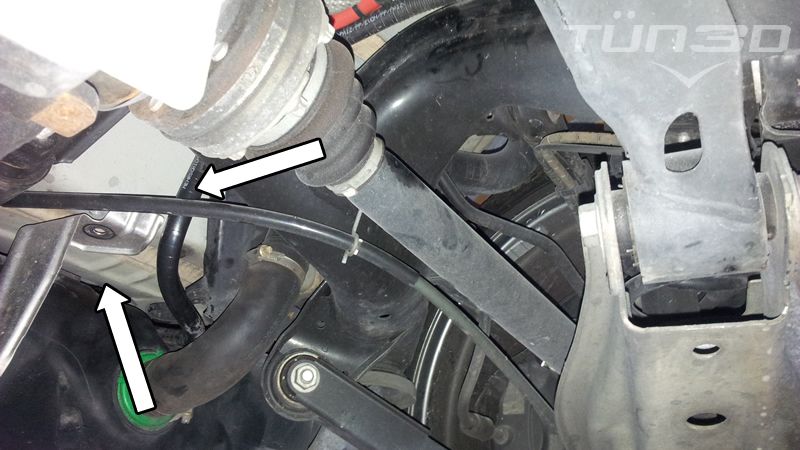 Here is an under view of the LPFP vent-line. You need some room to maneuver (about an inch), but you don't need to drop the entire fuel cell. Simply unbolt the passenger side support brackets and it will drop enough to allow the swap... 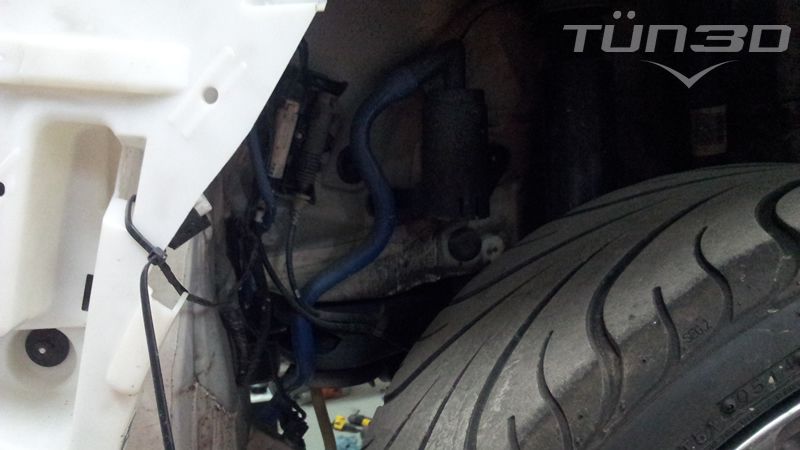 Here is where the 16137845194 - Exhaust Steam Pipe with Dust Filter & 16137845195 - Gas Filler Vent Pipe are located. Very easy to swap... 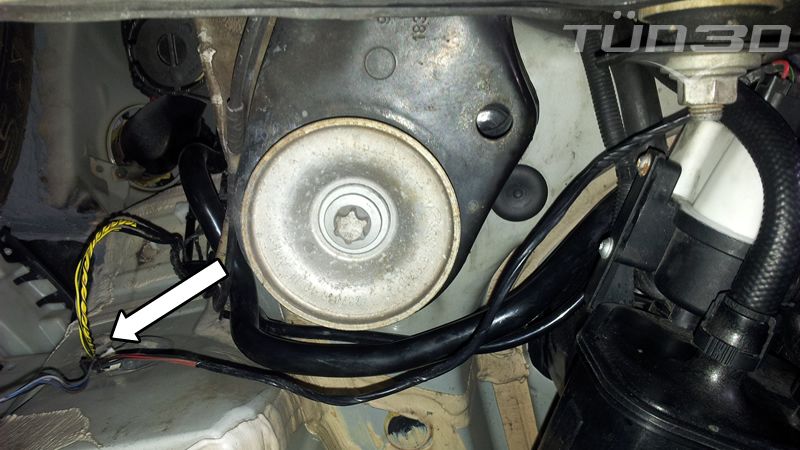 Here's another myth I want to debunk. Some guys have said that the charcoal canister wires/connection has to be extended. This is not true. The group of wires/connection which includes the charcoal canister & tire pressure monitor are taped together. Removing the tape allows more play on the wire(s). Everything reaches perfectly. Re-tape the wires and your all set... ////////////////////////////////////////////// Scavenge Air Line Installation ========================= 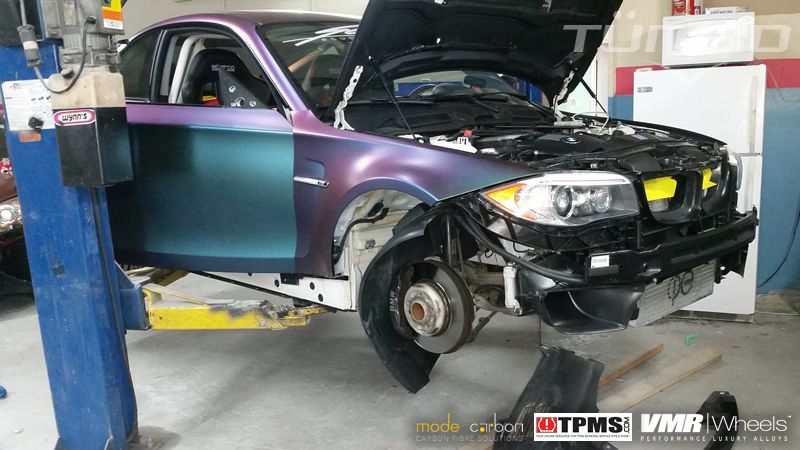 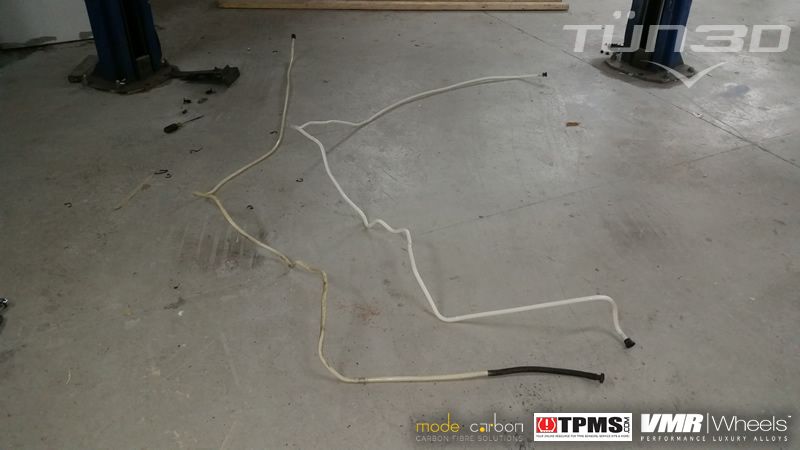 Putting in the 1M scavenge air/vent line that goes connected to the HPFP. You can see the 135i line and the modification needed to make it work on the left. Since we're not cutting corners, this had to be done... 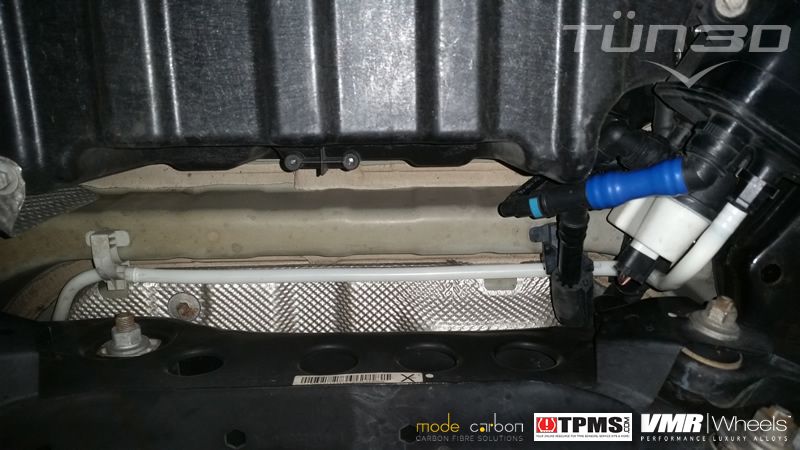
__________________
Last edited by TUN3D; 03-16-2015 at 11:15 AM.. |
| 12-05-2014, 02:28 PM | #3 |
|
Colonel
 
1299
Rep 2,093
Posts
Drives: '11 135i M Sport
Join Date: Dec 2013
Location: Delmarva Peninsula
|
This looks to be the most intimidating part of the conversion process to me for some reason.
|
|
Appreciate
0
|
| 12-05-2014, 02:36 PM | #4 |
|
Major
193
Rep 1,181
Posts |
@Yeineken > No way man -- it's cake. You can knock it out in a few hours. It took me longer obviously because NO ONE had the damn information readily available. I also had issues with the dealer in terms of getting the battery and scavenge air line. Everything else is PnP.
__________________
Last edited by TUN3D; 12-05-2014 at 02:48 PM.. |
|
Appreciate
0
|
| 12-16-2014, 12:15 PM | #5 |
|
Shazaam

10
Rep 197
Posts |
Is the new rear bumper carrier required for the new bumper? Or is it only because of the exhaust?
__________________
@mattbmclean6f
2009 135i M Sport 6MT - ER CP - HKS BOV - AFE Intake - Cobb AP - VRSF DP's - Remus Quad Race Exhaust - CF Quad Diffuser - CF Spoiler - 19" Alufelgen CSL's - Hardwired V1 - Laser Interceptor Dual - Black Grilles - 1M Bumper - CF Splitter - Custom Alcantera Flat Bottom Steering Wheel |
|
Appreciate
0
|
| 12-16-2014, 12:23 PM | #6 |
|
Major
193
Rep 1,181
Posts |
@MBM6F > Not required to mount the bumper. However, if you're going stock 1M exhaust or 1M aftermarket -- yes. It's mainly for exhaust mounting purposes. The 1M bumper carrier has specific hooks/mounting points for the exhaust.
That said, you can modify the 135i bumper carrier -- just weld/adjust the hooks.
__________________
|
|
Appreciate
0
|
| 12-16-2014, 12:33 PM | #7 |
|
Shazaam
10
Rep 197
Posts |
Thanks for the speedy response. Just got off the phone with ECS in regards to shipping. As soon as I hear from the body shop I think I'm ready to dive into this project.
__________________
@mattbmclean6f
2009 135i M Sport 6MT - ER CP - HKS BOV - AFE Intake - Cobb AP - VRSF DP's - Remus Quad Race Exhaust - CF Quad Diffuser - CF Spoiler - 19" Alufelgen CSL's - Hardwired V1 - Laser Interceptor Dual - Black Grilles - 1M Bumper - CF Splitter - Custom Alcantera Flat Bottom Steering Wheel |
|
Appreciate
0
|
| 04-20-2015, 10:44 AM | #9 |
|
First Lieutenant
 94
Rep 307
Posts
Drives: 11' E82 S65 1M, 21' F95 X5MC
Join Date: Aug 2012
Location: Ponte Vedra, Florida
|
Huge thanks to TUN3D ... My battery relocation was a success, even tackled the scavenge air/vent line!
__________________
'87 E30 M62 V8 6MT -- '11 E82 1M CLONE S65 6MT -- '21 F95 X5MC  |
|
Appreciate
0
|
| 04-22-2015, 02:55 PM | #10 |
|
First Lieutenant

24
Rep 382
Posts |
Great write up! Thank you! Anyone done the rear 1M but left the front stock 135, yet? I wonder how that would look. If it would be ok looking (besides the side skirt not lining up) until I could afford to do the front.
__________________
2011 Space Grey 135i Sold
 06 GTO , 06 WRX, 59 Bug AV cars and Coffee www.facebook.com/Avcarsandcoffee/ |
|
Appreciate
0
|
| 04-22-2015, 05:50 PM | #11 | |
|
Colonel
1299
Rep 2,093
Posts
Drives: '11 135i M Sport
Join Date: Dec 2013
Location: Delmarva Peninsula
|
Quote:
__________________
|
|
|
Appreciate
0
|
| 04-23-2015, 09:18 AM | #12 |
|
Major
193
Rep 1,181
Posts |
CGMike > Like Yeineken said, not sure anyone has done it this way. In either case, the side skirts wont line up. So it's really up to you. The rear is the most difficult part of the project. If you have access, and can pull it off first -- go for it. The front can be done from home -- whenever you want.
__________________
|
|
Appreciate
0
|
| 04-23-2015, 04:58 PM | #13 |
|
First Lieutenant
24
Rep 382
Posts |
I know the front is fairly easy and a bolt on affair, but I think the car looks weird when the front is done but not the rear. I know its more labor intensive, I was just curious if anyone had done the rear first. Thanks for these great write ups again!
__________________
2011 Space Grey 135i Sold
06 GTO , 06 WRX, 59 Bug AV cars and Coffee www.facebook.com/Avcarsandcoffee/ |
|
Appreciate
0
|
| 04-25-2015, 08:00 AM | #14 | |
|
Colonel
1299
Rep 2,093
Posts
Drives: '11 135i M Sport
Join Date: Dec 2013
Location: Delmarva Peninsula
|
Quote:
__________________
|
|
|
Appreciate
0
|
| 06-16-2015, 04:42 AM | #15 | |
|
New Member

0
Rep 6
Posts |
Quote:
 Now, I have a 135i coupe and looking to get an OEM 1M exhaust installed. Have begun putting the shopping list together and as far as the entire IBS-deal goes, of course, I have the black more expensive cable in the car today. Happy Days..! ") My main purpose is to be able to mount the 1M exhaust I have laying around, and though I really dig the all-in approach you clearly went for (  ) with your conversion of the entire car, I don't really feel the need to be that thorough when it comes to only using OEM parts to make this exhaust install possible. I will purchase the parts that really needs to be purchased, but I don't mind cutting a corner or two if the consequences is no other than having to know that though it's fully functional, it's not done entirely "correct", so to speak. ) with your conversion of the entire car, I don't really feel the need to be that thorough when it comes to only using OEM parts to make this exhaust install possible. I will purchase the parts that really needs to be purchased, but I don't mind cutting a corner or two if the consequences is no other than having to know that though it's fully functional, it's not done entirely "correct", so to speak.First and perhaps only question I have to those of you that might know: Would extending the black negative cable do the same trick as replacing it with 1M oem part? I'm figuring the only reason having to do something at all with this is that the 135i oem part is too short and won't reach the battery when repositioned in the new bucket. Am I right or perhaps dead wrong? For instance, just looking at pictures of the small adapter cable, which BMW also charges a fair amount of dough for, it doesn't reveal if it's one and only purpose is to make two different type of connectors "connect". Guessing the connector on the 1M IBS-unit differs from the 135i version..? Though the function of the IBS most likely should be exactly the same..? Sorry for long post, hope you bare with me!  Once again, love the post and build! Once again, love the post and build! |
|
|
Appreciate
0
|
| 06-16-2015, 09:51 AM | #16 |
|
Major
193
Rep 1,181
Posts |
Ericsson.FFS > Thanks for checking out the thread/build. You can certainly improvise and cut corners as you see fit. I've seen threads/posts were the battery relocation is NOT done to OEM spec (worked out beautifully).
Extending the cable will do the trick.
__________________
|
|
Appreciate
0
|
| 06-18-2015, 10:06 AM | #17 |
|
New Member
0
Rep 6
Posts |
Thank you so much for clarifying this!
I did just now stumble upon something in another thread that brought to life yet another question, perhaps you or someone else that reads this have an answer for this as well?  Here goes: In another thread covering an 1M exhaust conversion, http://www.1addicts.com/forums/showt...ctional&page=2, the user 1SER135 wrote the following about evaporative canister related issues that needs to be tackled: "1SER135*05:49 AM 11-16-2012 Ok so as a update i thought id let everyone know that the evaporative canister is apparently only a problem with the US spec cars. This is why Eisenmann had to mod their quad exhaust for US spec 1er and not EU Spec. Australia has EU spec so we dont need to worry about it."... As I live in Sweden my car would also be of EU-specs, so what I wonder is if this means there's no need to deal with some/any of the evaporative canister-issues, i.e. they are in fact no issues at all? So far it has appeared that there's at least 3 evaporative related parts I would need: 16137845193 - Low Pressure Fuel Pump Bucket Vent Pipe 16137845194 - Exhaust Steam Pipe with Dust Filter 16137845195 - Gas Filler Vent Pipe Though, I believe this has been proven to be so on a car with US-specs, but perhaps it doesn't affect those of us that drives a EU-spec'd car....? Thanks, again |
|
Appreciate
0
|
| 06-18-2015, 01:02 PM | #18 |
|
Major
193
Rep 1,181
Posts |
Ericsson.FFS > http://www.partsbase.org/parts/bmw-16137163596/
16137163596 > Activated Charcoal Filter. left steering Looks like the canister and all relative lines are the same in both models. The canister is repositioned on the 1M. Because of the angle, and non-flex material of the vent lines, you need to get new ones. That, or you can always hack away and extend them. Prior to getting the Scavenge air line from Germany (16137845196 - Scavenge air line), I modded/extended it. Worked beautifully. I'm not a hack though, so I bought the original part. All vent lines are rather inexpensive, but to each his own... ------------------- In terms of Eisenmann modifying their exhaust (throwing up a complete assumption BTW), I'd bet that it has nothing to do with the canister. If it's an emissions regulation type scenario, then they probably changed some of the properties inside of the exhaust -- but externally -- it would be the same size/shape and fit both the US & EU spec models. The exhaust doesn't connect to the canister (has nothing to do with it). The canister is a fuel ventilation system...period. Here is the exhaust directly from them... https://eisenmannblog.files.wordpres.../img_74851.jpg See the canister? Cheers my friend.
__________________
|
|
Appreciate
0
|
| 06-18-2015, 01:18 PM | #19 |
|
Major
193
Rep 1,181
Posts |
Ericsson.FFS > Let me clear up yet another point, which I think will answer any other questions you might have.
It seems like you want to take more of a "cutting-corners" -- "saving-money" approach to this whole thing. Nothing wrong with that. This thread however, is not that. I personally wanted my car to look exactly like a 1M, so I went all they way with genuine parts. This is the right way/headache free approach to doing it. I didn't have the time/luxury to reinvent the wheel. Anyways, here's my recommendation to you... Buy and change the bucket (51718051597). There's no way around this if you want to use/buy a legit 1M exhaust system. Once you install it...and attach the canister...it will dictate what modifications/extensions you have to do (both to the battery/cables & vent lines).
__________________
|
|
Appreciate
0
|
| 06-18-2015, 02:16 PM | #20 |
|
New Member
0
Rep 6
Posts |
Man you're quick! Thank you for this, your time and effort put in to answering my questions is very appreciated. I do feel a bit like a cheap ass threadjacker, asking for simple ways to save a buck or two, when clearly this thread isn't about that at all. Sorry bout this, I feel deep respect for the class A work you have had done to your vehicle and to the fact that you have spared no expenses in the pursuit of a genuine result!
I understand it seems like cutting corners is my preferred way to go, but actually it's generally not. As you say, the trouble/headache free way is seldom achieved by trying to cut corners. My main concern is really that I don't want to end up in a situation where the need of something that I haven't got suddenly is present, discovering this whilst the car is hoisted and in pieces, and of course, the dealer is closed for the weekend and the part is backlisted into the next decade. It is my daily driven car and I need it to be in at least somewhat functional order, as much of the time as possible. To sum things up, as I think I by now have gotten the questions and concerns out of my system, I will as you say order the multifunctional pan, but also most of the cables, vent lines and extras possibly needed. Who needs another headache anyway?! Thank you again! If you like I don't mind at all removing my posts in this thread, just to not let it get off course in any way. Just say the word! |
|
Appreciate
0
|
| 06-18-2015, 03:34 PM | #21 |
|
Major
193
Rep 1,181
Posts |
Ericsson.FFS > At all man. Trust me...I understand where you're coming from. Absolutely nothing wrong with your questions, etc. -- or what you're trying to accomplish. At the end, who cares...long as it's functional -- I'm all for it. Most of this stuff is not anything anyone is ever going to see anyways.
You can certainly extend the battery cables and vent lines as needed. It's pretty basic stuff in the grand scheme of things. The parts listed above is everything you're going to need. Send it to your local parts dealer/online-source and see what the availability is. Let me know what you can't get and we'll figure out a way to modify it. Aside from the battery bucket, which is non negotiable, I would also get the right size battery (11"). I've seen where people have continued to use the longer 135i battery (13") and it's somewhat of a pain in the ass. It doesn't sit/secure properly to the bucket. I would also get these two: 16137845194 - Exhaust Steam Pipe with Dust Filter 16137845195 - Gas Filler Vent Pipe Those two lines are smaller in diameter (perhaps a little more delicate to extend) + one of them has the dust filter attachment. The other two lines (16137845196 - Scavenge air line && 16137845193 - Low Pressure Fuel Pump Bucket Vent Pipe) can be extended. These are a little larger and perhaps easier to work with. A double sided nipple and some flexible tubing will work. No need to remove anything man. All this is good conversation. Glad I could help out. God knows I had a million questions as well...so it's all good. Let me know how it goes and if you need anything else. Look forward to seeing some pics of your project!
__________________
|
|
Appreciate
0
|
| 08-24-2015, 01:03 PM | #22 |
|
New Member
0
Rep 6
Posts |
Update, job done
Hi again,
Well, it's done! It went pretty smooth all in all, though not really as expected. Here's why... As I posted in a reply earlier on, someone had written in another thread that the charcoal canister-issues didn't affect the EU-spec'd cars, I guess he was right..! At least in some ways. Here's what faced me after removing the rightside wheel well liner: Note the lack of dust filter assembly and the open-ended vent. pipe (also, in white plastic, instead of blue) Further down and below, I also found that I have no electrical wiring going to the canister, and that the canister itself doesn't look at all like the one seen in your car on pictures above. I recon there may be at least 2 possible variants - perhaps the one you guys in US have is the "Active" one, with electric components inside, and the one we find here in Sweden, and perhaps other EU countries, could be described as a more passive type of charcoal canister..? Picture below: Prior to getting this swap done I did buy the Exhaust steam pipe with dust filter (1613784514) and the Gas filler vent pipe (1613784515), although I didn't end up using either one of them. The dust filter assembly pipe didn't at all line up with the canister, for perhaps obvious reasons (being the "wrong" canister ) and the new 1M gas filler vent pipe also didn't seem to wanna live in this car. The Scavenge air line (on my car blue plastic instead of white) did in my case not need to be extended, but in fact shortened (and reshaped). I order to make the three pipes connect to the canister mounted in its new position, I ended up reshaping them somewhat with a hot air gun and also shortening the pipes by this much: Though, the white and thicker vent pipe needed to be slightly extended with a short piece of flexible tubing in order to make it reach the canister with a somewhat tight bend. All in all, getting the different parts to play together was an exciting and mind-awarding job! :-) Cutting corners, as I did do with this swap, I also ended up welding two new removable mounting brackets to hang the rear 1M muffler by, as opposed to replacing the rear bumper carrier. The battery cables turned out just fine, extended with the help of proper, heavy duty, crimp&solder extension sleeves. For time being I did settle with an original 135i rear diffuser, which I modified to mate with the quad exhaust tips. Result below: Kinda sucked that the left side cutouts needed to be moved to the right about 8 cm... But of course... Thank you once more for the willingness to share your experiences with the rest of us! It helped a bunch along the way!!  |
|
Appreciate
0
|
Post Reply |
| Bookmarks |
|
|


