|
|
|
|
|
| 03-14-2010, 06:32 AM | #1 |
|
European Editor

10532
Rep 22,992
Posts |
DIY Clear Bra install...
Hi Guys & Gals,
Just thought I would cross post this: I will be doing a clear bra DIY as soon as the weather warms up over here. Right now we still are in winter mode. I bought the clear bra film thru my local BMW Zentrum. They even came with these handy DIY directions! I asked my dealer "how much" - they told me 300 to 400 euros! So... I will attempt the install myself. It doesn't look THAT hard... just tedious I think. Mounting Kit: 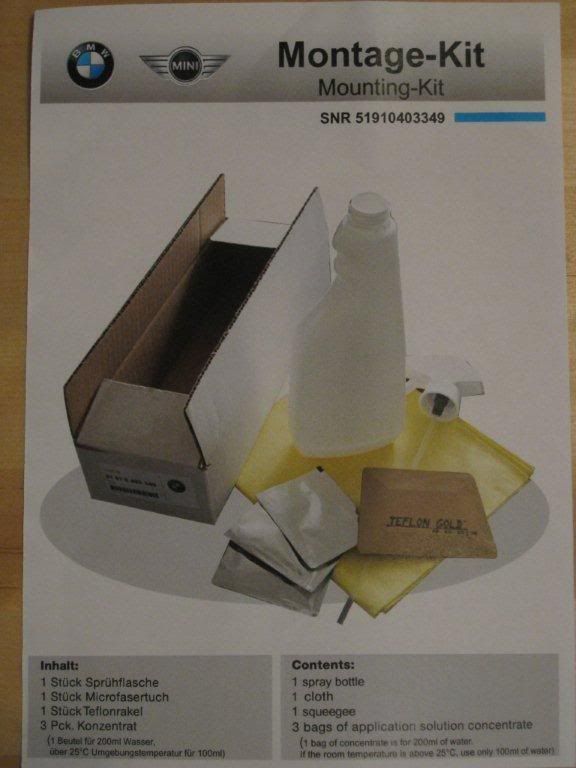 Instructions: 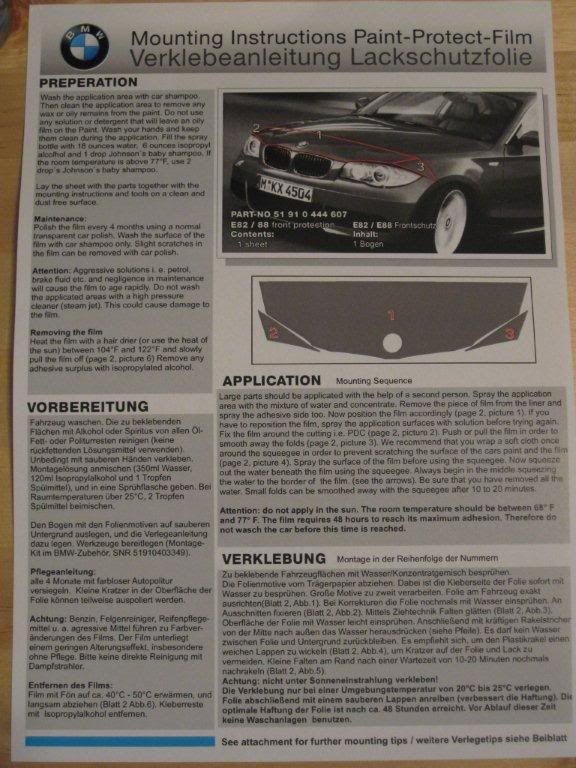 Step by Step Directions: 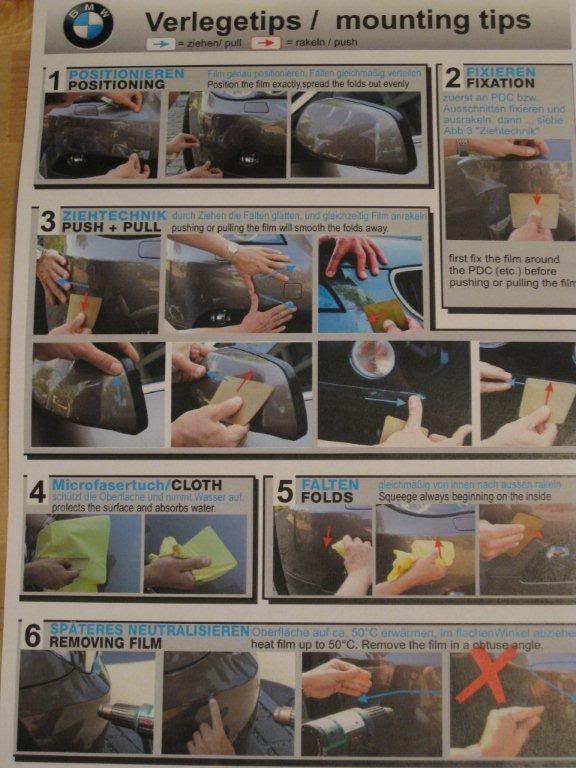 Bumper Directions: 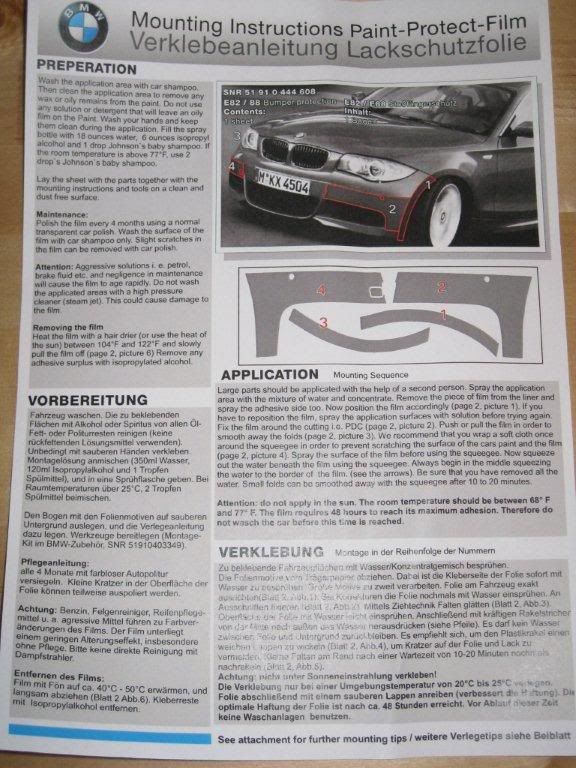 Goodies in the box - just waiting for Spring! 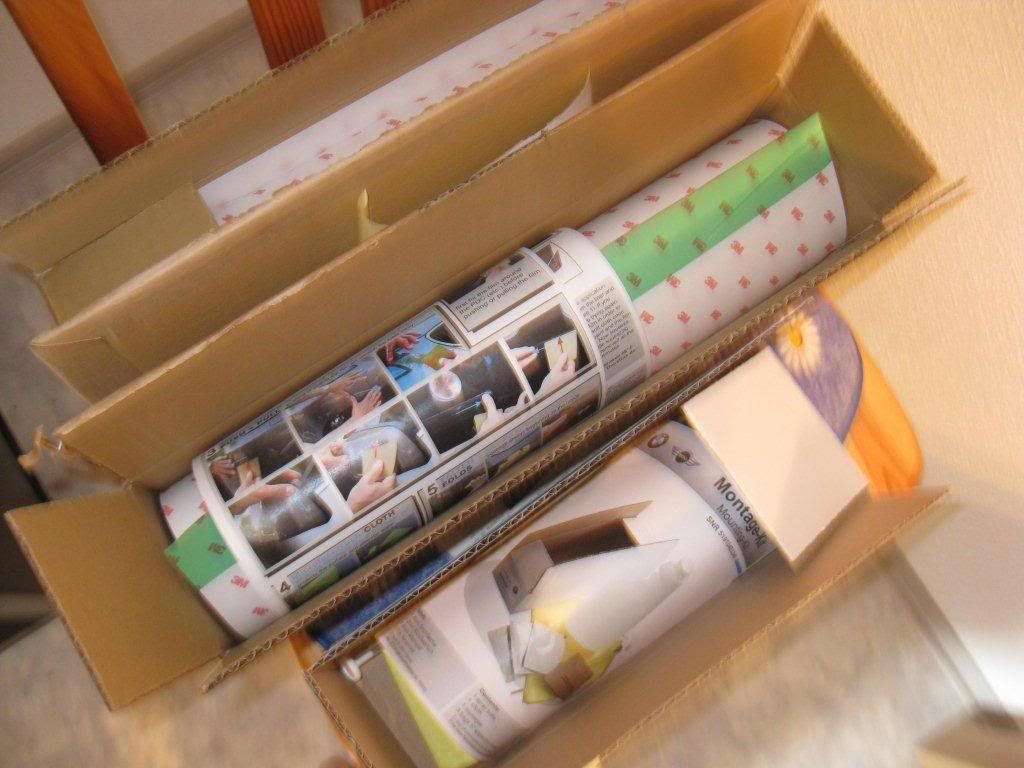 IF Anyone is interested in the BMW Part numbers here they are: Montage/Mounting Kit # 51 91 0 403 349 27 euros Foil Bumper # 51 91 0 444 608 57 euros Foil Hood # 51 91 0 444 607 75 euros RealOEM.com http://realoem.com/bmw/partxref.do?p...ur=&series=E82 As soon as I install this clear bra 3M film - I'll post my results! Dackel |
| 03-14-2010, 06:17 PM | #3 |
|
European Editor
10532
Rep 22,992
Posts |
yea... I am still not sure IF I will do the install myself or let a pro do it. I have these thick 3M film for the headlights I bought from Griots. IF I can install those without too much problem I might tackle the hood first and see how it goes. I might also just chicken out and let the Trim-Line guy do it too. lol
thanks David |
|
Appreciate
0
|
| 03-15-2010, 07:41 AM | #4 |
|
Major
 
133
Rep 1,416
Posts
Drives: M-Sport 128i, 328xi, 3.0CS
Join Date: Jun 2008
Location: New England, USA
|
I did it myself on our 328xi. The film was cut incorrectly so I got to do it again. The second time came out better.
You need a lot of light to see what you are doing. If you do it in bright sun the surface will get warm and evaporate the water and alcohol, and makes the job really difficult. Make sure that the surface is REALLY clean before you start. Use LOTS of soapy water to float the film.
__________________
'09 128i - Black Sapphire Metallic\Coral Red\Glacier Silver\N51 DISA\6MT\Navigation\Premium\M-Sport\Heated seats\Xenon\Headlights\iPod\Smartphone\Euro Delivery
|
|
Appreciate
0
|
| 03-15-2010, 10:14 AM | #5 |
|
European Editor
10532
Rep 22,992
Posts |
I bought the BMW factory kit. I hope it was cut correctly! I have a Q for "m_thompson": What kind of "soapy solution" did you use to mount the 3M film? In the "BMW Mounting Instructions" it says to use:
18 oz water 6 oz isopropyl alcohol (97% I am guessing?) and ONE DROP of Johnsons & Johnsons baby shampo!  It says to use two drops IF the room temp is above 77' F. I also bought the "Mounting Kit"... so it has some dried crystal packs to mix with water. I am thinking I won't have to use this soapy home made solution. ? I was just wondering what others have used to mount the 3M film. It kind of sounds to me that not a whole lot of people have tackled this themselves. ? bye, David |
|
Appreciate
0
|
| 03-15-2010, 12:24 PM | #6 | |
|
Major
133
Rep 1,416
Posts
Drives: M-Sport 128i, 328xi, 3.0CS
Join Date: Jun 2008
Location: New England, USA
|
Quote:
We carefully cleaned the paint to make sure that there would be nothing under the film, washed all of the oils off the paint with the soapy solution, misted the paint with the soapy solution so there were droplets everywhere, and carefully laid down the film. This would be difficult for just one person to do. The first film didn't fit well so the manufacturer sent us an updated one. They said to leave the car in the sun for an hour and carefully peel the film off. It came right off without leaving anything on the paint. Make sure you wear gloves when you peel the film off because you can burn your hands. Ask me how I know. ;-)
__________________
'09 128i - Black Sapphire Metallic\Coral Red\Glacier Silver\N51 DISA\6MT\Navigation\Premium\M-Sport\Heated seats\Xenon\Headlights\iPod\Smartphone\Euro Delivery
|
|
|
Appreciate
0
|
| 03-15-2010, 03:14 PM | #7 |
|
European Editor
10532
Rep 22,992
Posts |
Do you prep the paint in any way? I was thinking of waxing my car once or twice before mounting the 3M film.
I was also thinking of using some 3M adhesive remover - to prep the paint surface just before the install. The bmw directions also say to park the car AND the film in the sun for an hour or two. Then do the install in a shaded area. I think the paint surface must not be too hot - so that the soapy solution doesn't evap when you spray it on. David |
|
Appreciate
0
|
| 05-03-2010, 12:31 PM | #8 |
|
European Editor
10532
Rep 22,992
Posts |
Clear Bra – Install Photos…
Hi Guys, A few months ago I was thinking of installing 3M’s Clear Bra film onto my new 135i. I inquired at a few BMW dealers but they all wanted way too much for this product. Both of my local dealer’s quoted me three to four hours labor @110 euro per hour!! I found someone locally, quite by accident that only charged me 30 Euros per hour. Only took them 2.5 hours too!! One day I was driving around my village and noticed this new Audi A6 wrapped in a flat black foil. I took noticed of the company’s name that advertised commercial wrapping of cars and ads. I contacted the guy and the rest was history! When I first started to research this clear bra thing… I couldn’t believe how many people were “posting” about interest in it… yet no one had done a DIY!!! You really do not need many special tools. Basically you need: *some paint cleaner *spray bottle filled with water and soap mix *scissors *hot air gun or hair drier *sharp x-acto cutting blade *old credit card or squidgy *soft micro towels *3M clear bra film! So… I ordered BMW’s pre cut one series kit and was going to install it myself. But the more I thought about it the more reluctant I became. I should have just done it myself… but instead I found someone locally here in Germany to do the install. As someone said here… “…just pay the MAN”! Well… in my case the installer was a woman. Lol I think IF I had to do all over again… I would tackle this job myself. (in fact I am seriously considering do my roof son in 3M’s Di Noc, carbon fiber look alike film) I was just too worried, I guess about messing up the 3M clear film. But in watching my installer do the work… the 3M film can take A LOT of abuse. You can wrinkle that stuff up…. Then apply some heat via a hot air gun… and the stuff is just magical! You would have never known how messed up that film was. It really comes out great. A couple of tips: *use a old credit car or squeegee. My installed had this hard plastic one. One one side she had a soft wet micro fiber towel wrapped around one side. This way you don’t scratch the 3M film. *Don’t use the heat gun too much. You just want to wave it over the film until it goes “limp”. I was kind of shocked that she was using the gun sparingly. *For the mirrors she did them dry. I was really surprised on how much abuse the film can take. When you get a wrinkle… just pull the film back off and keep working it with your squeegee. *you need to have A LOT of patients to do this stuff!!! The hardest part of the job was wrapping the mirrors in one piece of 3M film. You just have to keep working it with heat and persistent! I was also surprised my installer did not use any soapy spray lube on the mirrors. She just did them “dry”. I guess you only need the lube for areas that you might need to reposition. The BMW hood emblem was also kind of difficult bc of the hood curvature. Once the film is on the car… the seams are very hard to see. In some of the photos you can see where the film starts and stops… but that was because there was still some soapy film on the 3M film edges. Once I cleaned the soap off… you can hardly see the film edges. The installer told me it takes a few days to fully sure to the car’s body panels. I hope I don’t see too much of the infamous German rain this week! I am quite pleased with the outcome! I highly recommend this stuff! I do think next time around I would go with a fully custom film. The BMW kit stops just short (3mm) of the hood edges. I think the (many!) pictures speak for themselves. Enjoy! 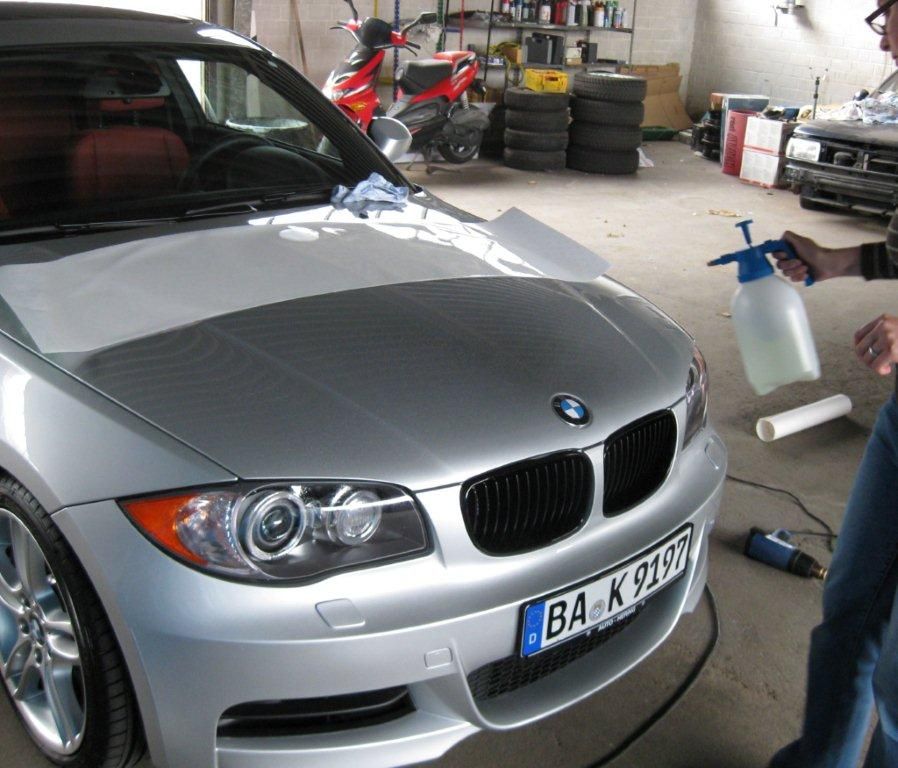 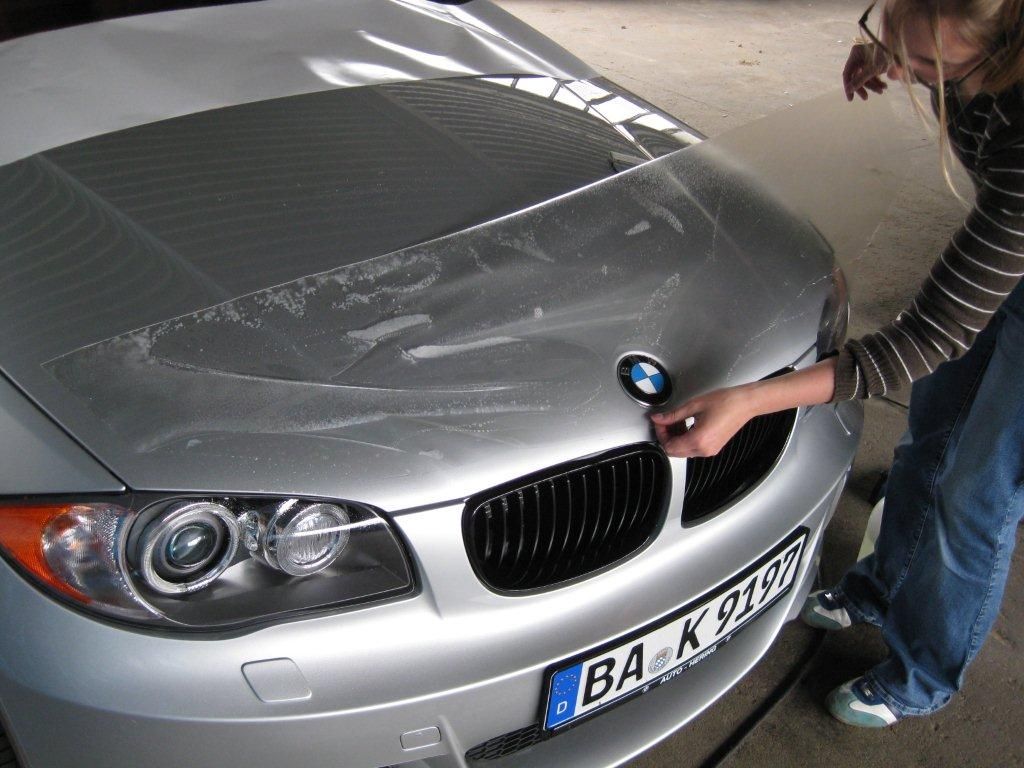 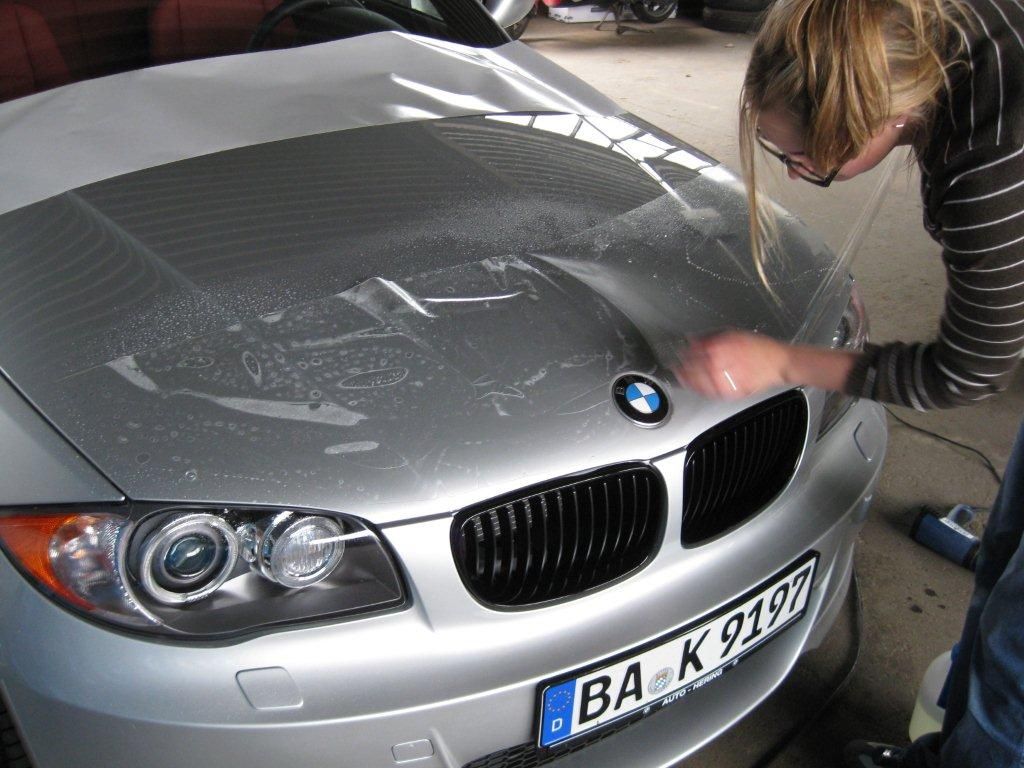 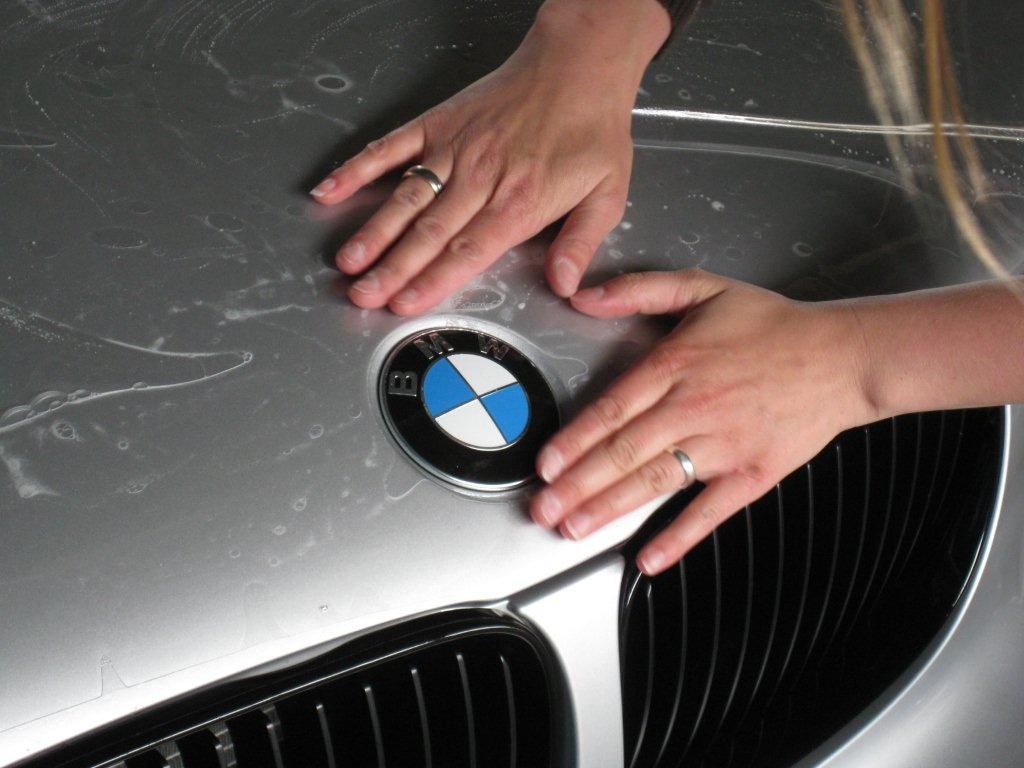 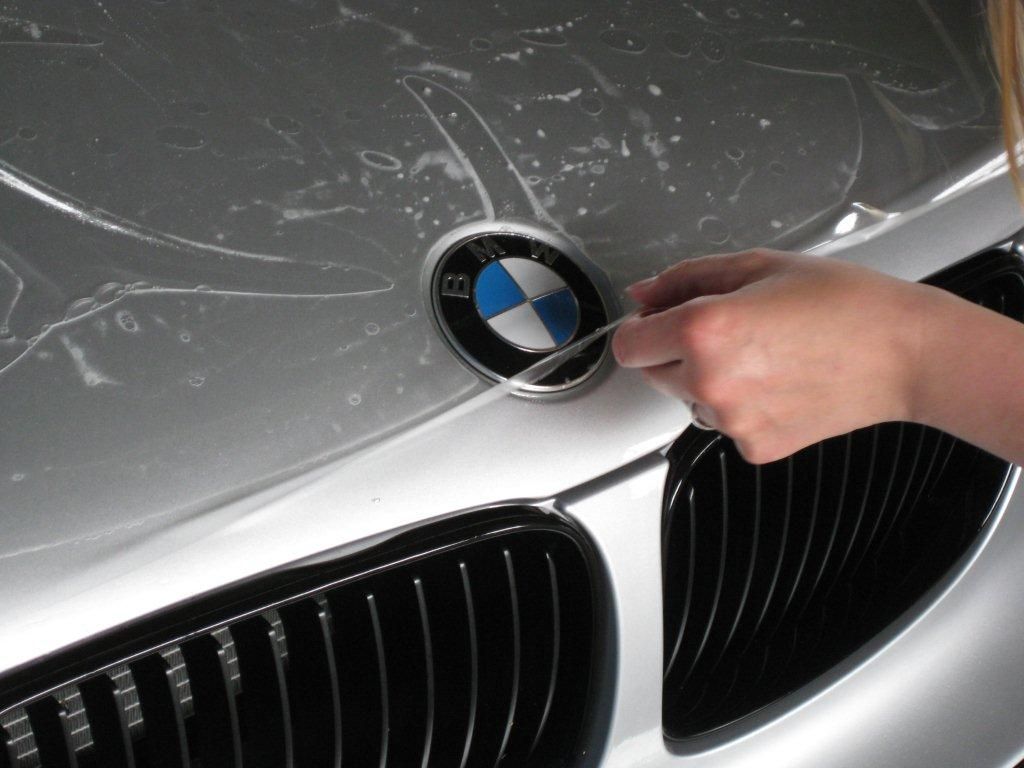 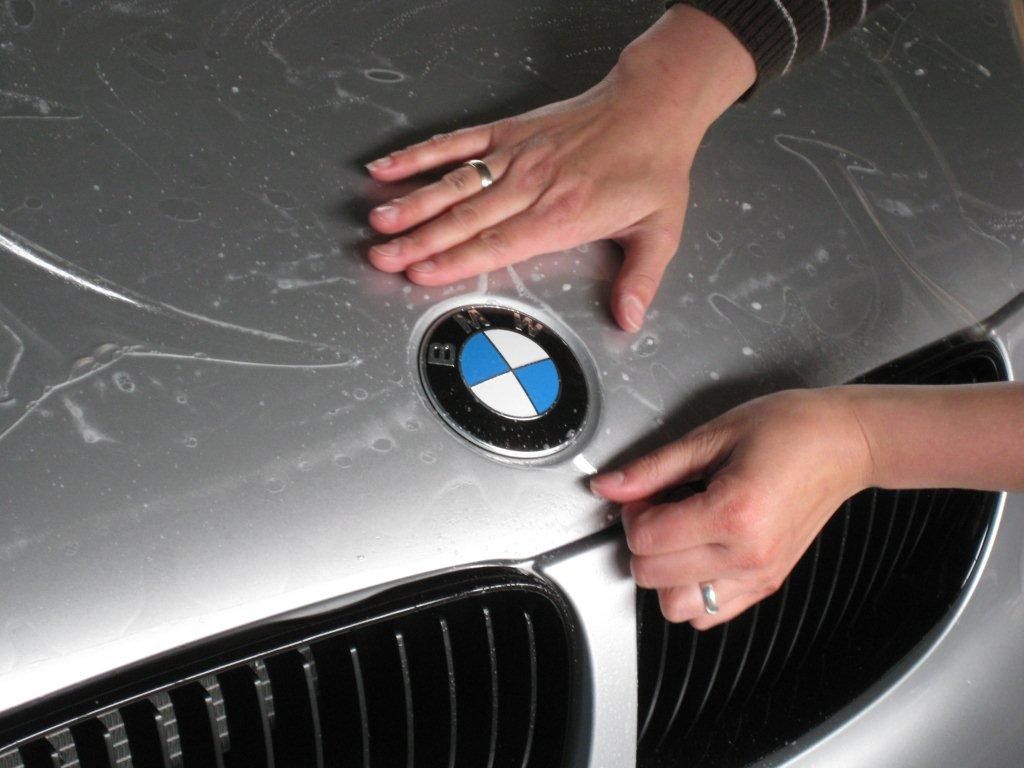 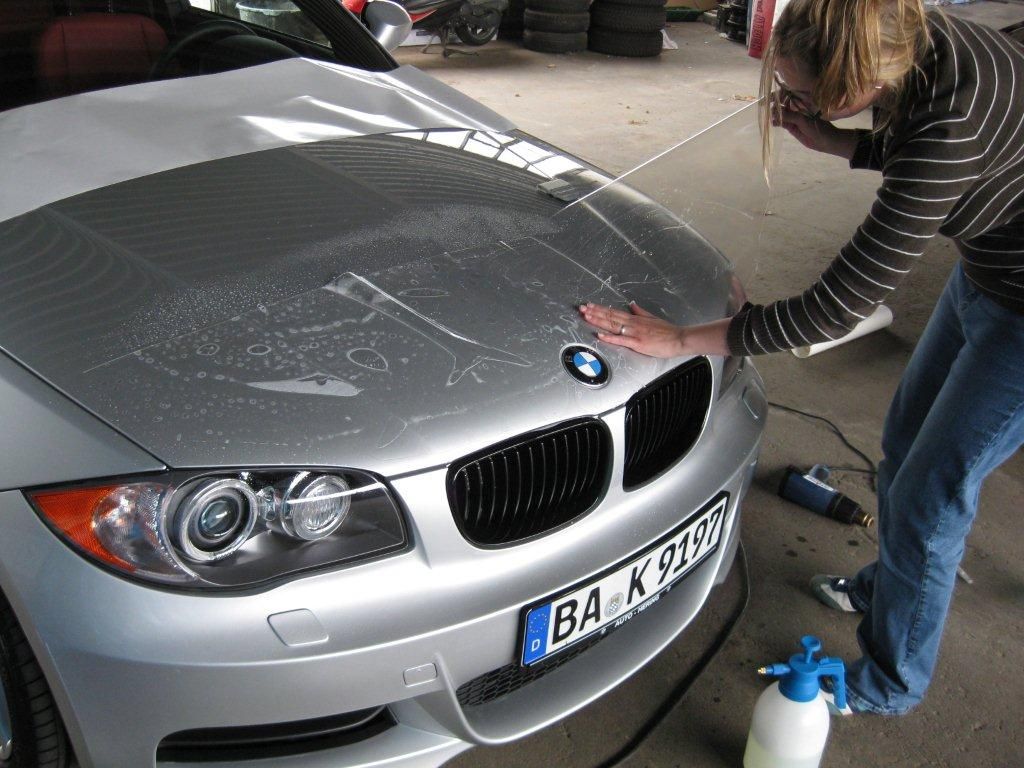 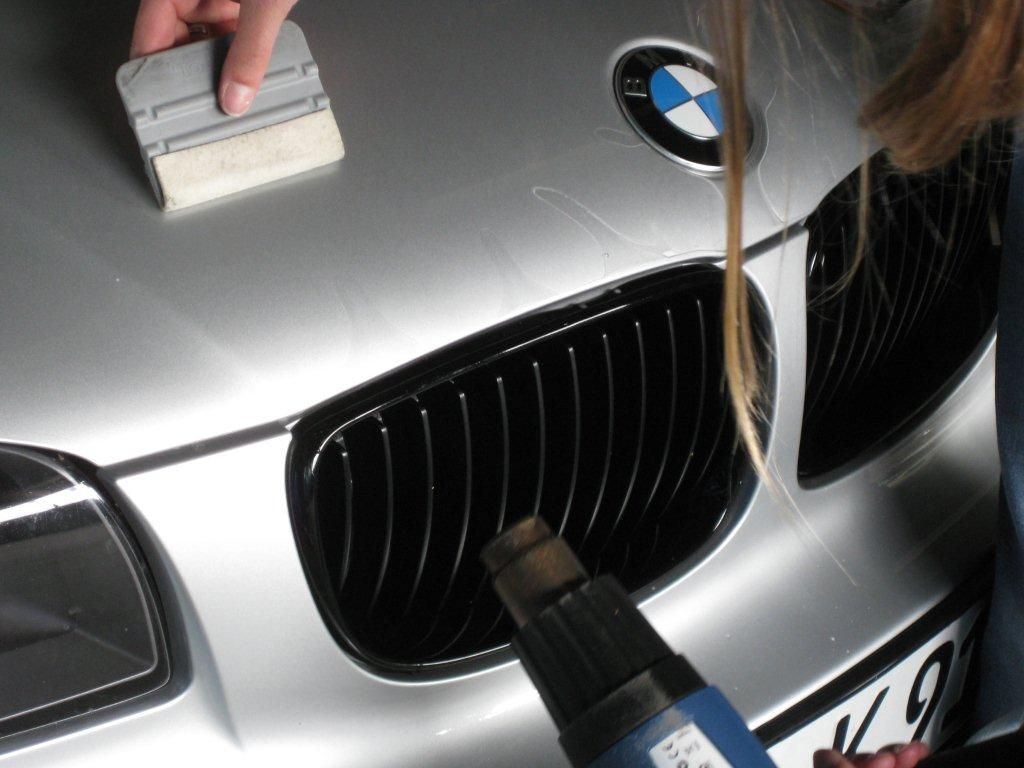 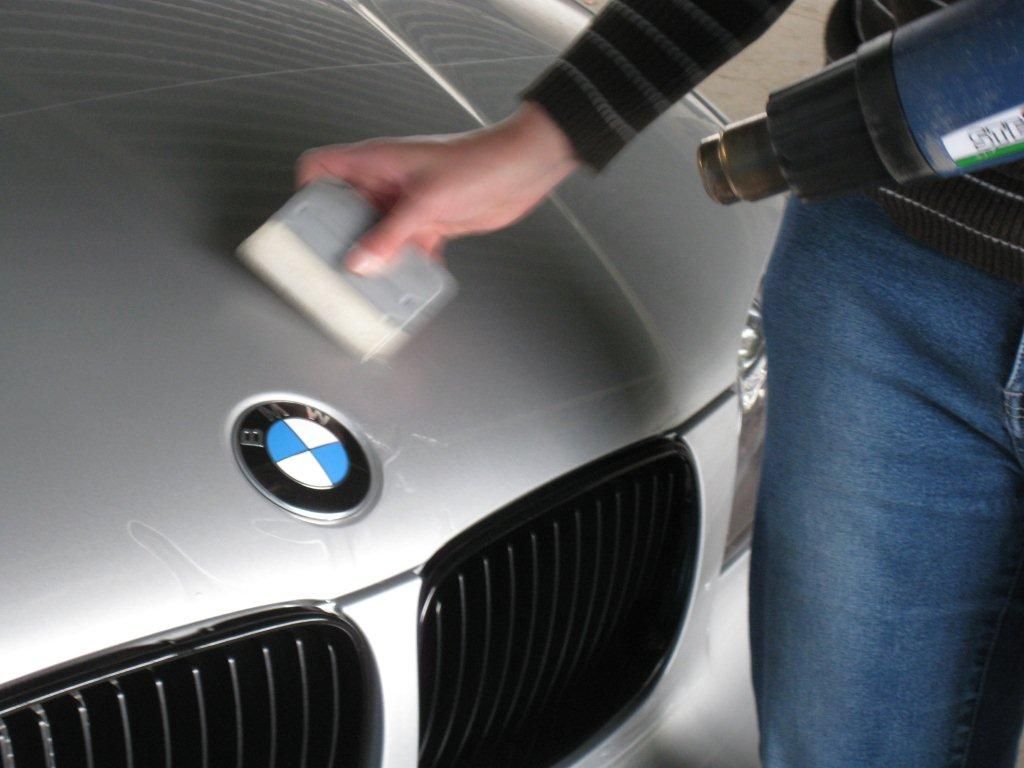 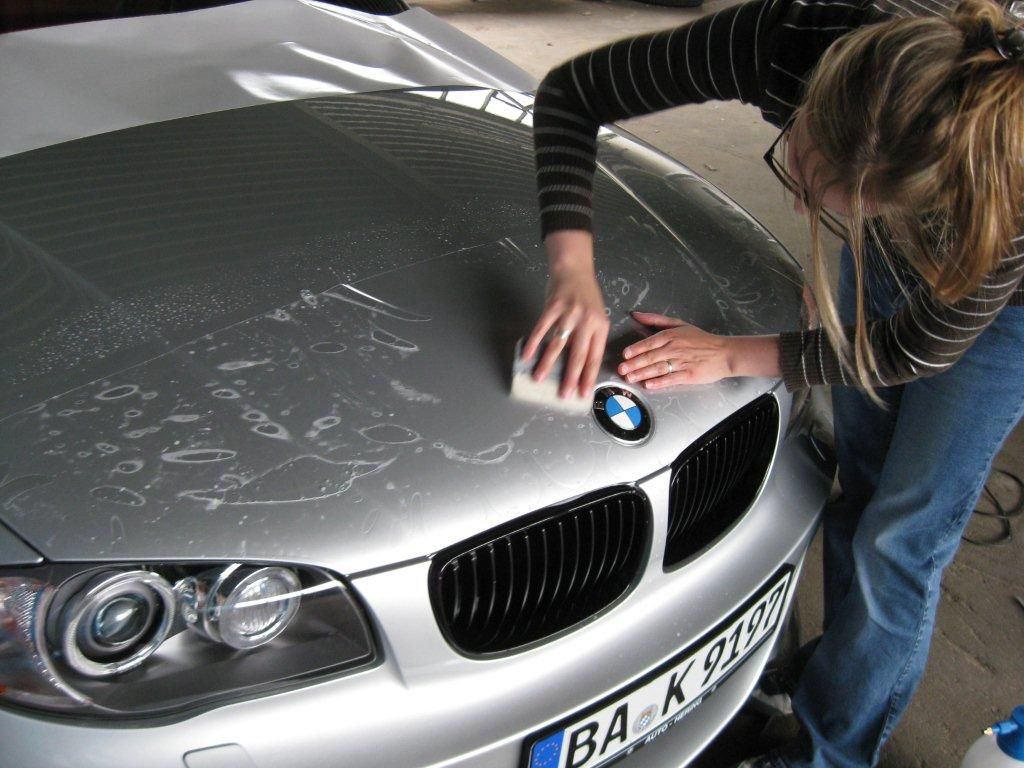 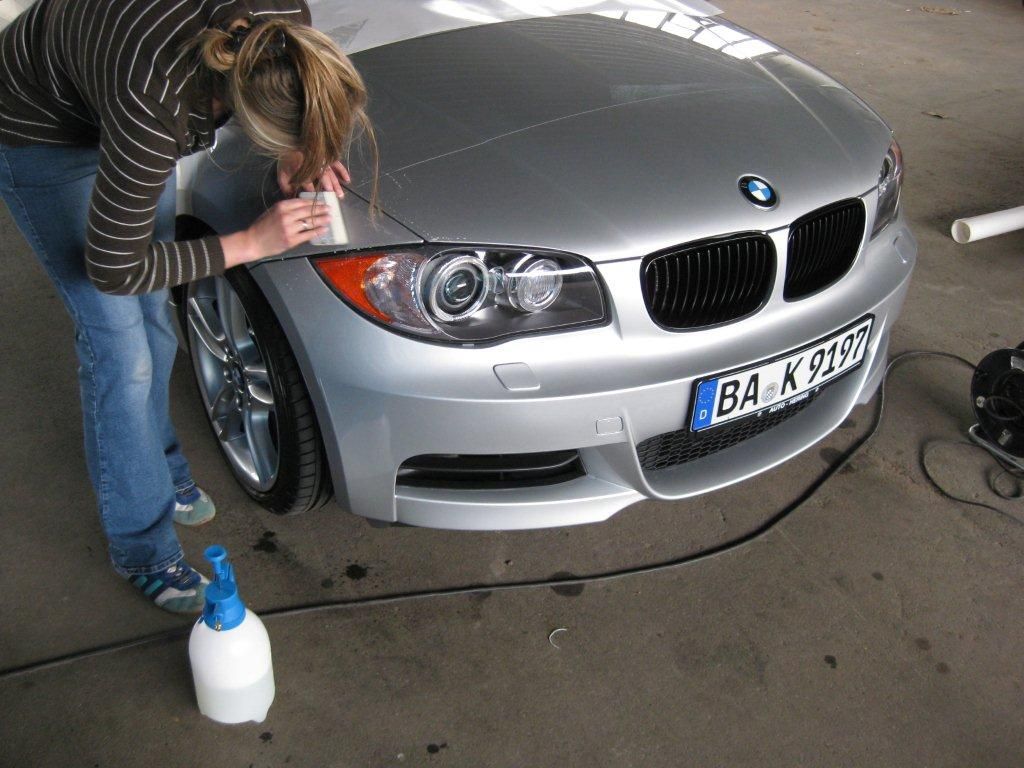   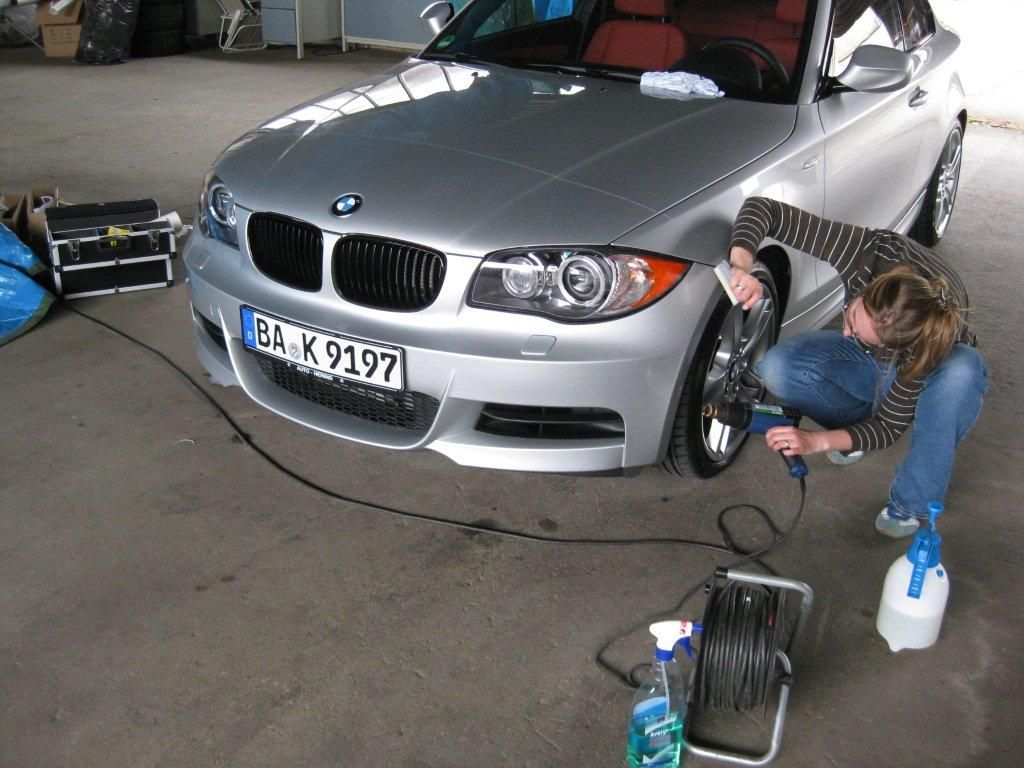 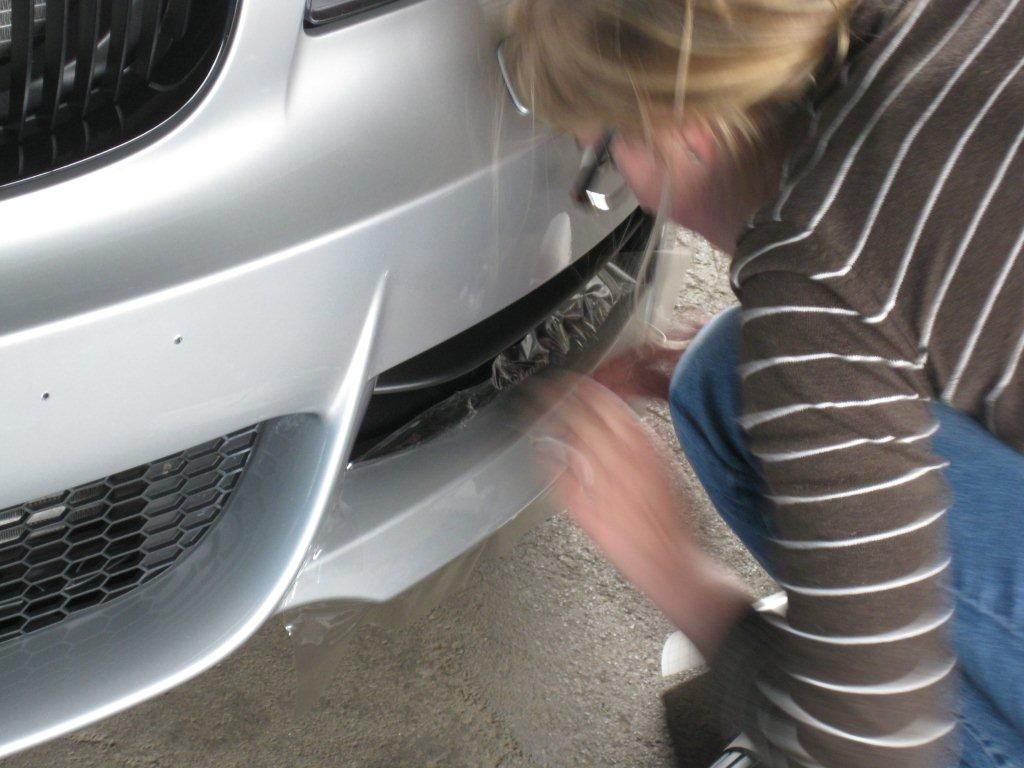 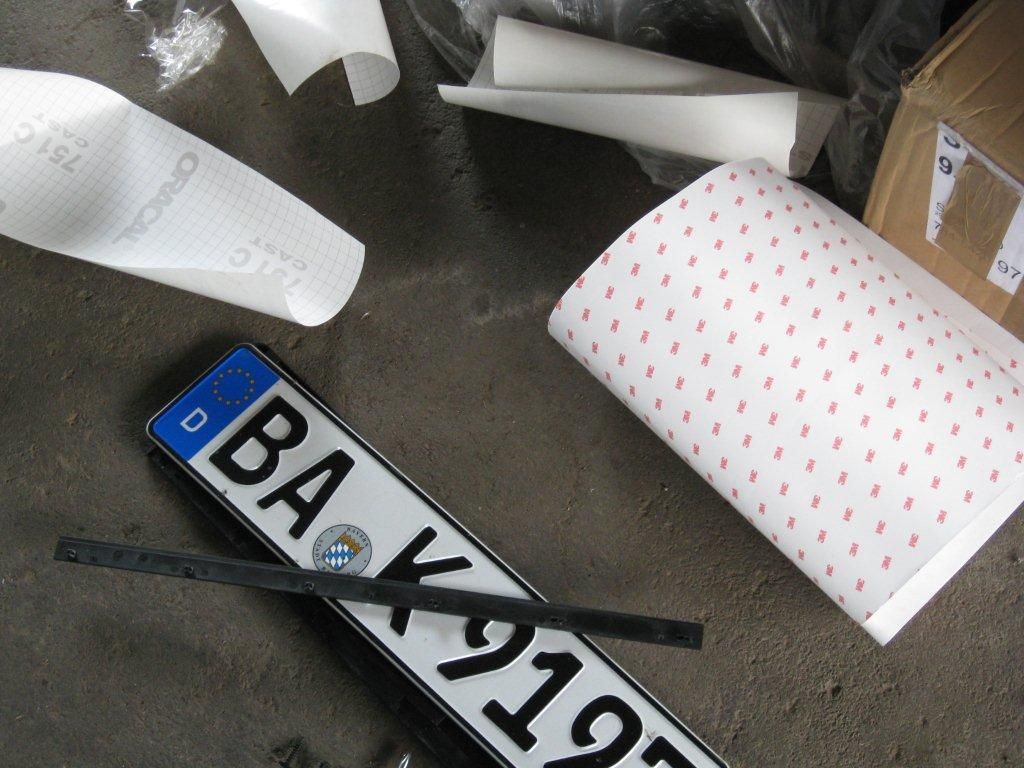 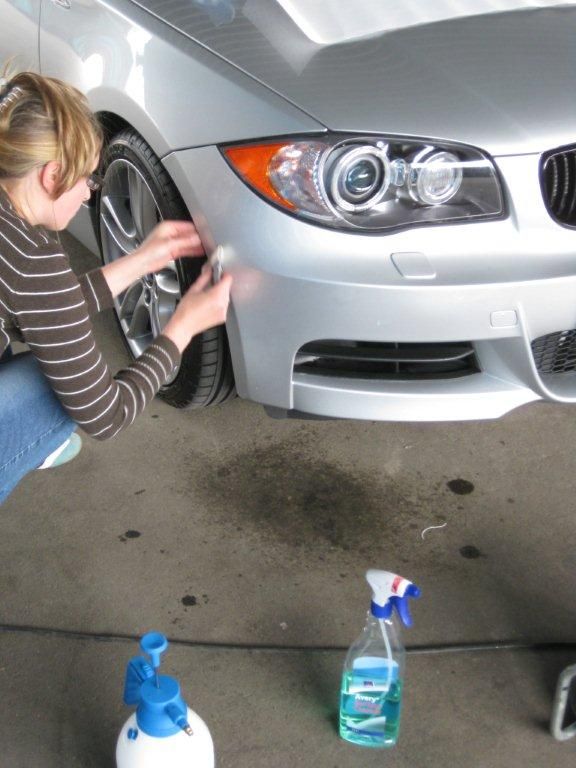 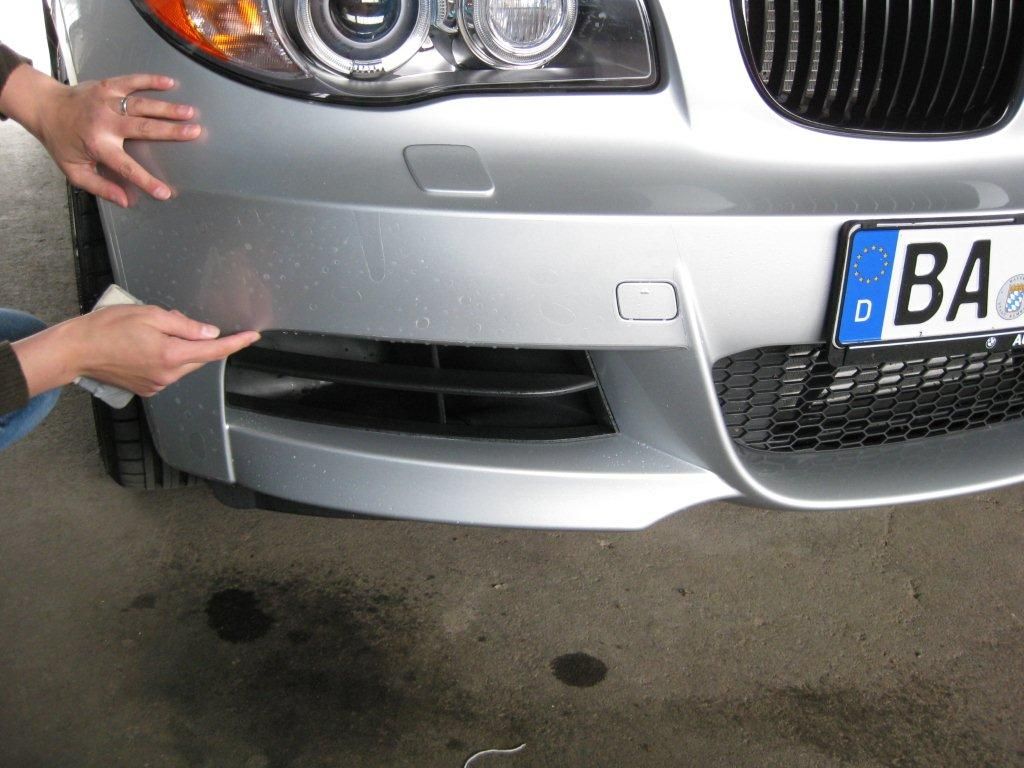 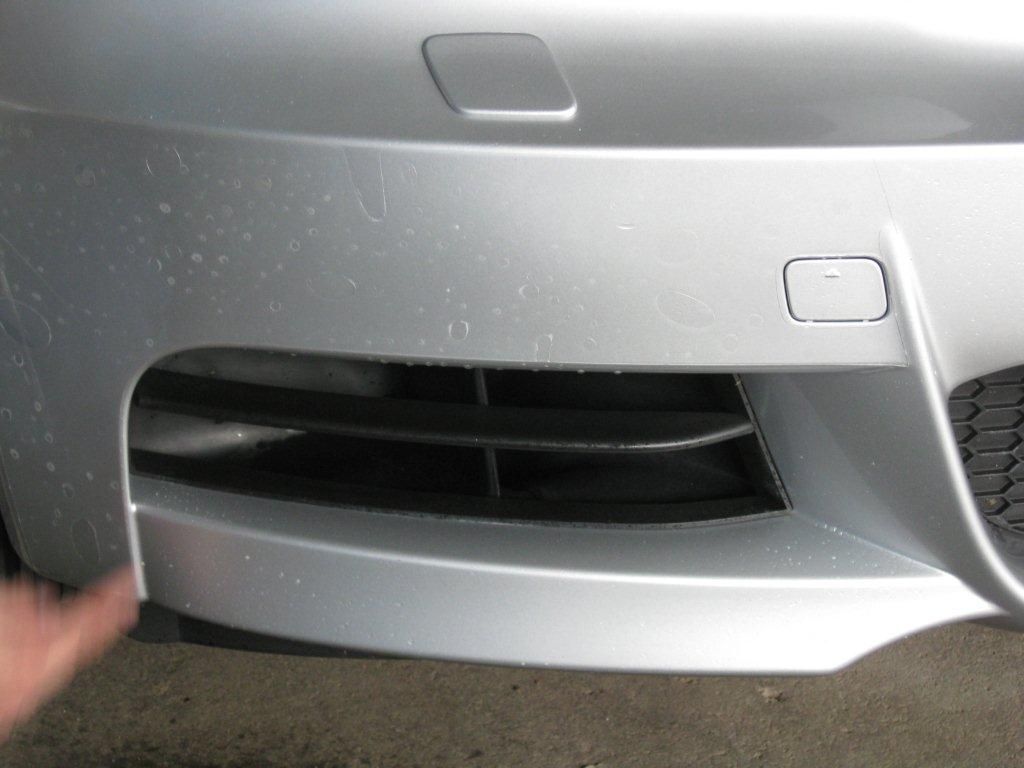 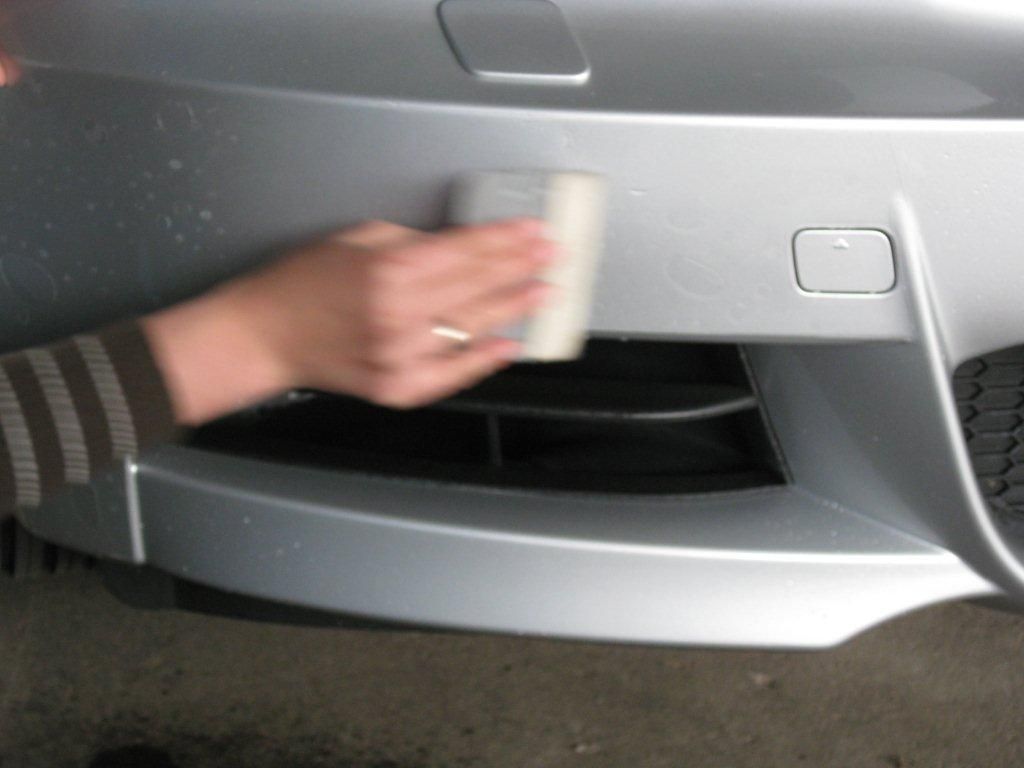 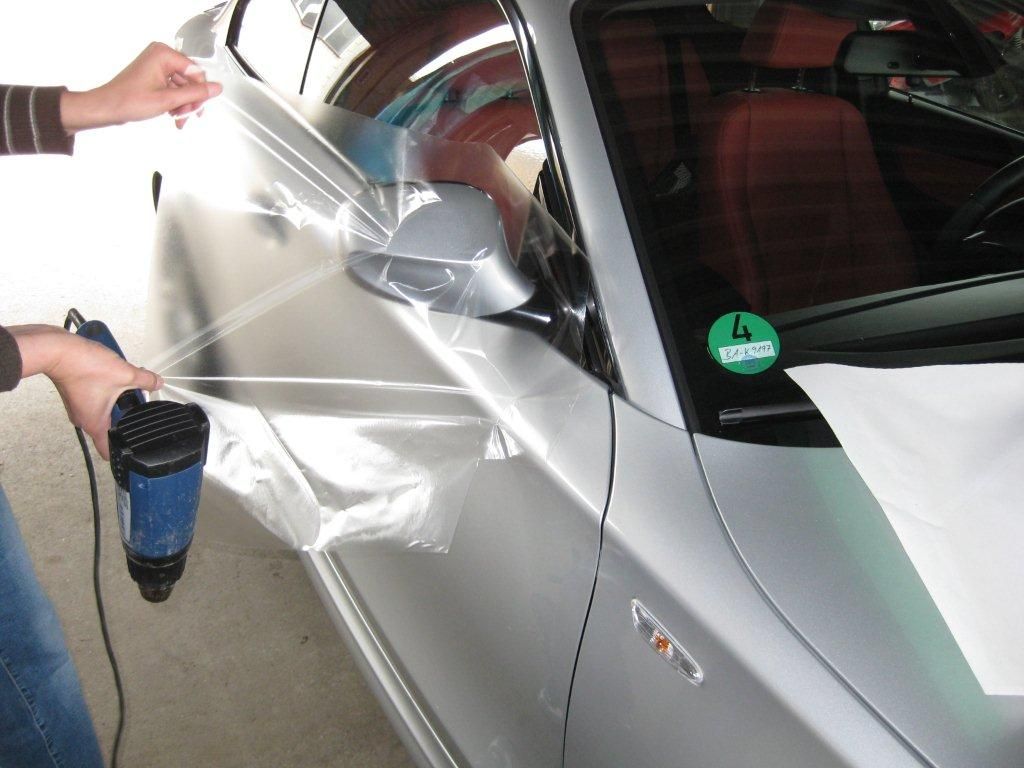 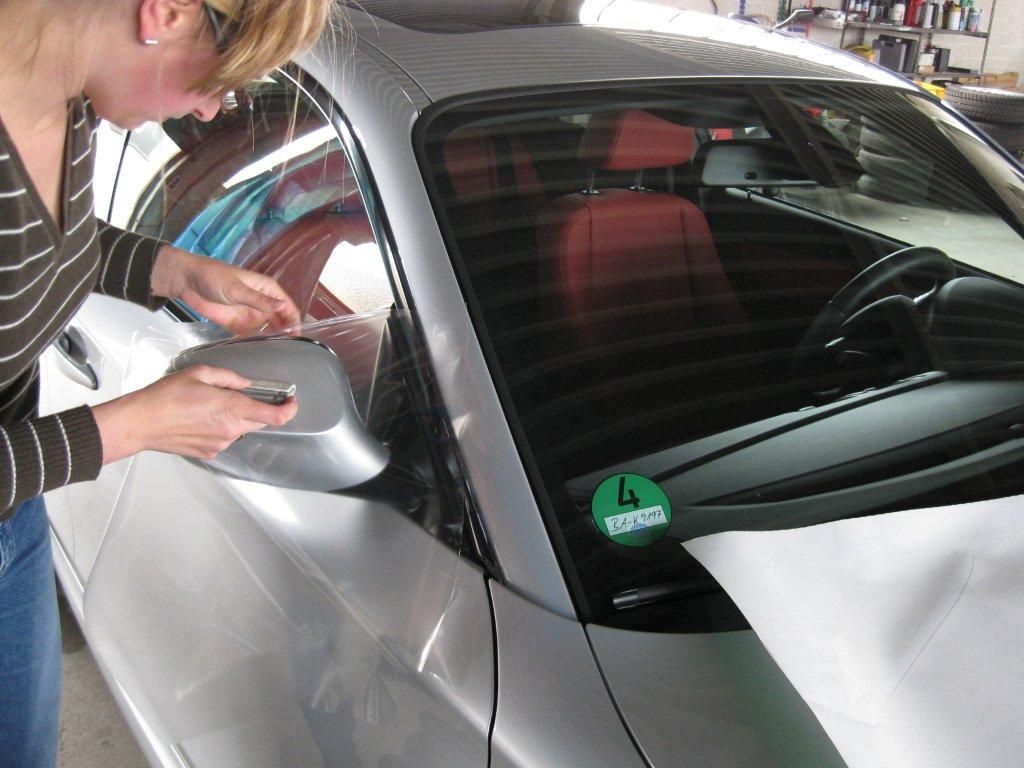 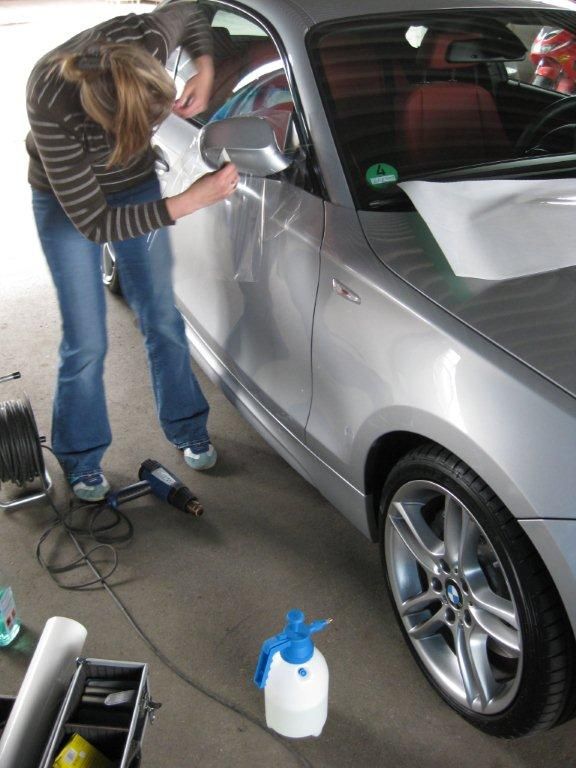 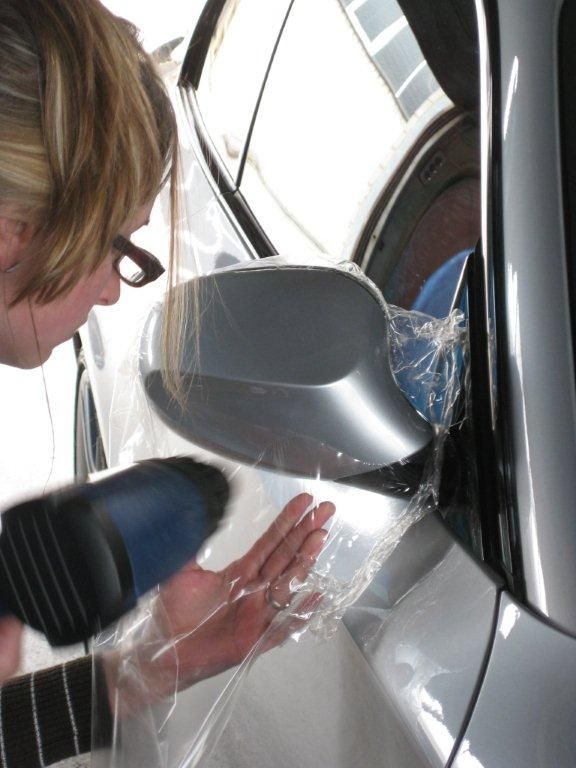 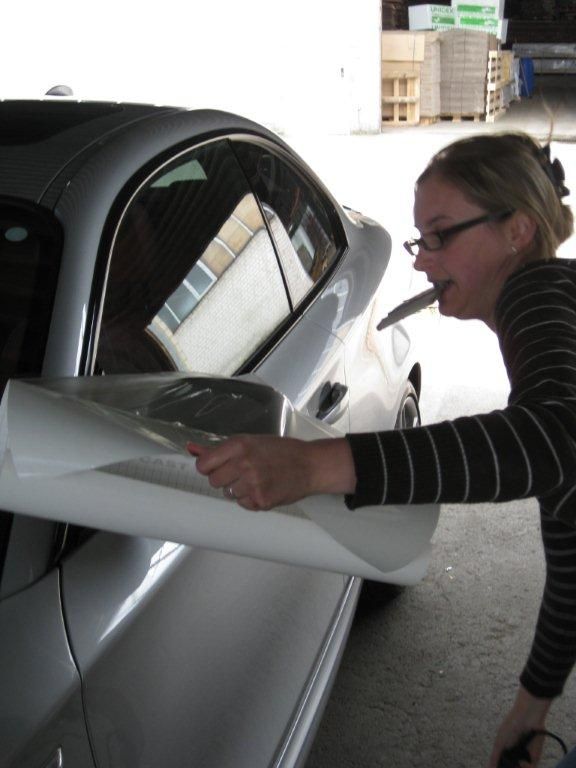 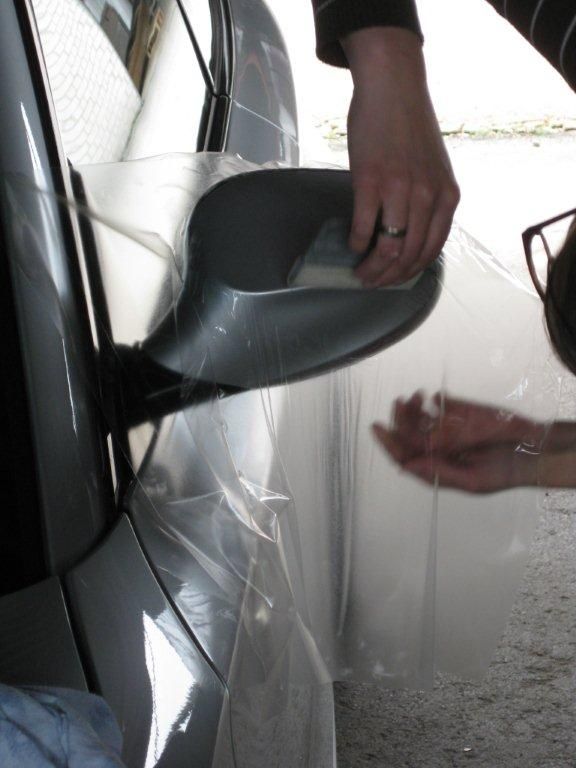 And… the finished car sitting outside in the sun! 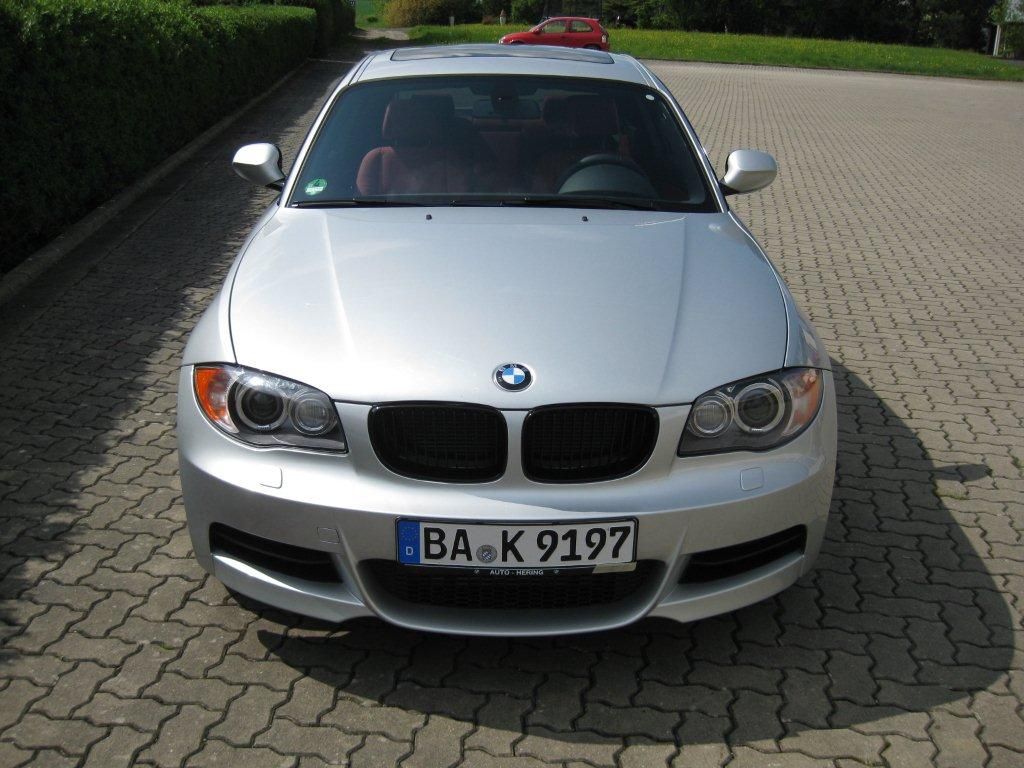 PS: here is a hint to my next project… 3M “Di Noc” carbon fiber vinyl!! I am thinking about wrapping my roof in this stuff! Might just do my mirrors too! 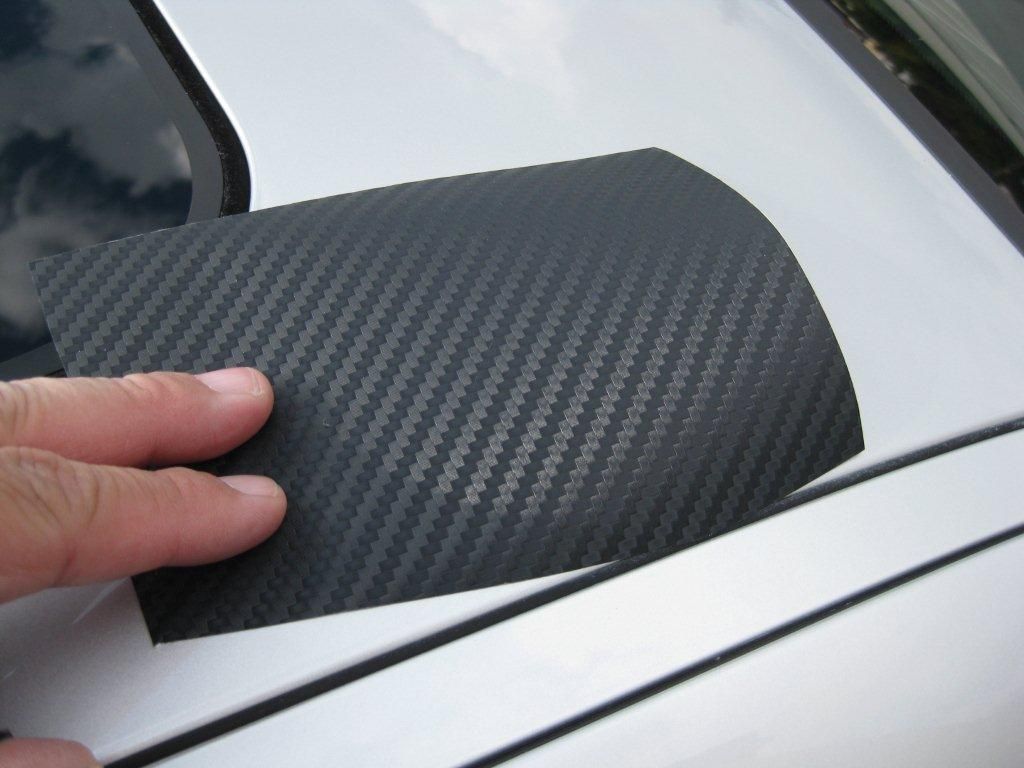 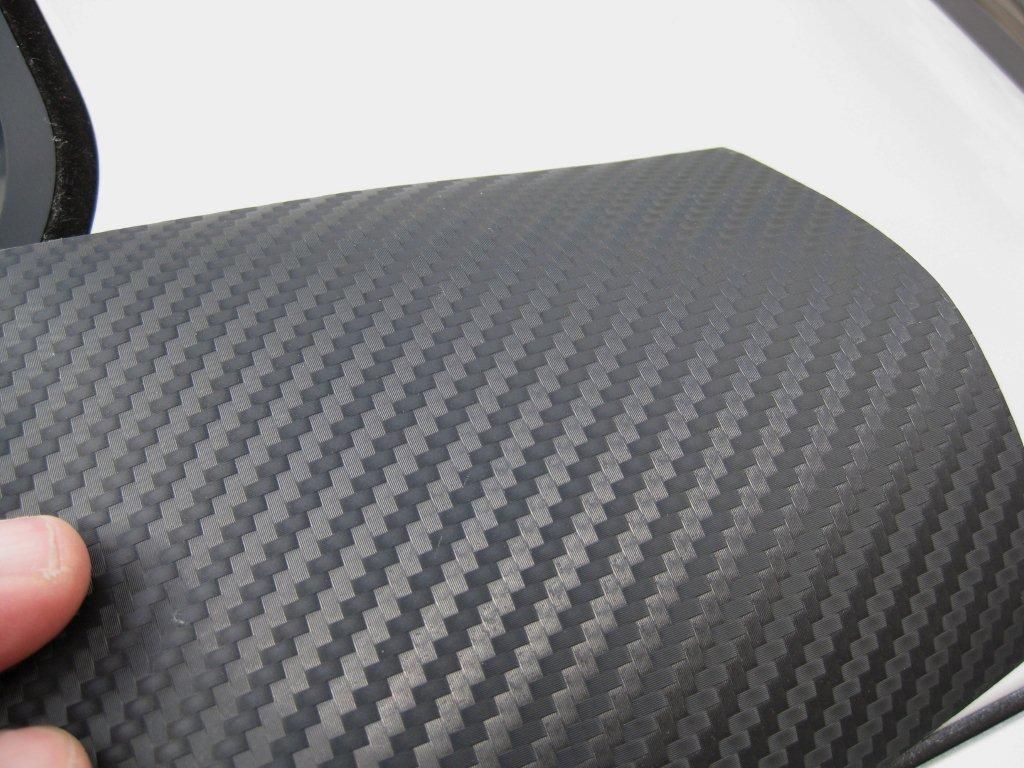 |
|
Appreciate
0
|
| 05-03-2010, 04:25 PM | #9 |
|
Ex '87 Carrera
246
Rep 1,259
Posts |
Thanks for all the documentation David; a splendid job as usual!
I'm still not clear on a couple things though; your first post says you bought the BMW custom cut pieces, but in your second post you mention 3M film. Is that just what the installer used and they custom cut it and did not use the BMW film? Is the stuff pretty tough? Could it take small rocks without the paint getting bunged? Pretty easy to clean? Wax over? I almost pulled the trigger on this when the dealer did their post doc-signing sales pitch, but figured I had spent enough in one day... I am starting to pick up some little rock chips now though... ianc
__________________
"I will tell you there is a big difference between driving money and driving blood, sweat and tears." - PorscheGuy79
"I got 328 loaner and was impressed with performance. It feels much faster than my 135i." - MOCKBA |
|
Appreciate
0
|
| 05-03-2010, 04:59 PM | #10 |
|
European Editor
10532
Rep 22,992
Posts |
Hi Ianc,
Yea... my car is only a few months old and I already have several (5) rock chips on the front of the car! One big one on the hood from the major snow we got in February! That one just drives me nuts!! Driving on the autobahns has some draw backs - from all these rock chips. I bought and used the BMW foil/clear bra kits, as I mentioned above. One kit covers the hood (the first 15 inches or so) and tips of the front fenders. The other kit covers 'some" of the bumpers. The clear bra foil is made by 3M and comes from BMW. My installer also uses 3M products. Its fairly thin stuff... less than one millimeter thickness, I believe. I was a little disappointed by what all they (Bmw's kit) cover in the bumpers. Basically it is just the L-shaped strip from the middle part of the bumper from the front tag and over outwards and down. Kind of an upside down L shape form. Also the outer edge of the front fender. You can see by the BMW sheets I included in my first post, what all the kit film covers. Since I had the shop also cover my mirrors with their 3m film, I also had them add some film in some strategic spots. I had them add some film to the front spoiler splitters (brake ducts and oil cooler feeds). Also to the nose area around the grill area. The BMW pumper kit is designed for Euro plated cars… so I also had the shop add some extra strips to the front tag area – for one day when I return to the states. I really can not get over the fact how easy my installer made the whole process go. It really was easy install. Except for the mirrors that is. That is where she spent most of her time doing. take care, David |
|
Appreciate
0
|
| 05-04-2010, 07:27 AM | #11 |
|
Major
133
Rep 1,416
Posts
Drives: M-Sport 128i, 328xi, 3.0CS
Join Date: Jun 2008
Location: New England, USA
|
She used a slightly different procedure than what is usually in the instructions and what I have seen other people do. The instructions say to wash the soapy solution from under the film with alcohol. The results look great!
__________________
'09 128i - Black Sapphire Metallic\Coral Red\Glacier Silver\N51 DISA\6MT\Navigation\Premium\M-Sport\Heated seats\Xenon\Headlights\iPod\Smartphone\Euro Delivery
|
|
Appreciate
0
|
| 05-04-2010, 05:08 PM | #12 | |
|
European Editor
10532
Rep 22,992
Posts |
Quote:
The BMW direction only say to use ONE spray bottle of soapy water solution. But I have some 3M film for my headlights from Griots... and they say to use the two bottle method! !?!?!? I don't think there is a wrong or right way. its just what works best for the person doing the install. My installer used the "dry" method for the mirrors. She just use a wee bit of heat from the heat gun to make the film go soft/limp... then she (gently)streched the film over the mirror. She would then work the air bubbles out from the center outwards. When she would get a area that would not pop the bubble out... she would pull the film off slightly and then restart all over again that section. For the hood and bumper pannels... she would wet down the film AND the car body area. And then she started working the trapped air bubbles outward. It all went really so easy. The hardest part was when she did the mirrors. Total time was a little over two hours. And I would estimate she spent a good hour or more doing the two mirrors. The hood and bumpers went on really fast! Take care, Let me know if anyone else has Q's! |
|
|
Appreciate
0
|
| 05-04-2010, 07:14 PM | #13 |
|
Lieutenant

8
Rep 567
Posts |
Dackelone,
I've been contemplating the same treatment on my car. How visible are the seams (between clear bra and uncovered paint)? I know you haven't had it on very long, but do you get wax/dirt buildup in those seams? How resilient do you think the material is to sun/heat? I live in Arizona and there's a lot of rocks flying around here... rock chips are very common. But the high heat and tons of sun have me worried that it won't last very long before it starts deteriorating. Thanks. |
|
Appreciate
0
|
| 05-05-2010, 05:23 AM | #14 |
|
European Editor
10532
Rep 22,992
Posts |
I will take some pics soon. They said not to wash the car for a few days. So I will have to wait until I can clean the car. We had some rain yesterday and the car looks crappy.
The seams can not be seen in the sun. You can "feel them" though. I think this material is really thin. Under 1mm, I think 0.7mm if I remember correctly. In my garage you can see the seams/edges. But that really doesn't bother me. Stone chips erk me more. I think using a wax/polish that leaves no residue will be the key to keeping the edges invisable. They tell me no polish is needed for the film. Time will tell. I guess IF after a year ir two it starts looking like crap... you CAN remove this clear bra film with just some heat. Infact IF you look closely at the BMW directions about... they infact show how to remove the film at 90'+ angle to peel it off with a heat gun. |
|
Appreciate
0
|
| 05-05-2010, 10:12 AM | #15 |
|
Ex '87 Carrera
246
Rep 1,259
Posts |
So David, some more questions, as you've got me thinking now.
From what I can see, the hood and bumper are two separate kits from BMW. Probably (typical BMW) highly overpriced for what they are, but custom cut to fit the 135 exactly. Am I correct so far? Worth the price in your opinion, or would it be worth it to try custom fitting it? I think I know the answer to this one...  Your description and pics make it look a lot easier than I thought it would; at least for the hood and bumper (don't care about the mirrors so much). If you had it to do over again knowing what you know now, would you at least do those sections yourself? ianc
__________________
"I will tell you there is a big difference between driving money and driving blood, sweat and tears." - PorscheGuy79
"I got 328 loaner and was impressed with performance. It feels much faster than my 135i." - MOCKBA |
|
Appreciate
0
|
| 05-05-2010, 05:31 PM | #16 | |
|
European Editor
10532
Rep 22,992
Posts |
Quote:
The BMW kits were made well. Except for the hood piece which was a bit short/small I thought. It leaves about 3mm of the hood edges exposed. And its about 1mm short on the front of the hood nose edge. I think IF I were to do it again I would only order the bumper kit and go custom on the rest of the car. I had the lady do custom wrap for the M-bumper kenards(brake/oil cooler ducts) and I had her apply some foil to around the kidney grill area too. But by that time she had ran out of foil! Because she wasn't planning on using her supplies. Just mine. lol It all turned out very well. I think. Only time will tell. Here are some better pics of what each BMW kit consists of: Hood and fendar area coverage... 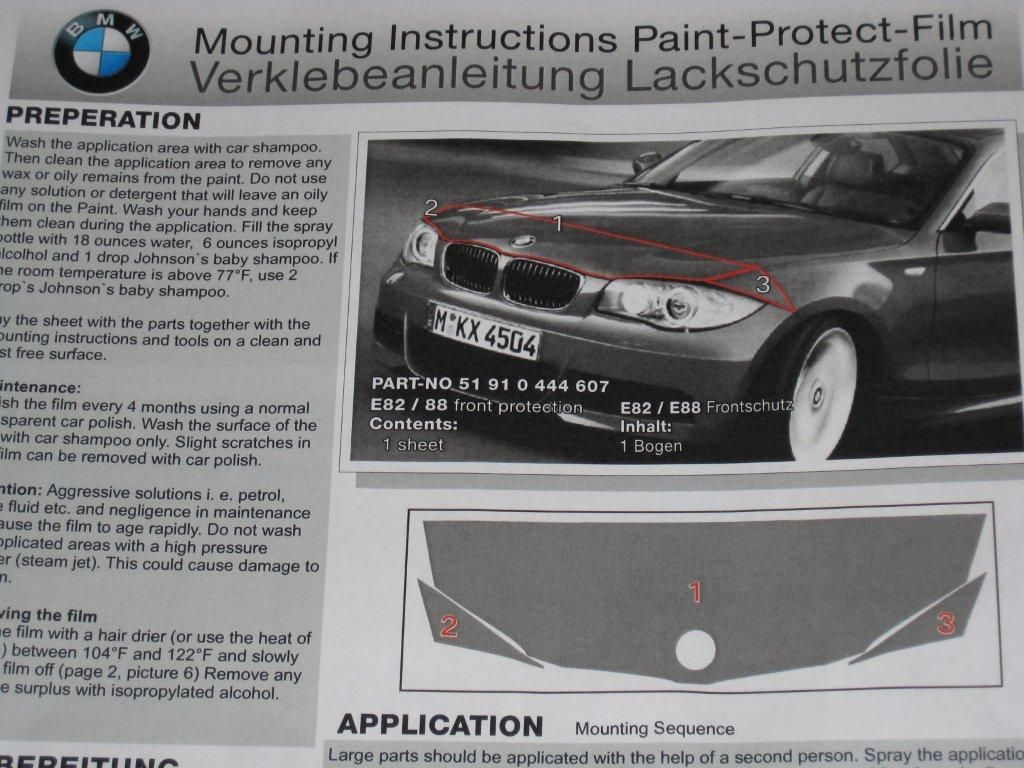 Bumper and wheel arches coverage... 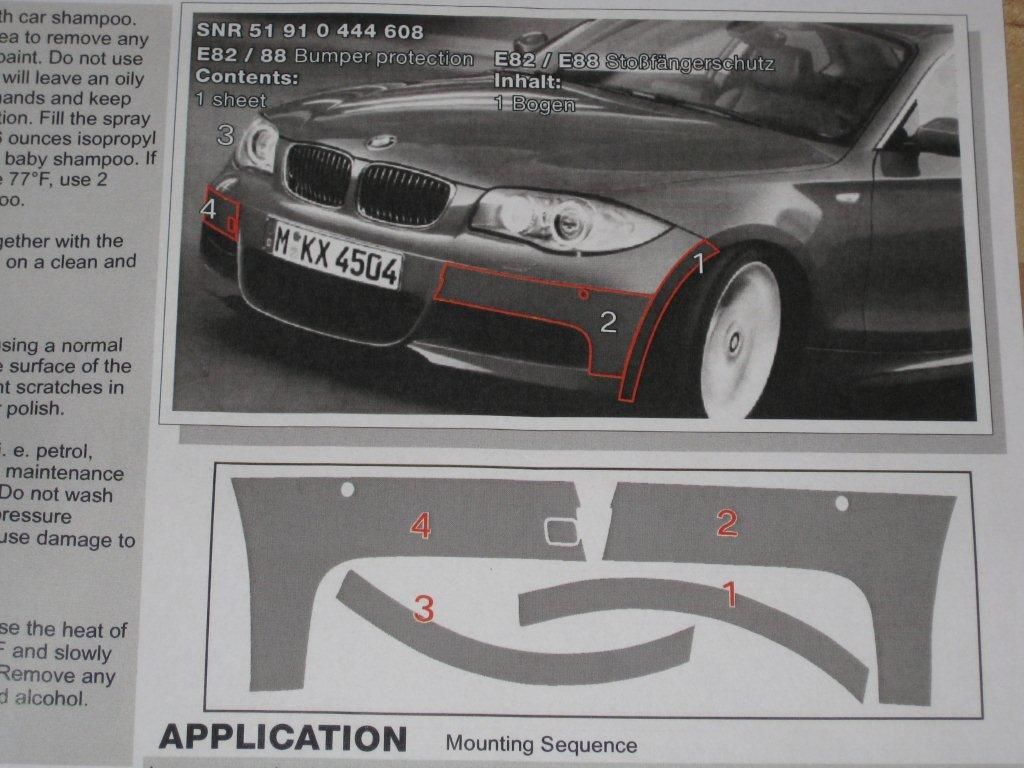 Notice how the kit stops just short of teh front euro tag. I removed my tag and had the installer apply some foil to the entire inner bumper area. bc one day I might move back to the states! I also applied some "foil" to the three painted areas around the kidney grills. Can you see where the Clear Bra ends?   How about here? I put my camera case on the edge of the clear bra foil line. 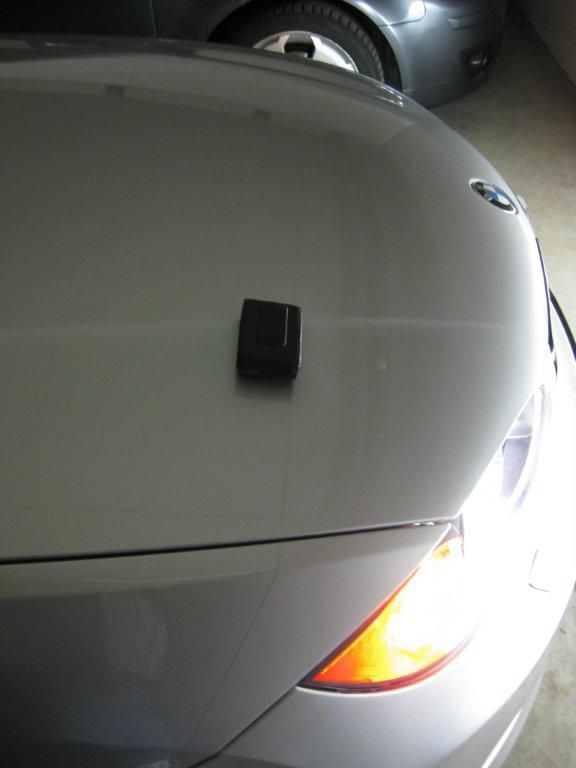 |
|
|
Appreciate
0
|
| 05-06-2010, 02:38 PM | #17 |
|
Ex '87 Carrera
246
Rep 1,259
Posts |
Well, I went ahead and pulled the trigger on the hood and bumper pieces from BMW. Will be attempting it myself and will let you know how it turned out. Thanks for the pics David!
ianc
__________________
"I will tell you there is a big difference between driving money and driving blood, sweat and tears." - PorscheGuy79
"I got 328 loaner and was impressed with performance. It feels much faster than my 135i." - MOCKBA |
|
Appreciate
0
|
| 05-06-2010, 04:11 PM | #18 | |
|
European Editor
10532
Rep 22,992
Posts |
Quote:
You might also order some extra 3M clear film - to do the "other" areas that the BMW kit omits. Like the bottom part of the front bumper and inner parts near the front lic plate. I think the area around teh grills is also important. I might redo that area myself soon. Good Luck David |
|
|
Appreciate
0
|
| 05-06-2010, 04:23 PM | #19 | |
|
Ex '87 Carrera
246
Rep 1,259
Posts |
Quote:
Have you found any sources where the film can be purchased? ianc
__________________
"I will tell you there is a big difference between driving money and driving blood, sweat and tears." - PorscheGuy79
"I got 328 loaner and was impressed with performance. It feels much faster than my 135i." - MOCKBA |
|
|
Appreciate
0
|
| 05-06-2010, 04:37 PM | #20 | |
|
European Editor
10532
Rep 22,992
Posts |
Quote:
I found some film sold thru Amazon.de the German website. But I do not know who sells the stuff in the states. Anyone? Btw... let me know if you need my to repost the reciepe for the soapy solution to float the film. It should come in the box you get from BMW though. I can dig it up IF anyone need it. I thought I posted it before somewhere. |
|
|
Appreciate
0
|
| 05-16-2010, 10:03 AM | #21 |
|
Major
133
Rep 1,416
Posts
Drives: M-Sport 128i, 328xi, 3.0CS
Join Date: Jun 2008
Location: New England, USA
|
I just installed the hood kit. This was my third clear bra installation. Everything went great except that I couldn't get some of the edge near the roundel to stick. I used a hair dryer to warm the edges a little and it worked OK. I have an industrial hot air gun, but I don't think that I have enough experience to use it on the film.
__________________
'09 128i - Black Sapphire Metallic\Coral Red\Glacier Silver\N51 DISA\6MT\Navigation\Premium\M-Sport\Heated seats\Xenon\Headlights\iPod\Smartphone\Euro Delivery
|
|
Appreciate
0
|
| 05-16-2010, 10:15 AM | #22 | |
|
European Editor
10532
Rep 22,992
Posts |
Quote:
My installer used the heat gun very sparringly. She only used it maybetwo or three times around the hole cutout. She mostly used the heat gun to make the film "limp" or "soft" - just waving the gun a little bit around that area on the 3M film... then... she would just keep working the air bubbles out. Over and over again. You just have to have patients and keep at at. When she first applied the 3M hood film... I thought to myself that emblem area will be hard to do... but she really made it look easy. Just keep at it. It will want to "peel off", she would just pop out the air bubbles with her small squegy and then start on something else. And then a few minutes later(after the soapy watter solution would stat to dry... she would use her squegy again. Just keep after it. It will take a hold after a few tries. Btw... I notice the inside of my mirrors are starting to peel a little bit. She told me that might happen - and to just take a squegy and work it myself. The film is very durrable and strechable. Good Luck David |
|
|
Appreciate
0
|
Post Reply |
| Bookmarks |
|
|