BMW 1 Series Coupe Forum / 1 Series Convertible Forum (1M / tii / 135i / 128i / Coupe / Cabrio / Hatchback) (BMW E82 E88 128i 130i 135i)


Post Reply
 
Thread Tools Search this Thread
      03-11-2015, 05:47 PM   #1
guru_method
Eating M3s for breakfast
guru_method's Avatar
No_Country
46
Rep
299
Posts

Drives: AW 09 135i M
Join Date: Nov 2011
Location: Dallas, TX

iTrader: (4)

What's so hard about opening the headlights?

I bought a set of halogens in good condition at a good price just to swap the lenses onto my Xenons because they have 37 million tiny cracks on the inside that makes them look horrible.

Now, I've opened a few headlights before but I read that these are extremely difficult to do. What exactly is so hard about it?

I also read that there is a hot-knife method that involves cutting a certain part to be able to take out the lens completely. Does anybody have an idea what part exactly needs to be cut out?

After close examination i see that the part that might be troublesome could be the outside corner but am not sure.

PLEASE HELP
Appreciate 0
      03-11-2015, 05:50 PM   #2
tglazed
Lieutenant
46
Rep
406
Posts

Drives: 135i
Join Date: Feb 2014
Location: SLC, Utah

iTrader: (1)

I attempted to open my headlights and gave up. I have opened countless headlights but these are on an entirely different level. If you attempt please take pictures and notes on what you do. I was stumped and threw in the towel
Appreciate 0
      03-11-2015, 06:33 PM   #3
drewster99
Second Lieutenant
43
Rep
205
Posts

Drives: 1 SERIES
Join Date: Jun 2014
Location: USA

iTrader: (2)

I've opened a bunch too but I'm hesitant since so many people on here basically say it's impossible. Please post your progress if you make any.
Appreciate 0
      03-11-2015, 08:09 PM   #4
ShocknAwe
1Addict
ShocknAwe's Avatar
3228
Rep
7,889
Posts

Drives: E82 Mutt, M57 Truck
Join Date: Jul 2012
Location: Charleston

iTrader: (22)

If you're willing to cut them open and reseal it's not a big deal. That's what OSS etc do.
__________________
2010 135i 6MT Jet Black
N54/3 FE82 Mutt | BUILD THREAD | GARAGE SALE
Appreciate 0
      03-12-2015, 02:42 AM   #5
tglazed
Lieutenant
46
Rep
406
Posts

Drives: 135i
Join Date: Feb 2014
Location: SLC, Utah

iTrader: (1)

Even cutting them is pretty hard. I took a razor to my headlights and couldn't get them open. Tried heat gun and cutting and oven then cutting. None worked for me. I'm going to go at it again soon though because I was pretty tired the night i tried.

http://www.lightwerkz.net/news/2012/...ye-conversion/

Last edited by tglazed; 03-12-2015 at 10:53 AM..
Appreciate 0
      03-12-2015, 03:38 PM   #6
Gray_Panther
Brigadier General
Gray_Panther's Avatar
1553
Rep
3,234
Posts

Drives: 128i
Join Date: Jun 2012
Location: Upstate NY

iTrader: (0)

I got them open hehe. Will post later. Currently at work dominating life.
__________________
2012 BMW 128i 6MT Deep Sea Blue Metallic
Appreciate 0
      03-12-2015, 05:36 PM   #7
guru_method
Eating M3s for breakfast
guru_method's Avatar
No_Country
46
Rep
299
Posts

Drives: AW 09 135i M
Join Date: Nov 2011
Location: Dallas, TX

iTrader: (4)

Quote:
Originally Posted by tglazed View Post
I attempted to open my headlights and gave up. I have opened countless headlights but these are on an entirely different level. If you attempt please take pictures and notes on what you do. I was stumped and threw in the towel
Quote:
Originally Posted by drewster99 View Post
I've opened a bunch too but I'm hesitant since so many people on here basically say it's impossible. Please post your progress if you make any.
I have two sets at the moment and wouldn't think twice to hack up the halogens. I'll be sure to get some pics of that and document it as best I can.

Quote:
Originally Posted by ShocknAwe View Post
If you're willing to cut them open and reseal it's not a big deal. That's what OSS etc do.
I would, but it seems to be excessive at least for the whole headlight. There are also areas where it seems it would be impossible to cut. Since I am swapping lenses the cuts on the 4 headlights would have to matchup perfectly to be able to swap, I don't think it's the best idea for my situation.

Quote:
Originally Posted by tglazed View Post
Even cutting them is pretty hard. I took a razor to my headlights and couldn't get them open. Tried heat gun and cutting and oven then cutting. None worked for me. I'm going to go at it again soon though because I was pretty tired the night i tried.

http://www.lightwerkz.net/news/2012/...ye-conversion/
There is a thing called the hot knife which is basically a very hot scalpel-like knife that will melt the plastic and cuts like butter. That's what retrofitters use.

Thanks for the link, it doesn't seem like they cut at all to me in those pics.

Quote:
Originally Posted by Gray_Panther View Post
I got them open hehe. Will post later. Currently at work dominating life.
Share your wisdom!
Appreciate 0
      03-13-2015, 04:18 PM   #8
tglazed
Lieutenant
46
Rep
406
Posts

Drives: 135i
Join Date: Feb 2014
Location: SLC, Utah

iTrader: (1)

And we will never hear from him again
Appreciate 0
      03-13-2015, 09:07 PM   #9
Gray_Panther
Brigadier General
Gray_Panther's Avatar
1553
Rep
3,234
Posts

Drives: 128i
Join Date: Jun 2012
Location: Upstate NY

iTrader: (0)

Quote:
Originally Posted by tglazed View Post
And we will never hear from him again
Quoting your post so you know I responded.

Ok let's begin:
There are confirmed two clean ways to separate the lens from the plastic housing. The hardest is using a long flat-head screwdriver and a heat gun. The simplest is by use of a hot knife.
Heat gun method-
Prepare to brawl and flex the housing all around, you will need to heat up the plastic and the damn perma-seal. Start at the top middle and heat up the plastic, not so much that the lens melts also. Keep the heat gun about 5" away, 3-4" if you are brave, and don't concentrate on one spot rather move it along the lining to heat up the area. Check often, as in heat for 15-20 seconds and try to lift up the plastic with a screwdriver. If it is not budging, try forcing and scraping before heating again.
Once you can slide the screwdriver in, try to slide through inside the housing, once this is done you will have a starting point. Now move left and right evenly and don't just go around clock/counter-clockwise. Keep lifting the plastic and scraping off the perma-seal, don't be afraid to mess up the plastic lining.
The reason you can mess up the plastic lining on the housing is because you can use the heat gun to reform the plastic so as to create a channel again. Use butyl rubber to fill the channel and THEN you can throw it in the oven to put the lens back onto the housing.

Hot knife method-
This is crazy simple, I kick myself for not doing it on the first two times I have separated the headlights! Take a hot knife attached to a soldering iron or whatever, make sure it is thin and not thick. Just knife all along the headlight, pretty much 1cm behind where the actual lens sits. I will be receiving Infiniti headlights early next week and I will use the hot knife method and record it on youtube. I will also include in the video actual 1er headlights and mark a trail to follow when hot-knifing them open.
You will have to wait until spring (April or May) when I take apart my 1er headlights to change up the eyebrow. When I make that video I will post a thread on the forum for all to see....unless someone else does it before me!

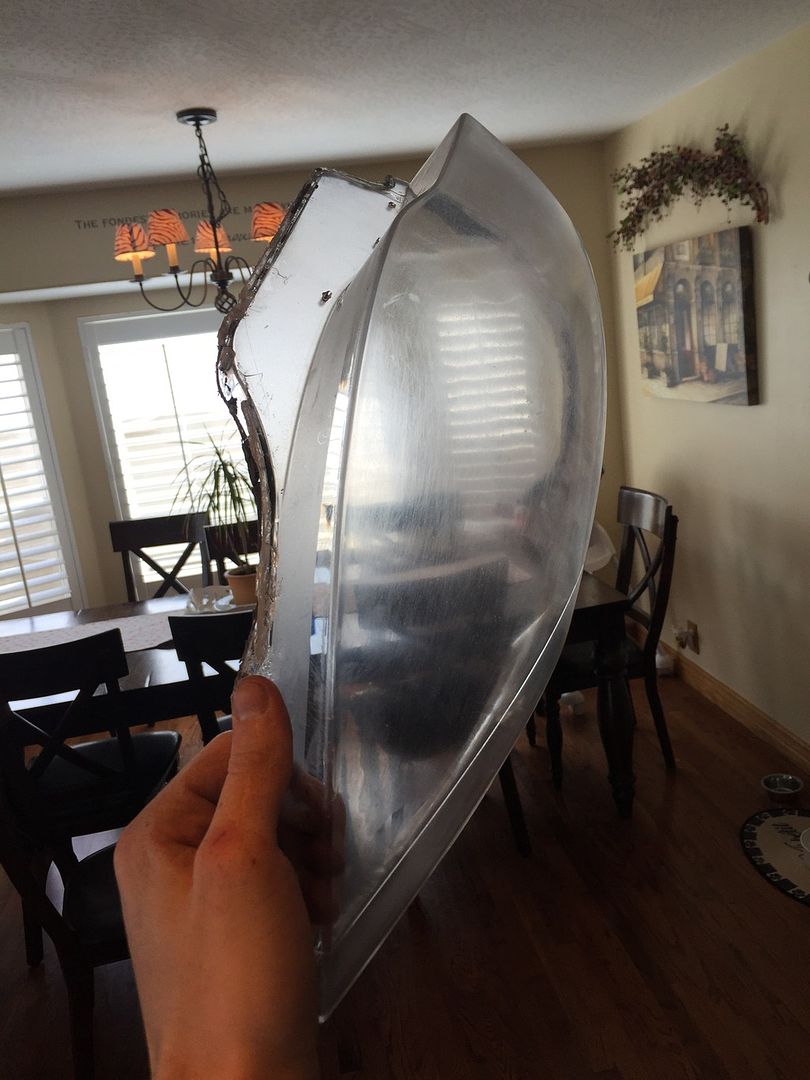
Here is a picture of the heat gun method, you will notice how the lining of the housing is severely bent up. Not a big deal, because I applied heat to the plastic and reformed it. I then sealed the headlights back up and threw it in a humidity chamber at work...No condensation!!


Hope this helps, feel free to pm me if you want to talk about it over the phone.
__________________
2012 BMW 128i 6MT Deep Sea Blue Metallic
Appreciate 0
      03-14-2015, 12:36 AM   #10
tglazed
Lieutenant
46
Rep
406
Posts

Drives: 135i
Join Date: Feb 2014
Location: SLC, Utah

iTrader: (1)

You are the man! I will be trying the hot knife method probably Wednesday. Ill take pictures if I succeed.
Appreciate 0
      03-14-2015, 05:53 AM   #11
Gray_Panther
Brigadier General
Gray_Panther's Avatar
1553
Rep
3,234
Posts

Drives: 128i
Join Date: Jun 2012
Location: Upstate NY

iTrader: (0)

Quote:
Originally Posted by tglazed
You are the man! I will be trying the hot knife method probably Wednesday. Ill take pictures if I succeed.
I will post a video to show where exactly the trail should be to hot knife. It would suck if you hot knife a clip or a post that cannot be repaired. But if you want to go for it then be my guest.
__________________
2012 BMW 128i 6MT Deep Sea Blue Metallic
Appreciate 0
      03-17-2015, 03:00 PM   #12
tglazed
Lieutenant
46
Rep
406
Posts

Drives: 135i
Join Date: Feb 2014
Location: SLC, Utah

iTrader: (1)

So what did you end up doing wih the Orange/clear reflector. I have mine apart right now and am not sure what to do with it. If I should paint the entire thing, leave the entire thing out of the headlight, I can't just paint the Orange part as it is pretty hard to tape off to get the line right. Any opinions on what I should do?
Appreciate 0
      03-17-2015, 08:51 PM   #13
Gray_Panther
Brigadier General
Gray_Panther's Avatar
1553
Rep
3,234
Posts

Drives: 128i
Join Date: Jun 2012
Location: Upstate NY

iTrader: (0)

Quote:
Originally Posted by tglazed View Post
So what did you end up doing wih the Orange/clear reflector. I have mine apart right now and am not sure what to do with it. If I should paint the entire thing, leave the entire thing out of the headlight, I can't just paint the Orange part as it is pretty hard to tape off to get the line right. Any opinions on what I should do?
That's great that you got them apart, how did you go about doing it?

I like the look of the orange reflector so I left it in.

Take a wide roll of painters tape and just slap it over the border between the clear and the orange and take the knife of Exact-O and cut along the border. Remove the tape on the orange side and paint away.

Edit: OP, can I have your old lenses?
__________________
2012 BMW 128i 6MT Deep Sea Blue Metallic

Last edited by Gray_Panther; 03-17-2015 at 09:46 PM..
Appreciate 0
      03-17-2015, 10:42 PM   #14
tglazed
Lieutenant
46
Rep
406
Posts

Drives: 135i
Join Date: Feb 2014
Location: SLC, Utah

iTrader: (1)

Screw driver and heat gun. What are you using to seal it back up?
Also, my lense looks like shit, the PO took sand paper or something to it and left it all scratchy... I have buffed, polished, everything in the books to try refinishing these, does anyone have an idea of what else to try. I am tempted to try re clearing them but am pretty sketched out about that.
Appreciate 0
      03-18-2015, 06:03 AM   #15
Gray_Panther
Brigadier General
Gray_Panther's Avatar
1553
Rep
3,234
Posts

Drives: 128i
Join Date: Jun 2012
Location: Upstate NY

iTrader: (0)

Quote:
Originally Posted by tglazed
Screw driver and heat gun. What are you using to seal it back up?
Also, my lense looks like shit, the PO took sand paper or something to it and left it all scratchy... I have buffed, polished, everything in the books to try refinishing these, does anyone have an idea of what else to try. I am tempted to try re clearing them but am pretty sketched out about that.
Do you have any pictures?

I used butyl rubber to seal them back up. I got it from theretrofitsource.
__________________
2012 BMW 128i 6MT Deep Sea Blue Metallic
Appreciate 1
      03-18-2015, 07:58 AM   #16
tglazed
Lieutenant
46
Rep
406
Posts

Drives: 135i
Join Date: Feb 2014
Location: SLC, Utah

iTrader: (1)

Ya I'll post pictures later today of the headlights finished and of the scuffed up lense.
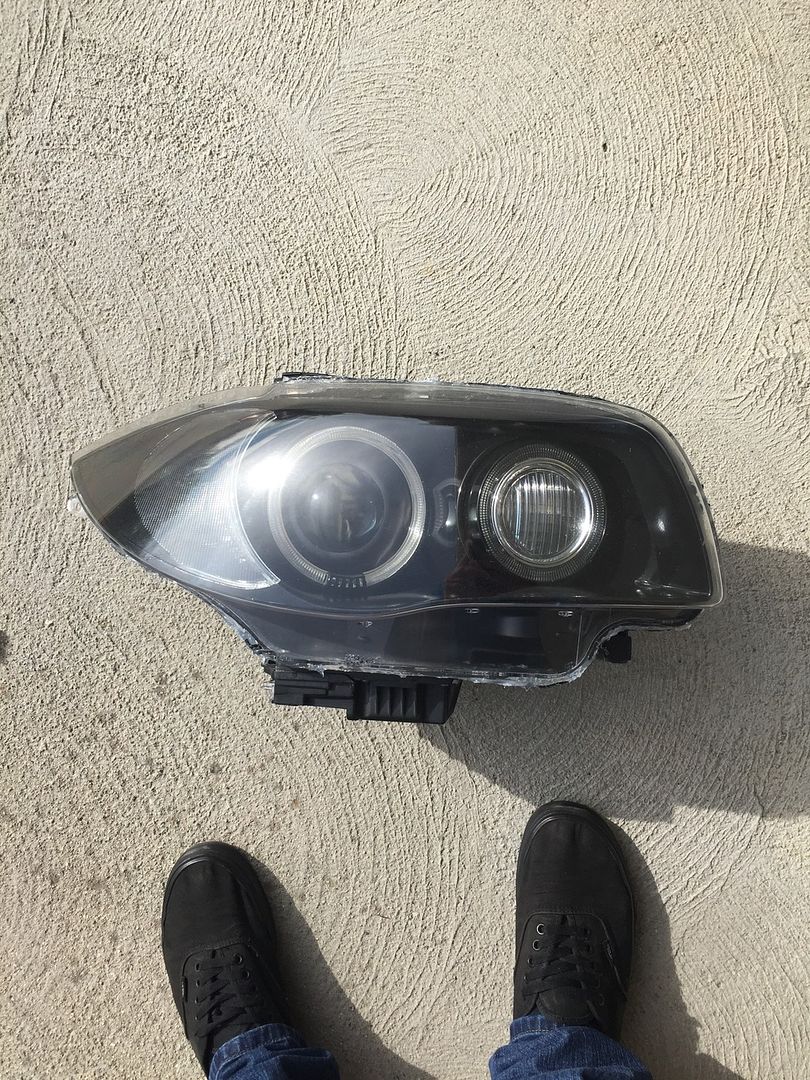


Don't mind the terrible sealing job, got carried away because I didn't want any moisture in there

Last edited by tglazed; 03-18-2015 at 11:45 AM..
Appreciate 0
      03-18-2015, 02:47 PM   #17
Gray_Panther
Brigadier General
Gray_Panther's Avatar
1553
Rep
3,234
Posts

Drives: 128i
Join Date: Jun 2012
Location: Upstate NY

iTrader: (0)

Quote:
Originally Posted by tglazed
Ya I'll post pictures later today of the headlights finished and of the scuffed up lense.


Don't mind the terrible sealing job, got carried away because I didn't want any moisture in there
Those look great. I like what you did with the orange.
__________________
2012 BMW 128i 6MT Deep Sea Blue Metallic
Appreciate 0
      03-18-2015, 05:22 PM   #18
Pig Farmer
Major
340
Rep
1,293
Posts

Drives: E92M
Join Date: May 2010
Location: Florida

iTrader: (0)

Quote:
Originally Posted by tglazed View Post
Screw driver and heat gun. What are you using to seal it back up?
Also, my lense looks like shit, the PO took sand paper or something to it and left it all scratchy... I have buffed, polished, everything in the books to try refinishing these, does anyone have an idea of what else to try. I am tempted to try re clearing them but am pretty sketched out about that.
Just a thought... When I was in high school I took a shop class where we worked with plexiglas. After cutting, we would sand the plexiglas with 280 grit, then 400 grit, then 600 grit, then 1000 grit wet sandpaper. After the sanding we would use a buffing wheel with a bit of compound to polish the plexiglass. When finished, it looked better than new. The key was to take your time, rinse often, and make sure each successive sanding removed all of the marks left by the previous piece of sandpaper. I would guess that this process would take a couple hours per lens. I'm just not sure if clear coat would adhere to the lenses after they are buffed.
Appreciate 0
      03-18-2015, 05:27 PM   #19
tglazed
Lieutenant
46
Rep
406
Posts

Drives: 135i
Join Date: Feb 2014
Location: SLC, Utah

iTrader: (1)

Quote:
Originally Posted by Pig Farmer View Post
Just a thought... When I was in high school I took a shop class where we worked with plexiglas. After cutting, we would sand the plexiglas with 280 grit, then 400 grit, then 600 grit, then 1000 grit wet sandpaper. After the sanding we would use a buffing wheel with a bit of compound to polish the plexiglass. When finished, it looked better than new. The key was to take your time, rinse often, and make sure each successive sanding removed all of the marks left by the previous piece of sandpaper. I would guess that this process would take a couple hours per lens. I'm just not sure if clear coat would adhere to the lenses after they are buffed.
Ill look more into that. 3M's headlight restoration kit is very similar but it was not near aggressive enough to get out the scratches that were already there.
Appreciate 0
      03-18-2015, 06:34 PM   #20
guru_method
Eating M3s for breakfast
guru_method's Avatar
No_Country
46
Rep
299
Posts

Drives: AW 09 135i M
Join Date: Nov 2011
Location: Dallas, TX

iTrader: (4)

I've been out of it for a while... dominating life as they say

Quote:
Originally Posted by Gray_Panther View Post
Edit: OP, can I have your old lenses?
When I finish up you can have them for sure. They look very clear but they have a lot of "micro cracking" on the inside that's impossible to take out and light will reflect off them.

Quote:
Originally Posted by tglazed View Post
Ill look more into that. 3M's headlight restoration kit is very similar but it was not near aggressive enough to get out the scratches that were already there.
3M won't get you anywhere with deep scratches like those.

I went a little overkill but with great results. The lights weren't yellowed but did have some random deep scratches from being stored improperly and a lot of stone chips. I bought every single sandpaper grit from 180-2500. This is what I did:

- Cleaned the headlights with dishsoap and water.
- Had some clean soapy water in a bowl next to the headlight.
- Wet the headlight and the paper and started sanding in circular motion (found this to be better than side to side). Sand a little then wet the paper again, sand a little then wet the paper again. Some people use a spray bottle, I like to rinse out the paper to remove the build up.
- Initially it is going to be hard to see results, this is because there is a protective coating that needs to be sanded off and doesn't like leaving it's home.
- Once the headlight looks evenly cloudy, you're ready to clean and move on to the next grit. It might take 10 or more minutes per grit so be patient and make sure you go everything evenly.
- Once you've finished with the 2500 or whatever the highest grit you could find is, give it a nice cleaning.
- I am lucky enough to own a Flex Polisher, so I took some Menzerna FG400 with a cutting pad and gave it a nice buff. Followed up with Menzerna Super Finish with a finishing pad. Then sealed with Menzerna power lock. This is totally optional, a very thorough hand buff with quality polishing compound and sealants should work too.

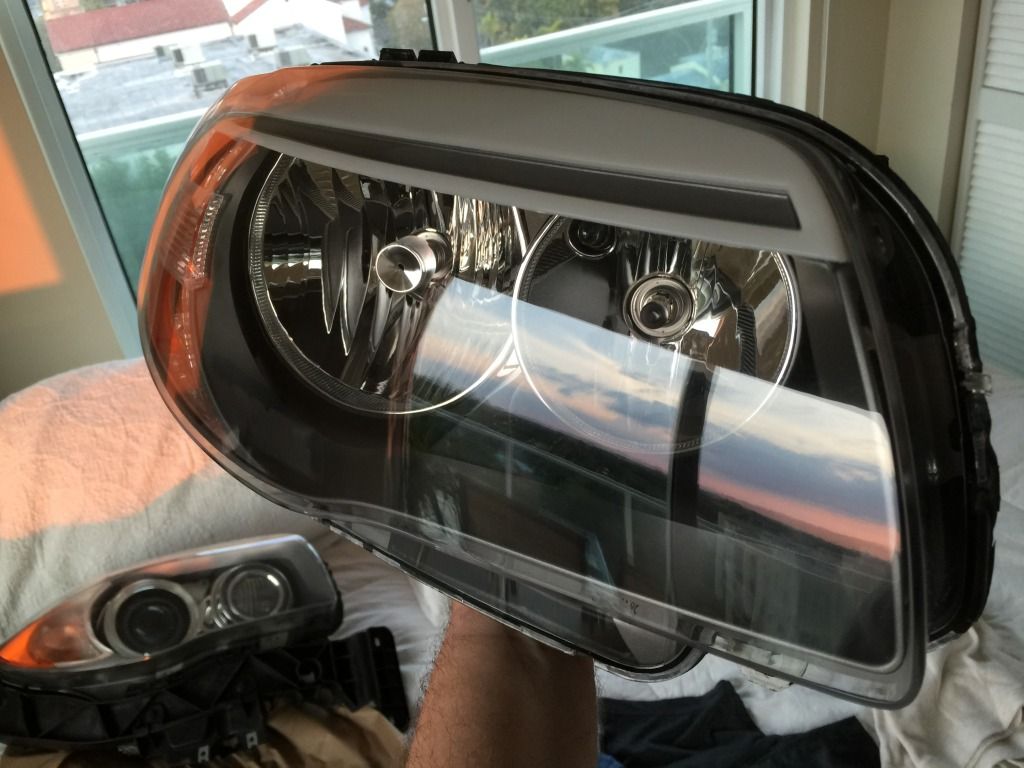
This is how they turned out, my plan is to swap the lenses as well as the eyebrow and interior trim onto my xenons.
Appreciate 6
      03-18-2015, 08:37 PM   #21
tglazed
Lieutenant
46
Rep
406
Posts

Drives: 135i
Join Date: Feb 2014
Location: SLC, Utah

iTrader: (1)

Wow that looks incredible. My next day off I know what I'm doing
Appreciate 0
      03-18-2015, 09:27 PM   #22
mmmusty
Private First Class
26
Rep
144
Posts

Drives: 2008 alpine white 128i
Join Date: Jan 2011
Location: Los Angeles

iTrader: (1)

fantastic, thanks guys, particularly Panther!
Appreciate 0
Post Reply

Bookmarks

Thread Tools Search this Thread
Search this Thread:

Advanced Search

Posting Rules
You may not post new threads
You may not post replies
You may not post attachments
You may not edit your posts

BB code is On
Smilies are On
[IMG] code is On
HTML code is Off


All times are GMT -5. The time now is 11:20 PM.


1addicts
Powered by vBulletin® Version 3.8.11
Copyright ©2000 - 2024, vBulletin Solutions Inc.
1Addicts.com, BIMMERPOST.com, E90Post.com, F30Post.com, M3Post.com, ZPost.com, 5Post.com, 6Post.com, 7Post.com, XBimmers.com logo and trademark are properties of BIMMERPOST