

|
|
|
|
|
| 07-15-2018, 02:11 PM | #1 |
|
Captain
 641
Rep 695
Posts |
DIY RSFB Removal Tool
I installed Whiteline 2-piece rear subframe bushings this weekend. This involves pressing the stock bushings out of the subframe, then putting the Whiteline pieces in. The Whiteline bushings are easy you can push them in by hand. This tool is only used to remove the stock bushings. I used this method after reading vtl 's thread here and all credit for ingenuity belongs with him. Im writing this up only to help the next guy find the right hardware and put it all together. Once the tool was assembled, my bushings came out easily with no drama in about 5-10 minutes per bushing.
The basic idea is very similar to what you will get if you rent HPAs tool, except we are using an adjustable fuel pump removal tool in place of their machined piece. Why do this? The cost to build it is the same as the cost to rent their tool, and you are not at the mercy of the rental availability and return process. And at the end of the day, you will have this tool forever, rather than sending back to HPA. The key to getting this right is buying quality hardware to prevent tool breakage and thread galling. Home Depot/Lowes carries garbage. I ordered hardware from McMaster-Carr because you have a lot more control over the grade of the steel youre buying. They wont tell you what shipping costs until you place your order. For me it was $9 and my order was on my doorstep in 2 days. I did the first bushing with just the fuel pump tool and it bent. I then got some 1/4" flat stock to support it. It took a lot more time to drill the flat stock than it was worth and I would recommend buying 2 fuel pump tools to double them up. Parts From McMaster-Carr:
From Amazon:
From Lowes or HD: You need longer bolts for the arms of the fuel pump tool since you are doubling the width of the beam. The screws were 5/16-18 thread size. You need a 1 long bolt. These do not need to hold any sort of load, all they do is lock the arms to the beam of the fuel pump tool. You can use Lowes-quality bolts here. McMaster-Carr does carry these (a pack of 100 for $6) or you can get a pack of 2 from Lowes for $0.71. Guess which one I did! Tools
Drill the 3/8 drive (the square hole) in the fuel pump tools with the 1/2" bit. This will take a little while with a handheld drill. It takes some pressure to get the bit to bite in. Okay, so you can probably figure out how this all goes together. You double up the fuel pump tools / flat stock and use the longer bolts to mount the arms. The arms should be mounted in reverse meaning the cutouts should face out. For the front bushings, the inside edges of the arms need to be 2 7/8 apart. For the rear bushings, the inside edges need to be 3 1/8 apart. The 1/2" bore should be centered between the arms but this doesnt have to be perfect. Get it pretty close. Put a washer and 2 nuts on the threaded rod and put the rod through the center hole of the tool. Put lots of anti-seize on the other side of the threaded rod, dont be shy with it. At the end of this job you will look like the tin man, deal with it. Put the threaded rod through the bushing. On the top of the bushing, put a washer and one nut. The arms of the fuel pump tool will fit into 2 slots on the side of each bushing. Thread the 2 nuts on the bottom up until there is no play in the tool, then use the 2 wrenches to lock the bottom nuts against each other, which also locks them to the rod. I would avoid getting anti-seize on this end of the rod since you dont want the nuts to move on the rod. Then you just turn the bottom nut with the ratcheting wrench, which will pull the top nut down and pull out the bushing. It is very simple. Towards the end you might need to use the second wrench to keep the top nut from spinning, as there is not much force required for the last 1/2" or so and nothing keeping the top nut from spinning on the top of the bushing. I cannot stress the importance of anti-seize enough. You will use this liberally on the fine-thread steel rod and reapply with each bushing. Fine threads are stronger than course threads and it will be easier to turn the wrench (though more turns will be required), but fine threads are more susceptible to galling so it is imperative that you use anti-seize. My bottle was 5 years old and had turned to a thickish paste. I bought a new bottle for this job. The photos were taken before I added the flat stock layer: 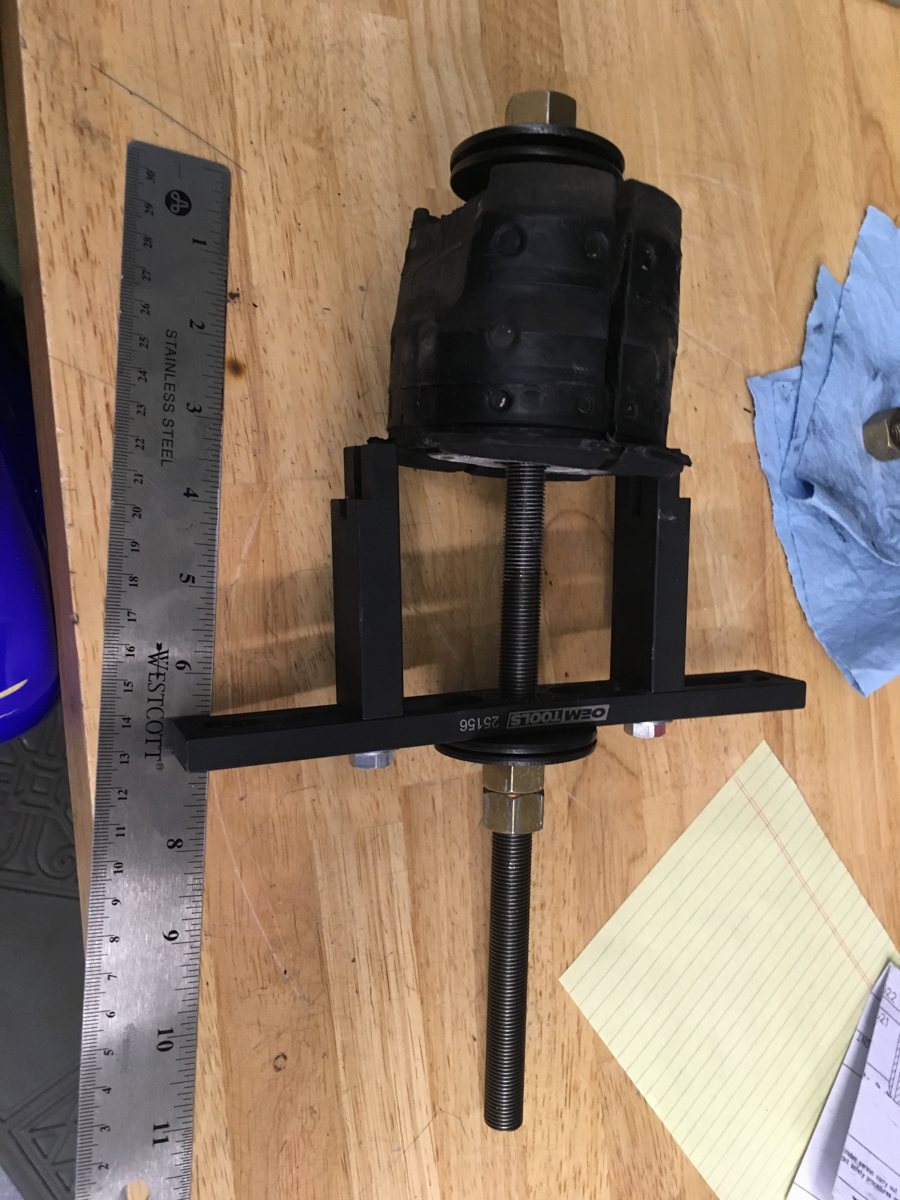 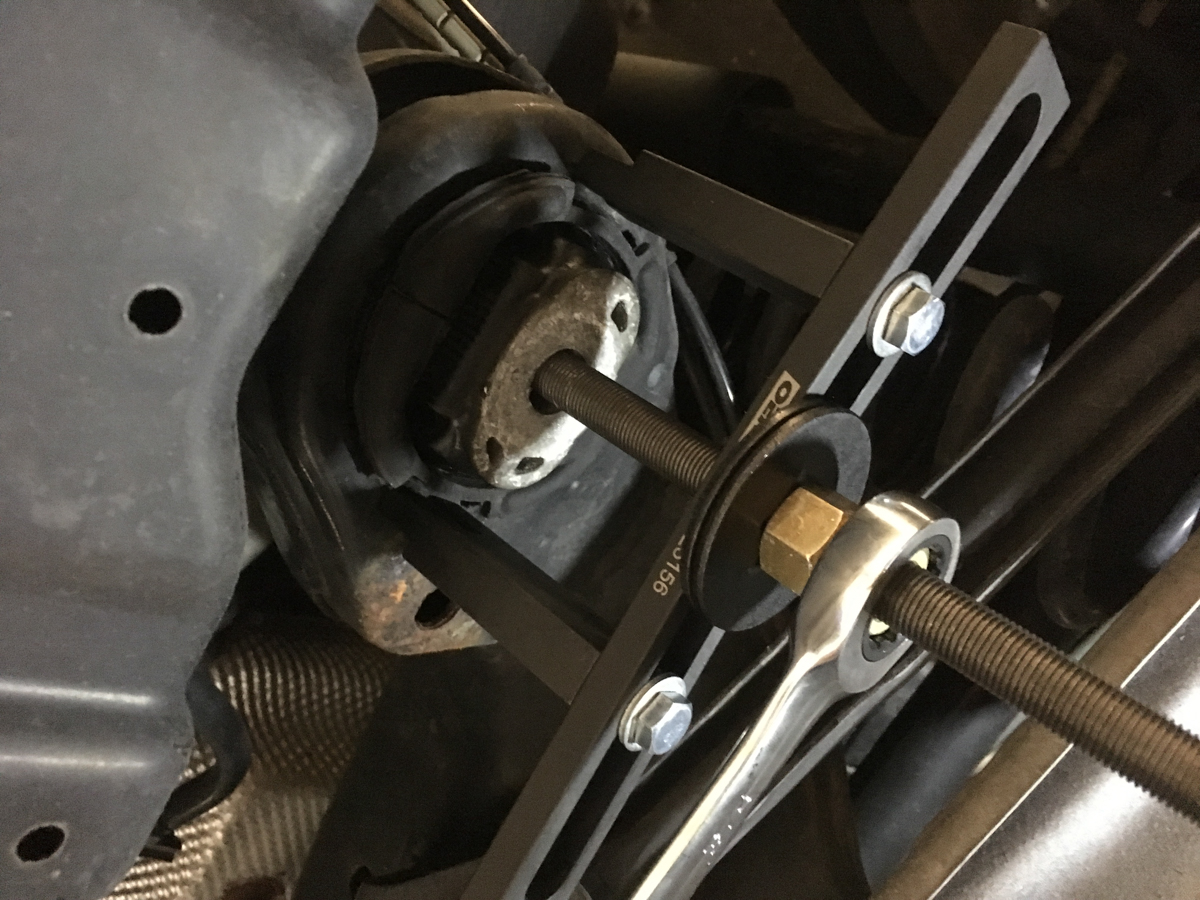 |
| 05-03-2020, 11:16 PM | #2 | |
|
Lieutenant
183
Rep 537
Posts |
Great tool
Quote:
 |
|
|
Appreciate
0
|
| 05-10-2020, 07:37 AM | #3 |
|
Colonel
 828
Rep 2,232
Posts |
Nice job on the tool!! With the capacity for a bit more risk, I used a torch, a big socket (23mm I think) and the weight of the car and was able to get mine out in about 30 mins for all of them. But your way and using a tool like this is probably the better route.
|
|
Appreciate
0
|
Post Reply |
| Bookmarks |
| Thread Tools | Search this Thread |
|
|


