|
|
|
|
|
| 09-08-2014, 05:06 PM | #155 |
|
Major
 193
Rep 1,181
Posts |
MaDoNiOn > Ohhhhh, you meant the inside wheel covers? Supposedly they came in today. Will pick up tomorrow morning. Everything should be OEM fitment.
__________________
Last edited by TUN3D; 09-11-2014 at 11:15 AM.. |
|
Appreciate
0
|
| 09-10-2014, 12:10 PM | #156 | |
|
Lieutenant
 
25
Rep 469
Posts
Drives: 2008 Bmw 130i E81
Join Date: Aug 2012
Location: SouthAfrica
|
Quote:
 . .sweeet 
__________________
Wishlist...
Bmw 135i Convertable White... |
|
|
Appreciate
0
|
| 09-11-2014, 11:14 AM | #158 |
|
Major
193
Rep 1,181
Posts |
Update >
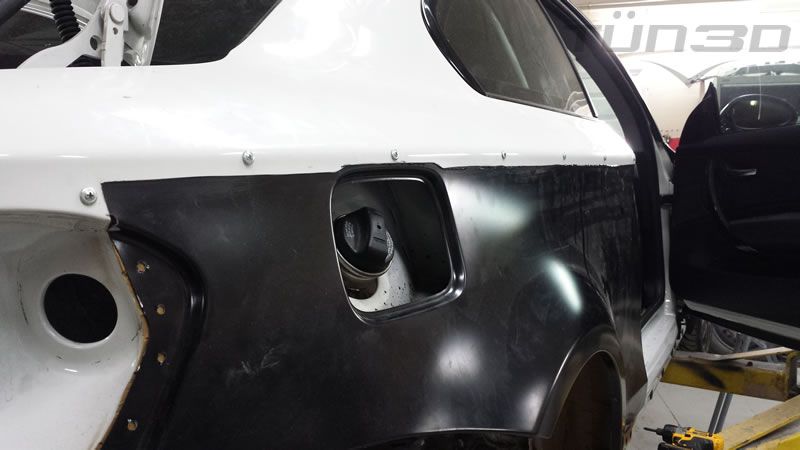
Added more images of the inside fender work. If all goes well, we're bonding/sealing & priming the welds today. If we have time, we'll start the body work as well. Tony135 > I sent you a PM. MaDoNiOn > Got the wheel wells. They are hard plastic as opposed to the 135i's flimsy fabric liners. Did a little test fitment and looked good. Waiting to take the temporary screws from the inside fenders before I do a complete fitment/pics.
__________________
|
|
Appreciate
0
|
| 09-11-2014, 02:45 PM | #160 | ||
|
Lieutenant
25
Rep 469
Posts
Drives: 2008 Bmw 130i E81
Join Date: Aug 2012
Location: SouthAfrica
|
Quote:
Quote:
 Man this is the best read on the forum! about the exaust any thoughts yet? remus is easy install. But knowing you want powaa you prob go custom Strait pipe all the way
__________________
Wishlist...
Bmw 135i Convertable White... |
||
|
Appreciate
0
|
| 09-11-2014, 02:57 PM | #161 |
|
Major
193
Rep 1,181
Posts |
MaDoNiOn > Yeah I'm thinking of going custom mids/and axle-back. On my previous 1er, I had a Berk "Full" Race Exhaust, and the sounds was awesome. I wouldn't mind Berk-Mids and a custom axle-back either. The "Mids" make all the difference in terms of sound.
I have to go see my muffler guys after this is over. I'm going to see how much it would be to make a Meisterschaft type axle back. Idk man, I refuse to pay $3K for some twisting metal.
__________________
|
|
Appreciate
0
|
| 09-11-2014, 04:24 PM | #162 |
|
1Addict
3234
Rep 7,894
Posts |
Nice! So it looks like you went the route of grafting the 1M rear fender panel and then just cutting the outer edge of the inner fender lip, welding to the 1M body panel and patching the difference on the inside?
__________________
|
|
Appreciate
0
|
| 09-12-2014, 04:53 PM | #164 |
|
Major
193
Rep 1,181
Posts |
Update >
Added another round of images. We're 90% there. Inner fenders have been welded, sealed, and copper primed. Panels have been permanently bonded. Today we'll finish the outer welding, and final alignments. We'll also apply the final (heavy-duty) layer of sealant to the inside wheel well and a coat of final primer. We should also start the bodywork. Decided to paint the car after-all -- why not! LMFAO. I figured "when in Rome" -- would hate to have another extensive body-shop session down the line.
__________________
|
|
Appreciate
0
|
| 09-12-2014, 06:13 PM | #165 | |
|
Colonel
 
1301
Rep 2,093
Posts
Drives: '11 135i M Sport
Join Date: Dec 2013
Location: Delmarva Peninsula
|
Quote:

__________________
|
|
|
Appreciate
0
|
| 09-12-2014, 06:47 PM | #166 |
|
Major
193
Rep 1,181
Posts |
Yeineken > VO = Hells no! I'd love to and have the resources to do it, but would be a huge undertaking. Spraying it back to AW is the better move, much cleaner finish. I'm definitely wrapping it in some funky bad-ass color though.
__________________
|
|
Appreciate
0
|
| 09-15-2014, 09:17 AM | #168 | |
|
Major
193
Rep 1,181
Posts |
Update >
Hey guys, we killed all the welding and sealing this past weekend. Body work starts and will most likely be finished today/tomorrow night. I'll post some pics in a bit of this weekends work. While the sealing material has been drying, I've been putting the front of the car back together. I took it apart for the PPK2 installation. That said, I wanted to bring some attention to an issue I discovered and later confirmed on a post by Pig Farmer -- Quote:
I'll let you know what happens when I get the new shroud. Hopefully the design and mounting points for the fan are consistent -- if not, I'm SOL.
__________________
Last edited by TUN3D; 09-15-2014 at 09:25 AM.. |
|
|
Appreciate
0
|
| 09-15-2014, 11:58 AM | #170 | |
|
Lieutenant
25
Rep 469
Posts
Drives: 2008 Bmw 130i E81
Join Date: Aug 2012
Location: SouthAfrica
|
Quote:
oh and before you guys sealed it did you test fit the rear bumper?
__________________
Wishlist...
Bmw 135i Convertable White... |
|
|
Appreciate
0
|
| 09-15-2014, 12:52 PM | #173 | |
|
Lieutenant
25
Rep 469
Posts
Drives: 2008 Bmw 130i E81
Join Date: Aug 2012
Location: SouthAfrica
|
Quote:

__________________
Wishlist...
Bmw 135i Convertable White... |
|
|
Appreciate
0
|
| 09-15-2014, 12:58 PM | #174 |
|
Major
193
Rep 1,181
Posts |
MaDoNiOn > Sorry bro, forgot to post the test fitting. It's up now under "UPDATE 09/09/14 - REAR FENDERS". Everything fit like a glove (pre-welding). Which two body panels are you referring to? Is it the long seam that DTR posted above (where the screws are)?
__________________
|
|
Appreciate
0
|
| 09-15-2014, 01:06 PM | #175 |
|
Major
193
Rep 1,181
Posts |
DTR > Thanks for following man! I post pictures on there as things happen -- glad you're on-board.
The cut we made on the black (1M panel) is about 1" longer than what is revealed. It tucks inside the car (135i panel). When the bond/glue is applied along the seam, the screws push both panels together. You can't even fit a nail in between the two. After it dries, all screws are removed. I added the pics on the home page. Check it out.
__________________
|
|
Appreciate
0
|
Post Reply |
| Bookmarks |
|
|