

|
|
|
|
|
|

| ||||||||||||||||
Post Reply |
|
|
Thread Tools | Search this Thread |
| 07-24-2011, 02:31 PM | #1 |
|
Captain
 
53
Rep 941
Posts |
DIY: Intercooler install for dummies(the stuf the manufacturers dont want you to see)
So i did and Helix FMIC install today, solo i might add.. took me around 4 hours to do however, but i didnt mess anything up.
If you have retard strength like me , you dont need help..  OK, So basically i wanted to take pics as i went along with this install. I mainly stopped and took photos of certain areas and procedures of the install that where not included or unclear in any of the FMIC videos or guides I saw on youtube. I will skip a lot of whats already included in a lot ofthose videos already and just attempt to clear up the parts they may have missed. those videos : and Removal of the stock FMIC is very easy and well documented in these videos. No need to discuss that further.. Now, One major thing everyone wants to know and is not included in these videos, where to trim! ? Trimming i did is based on the Helix FMIC and HPF intercoolers: 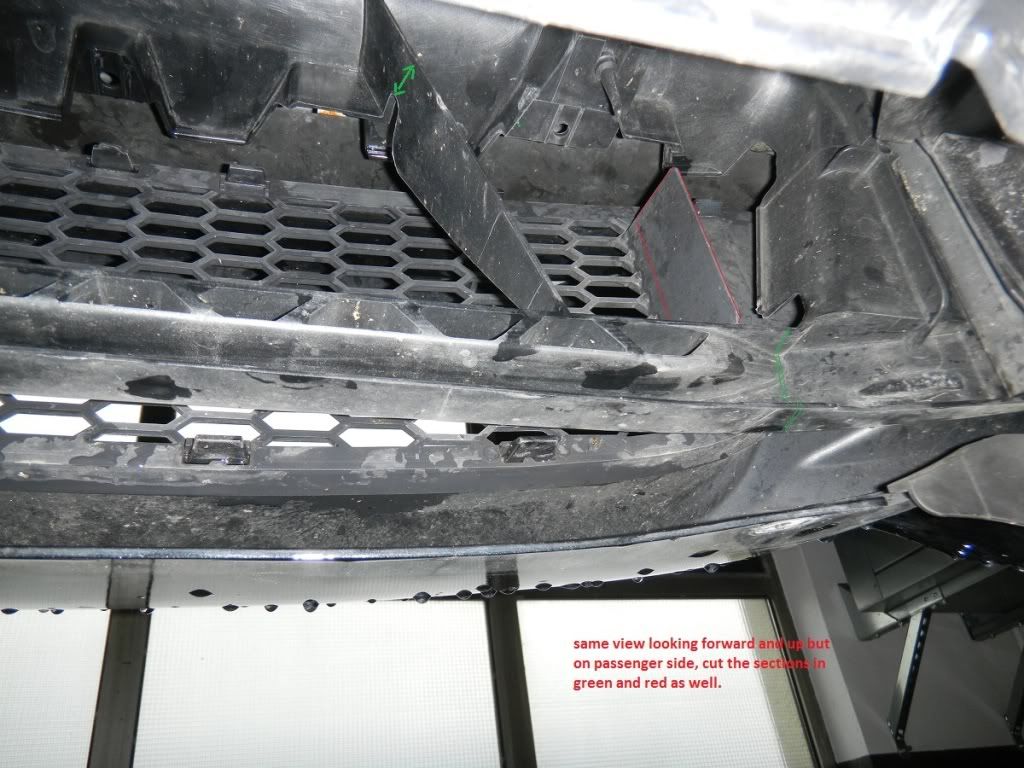 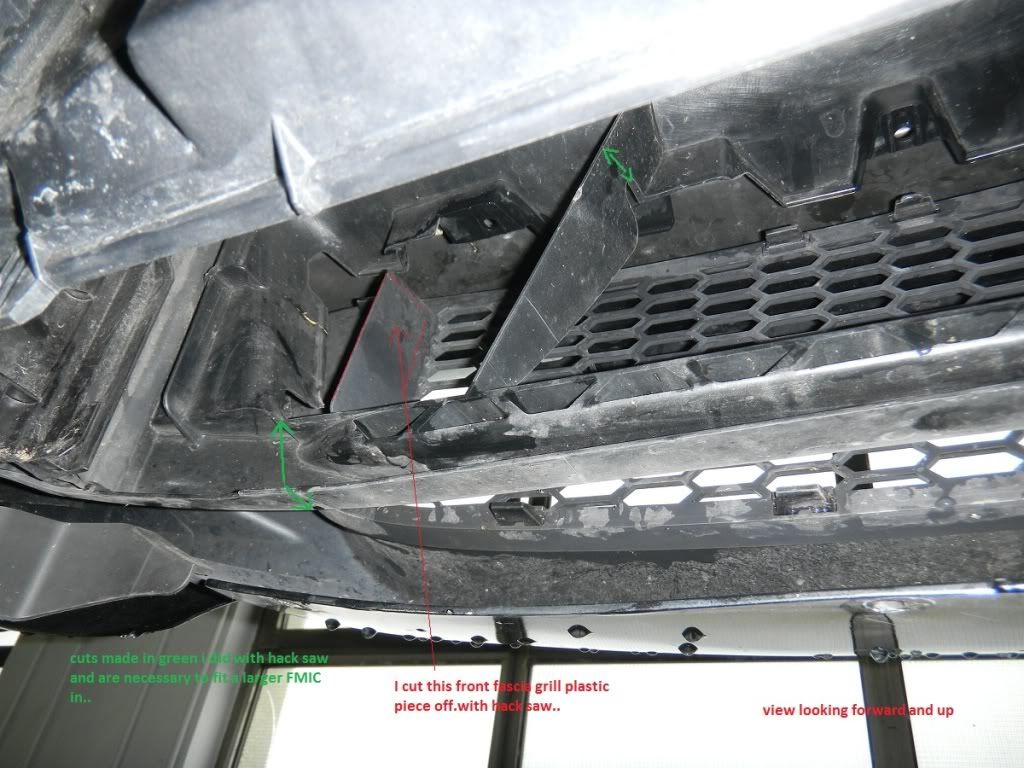 This small corner of plastic was a big deal. I was able to put the FMIC up and in enough but was not able to line up the passenger side mounting screw. It had to come off.. This portion on passenger side only, you will need to trim if you are installing the Helix FMIC, im not sure if you need to trim it with the HPF IC.. 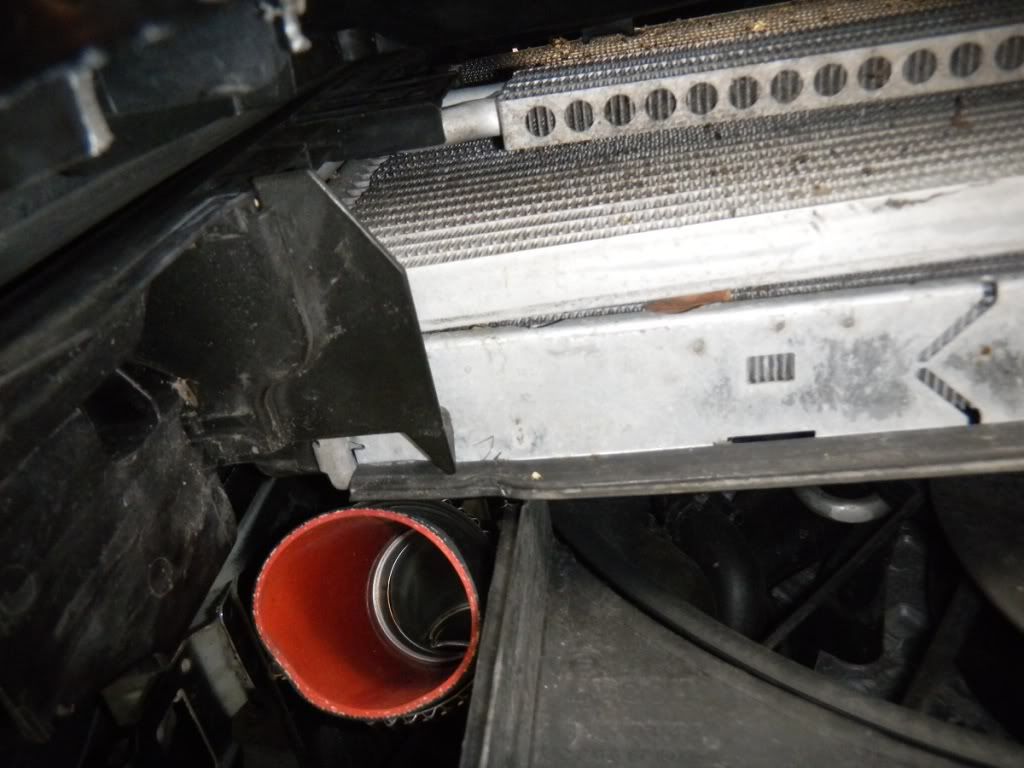 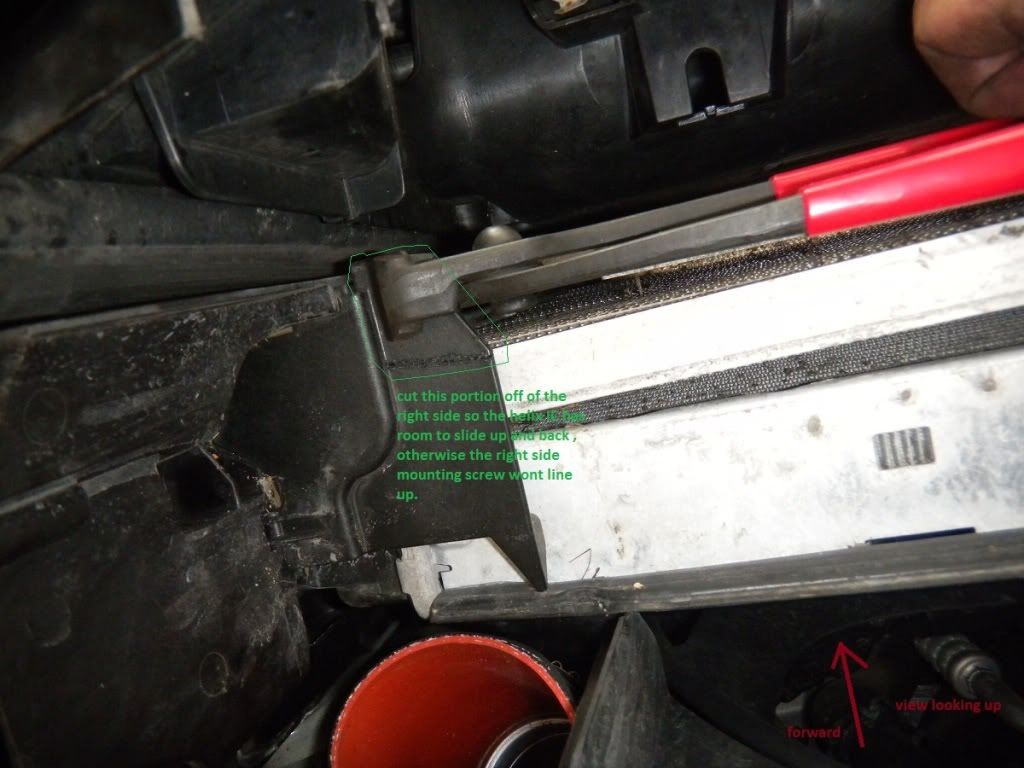 When installing the Helix FMIC(with its tall front face stepped portion) you will most likely hit a temp sensor mounted just inside the front fascia's plastic grill on the top passenger side area.. It looks fragile and can break if you dont place it asside before mounting the intercooler. It comes out easily by pushing straight up on it. putting it back, you will have to do a reach around method  as seen below, and to do this, you will need the plastic grill removed: as seen below, and to do this, you will need the plastic grill removed: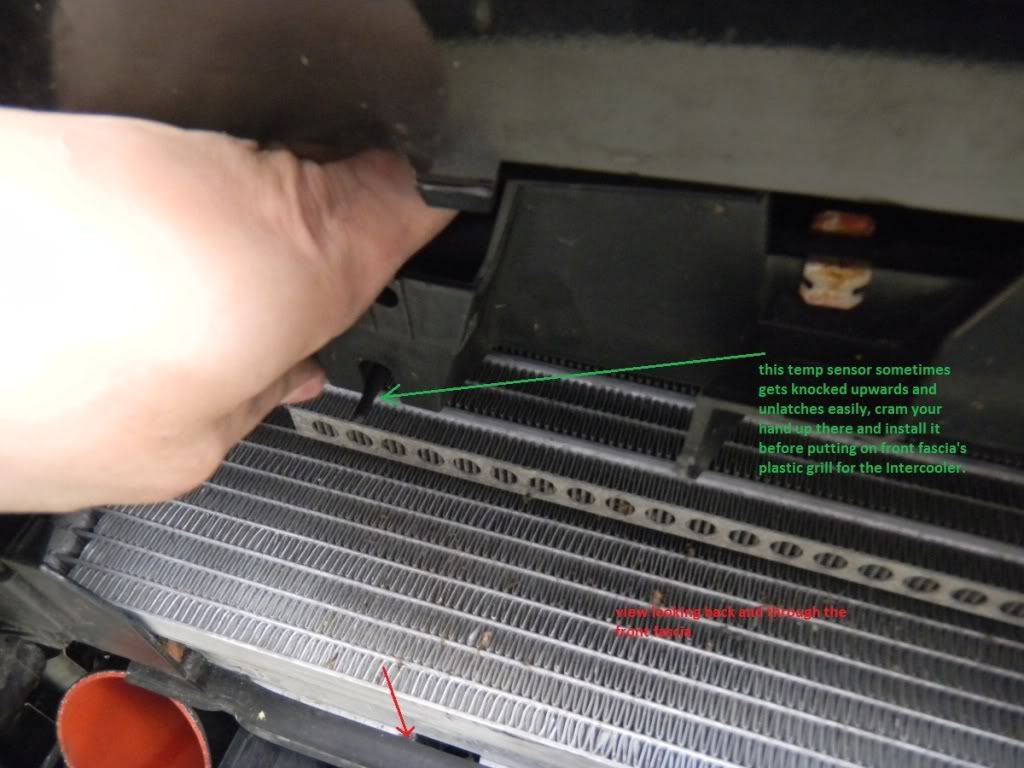 Another crucial part not really shown besides Helix' video(very briefly however) is the load bearing clips that hold it all together.. they are the main thing that prevent the radiator and FMIC from falling out of the car! besides the hoses .. lol.. Taking these clips off is necessary to get a lot of play in the structure that the intercooler mounts too.. This play will help when installing the rubber couplings and clamps as well. Quick Video to get an idea of whats going on when the clips are removed: 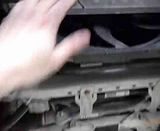 this is what the clips look like top and bottom: 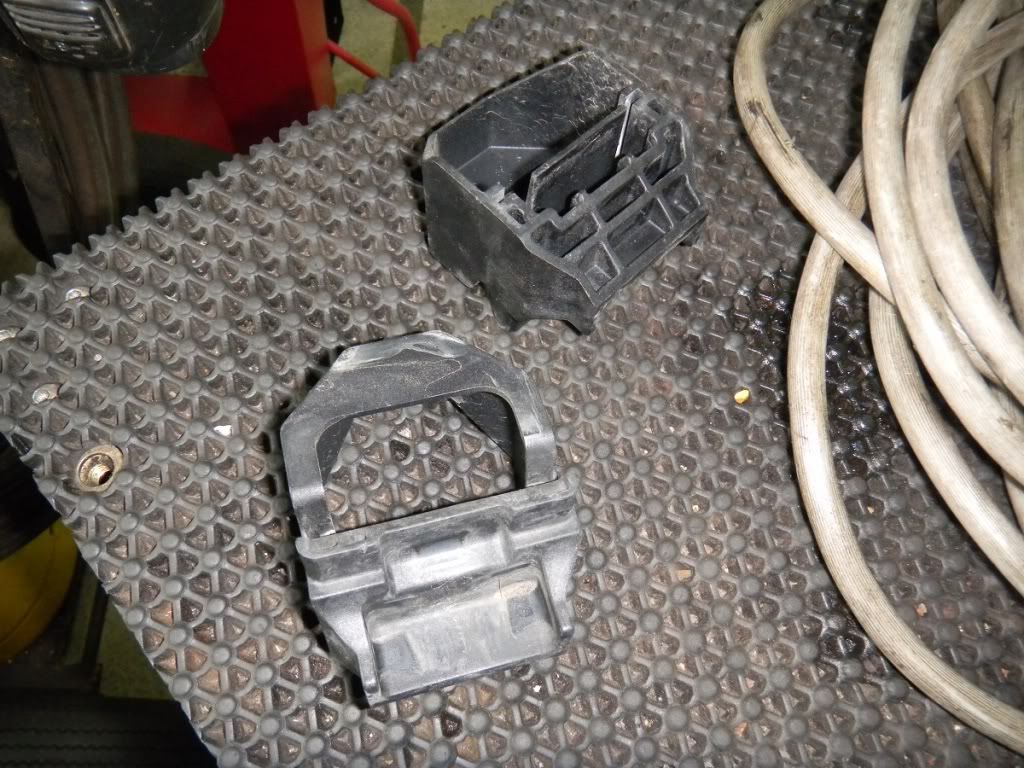 install clips after your new IC is mounted with screws and the duct couplings are lined up or already tightened. I personally lined up the ducts on the IC and then to get more of the rubber over the new IC i had to push the IC+radiator assembly up hard and get both clips to lock in place. This gave me more rubber to work with and create a good seal with the clamps. 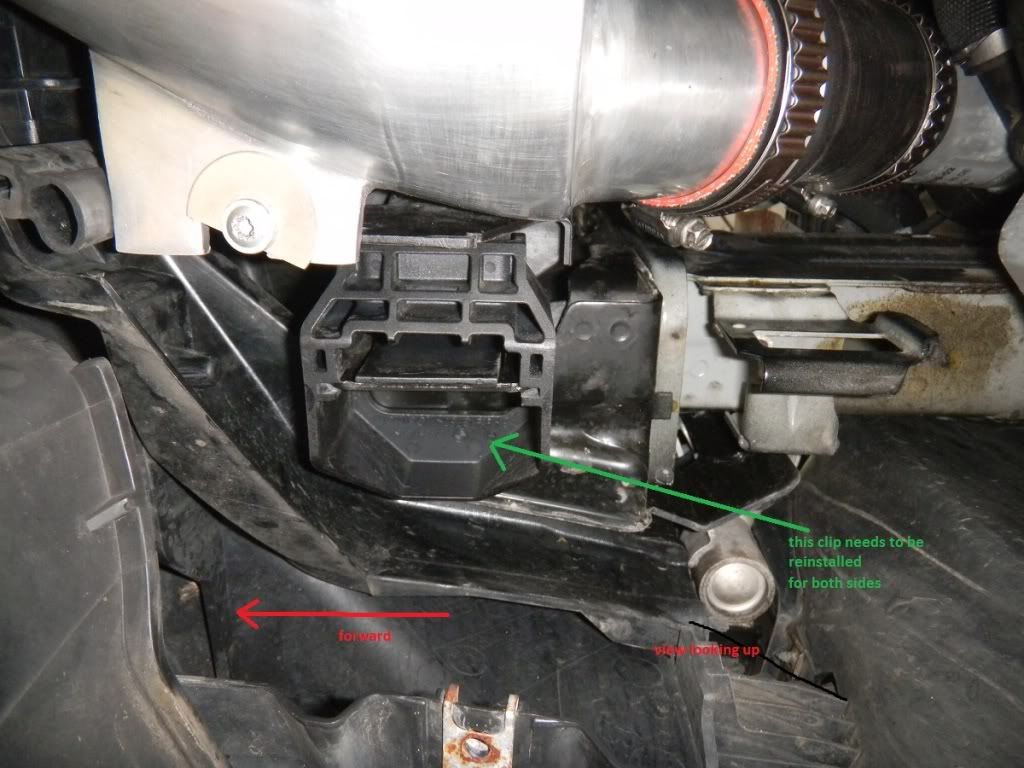 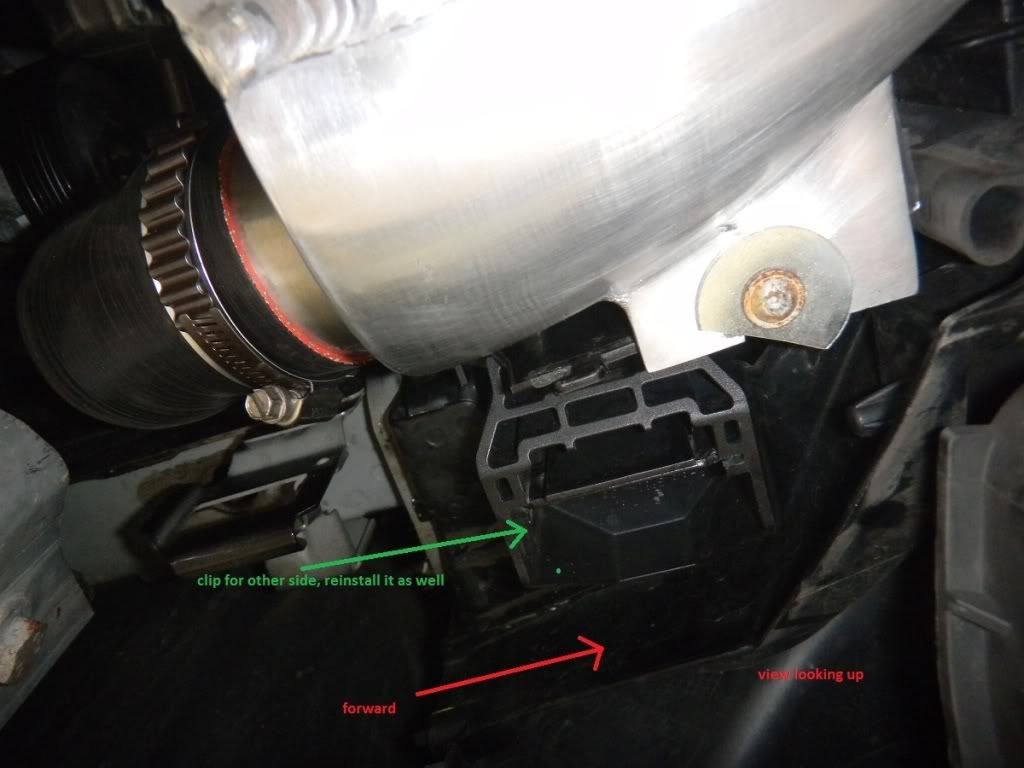 One last thing other DIY's didny tell ya! Use Enginuity!  Hopefully after this extra info it will make installs easier for other people, as well as more confidence when your out there getting your hands dirty.. My pain your gain...
__________________
JB4, DCI, Digi boost, CSL eyelids, 5% tint, KW v2's. Bastuck 85mm quad w/ berk resonated mids, LED int ltg, Perf SSK, CF int trim, 19" SF-71 rims, CDV mod, BMS OCC, ER+tial charge pipe. AR DP's, Helix IC,meth, drilled slotted rotors
 Last edited by romak47; 07-24-2011 at 02:39 PM.. |
| 07-25-2011, 07:08 AM | #3 |
|
Captain
53
Rep 941
Posts |
Well, what i noticed after putting it in, at WOT it pulls a little better in low RPMs while in a high gear. Also i feel more power in the top end of the RPM range. havent had a hot enough day to try and heat soak it compared to my stock one. Stock one gets heat soaked in weather above 25c very easily. Will see how it does on a hot day soon.
I will do a dyno and a couple weeks. Free one on Spangdahlem during a car show.
__________________
JB4, DCI, Digi boost, CSL eyelids, 5% tint, KW v2's. Bastuck 85mm quad w/ berk resonated mids, LED int ltg, Perf SSK, CF int trim, 19" SF-71 rims, CDV mod, BMS OCC, ER+tial charge pipe. AR DP's, Helix IC,meth, drilled slotted rotors
|
|
Appreciate
0
|
| 07-25-2011, 11:08 PM | #4 |
|
Colonel
 
153
Rep 2,757
Posts
Drives: 2017 Audi A4
Join Date: Nov 2009
Location: Arden, NC
|
Also just to keep in mind, the HPF does come with 2 thick SS load bearing pieces that attach to the bottom of the IC, this helps as well with that "not falling out of car" bit
 |
|
Appreciate
0
|
| 07-28-2011, 02:58 PM | #6 | |
|
Got Turbs?
26
Rep 317
Posts |
Thanks!! You saved me the trouble when my Helix comes in!
__________________
Quote:
|
|
|
Appreciate
0
|
| 07-28-2011, 03:48 PM | #7 |
|
Second Lieutenant
18
Rep 254
Posts |
Great DIY, Romak.
I'm planning on getting the guys at Stett to install mine, but I may just show them this anyway...
__________________
cdv delete | clutch stop | bmw performance ssk | meisterschaft gt | berk mids | dinan cai | helix fmic | m3 subframe bushings, swaybar, front and back suspension bits | dinan stage 1 suspension | dinan cf strut brace |gc camber plates | dinan oil cooler | apex ec-7s w/PSSs | cobb stage 1 + fmic
 |
|
Appreciate
0
|
| 08-23-2011, 03:34 PM | #8 |
|
Colonel
150
Rep 2,221
Posts |
Romak, wonderful write up. I am going to add a few notes which will make the install for everyone else even easier. Please put it in the OP so people who read it will know where they can save some time
1st: The clip that you cut with the clippers, instead of cutting it simply take it out. The intercooler wont sit properly with it in there. Just pull and you should be able to get it out 2nd: instead of trimming everything that you did you only need to trim one thing. In the very first picture you have (below the hpf video) you can see the ambient air temp sensor in the top right of the picture (Its right above the little box you circled in red and looks like a long nipple  ). Simply cut that square and tuck the ambient sensor into the bumper shrowd. ). Simply cut that square and tuck the ambient sensor into the bumper shrowd. Lastly, Sometimes it is easier to install the intercooler when you take out those two large clips on the left and right of the intercooler. Thats fine but make sure you put those clips back in. They do squeeze the supports around the intercooler and hold it in place. The HPF one needs those brackets because of its tremendous weight and the amount of support you need to cut away when installing it. We have NEVER had an issue with the intercooler moving or dropping out of the bottom of the car. Thats it! everything else should fit into place. No need to cut the front fins and all that. Hope you enjoy your intercooler and dont be afraid to PM me with any questions Last edited by Alex@Helix; 08-23-2011 at 03:46 PM.. |
|
Appreciate
0
|
| 10-15-2011, 10:25 PM | #9 |
|
Lieutenant Colonel
 

44
Rep 1,883
Posts |
Good info. Thanks to both of you.
Hey Alex, I've got a Helix IC taken out of a 335 I'm about to try and install in my 135. Are these the same part/will it fit as per above? Thanks, Tim.
__________________
Driving - Manual E90 M3 (Melbourne Red/Black).
Riding - BMW R1200RS Sport. |
|
Appreciate
0
|
| 02-10-2012, 10:40 PM | #11 |
|
Colonel
153
Rep 2,757
Posts
Drives: 2017 Audi A4
Join Date: Nov 2009
Location: Arden, NC
|
Sorry to bump such an old ass thread but im having an issue. I tried to get my shop to remove my hpf FMIC and install my stock one back again but they tell me that I need some sort of inside bumper trim piece replaced in order to fit the stock FMIC back as they trimmed it up when installing the HPF..
Soo, anyone have an idea of what I may need, or if that's even necessary? I noticed the op noted those 2 "support pieces" that are put under the fmic, not sure if mine were removed or what when my shop installed the part. I just figured that since the oem fmic is soo light and clips secure onto the pipes anyways and has the undertray below it that there would be no risk of it falling or moving. Can someone please help here? Anyone who has reinstalled their stock fmic after having a larger one like HPF installed previously???  |
|
Appreciate
0
|
| 05-29-2013, 06:03 PM | #12 |
|
Private

1
Rep 82
Posts |
Anyone else have trouble removing the OEM intercooler hoses? They don't have screws to loosen them... Just a metal clip around the top portion. I'm talking about after I take out the stock intercooler and needing to removing the hoses to put the aftermarket ones in... Am I just being a wimp? I feel like if I pull harder I'm going to rip out the CP.
Thanks! |
|
Appreciate
0
|
| 05-29-2013, 10:31 PM | #13 |
|
Colonel
375
Rep 2,388
Posts
Drives: M2 Competition
Join Date: May 2011
Location: East Bay, CA
|
Very nice write-up!
|
|
Appreciate
0
|
| 05-30-2013, 08:27 PM | #14 | |
|
Lieutenant
143
Rep 567
Posts |
Quote:
__________________
07 335 6MT
|
|
|
Appreciate
0
|
| 06-01-2013, 06:01 PM | #15 | |
|
Captain
53
Rep 941
Posts |
Quote:
__________________
JB4, DCI, Digi boost, CSL eyelids, 5% tint, KW v2's. Bastuck 85mm quad w/ berk resonated mids, LED int ltg, Perf SSK, CF int trim, 19" SF-71 rims, CDV mod, BMS OCC, ER+tial charge pipe. AR DP's, Helix IC,meth, drilled slotted rotors
|
|
|
Appreciate
0
|
| 08-20-2013, 04:17 AM | #16 |
|
Captain
75
Rep 642
Posts |
My quick addition to the Helix install.
- The Helix can be installed with zero cutting. You will have to put some pressure towards the back of the car as it is going into position but with some persistence it will slide nice and snug right behind the temp sensor bracket. - Be careful of the beveled pieces on the front of the IC. They tend to catch on the trim while positioning the IC. If you are not careful it will make you think the IC is as far up as it can go. Take your time and another set of hands or two helps a lot. * When you get it right, the top of the IC will be behind the temp sensor bracket and will sit nice and level. - I haven't seen this done before but I reused the stock rubber shroud from the bottom of the original IC. Without this there is a gap along the bottom of the IC that allows air to pass underneath the car and around the IC. IF you take off the original clips and place a strip of double sided tape on the bottom of the IC, the shroud will fit perfect to the bottom of the Helix and maintain the factory air seal.
__________________
 |
|
Appreciate
0
|
Post Reply |
| Bookmarks |
|
|


