

|
|
|
|
|
|

| ||||||||||||||||
Post Reply |
|
|
Thread Tools | Search this Thread |
| 11-11-2014, 08:31 AM | #1 |
|
Second Lieutenant
 26
Rep 228
Posts |
135i M-tech Package with 1m Style Replica Bumper - DANGEROUS
Whats up guys. So I know there is a bunch of threads to these 1m bumpers for e82, but I cant find any of them addressing the obvious problems these have.
Most of the vendors sell the bumper with the fog light holes to place the lights on them. This is a huge problem for those of us who need this duct clear to cool the brakes and oil. I bought mine thinking that this plastic can be removed, and I was wrong. I want to know what are the 135i owners like me doing for this. Placing fog lights in that location is a terrible idea and dangerous as it covers the air path for the oil/brake cooling. Is there any DIY to remove this plastic? Please help on this issue for the fitment to be perfect but safe. Also, an issue that has been addressed is the healight washers, but no one is doing a DIY on how to make this. I will probably drill the holes myself, but does anyone know the right placement for these? |
| 11-11-2014, 03:00 PM | #3 | |
|
Second Lieutenant
26
Rep 228
Posts |
dremel
Quote:
Well yeah thats the ultimate option. Has anyone done it? im just scared its gonna look like sh!t and that the paint will peal off after I do it. |
|
|
Appreciate
0
|
| 11-11-2014, 06:27 PM | #4 | |
|
Colonel
 384
Rep 2,384
Posts |
Quote:
Then if the paint starts peeling off its on them, not you |
|
|
Appreciate
0
|
| 11-11-2014, 09:51 PM | #5 |
|
First Lieutenant
111
Rep 378
Posts |
I live in the southern US and have no need for headlight washers. Took out the fuse so they don't work anymore. I hated it when they sprayed all over my baby's clean face like she was some kind of porn star. Do you really need to use the washers? Think it would look cleaner without the bumps.
|
|
Appreciate
0
|
| 12-04-2014, 10:57 AM | #6 |
|
Second Lieutenant
26
Rep 228
Posts |
Im keeping them in. I think it looks pretty cool when the lid lifts, sprays, and goes down. the bumper i got had the washers marked with an outline, so dremmel was easy to do.. will upload pics when i get it painted.
|
|
Appreciate
0
|
| 12-04-2014, 11:22 AM | #7 |
|
Private First Class
 
13
Rep 152
Posts |
I was about to bite the bullet on the same bumper with fog lights.
Definitely agree that its a bad idea. let us know how yours turns out - i was going to just dremel and make it work
__________________
2011 BMW 135i, 6MT, Jet Black - BMS Clutch Stop, Berk Street Exhaust, LCI Blackline Tails
2007 Mazda RX8, 6SP, Stormy Blue Mica - Sold |
|
Appreciate
0
|
| 12-04-2014, 11:29 AM | #8 |
|
Major
 195
Rep 1,181
Posts |
jbarzelatto > I've had three of these bumpers to date including the first fiberglass version that came out. Here are my notes and I hope it helps...
Headlight Washers: If you want to retain the headlight washers, then you'll have to cut out the holes. My recommendation is that you scrap the bulky 135i pop-ups and replace them with 1M spray nozzles. This will cost you a little more but will make your life easier in terms of cutting & installation. It's a flexible system so you don't have to be as accurate with the holes -- less cutting etc. Will also give you that real 1M look. As an alternative, you can remove the system all together. I've never liked it as it sprays water all over the place, not just the headlights. I coded out my nozzles, but you don't really have to. Like gap > said, pull the fuse or look thru my conversion thread and you'll see how to remove the system -- no codes/no leaks: http://www.1addicts.com/forums/showthread.php?t=1058161 Ducts: In order to get the fog-lights in, you have to remove the 135i ducts -- it fits awkwardly and applies pressures/pushes the bumper out otherwise. As far as "cooling" goes for the brakes and oil, you can do without (LMAO). It makes no appreciable difference in terms of daily-driving & 1/4 mile runs. AutoX might be a different story, but otherwise...you're fine. Think of it like this...if BMW really needs functional air-ducts to help the brakes and oil-cooler...we're in trouble (LOL). As an alternative, if you scrap the fog-lights all together and cut out the brackets, you can rock 1M ducts. They fit perfectly. The only issue you'll have is the drivers side duct. There is no native mounting point other than a single screw. There is a workaround tho. Another issue is the horn bracket. You can modify the duct to fit or you can simply relocate the horns: http://www.1addicts.com/forums/showthread.php?t=1058161 Yet another alternative, if you're not afraid of cutting things up, you can modify/fuse the existing 135i ducts to 1M ducts. Let me find the images I had... 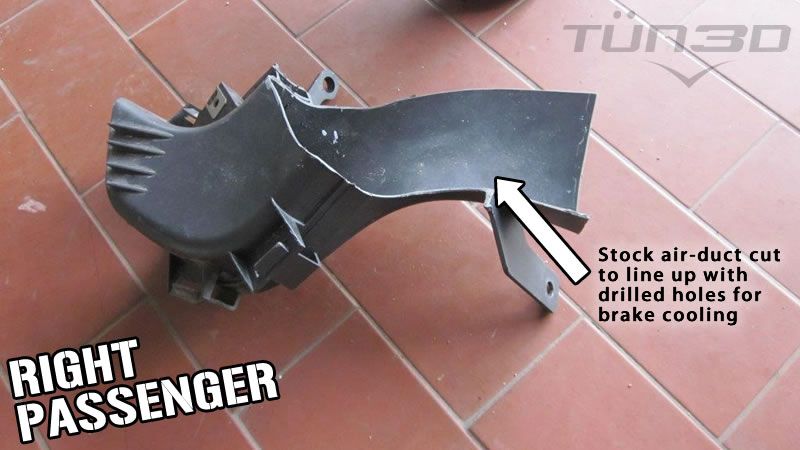 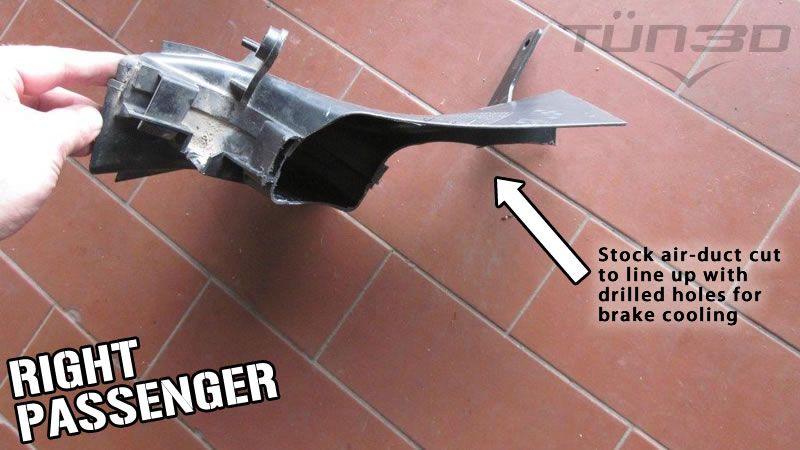 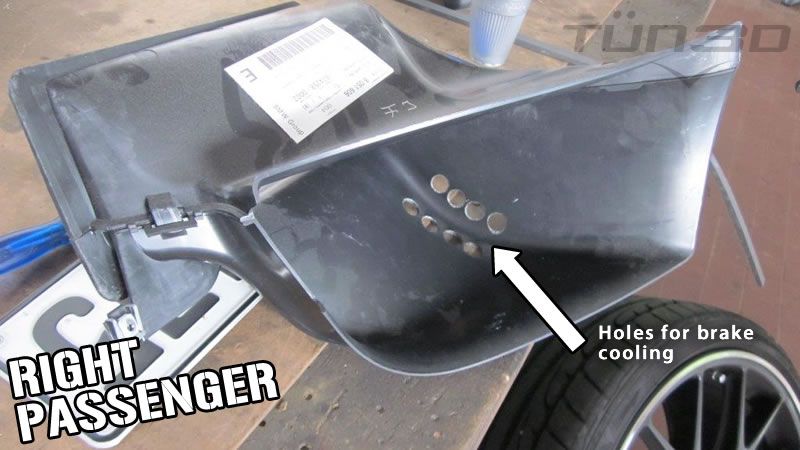 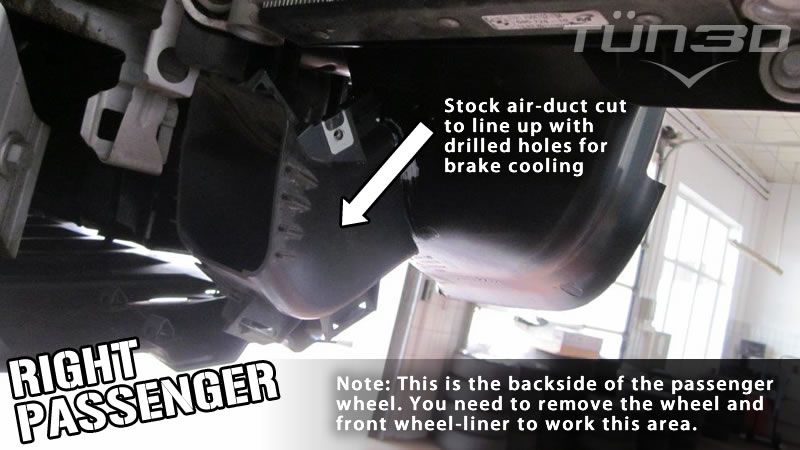 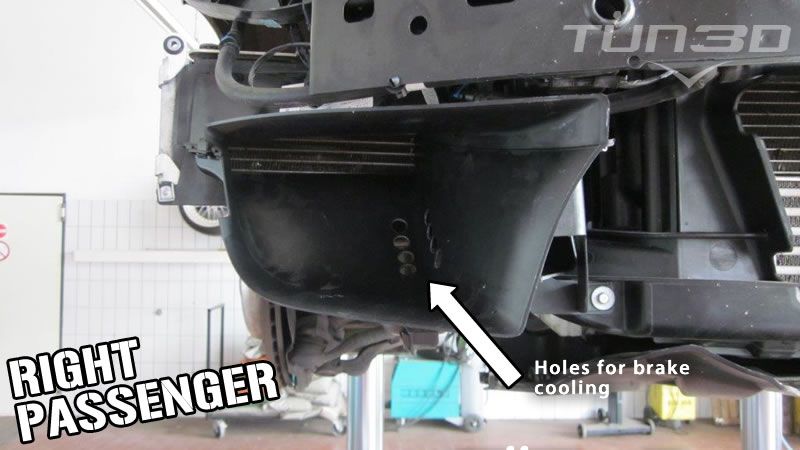 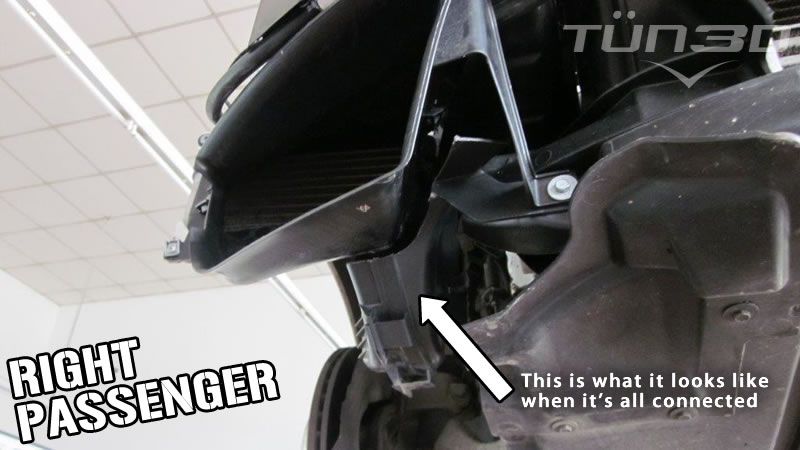 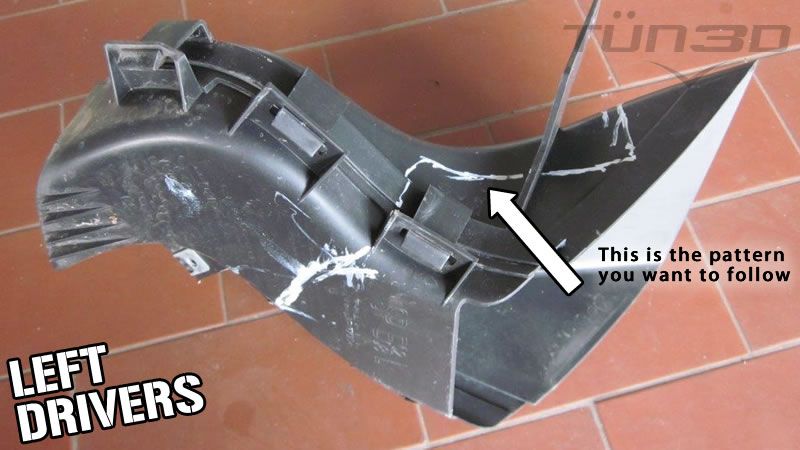  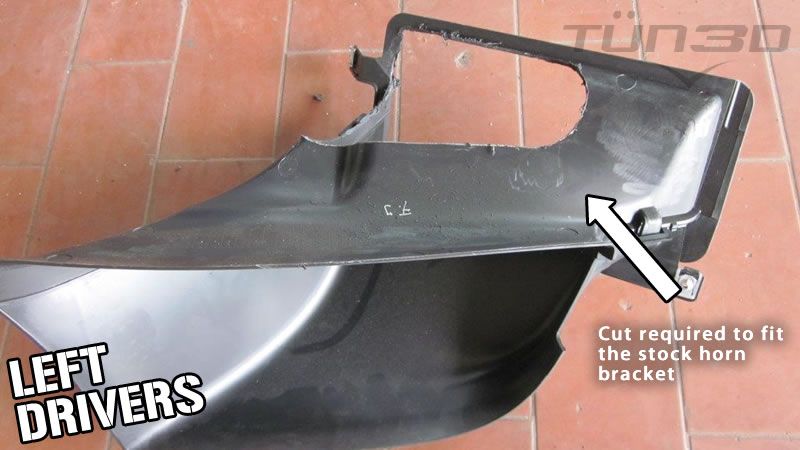 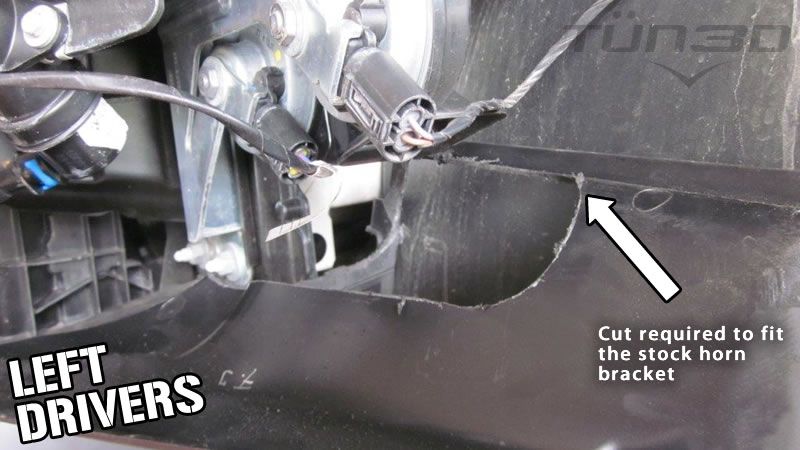 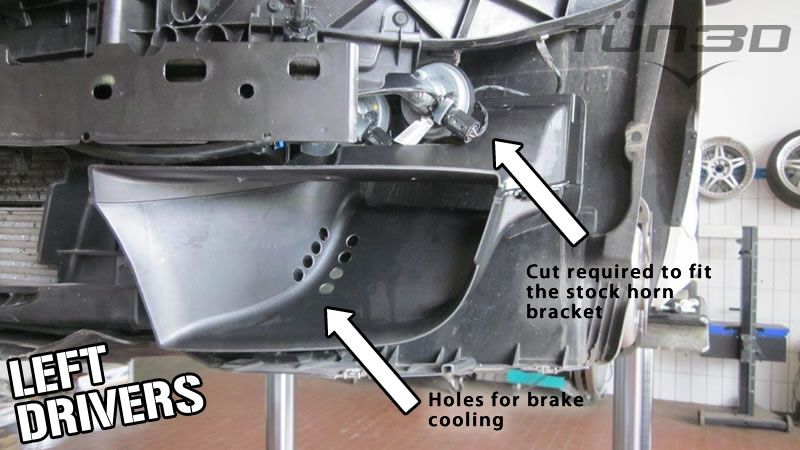 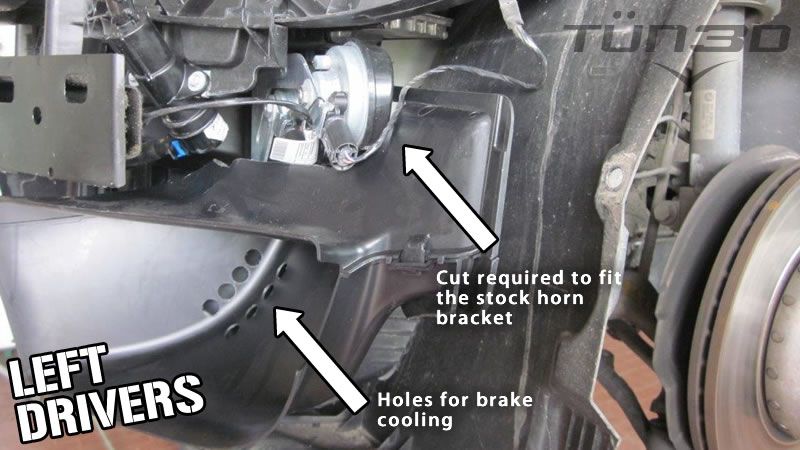 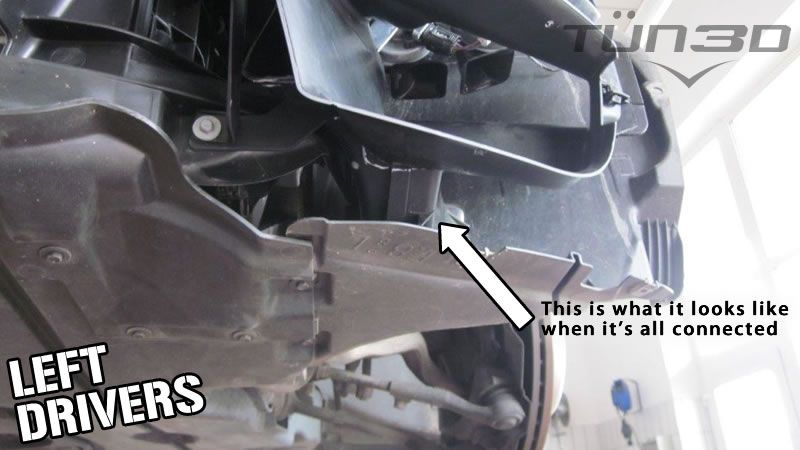
__________________
Last edited by TUN3D; 12-04-2014 at 12:57 PM.. |
|
Appreciate
2
|
| 12-04-2014, 12:41 PM | #9 |
|
Major
195
Rep 1,181
Posts |
In terms of the left duck workaround, there is no radiator/oil-cooler in this area where the duct hooks up to. There is literally 1-screw that lines up to keep it from falling. As a result, it sorta just dangles there. To secure it, try this:
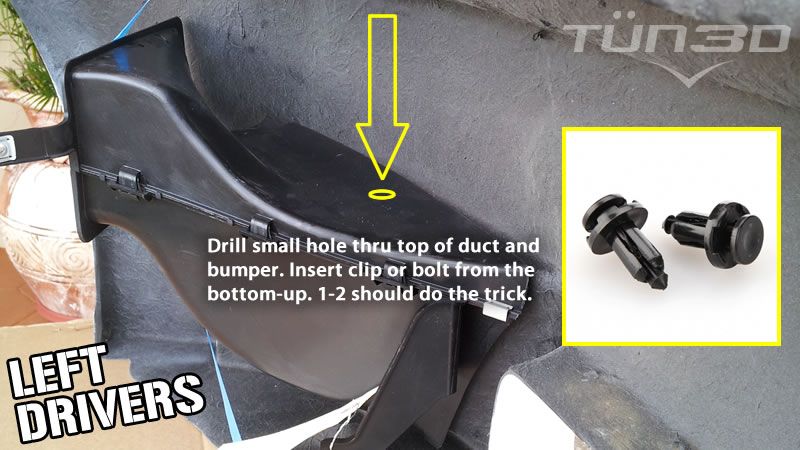 A clip or small screw/bolt will work. From the bottom-up, you can't see it. Hope this helps you guys out.
__________________
Last edited by TUN3D; 12-04-2014 at 12:57 PM.. |
|
Appreciate
0
|
| 12-09-2014, 03:41 PM | #10 |
|
Private First Class
13
Rep 152
Posts |
Thanks for the advice man!
Do you have the part number for the 1M ducts we can use as an alternative? I'm not too good with cutting up plastic and may want to revert to stock. Do we need any brackets or bolts besides the ducts?
__________________
2011 BMW 135i, 6MT, Jet Black - BMS Clutch Stop, Berk Street Exhaust, LCI Blackline Tails
2007 Mazda RX8, 6SP, Stormy Blue Mica - Sold |
|
Appreciate
0
|
| 12-10-2014, 05:39 PM | #11 |
|
Major
195
Rep 1,181
Posts |
tehron > It's all here man...
http://www.1addicts.com/forums/showthread.php?t=1058161 51748051605 - Air Duct L 51748051606 - Air Duct R If I had to go back, given the information I know now, I would: 1) Relocate the horns 2) Remove the pop-ups and put in 1M nozzles, or remove the headlight washers all together. 3) Secure the ducts like I explained here (more so on the drivers side): http://www.1addicts.com/forums/showp...03&postcount=9 It's the cleanest/most economical setup you can do. There are other options as well to secure the ducts properly, but they cost a little more.
__________________
|
|
Appreciate
0
|
| 12-14-2014, 01:05 AM | #12 |
|
Second Lieutenant
26
Rep 228
Posts |
no fog lights
Wow, this is a great TUN3D! We should sticky it.
But anyway, when I bought his bumper, I didnt want the fog lights, so it looks more like the 1m. This is why i grabbed a dremmel, and dremmelled out all the brackets and supports that would hold the headlight and cover. so my question is, could you give me some advice, for this case where I dont want the fog lights? i actually want to keep the ducts to cool the brakes and oil working. also, do you have any ideas for me to place some kind of cover or plastic grill to cover the big black holes? thanks for the help! |
|
Appreciate
0
|
| 12-14-2014, 07:36 AM | #13 |
|
Major
195
Rep 1,181
Posts |
jbarzelatto > There are no other grills to cover those holes other than the fog-light grills that come with the kit. Now that you removed the brackets, there really isn't another option.
Your best bet would be to use 1M ducts. If you want to keep the brake cooling functionality, you'll need to modify and fuse them with standard 135i ducts (like the images I posted). Here's my thing, and perhaps someone with real life brake experience (in regards to our cars), can chime in. I'm not really sure how MUCH of a difference those brake cooling ducts actually make on the street. You would need to have a serious spirited session around town before your brakes heat up to THAT point -- if at all. After owning (2) 135's in the last 4-5 years (with these bumpers/without brake cooling ducts), I've NEVER experienced any kind of heating issues. I've gone on those spirited drives around town and its been fine. The 1M, for reference, eliminated those awful/clunky brake cooling ducts and holes on the liners. To counter, they added cross-drilled rotors. That's the barometer I use. Perhaps when the time comes to change your rotors...upgrade...problem solved. Honestly man, if you want a really clean/authentic look, I would scrap those brake cooling ducts and get 1M ducts. The passenger side bolts up to the oil-radiator and keeps that cooling function. The only thing you'd have to do is find the best solution that fits YOU in regards to securing the drivers side.
__________________
|
|
Appreciate
0
|
| 12-14-2014, 08:44 AM | #14 |
|
Second Lieutenant
26
Rep 228
Posts |
dear tun3d. thanks for your answer.
i quoted my local dealer (in chile) and they don't have the 1m ducts in stock. 1) what im still confused with, is if whether this 1m ducts option is a must or if it is for it to look better? you are saying that the ducts are useless, so removing then COMPLETELY is an option as well?? 2) if i keep the original ducts and keep them where they are, and simply install the replica bumper on top of it, will this work and how would it look? 3) Kerchner sells the following grill i thought about fin dining a local mesh that looks like it and attaching it to the bumper, would this work? http://www.kerscher-tuning.de/styling/detail.php?id=739 Again, thanks so much for the support, and pardon me not fully understanding everything, as english is not my first language. thanks! |
|
Appreciate
0
|
| 12-17-2014, 09:55 AM | #15 |
|
Major
195
Rep 1,181
Posts |
jbarzelatto > No worries, glad I could help. I speak/write Spanish as well so let me now if you want me to translate any of this stuff.
1) A few things -- It will definitely make it look better and complete. If not, the open holes (IMHO) look sloppy. If you got a 1M style bumper, why not add the little details that make it look more authentic? The ducts are not useless. The passenger 1M duct goes connected to the oil-radiator and provides cooling. The driver's side traditionally, goes connected to an extra water-radiator (PPK2, which comes standard with 1M's). In your case, you will not have the extra water-radiator -- so this one will be for looks. You can add the PPK2 with the extra water-radiator, but that's a different story, more money, and overkill -- really. 2) I've done this. Although it will fit, you can feel the ducts push the bumper outwards. it's not a clean fit. 3) You can certainly add a mesh.
__________________
|
|
Appreciate
0
|
| 12-18-2014, 07:53 AM | #16 |
|
Second Lieutenant
26
Rep 228
Posts |
Thanks again tun3d.
I see that my replica bumper came with two metal frame, some sort of clip. are you familiar with this part? and where does it go? best regards! |
|
Appreciate
0
|
| 12-19-2014, 08:59 PM | #17 |
|
Lieutenant
22
Rep 406
Posts |
Tun3d were the three that you used all fog light options?
The fog light option seems to be the bumper most popular option. I always considered this with the OP idea but didn't part for his issue and because I find the bumper hangs a bit lower than others. Has anyone done the kerscher front bumper? I've seen pics of the rear and looks like a good quality/fitment
__________________
 |
|
Appreciate
0
|
| 12-25-2014, 07:01 PM | #18 |
|
Second Lieutenant
26
Rep 228
Posts |
ducts, and fitment
i just got my bumper installed, and it was kind of a paint.
tun3d, please chime in since you have had 3 of them and mostly likely one of them will be like mine. 1) For starters, the bumper is taller then the original one, so the bottom hangs lower then the tire covers. for this, the bumper came with " ] " shaped brackets to hold this separation. the problem is that from the side or rear, you can see the separation. On top of that, you can see through the long vertical opening on the end of the bumper, and you can see this ugly bracket too. 2)The bumper sits well in the top portion of the car, keeping a nice snug below the headlights, and also the 3 bolts that hold it behind the wheel cover. but the bottom holes to not match the stock covers. they are all separated the same, as if the bumper is too outside. but there is no more space, the bumper cover is touching the bumper itself. I had to secure the bottom with zip ties. Considering point 2, I want to know if the 1m air ducts idea will still work, if the bumper is not as close as it should be to the ducts. I will post pics showing this separation. Looking at my ducts, i can imagine how the 1m ducts will fix this ugly look. does that mean the 1m duct line up perfectly with a 1m replica bumper that is not the same width? If you had pictures of the 135i with this solution, i would love to see it and it would help alot. as always, thanks for your help and i hope u had a merry xmas. |
|
Appreciate
0
|
| 12-25-2014, 07:29 PM | #19 |
|
Second Lieutenant
26
Rep 228
Posts |
forgot to mention last point
3) the kidneys do not sit flush on the same level as the bumper. they stick out a lot more then the old bumper. its just to aligned. also the hood is harder to close now, so the bumper is definitly a bit higher. |
|
Appreciate
0
|
| 02-02-2015, 01:11 PM | #20 |
|
Captain
113
Rep 656
Posts |
Who'd you get the bumper from and what did you end up doing? I just got my 1m bumper and am trying to decide too. I don't mind keeping the ducting but I don't like the hole from the headlights. Is there just the regular 1m inserts for where the fog lights go?
|
|
Appreciate
0
|
| 06-15-2015, 02:34 AM | #22 |
|
Enlisted Member
 8
Rep 49
Posts |
 I bought ducts following TUN3D's posts. To make them flush you do have to kinda customize them with a hot knife. Especially on the driver side where on the 135i there is a horn in the way of the duct. I cut the upper side of the duct to make that fit and had to secure them with metal wires so they will hold their shape. I secured them with metal wires because as TUN3D mentioned, there are no brackets that will connect to the end side of the air ducts. I drilled holes in the ducts where they are not visible and wired them to fit before placing the bumper. Last edited by koluka; 06-15-2015 at 02:41 AM.. |
|
Appreciate
0
|
Post Reply |
| Bookmarks |
| Tags |
| 1m bumper, 1m conversion, convrsion, replica |
|
|


